Identification of spatial domains in spatial transcriptomics by deep learning.

Project description
Identification of spatial domains in spatial transcriptomics by deep learning
Update
 May 28, 2025
(1) Updated the installation method for DeepST.
(2) Fixed some bugs.
Overview
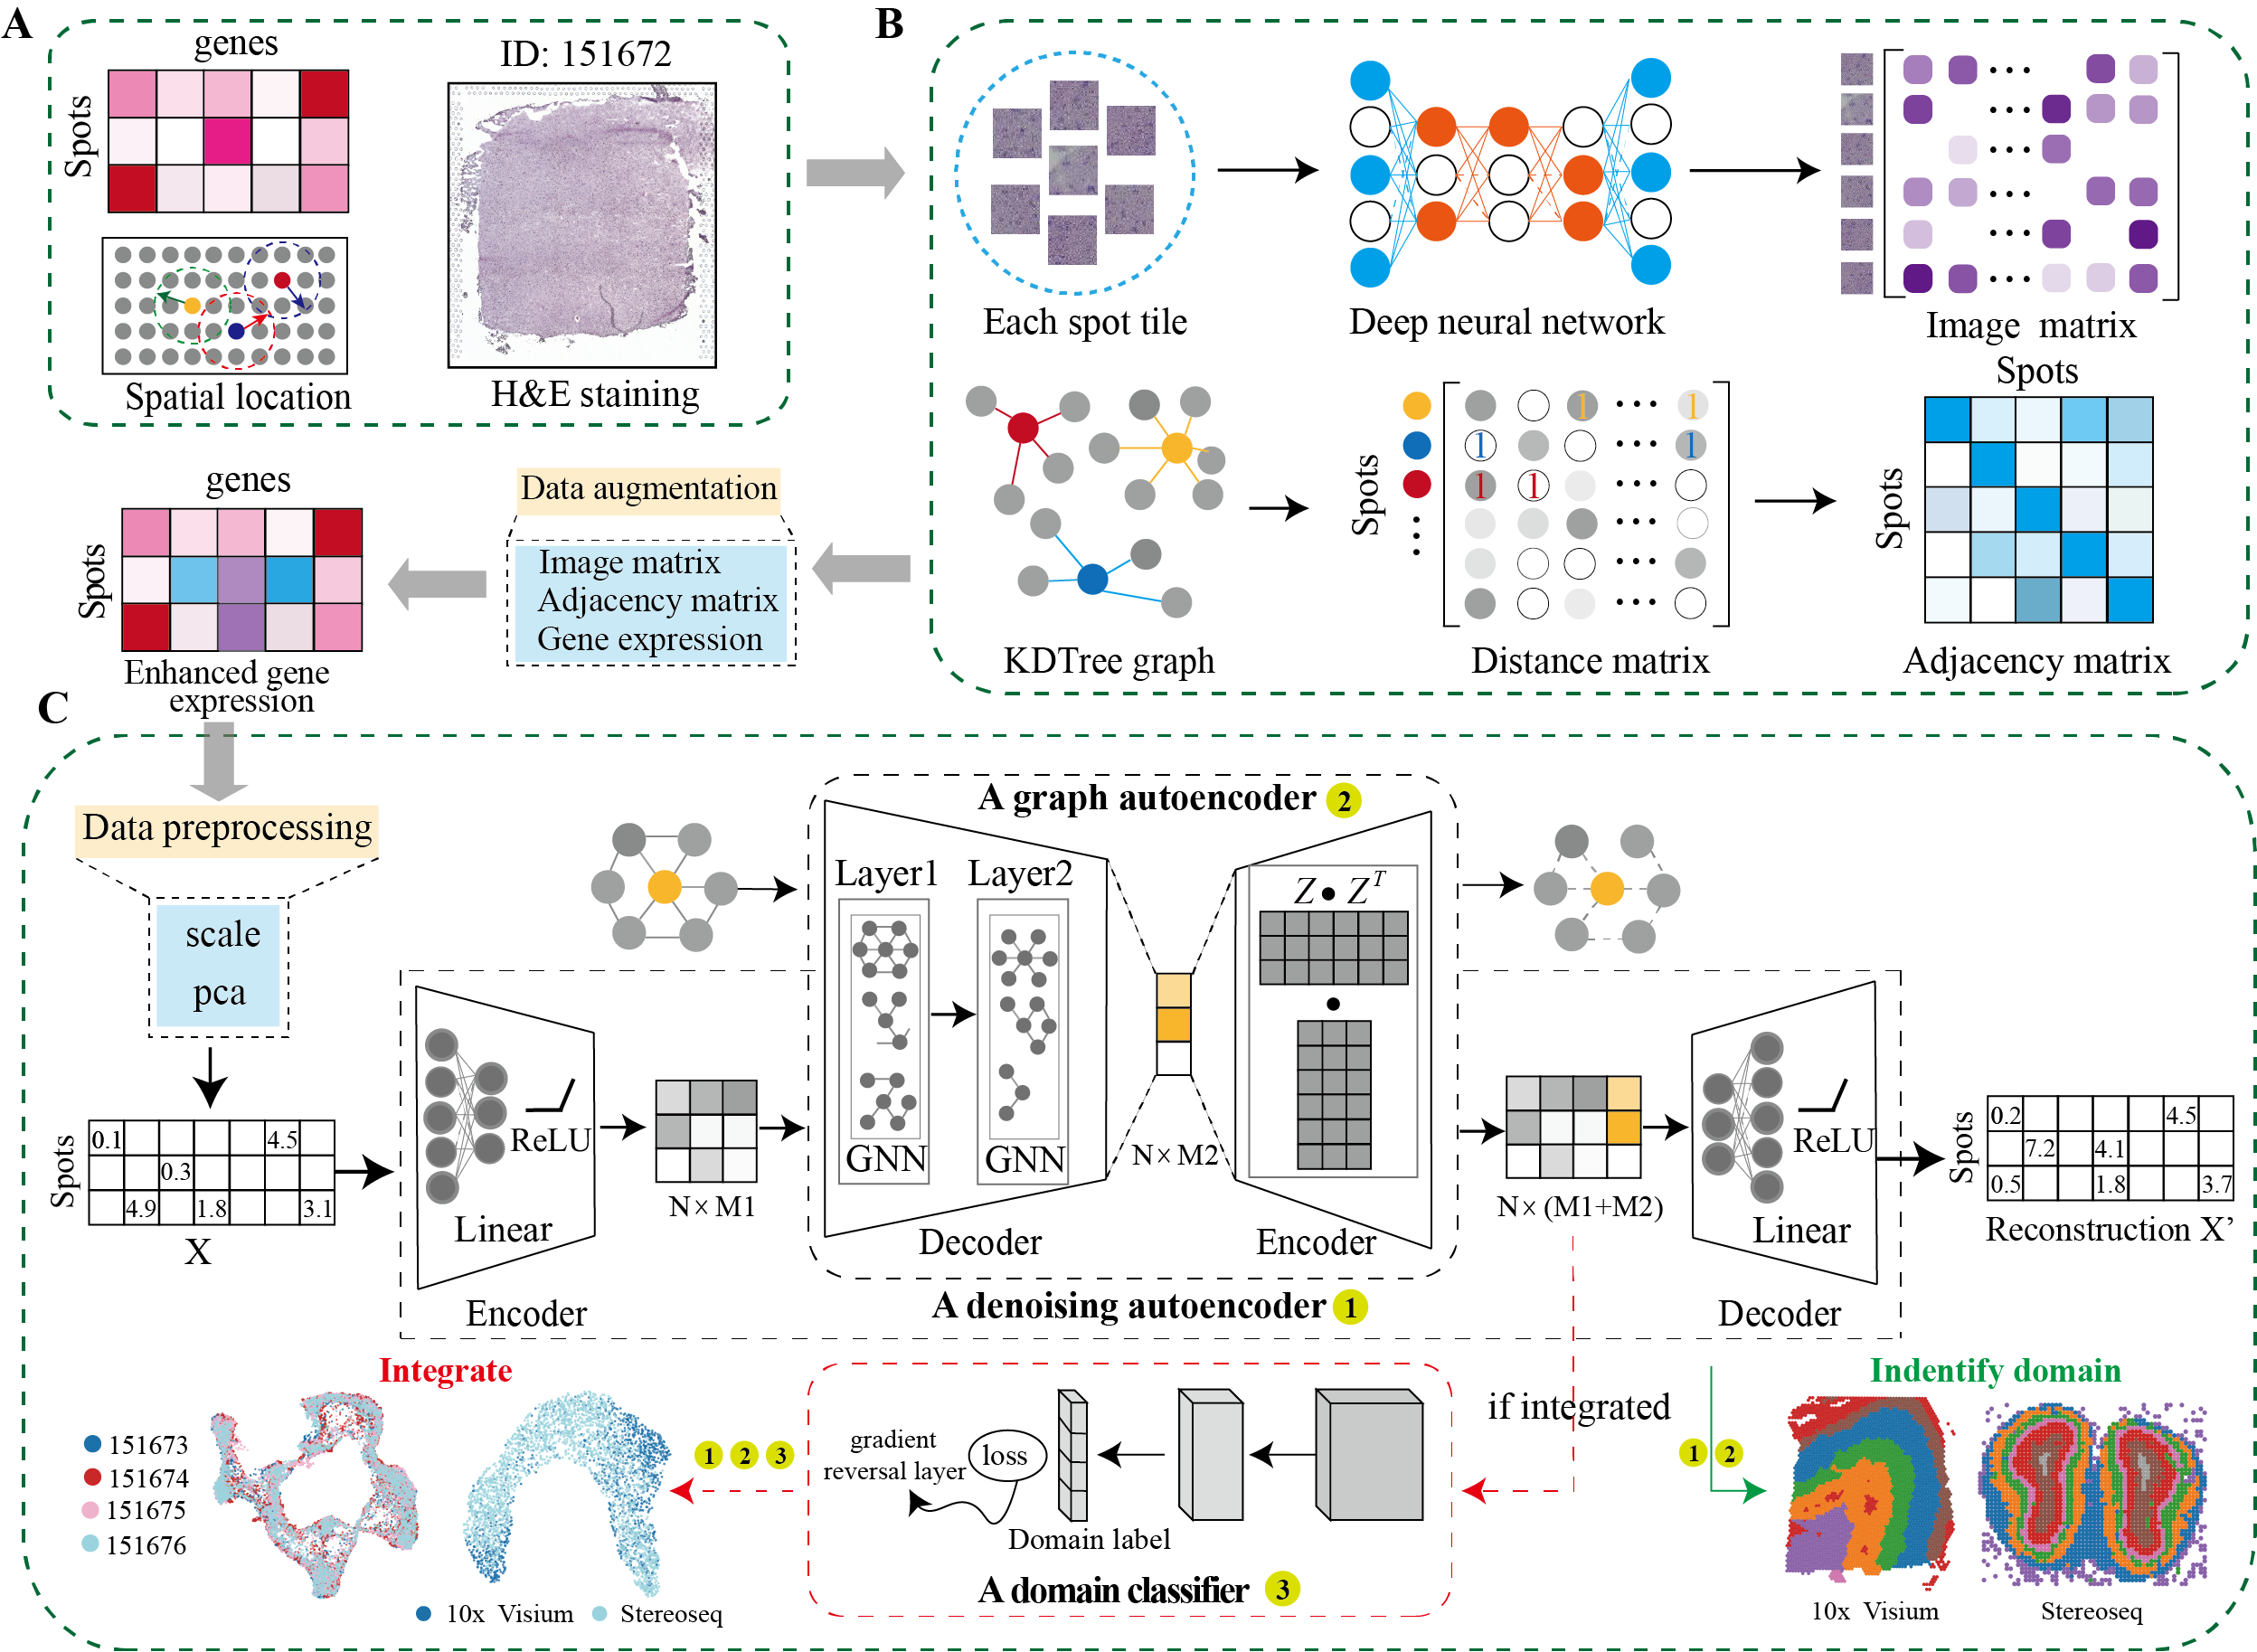
DeepST first uses H&E staining to extract tissue morphology information through a pre-trained deep learning model, and normalizes each spot’s gene expression according to the similarity of adjacent spots. DeepST further learns a spatial adjacency matrix on spatial location for the construction of graph convolutional network. DeepST uses a graph neural network autoencoder and a denoising autoencoder to jointly generate a latent representation of augmented ST data, while domain adversarial neural networks (DAN) are used to integrate ST data from multi-batches or different technologies. The output of DeepST can be applied to identify spatial domains, batch effect correction and downstream analysis.
How to install DeepST
To install DeepST, make sure you have PyTorch and PyG installed. For more details on dependencies, refer to the environment.yml file.
Step 1: Set Up Conda Environment
conda create -n deepst-env python=3.9
Step 2: Install PyTorch and PyG
Activate the environment and install PyTorch and PyG. Adjust the installation commands based on your CUDA version or choose the CPU version if necessary.
- General Installation Command
conda activate deepst-env
pip install torch==2.1.0 torchvision==0.16.0 torchaudio==2.1.0 --index-url https://download.pytorch.org/whl/cu118
pip install pyg_lib==0.3.1+pt21cu118 torch_scatter torch_sparse torch_cluster torch_spline_conv -f https://data.pyg.org/whl/torch-2.1.0+cu118.html
pip install torch_geometric==2.3.1
- Tips for selecting the correct CUDA version
- Run the following command to verify CUDA version:
nvcc --version- Alternatively, use:
nvidia-smi - Modify installation commands based on CUDA
- For CUDA 12.1
pip install torch==2.1.0 torchvision==0.16.0 torchaudio==2.1.0 --index-url https://download.pytorch.org/whl/cu121 pip install pyg_lib==0.3.1+pt21cu121 torch_scatter torch_sparse torch_cluster torch_spline_conv -f https://data.pyg.org/whl/torch-2.1.0+cu121.html pip install torch_geometric==2.3.1 - For CPU-only
pip install torch==2.1.0 torchvision==0.16.0 torchaudio==2.1.0 --index-url https://download.pytorch.org/whl/cpu
pip install pyg_lib==0.3.1+pt21cpu torch_scatter torch_sparse torch_cluster torch_spline_conv -f https://data.pyg.org/whl/torch-2.1.0+cpu.html
pip install torch_geometric==2.3.1
- For CUDA 12.1
Step 3: Install dirac from shell
pip install deepstkit
Step 4: Import DIRAC in your jupyter notebooks or/and scripts
import deepstkit as dt
Quick Start
-
DeepST on DLPFC from 10x Visium.
import os
import matplotlib.pyplot as plt
import scanpy as sc
import deepstkit as dt

# ========== Configuration ==========
SEED = 0                     # Random seed for reproducibility
DATA_DIR = "../data/DLPFC"   # Directory containing spatial data
SAMPLE_ID = "151673"         # Sample identifier to analyze
RESULTS_DIR = "../Results"   # Directory to save outputs
N_DOMAINS = 7                # Expected number of spatial domains

# ========== Initialize Analysis ==========
# Set random seed and initialize DeepST
dt.utils_func.seed_torch(seed=SEED)

# Create DeepST instance with analysis parameters
deepst = dt.main.run(
    save_path=RESULTS_DIR,
    task="Identify_Domain",  # Spatial domain identification
    pre_epochs=500,          # Pretraining iterations
    epochs=500,              # Main training iterations
    use_gpu=True             # Accelerate with GPU if available
)

# ========== Data Loading & Preprocessing ==========
# (Optional) Load spatial transcriptomics data (Visium platform)
# e.g. adata = anndata.read_h5ad("*.h5ad"), this data including .obsm['spatial']
adata = deepst._get_adata(
    platform="Visium",
    data_path=DATA_DIR,
    data_name=SAMPLE_ID
)

# Optional: Incorporate H&E image features (skip if not available)
# adata = deepst._get_image_crop(adata, data_name=SAMPLE_ID)

# ========== Feature Engineering ==========
# Data augmentation (skip morphological if no H&E)
adata = deepst._get_augment(
    adata,
    spatial_type="BallTree",
    use_morphological = False  # Set True if using H&E features
)

# Construct spatial neighborhood graph
graph_dict = deepst._get_graph(
    adata.obsm["spatial"],
    distType="KDTree"        # Spatial relationship modeling
)

# Dimensionality reduction
data = deepst._data_process(
    adata,
    pca_n_comps=200          # Reduce to 200 principal components
)

# ========== Model Training ==========
# Train DeepST model and obtain embeddings
deepst_embed = deepst._fit(
    data=data,
    graph_dict=graph_dict
)
adata.obsm["DeepST_embed"] = deepst_embed

# ========== Spatial Domain Detection ==========
# Cluster spots into spatial domains
adata = deepst._get_cluster_data(
    adata,
    n_domains=N_DOMAINS,     # Expected number of domains
    priori=True              # Use prior knowledge if available
)

# ========== Visualization & Output ==========
# Plot spatial domains
sc.pl.spatial(
    adata,
    color=["DeepST_refine_domain"],  # Color by domain
    frameon=False,
    spot_size=150,
    title=f"Spatial Domains - {SAMPLE_ID}"
)

# Save results
output_file = os.path.join(RESULTS_DIR, f"{SAMPLE_ID}_domains.pdf")
plt.savefig(output_file, bbox_inches="tight", dpi=300)
print(f"Analysis complete! Results saved to {output_file}")
-
DeepST integrates data from mutil-batches or different technologies.
import os
import matplotlib.pyplot as plt
import scanpy as sc
import deepstkit as dt

# ========== Configuration ==========
SEED = 0
DATA_DIR = "../data/DLPFC"
SAMPLE_IDS = ['151673', '151674','151675', '151676']
RESULTS_DIR = "../Results"
N_DOMAINS = 7
INTEGRATION_NAME = "_".join(SAMPLE_IDS)

# ========== Initialize Analysis ==========
# Set random seed and initialize DeepST
dt.utils_func.seed_torch(seed=SEED)

# ========== Initialize DeepST Integration ==========
integration_model = dt.main.run(
    save_path=RESULTS_DIR,
    task="Integration",       # Multi-sample integration task
    pre_epochs=500,
    epochs=500,
    use_gpu=True
)

# ========== Multi-Sample Processing ==========
processed_data = []
spatial_graphs = []

for sample_id in SAMPLE_IDS:
    # Load and preprocess each sample
    adata = integration_model._get_adata(
        platform="Visium",
        data_path=DATA_DIR,
        data_name=sample_id
    )

    # Incorporate H&E image features (Optional)
    # adata = integration_model._get_image_crop(adata, data_name=sample_id)

    # Feature augmentation
    adata = integration_model._get_augment(
        adata,
        spatial_type="BallTree",
        use_morphological=False, # Use prior knowledge if available
    )

    # Construct spatial neighborhood graph
    graph = integration_model._get_graph(
        adata.obsm["spatial"],
        distType="KDTree"
    )

    processed_data.append(adata)
    spatial_graphs.append(graph)

# ========== Dataset Integration ==========
# Combine multiple samples into integrated dataset
combined_adata, combined_graph = integration_model._get_multiple_adata(
    adata_list=processed_data,
    data_name_list=SAMPLE_IDS,
    graph_list=spatial_graphs
)

# Dimensionality reduction
integrated_data = integration_model._data_process(
    combined_adata,
    pca_n_comps=200
)

# ========== Integrated Model Training ==========
# Train with domain adversarial learning
embeddings = integration_model._fit(
    data=integrated_data,
    graph_dict=combined_graph,
    domains=combined_adata.obs["batch"].values,  # For batch correction
    n_domains=len(SAMPLE_IDS) )                 # Number of batches

combined_adata.obsm["DeepST_embed"] = embeddings

# ========== Spatial Domain Detection ==========
combined_adata = integration_model._get_cluster_data(
    combined_adata,
    n_domains=N_DOMAINS,
    priori=True,             # Use biological priors if available
    batch_key="batch_name",
)

# ========== Visualization ==========
# UMAP of integrated data
sc.pp.neighbors(combined_adata, use_rep='DeepST_embed')
sc.tl.umap(combined_adata)

# Save combined UMAP plot
umap_plot = sc.pl.umap(
    combined_adata,
    color=["DeepST_refine_domain", "batch_name"],
    title=f"Integrated UMAP - Samples {INTEGRATION_NAME}",
    return_fig=True
)
umap_plot.savefig(
    os.path.join(RESULTS_DIR, f"{INTEGRATION_NAME}_integrated_umap.pdf"),
    bbox_inches='tight',
    dpi=300
)

# Save individual spatial domain plots
for sample_id in SAMPLE_IDS:
    sample_data = combined_adata[combined_adata.obs["batch_name"]==sample_id]

    spatial_plot = sc.pl.spatial(
        sample_data,
        color='DeepST_refine_domain',
        title=f"Spatial Domains - {sample_id}",
        frameon=False,
        spot_size=150,
        return_fig=True
    )
    spatial_plot.savefig(
        os.path.join(RESULTS_DIR, f"{sample_id}_domains.pdf"),
        bbox_inches='tight',
        dpi=300
    )

print(f"Integration complete! Results saved to {RESULTS_DIR}")
Compared tools
Tools that are compared include:
Download data
| Platform | Tissue | SampleID |
|---|---|---|
| 10x Visium | Human dorsolateral pre-frontal cortex (DLPFC) | 151507, 151508, 151509, 151510, 151669, 151670, 151671, 151672, 151673, 151674, 151675, 151676 |
| 10x Visium | Mouse brain section | Coronal, Sagittal-Anterior, Sagittal-Posterior |
| 10x Visium | Human breast cancer | Invasive Ductal Carcinoma breast, Ductal Carcinoma In Situ & Invasive Carcinoma |
| Stereo-Seq | Mouse olfactory bulb | Olfactory bulb |
| Slide-seq | Mouse hippocampus | Coronal |
| MERFISH | Mouse brain slice | Hypothalamic preoptic region |
Spatial transcriptomics data of other platforms can be downloaded https://www.spatialomics.org/SpatialDB/
Contact
Feel free to submit an issue or contact us at xuchang0214@163.com for problems about the packages.
Release history Release notifications | RSS feed


Download files
Download the file for your platform. If you're not sure which to choose, learn more about installing packages.
Source Distribution
Built Distribution
Filter files by name, interpreter, ABI, and platform.
If you're not sure about the file name format, learn more about wheel file names.
Copy a direct link to the current filters
File details
Details for the file deepstkit-2.0.3.tar.gz.
File metadata
- Download URL: deepstkit-2.0.3.tar.gz
- Upload date:
- Size: 30.9 kB
- Tags: Source
- Uploaded using Trusted Publishing? No
- Uploaded via: twine/6.1.0 CPython/3.12.9
File hashes
| Algorithm | Hash digest | |
|---|---|---|
| SHA256 |
e01ef77a7a88bf8c5ec6ecfbab5e2114117bee45a7e67f94ae95e115b93f8a11
|
|
| MD5 |
da281e5785d0bbdbed3e8e9ac4c300e2
|
|
| BLAKE2b-256 |
70f0ba67b15bc32cdd5d4d6eba887c0440a8939a027742816812313127ff9532
|
File details
Details for the file deepstkit-2.0.3-py3-none-any.whl.
File metadata
- Download URL: deepstkit-2.0.3-py3-none-any.whl
- Upload date:
- Size: 30.7 kB
- Tags: Python 3
- Uploaded using Trusted Publishing? No
- Uploaded via: twine/6.1.0 CPython/3.12.9
File hashes
| Algorithm | Hash digest | |
|---|---|---|
| SHA256 |
47571bbaf14788a9e0d5c23e31f5cb752c84e42fadcb7b629e4734516c6ff351
|
|
| MD5 |
5fc93d8eedbde0960da1f4c7dc654f90
|
|
| BLAKE2b-256 |
49e4f170740d9ad71559cfc0c7ccd45c7fe2fedc2d84bc820356734c7e6ddfe7
|


