Automate depth tracking for your freediving videos: Works with or without dive computers.
Verified details
These details have been verified by PyPIProject links
GitHub Statistics
Maintainers

Project description
depthviz: Transform your freediving footage with depth tracking


depthviz makes it easy to add dynamic depth tracking into your freediving footage. It is a command-line tool for generating depth overlay videos from the data recorded by your dive computer. It processes your dive log and creates a video that visualizes the depth over time.

This allows you to create more informative and engaging dive videos, enriching the storytelling experience for both yourself and your audience. Click here to watch a sample video.
[!TIP] For performance freedivers, you can incorporate
depthvizinto your dive analysis. By visualizing your dive profile, you can identify areas for improvement and track your progress over time.
🌟 Like depthviz?
Please give us a shiny 
depthviz with your freediving community! ⭐️
🛠️ Installation
Prerequisites:
Installation:
pipx install depthviz
🚀 Usage
1. Download Your Data
- ✅ If you have a dive computer:
Export your dive log from your dive computer or diving application. See the source options table for supported formats. - 🚫 If you don't have a dive computer:
Record your dive profile manually using depth markers in your footage. See the No Dive Computer? section for more details.
2. Generate the Overlay
Use depthviz to generate a depth overlay video from your dive log.
depthviz -i <input_file> -s <source> -o <output_video.mp4>
Required Arguments:
-i,--input <input_file>: Path to your dive log file.-s,--source <source>: Source of the data. See the table below for supported sources.-o,--output <output_video.mp4>: Path or filename for the generated video with the depth overlay. The output file format must be.mp4.
Optional Arguments:
-d,--decimal-places <0-2>: Number of decimal places to display in the depth overlay. Valid values are0,1, or2. (Default:0)--no-minus: Hide the minus sign for depth values (e.g., display10minstead of-10m).--font <font_file>: Path to a custom font file for the text.--bg-color <color>: Background color (e.g.,green,'#000000'). (Default:black)💡 You can use this option to set the background color to match your video editor's chroma key color, if needed. (e.g.,
--bg-color green)--stroke-width <0,1,2,...>: Width of the stroke around the text in pixels. (Default:5)--time: Create a time overlay video. This option generates another video that displays the time elapsed during the dive.
[!TIP] Use the
--decimal-placesoption to control the precision of the depth display (e.g.,--decimal-places 1displays depths like-12.5m)
Source Options
| Source | Description | File type | Status |
|---|---|---|---|
apnealizer |
Data from Apnealizer application. | CSV | ✅ |
shearwater |
Data from Shearwater dive computers. | XML | ✅ |
garmin |
Data from Garmin dive computers. | FIT | ✅ |
suunto |
Data from Suunto dive computers. | FIT | ✅ |
manual |
Manual depth input. See the No Dive Computer? section for more details. | CSV | ✅ |
Example:
Example of generating a depth overlay video named depth_overlay.mp4 using data from 123456_ACTIVITY.fit exported from Garmin Connect (source: garmin).
depthviz -i 123456_ACTIVITY.fit -s garmin -o depth_overlay.mp4
3. Integrate with Your Footage
Import the generated overlay video into your preferred video editing software and combine it with your original dive footage. Adjust the blending and position of the overlay to suit your video style.
Watch this short tutorial on how to import an overlay video in CapCut Desktop.
🚫 No Dive Computer?
No Dive Computer, No Problem! You can still create a depth overlay video by manually inputting your dive log using the manual source option.
Example:
depthviz -i <manual_input.csv> -s manual -o <output_video.mp4>
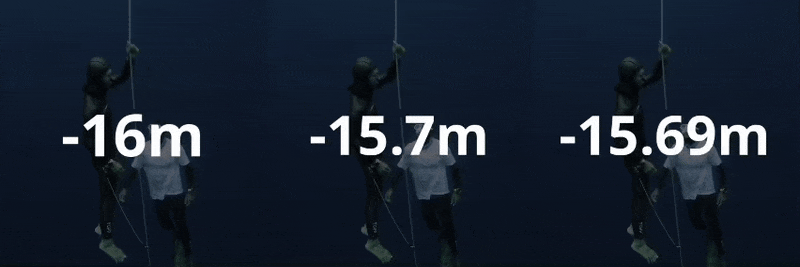
Freediving ropes with depth markers can help you record your dive profile manually. Use the depth markers in your footage as reference points to manually record your dive profile. Simply note the time and depth at each marker point to create your dive log.
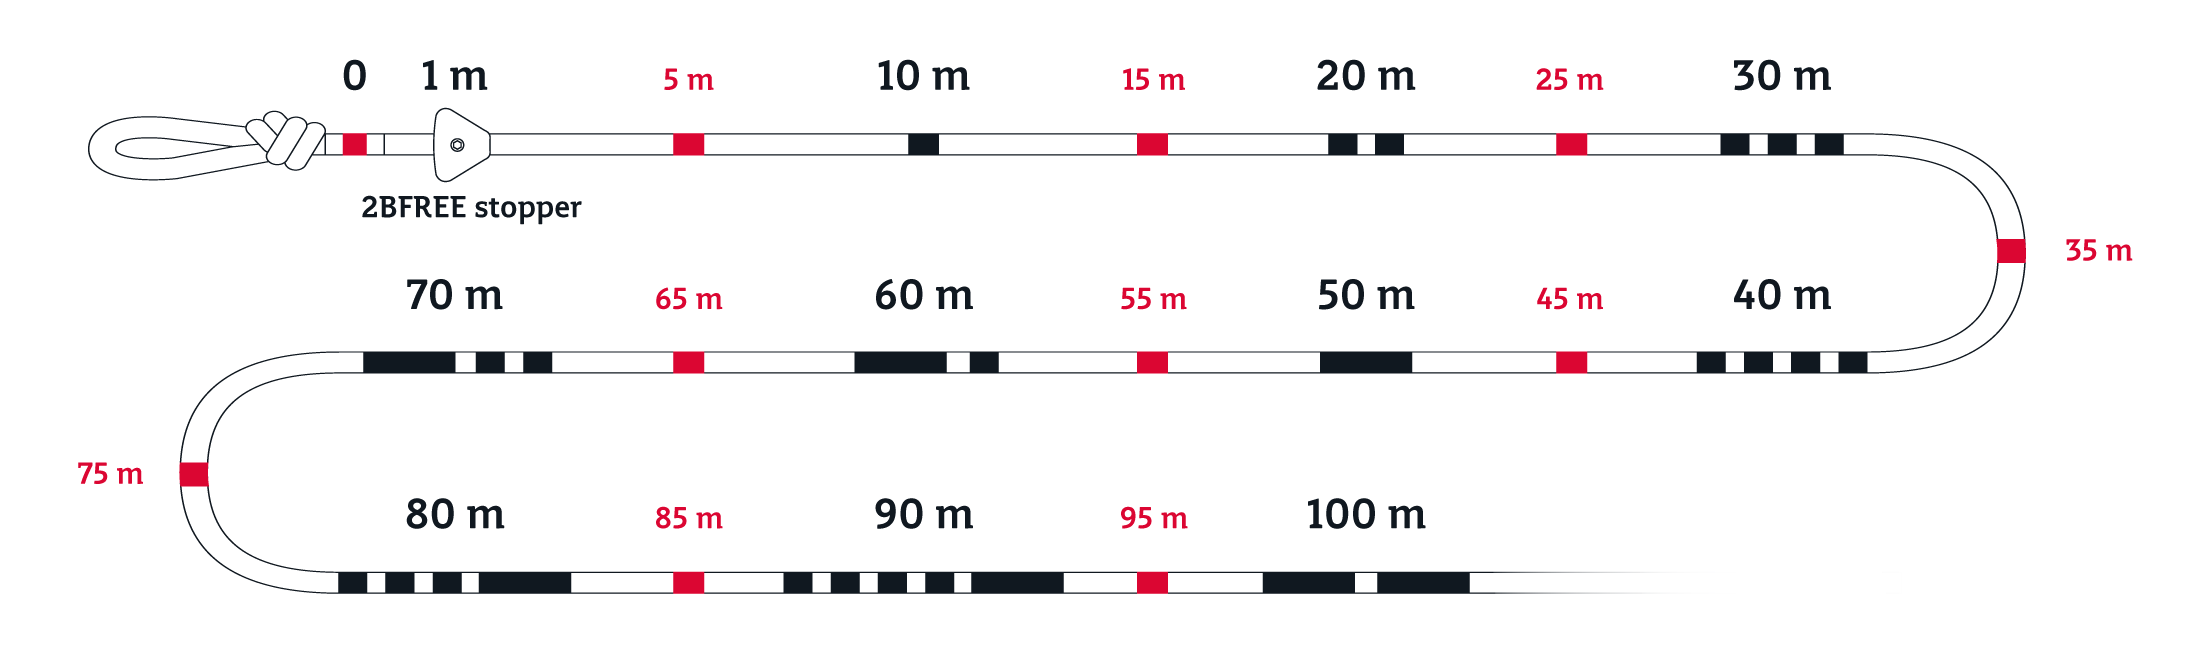 |
|---|
| Example of a Freediving Rope with depth markers. |
Manual Mode Input File Format:
The input file for manual mode should be a CSV file with the following columns:
Time: The time in seconds (e.g.,0,1,2, ...).Depth: The depth in meters (e.g.,10,9,8, ...).
You don't need to record the depth at every second. Record the depth at each time point where a depth marker is visible in your footage. depthviz will interpolate the depth values between the recorded points to create a smooth depth profile.
[!TIP] To quickly generate a basic depth overlay, you can record just three points: the start (0m), the maximum depth, and the end (0m).
depthvizwill handle the rest! For more complex dives (e.g., dives with significant variations in descent/ascent rate or bottom time), more data points are recommended.
Here is an example of a manual mode input file:
| Time | Depth |
|---|---|
| 0 | 0 |
| 6 | 5 |
| 12 | 10 |
| 19 | 15 |
| 26 | 10 |
| 33 | 5 |
| 39 | 0 |
Download the example input file here.
🧠 How It Works
depthviz works by parsing dive log data exported from various dive computers (or manually inputting dive data) and generating an overlay video that displays depth information.
Dive computers typically record either depth directly or pressure data. If the data is recorded as pressure, it is in the form of absolute pressure, which includes both atmospheric pressure and the pressure exerted by the water itself (hydrostatic pressure).
To determine the depth, depthviz uses the following approach:
- If the dive log contains depth data directly:
depthvizuses this data directly. - If the dive log contains pressure data:
- First, the hydrostatic pressure is calculated by subtracting atmospheric pressure (collected during the surface interval or dive start) from the absolute pressure:
- Then, the fluid pressure formula is used to calculate the depth:
Where:- $
P$ is the fluid pressure, - $
\rho$ is the density of the fluid (water), - $
g$ is the acceleration due to gravity (9.80665 m/s²), - $
h$ is the height (or depth) of the fluid column (what we want to calculate).
- $
- Rearranging the formula to solve for depth ($
h$):
- First, the hydrostatic pressure is calculated by subtracting atmospheric pressure (collected during the surface interval or dive start) from the absolute pressure:


Currently, depthviz uses a water density ($\rho$) according to the EN13319 standard, a European CE standard for dive computers, which assumes a water density of 1019.7 kg/m³.
The water density can vary depending on the type of water (e.g., freshwater, saltwater). Even different locations in the ocean can have varying densities. This variability can affect the accuracy of depth calculations. For more precise measurements, users may need to adjust the density value based on their specific diving environment. Especially for freshwater diving, the water density is lower than the standard value, which can lead to depth overestimation. We will add support for custom water density in future releases.
[!NOTE] The EN13319 standard ensures the accuracy and reliability of depth measurements in dive computers. For more information, you can refer to the EN13319 standard.
- Fill in the Gaps: Different dive computers have different sampling rates, and the data may not be recorded at regular intervals. If the dive log data contains gaps or missing values,
depthvizuses Linear Interpolation to estimate the depth at those points. This method calculates the depth at each time point by interpolating between the two nearest known depth values recorded by the dive computer. This will help ensure a smooth and continuous depth profile in the overlay video.

[!NOTE] Learn more about the Linear Interpolation method and how it is used to estimate values between two known depths.
- Generate Overlay Video: The depth information from the linearly interpolated data is rendered into an overlay video, displaying the depth over time. This overlay can then be combined with your original dive footage in your video editor.
🌱 Contribution
We welcome contributions to the depthviz project! If you have any ideas for improvement, bug fixes, or feature suggestions, feel free to open an issue to discuss or submit a pull request.
⌚ Help Us Expand Dive Computer Support!
Missing your dive computer? Help us add support! If you have a dive computer that is not currently supported by depthviz, you can help us by donating a sample dive log file exported from your device. This will allow us to analyze the data format and implement the necessary parsing logic to add support for your device.
To share your dive data, please follow the detailed instructions in our "Donate My Dive" guide.
⚖️ License
This project is licensed under the Apache License 2.0. See the LICENSE file for details.
📦 CycloneDX SBOM
This project provides a CycloneDX Software Bill of Materials (SBOM) in JSON format. The SBOM is generated by the GitHub Actions workflow and is available as an artifact for each release. The SBOM is generated using the cyclonedx-python library.
📬 Contact
For any inquiries, please open an issue or contact the maintainer at noppanut.connect@gmail.com.
Project details
Verified details
These details have been verified by PyPIProject links
GitHub Statistics
Maintainers
Release history Release notifications | RSS feed


Download files
Download the file for your platform. If you're not sure which to choose, learn more about installing packages.
Source Distribution
Built Distribution
Filter files by name, interpreter, ABI, and platform.
If you're not sure about the file name format, learn more about wheel file names.
Copy a direct link to the current filters
File details
Details for the file depthviz-0.5.3b1.tar.gz.
File metadata
- Download URL: depthviz-0.5.3b1.tar.gz
- Upload date:
- Size: 3.7 MB
- Tags: Source
- Uploaded using Trusted Publishing? Yes
- Uploaded via: twine/6.0.1 CPython/3.12.8
File hashes
| Algorithm | Hash digest | |
|---|---|---|
| SHA256 |
6bcec81928a4b3fa319d42f3cdac39696ac6a94bad1184e0e96379413e519836
|
|
| MD5 |
19e1b1b2d050a58ad0a85b67f03d9269
|
|
| BLAKE2b-256 |
c79b7db451f31f6dee1cc80b0b6fd6cf3a738578821949c3fc88098141acc92f
|
Provenance
The following attestation bundles were made for depthviz-0.5.3b1.tar.gz:
Publisher:
deploy.yaml on noppanut15/depthviz
-
Statement:
-
Statement type:
https://in-toto.io/Statement/v1 -
Predicate type:
https://docs.pypi.org/attestations/publish/v1 -
Subject name:
depthviz-0.5.3b1.tar.gz -
Subject digest:
6bcec81928a4b3fa319d42f3cdac39696ac6a94bad1184e0e96379413e519836 - Sigstore transparency entry: 164511805
- Sigstore integration time:
-
Permalink:
noppanut15/depthviz@5555d9637d86bf0dd969a121a84e8419b20c8b79 -
Branch / Tag:
refs/tags/v0.5.3b1 - Owner: https://github.com/noppanut15
-
Access:
public
-
Token Issuer:
https://token.actions.githubusercontent.com -
Runner Environment:
github-hosted -
Publication workflow:
deploy.yaml@5555d9637d86bf0dd969a121a84e8419b20c8b79 -
Trigger Event:
push
-
Statement type:
File details
Details for the file depthviz-0.5.3b1-py3-none-any.whl.
File metadata
- Download URL: depthviz-0.5.3b1-py3-none-any.whl
- Upload date:
- Size: 3.7 MB
- Tags: Python 3
- Uploaded using Trusted Publishing? Yes
- Uploaded via: twine/6.0.1 CPython/3.12.8
File hashes
| Algorithm | Hash digest | |
|---|---|---|
| SHA256 |
4e414e987f69fe402645280b5b68bdcc045a20a119feb22a8c4301fc29f5d4b1
|
|
| MD5 |
831d119c6f708142bae4a1fc7bce763b
|
|
| BLAKE2b-256 |
f11ce6a063f9866fff98e73058c537de2f525a0e243e94c744d406142d8d28f0
|
Provenance
The following attestation bundles were made for depthviz-0.5.3b1-py3-none-any.whl:
Publisher:
deploy.yaml on noppanut15/depthviz
-
Statement:
-
Statement type:
https://in-toto.io/Statement/v1 -
Predicate type:
https://docs.pypi.org/attestations/publish/v1 -
Subject name:
depthviz-0.5.3b1-py3-none-any.whl -
Subject digest:
4e414e987f69fe402645280b5b68bdcc045a20a119feb22a8c4301fc29f5d4b1 - Sigstore transparency entry: 164511808
- Sigstore integration time:
-
Permalink:
noppanut15/depthviz@5555d9637d86bf0dd969a121a84e8419b20c8b79 -
Branch / Tag:
refs/tags/v0.5.3b1 - Owner: https://github.com/noppanut15
-
Access:
public
-
Token Issuer:
https://token.actions.githubusercontent.com -
Runner Environment:
github-hosted -
Publication workflow:
deploy.yaml@5555d9637d86bf0dd969a121a84e8419b20c8b79 -
Trigger Event:
push
-
Statement type:


