
This release is a pre-release and may not be stable for production use.
DQuant
Automated Volatility Forecasting for Traders and Analysts

Volatility forecast with DQuant
About the Project
DQuant is an open-source Python library for automated volatility forecasting of financial time series. It handles all stages of model building: from raw prices to ready-made forecasts.
Key Idea
A trader doesn't need to know machine learning to use AI for volatility forecasting.
Features
| Automated feature engineering | Creates dozens of features from raw prices (open, high, low, close, volume) |
| Target variable without look-ahead bias | Correct calculation of realized volatility |
| 3 models to choose from | Gradient Boosting, XGBoost, LightGBM with early stopping |
| Training visualization | Error plot on train/validation to monitor overfitting |
| Save and load | Train once — use forever |
| Flexible customization | Your own features, model parameters, data sources |
| Integration with any data | Yahoo Finance, MetaTrader 5 |
Who is this for
- Algorithmic traders — for model calibration and risk management
- Discretionary traders — for assessing market regime and position sizing
- Quantitative analysts — for rapid prototyping
- Developers — for embedding into trading systems
- Students — as a ready-made benchmark and learning example
Installation
Requirements
- Python 3.7 or higher
- pip
pip install dquant
Verify Installation
import dquant
print(dquant.__version__)  # Should output the version
Quick Start
Minimal working example with Bitcoin
import pandas as pd
import yfinance as yf
from dquant.models import VolClustXGB


# 1. Load data
df = yf.download("BTC-USD", start="2020-01-01", interval='1d')
df = pd.DataFrame({
    'open': df[('Open', 'BTC-USD')].values,
    'high': df[('High', 'BTC-USD')].values,
    'low': df[('Low', 'BTC-USD')].values,
    'close': df[('Close', 'BTC-USD')].values,
    'volume': df[('Volume', 'BTC-USD')].values
}, index=df.index)

# 2. Create model
model = VolClustXGB({}, early_stopping=True)

# 3. Train model
features = [
    'TR',
    'returns',
    'abs_returns',
    'gap',
    'body',
    'shadow',
    'close_position',
    'roll_atr_14'
]
model.fit(df, feature_list=features, input_bars=70, horizon=20, trees_count=200, show_results=True)

# 4. Make forecast
rez = model.forecast(df.iloc[-70:].copy(), show=True)
Execution result
[0.0016554 0.0018979 0.0015921 0.0014239 0.0013767 0.0011586 0.0013139
 0.0009813 0.0007931 0.0012909 0.0013664 0.0016466 0.0014836 0.0011577
 0.0008737 0.0007213 0.0008084 0.0012699 0.0015358 0.0014748]
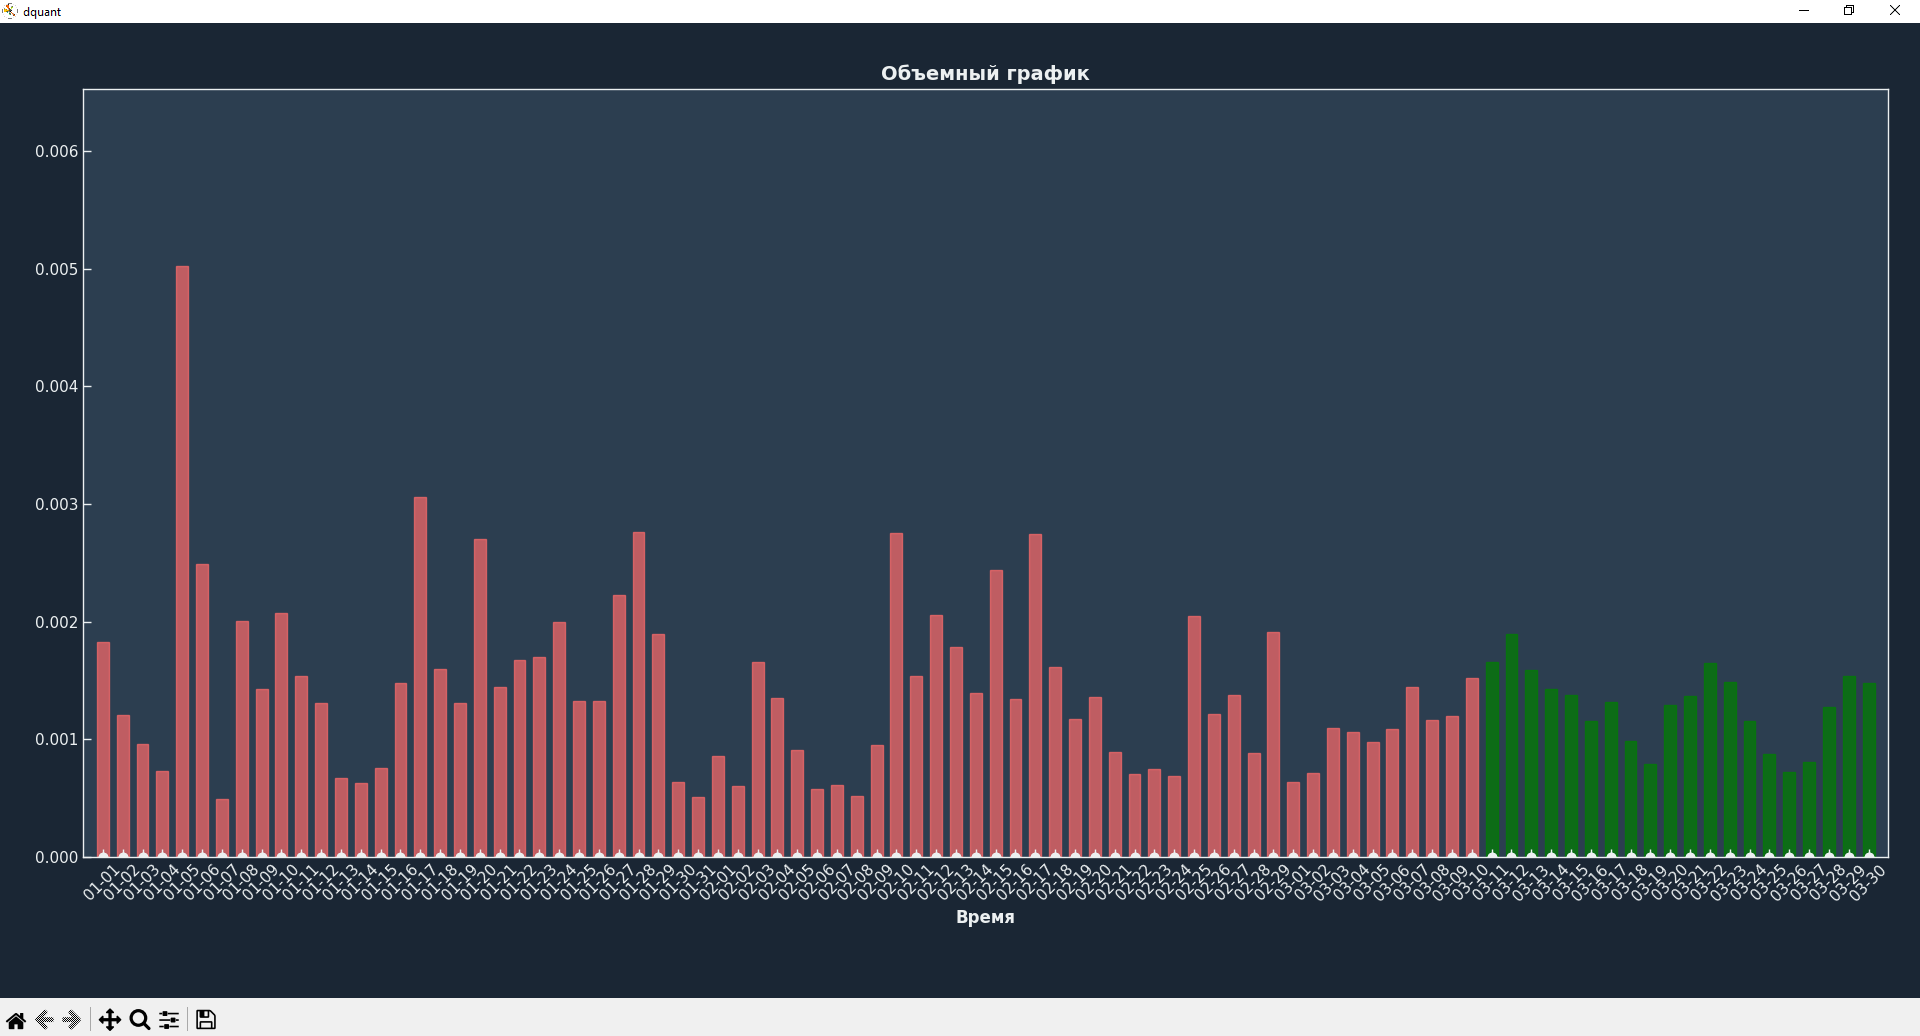
Red shows volatility for previous candles, green shows future volatility.
Documentation
| Resource | Description |
|---|---|
| Full documentation | All classes, methods, parameters |
Usage Examples
With Yahoo Finance
import pandas as pd
import yfinance as yf
from dquant.models import VolClustXGB


# 1. Load data
df = yf.download("BTC-USD", start="2020-01-01", interval='1d')
df = pd.DataFrame({
    'open': df[('Open', 'BTC-USD')].values,
    'high': df[('High', 'BTC-USD')].values,
    'low': df[('Low', 'BTC-USD')].values,
    'close': df[('Close', 'BTC-USD')].values,
    'volume': df[('Volume', 'BTC-USD')].values
}, index=df.index)

# 2. Create model
model = VolClustXGB({}, early_stopping=True)

# 3. Train model
features = [
    'TR',
    'returns',
    'abs_returns',
    'gap',
    'body',
    'shadow',
    'close_position',
    'roll_atr_14'
]
model.fit(df, feature_list=features, input_bars=70, horizon=20, trees_count=200, show_results=True)

# 4. Make forecast
rez = model.forecast(df.iloc[-70:].copy(), show=True)
With MetaTrader 5
import pandas as pd
import MetaTrader5 as mt5
import datetime as dt
from dquant.models import VolClustXGB


symbol = "EURUSD"          # symbol to watch
timeframe = mt5.TIMEFRAME_H1   # M1, M5, M15, H1, D1, etc.
days_back = 1000             # how many days of history to load

# Connect to MT5
if not mt5.initialize():
    print("Failed to connect to MetaTrader5")
    quit()

# Check that symbol is available
if not mt5.symbol_select(symbol, True):
    print(f"Symbol {symbol} not found or not enabled")
    mt5.shutdown()
    quit()

# Calculate dates
to_date = dt.datetime.now() + dt.timedelta(hours=3)
from_date = to_date - dt.timedelta(days=days_back)

# Load bars
rates = mt5.copy_rates_range(symbol, timeframe, from_date, to_date)

mt5.shutdown()  # terminal no longer needed

if rates is None or len(rates) == 0:
    print("No data!")
    quit()

# Convert to DataFrame
df = pd.DataFrame(rates)
df['time'] = pd.to_datetime(df['time'], unit='s')

df.rename(columns={
    'tick_volume': 'volume'
}, inplace=True)

# Create model
model = VolClustXGB({}, early_stopping=True)

# Train model
features = [
    'TR',
    'returns',
    'abs_returns',
    'gap',
    'body',
    'shadow',
    'close_position',
    'roll_atr_14'
]
model.fit(df, feature_list=features, input_bars=70, horizon=20, trees_count=200, show_results=True)

# Make forecast
rez = model.forecast(df.iloc[-70:].copy(), show=True)
Creating an indicator for Meta Trader 5
Immediately after training the model, you can export it to a working mql5 indicator. Just one more line of code is needed:
model.save('indicator_name', type_to_save='mql5')
Done! Now you can use your trained models in Meta Trader 5.
How to Contribute
We welcome any contribution to the project! Here are a few ways to help:
Report a bug
Found a bug? Create an Issue with a detailed description:
- What you did
- What you expected
- What actually happened
- Code to reproduce (if possible)
Suggest an idea
Have an idea for improvement? Write to Telegram or create an Issue with the enhancement label.
License
The project is distributed under the MIT license. See the LICENSE file for details.
Project Support
If dquant has helped you in your work or studies:
- Star the project on GitHub ⭐ — it's very motivating!
- Tell your colleagues about the library
- Write to me about your experience using it
Contacts
Author: Denis Makarov
- Telegram: @Denchik_ai
- GitHub: @artrdon
- Project website: dquant.space
1 maintainer

Download files
Download the file for your platform. If you're not sure which to choose, learn more about installing packages.
Source Distribution
Built Distribution
Filter files by name, interpreter, ABI, and platform.
If you're not sure about the file name format, learn more about wheel file names.
Copy a direct link to the current filters
File details
Details for the file dquant-1.3.0b0.tar.gz.
File metadata
- Download URL: dquant-1.3.0b0.tar.gz
- Upload date:
- Size: 22.6 kB
- Tags: Source
- Uploaded using Trusted Publishing? No
- Uploaded via:
twine/6.2.0 CPython/3.12.10
File hashes
| Algorithm | Hash digest | |
|---|---|---|
| SHA256 |
b17a4fc6cc60c42629e07a2fd6624c9c6b236ec6ee55f146f3d198c30106789c
|
|
| MD5 |
f1c0e1809935439b85e06cde132d463c
|
|
| BLAKE2b-256 |
77574723818e6a0ab25c93364c7a825abc8aeb01dd93adcf0daf286084de4320
|
File details
Details for the file dquant-1.3.0b0-py3-none-any.whl.
File metadata
- Download URL: dquant-1.3.0b0-py3-none-any.whl
- Upload date:
- Size: 21.1 kB
- Tags: Python 3
- Uploaded using Trusted Publishing? No
- Uploaded via:
twine/6.2.0 CPython/3.12.10
File hashes
| Algorithm | Hash digest | |
|---|---|---|
| SHA256 |
c30d1c3d3bd0dcaca444cbb2f74ad326cbce56757f8abdd921383db43be4490f
|
|
| MD5 |
6fd8dfa8328c92b429e0c58f310d48de
|
|
| BLAKE2b-256 |
7cd60e450e1aa1fb10d5d75018b9134dc5f1639a9eae04a94b459c0bf5872543
|







