Fiber Kit - moment curvature analysis for reinforced concrete, steel, wood, etc.

Project description

Fiber Section Analysis in Python
Define fiber material properties, create section, perform moment-curvature and PM interaction analysis with ease.
Introduction
fkit (fiber-kit) is a section analysis program implemented in Python. It is powerful, flexible, and easy-to-use. Perform moment-curvature and P+M interaction analysis with very few lines of code. Originally meant for reinforced concrete sections, it was later extended to all material type (e.g. wood, steel, FRPs, anything that can be defined by a stress-strain curve).
Notable Features:
- Large selection of material models (Hognestad, Mander, Todeschini, Ramberg-Osgood, Menegotto-Pinto, Bilinear, Trilinear, Multilinear)
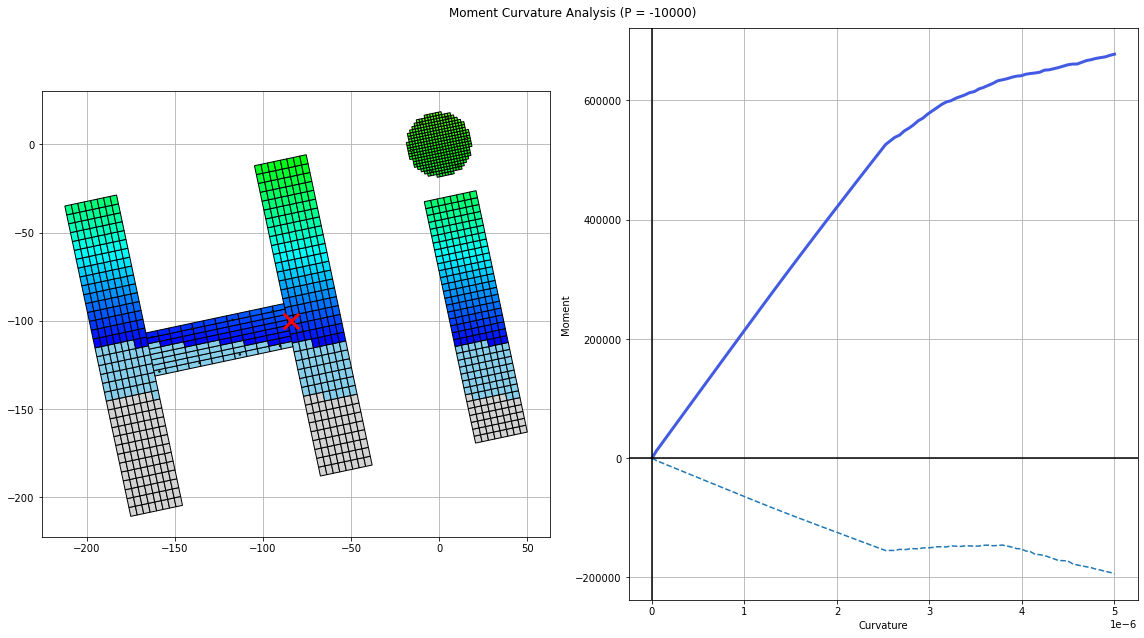
- Moment curvature analysis
- P+M interaction analysis
- Cracked moment of inertia calculations
- Fast, Intuitive to use, and fully transparent. View stress/strain data of every fiber at each load step
- Great looking visualizations
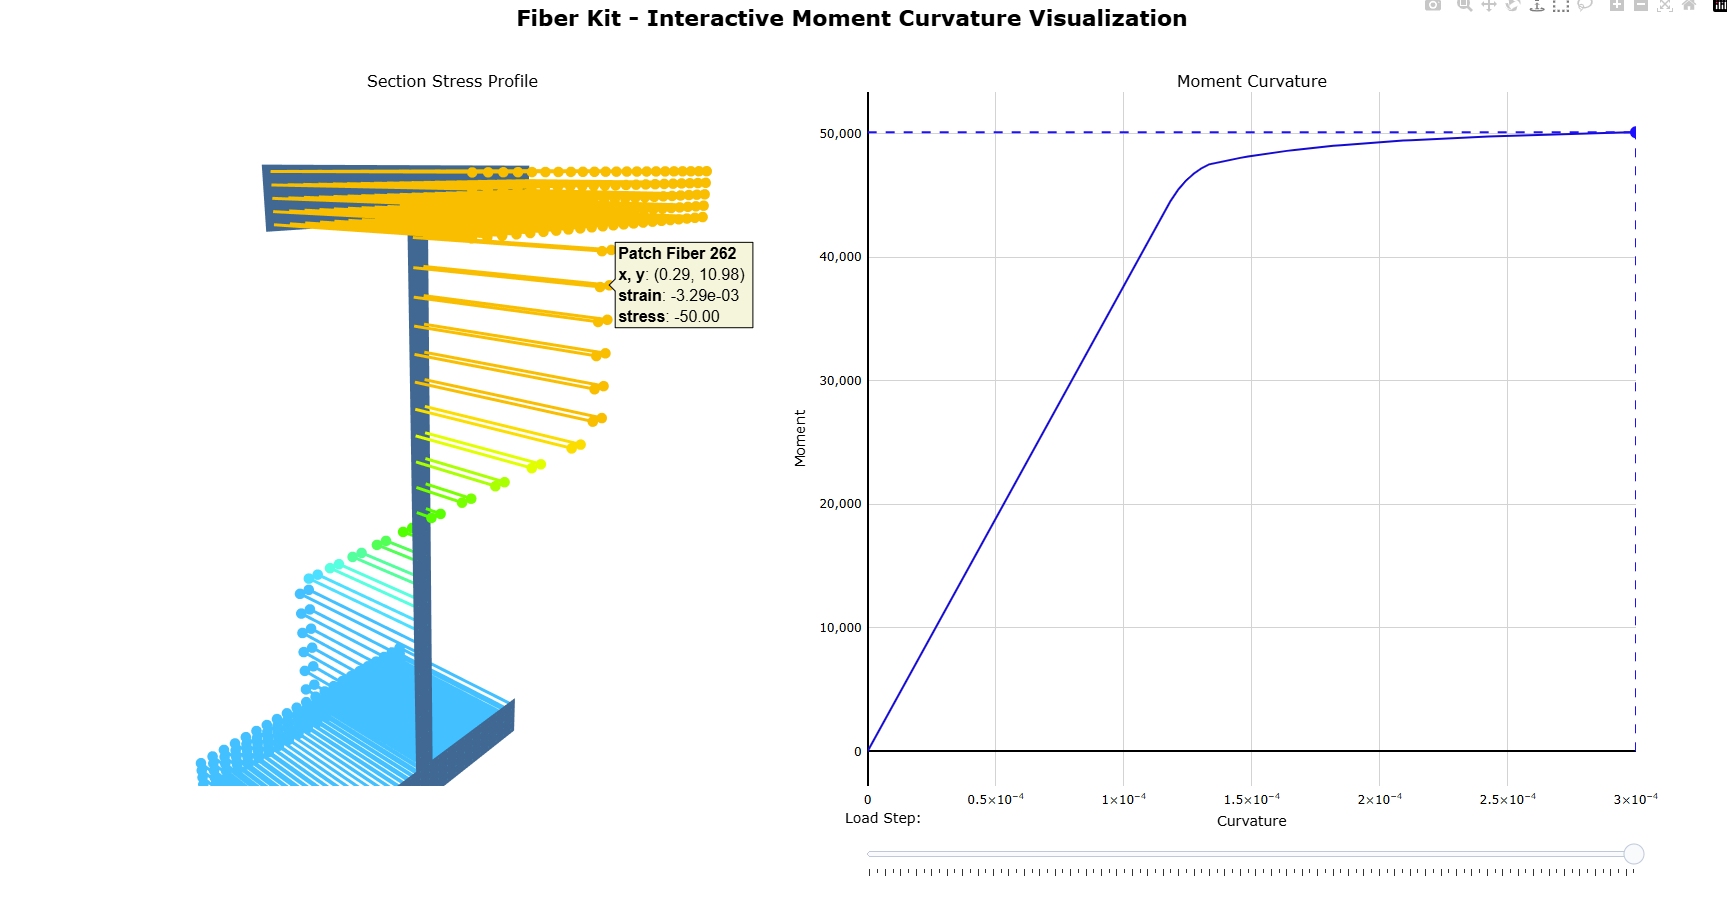
[New in v2.0.0] Interactive 3D plot powered by Plotly:
Quick Start
Run main_quickstart.py:
import fiberkit as fkit
# define concrete and steel fibers
fiber_concrete = fkit.patchfiber.Hognestad(fpc=4, take_tension=True)
fiber_steel = fkit.nodefiber.Bilinear(fy=60, Es=29000)
# create a rectangular beam section with SectionBuilder
section1 = fkit.sectionbuilder.rectangular(width = 18,
height = 24,
cover = 2,
top_bar = [0.6, 4, 1, 0], #[bar_area, nx, ny, y_spacing]
bot_bar = [0.6, 4, 2, 3], #[bar_area, nx, ny, y_spacing]
concrete_fiber = fiber_concrete,
steel_fiber = fiber_steel)
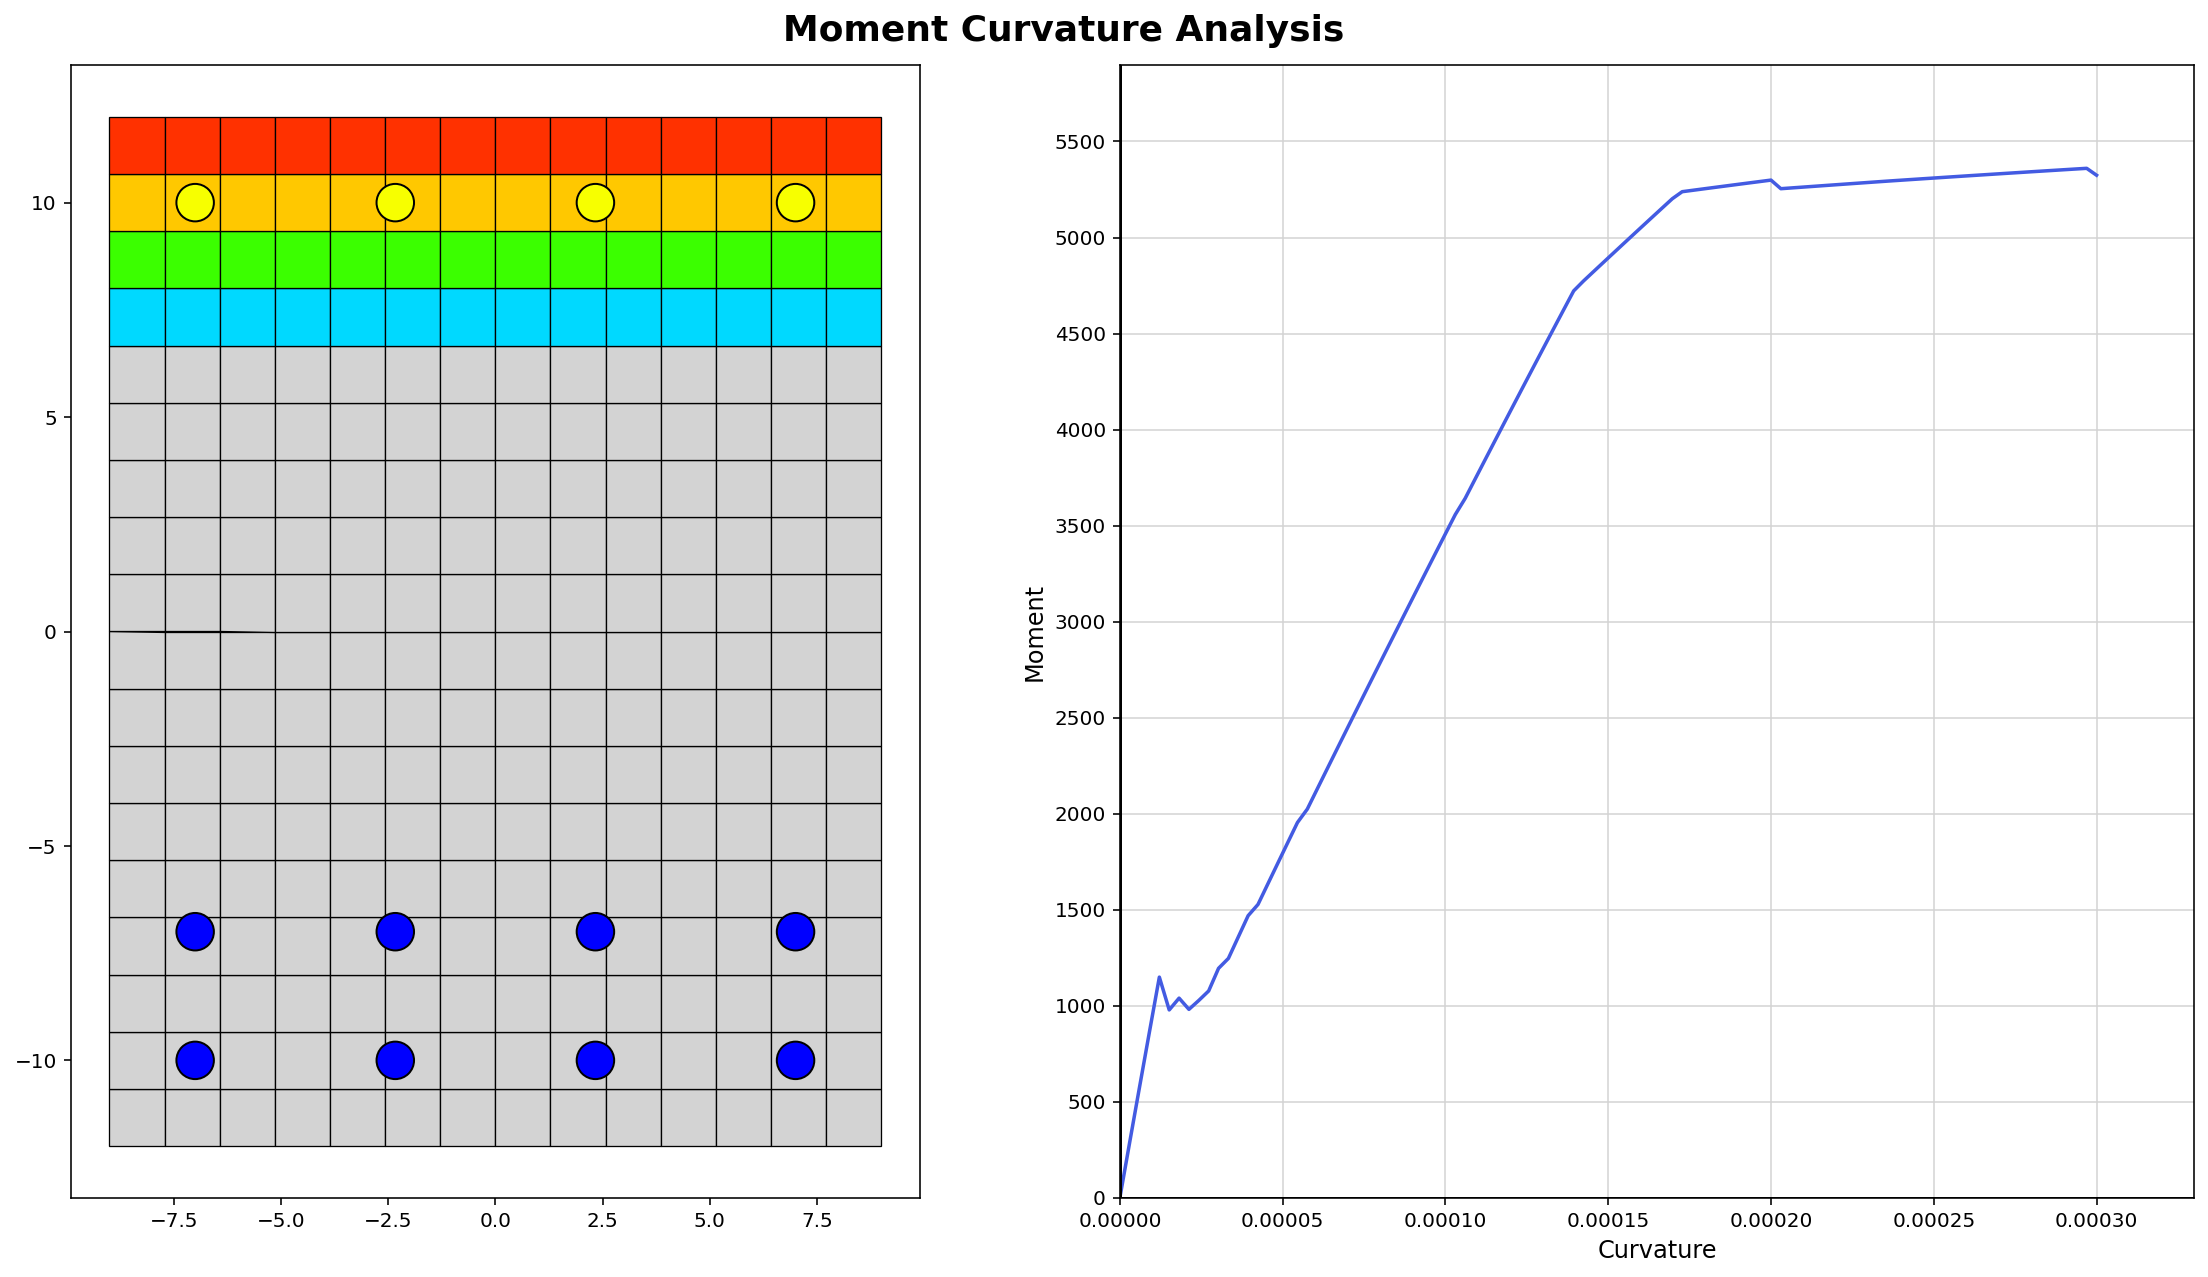
# moment curvature
MK_results = section1.run_moment_curvature(phi_target=0.0003)
df_nodefibers, df_patchfibers = section1.get_all_fiber_data()
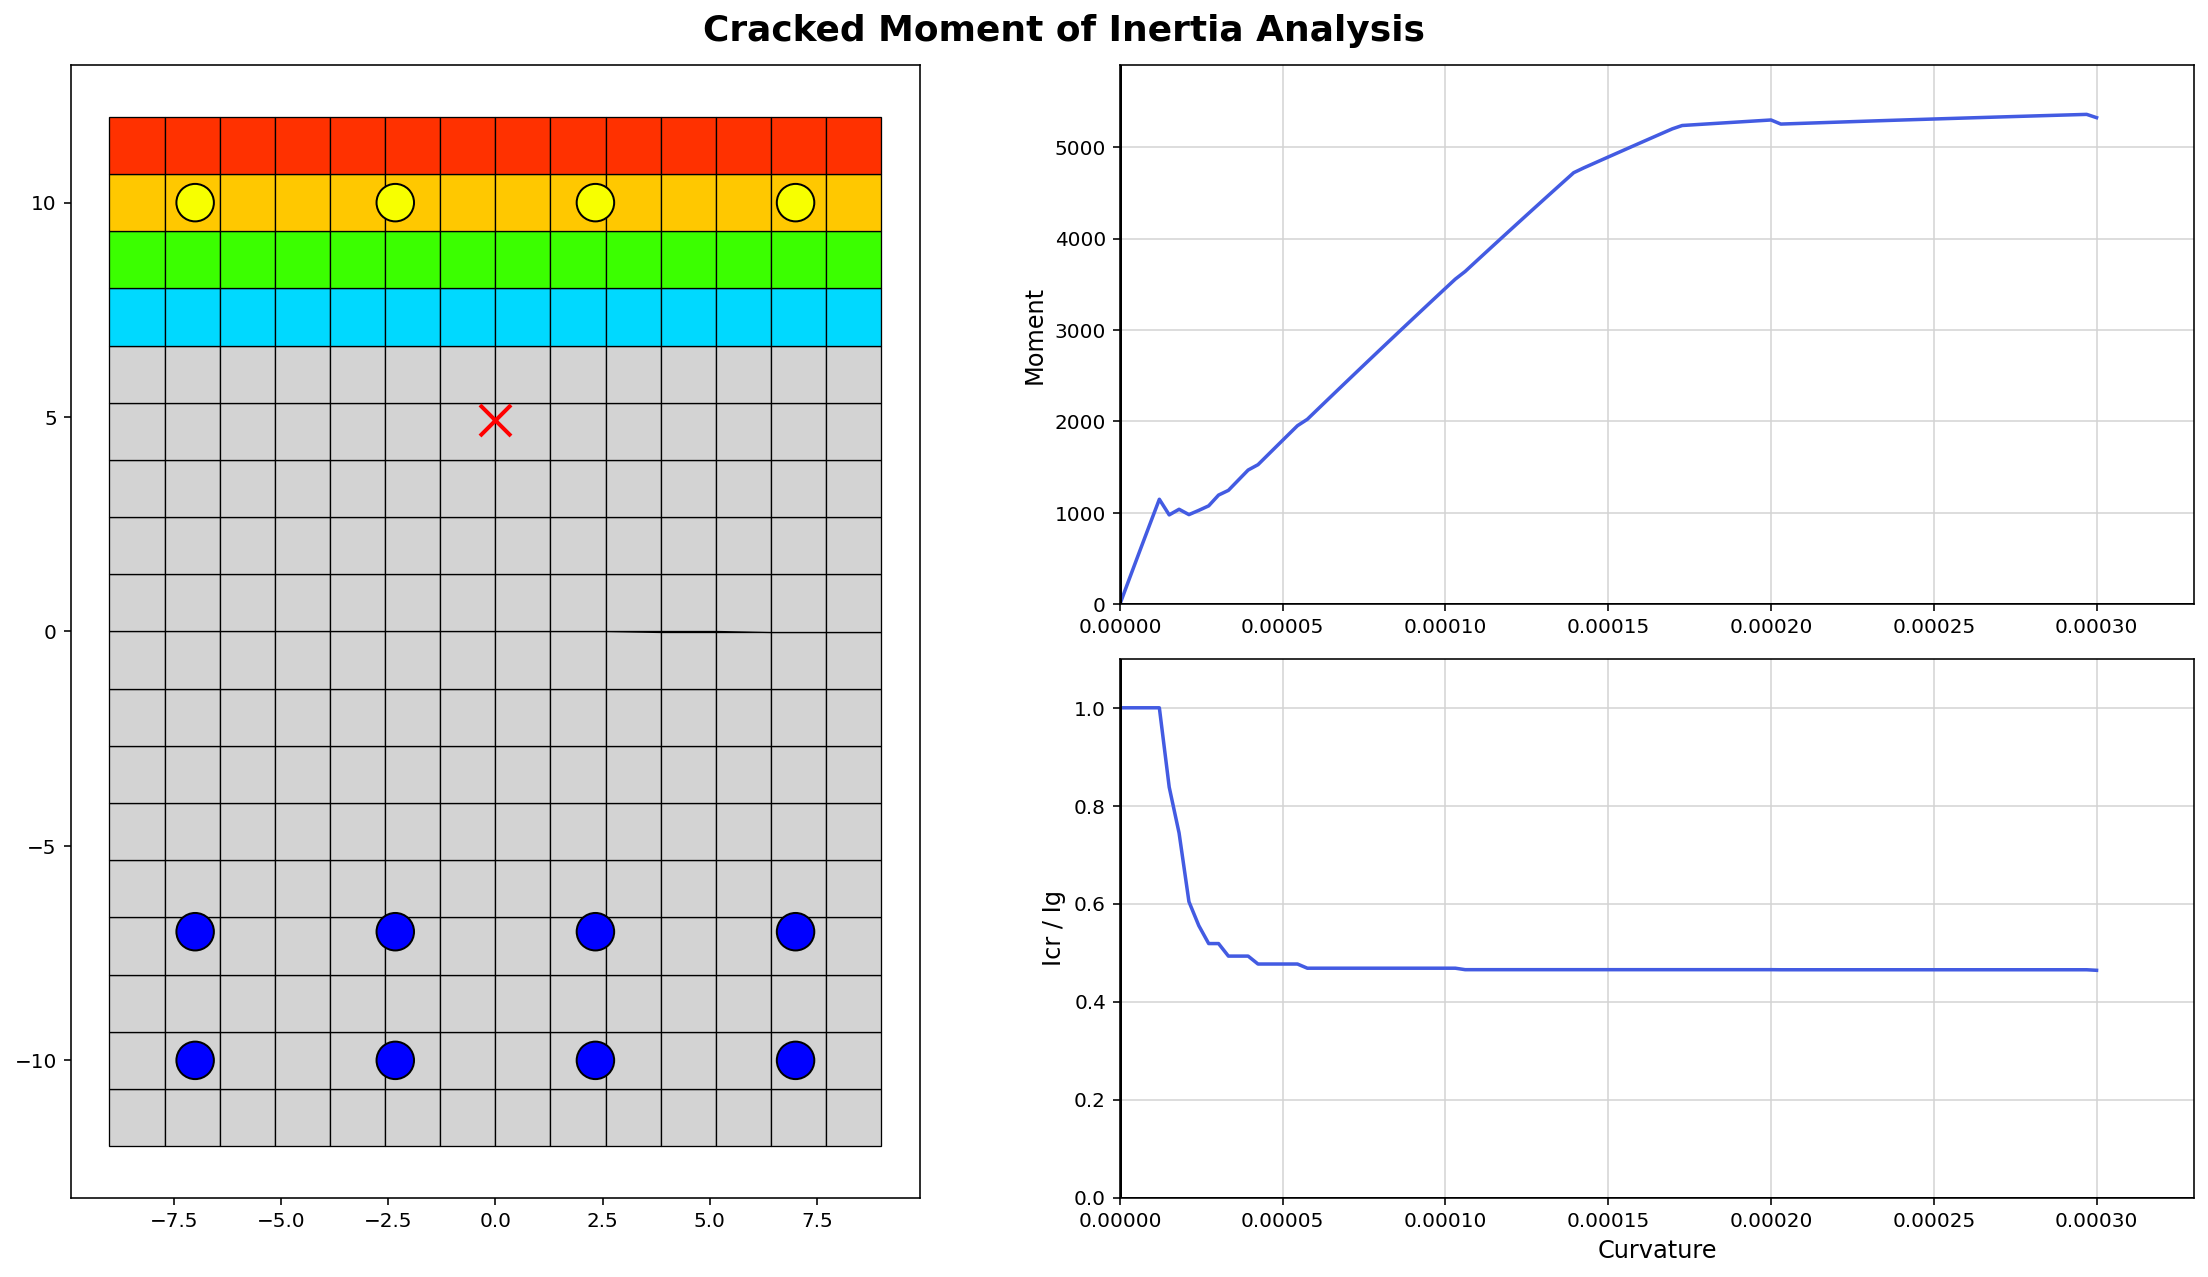
# cracked moment of inertia
Icr_results = section1.calculate_Icr(Es=29000, Ec=3605)
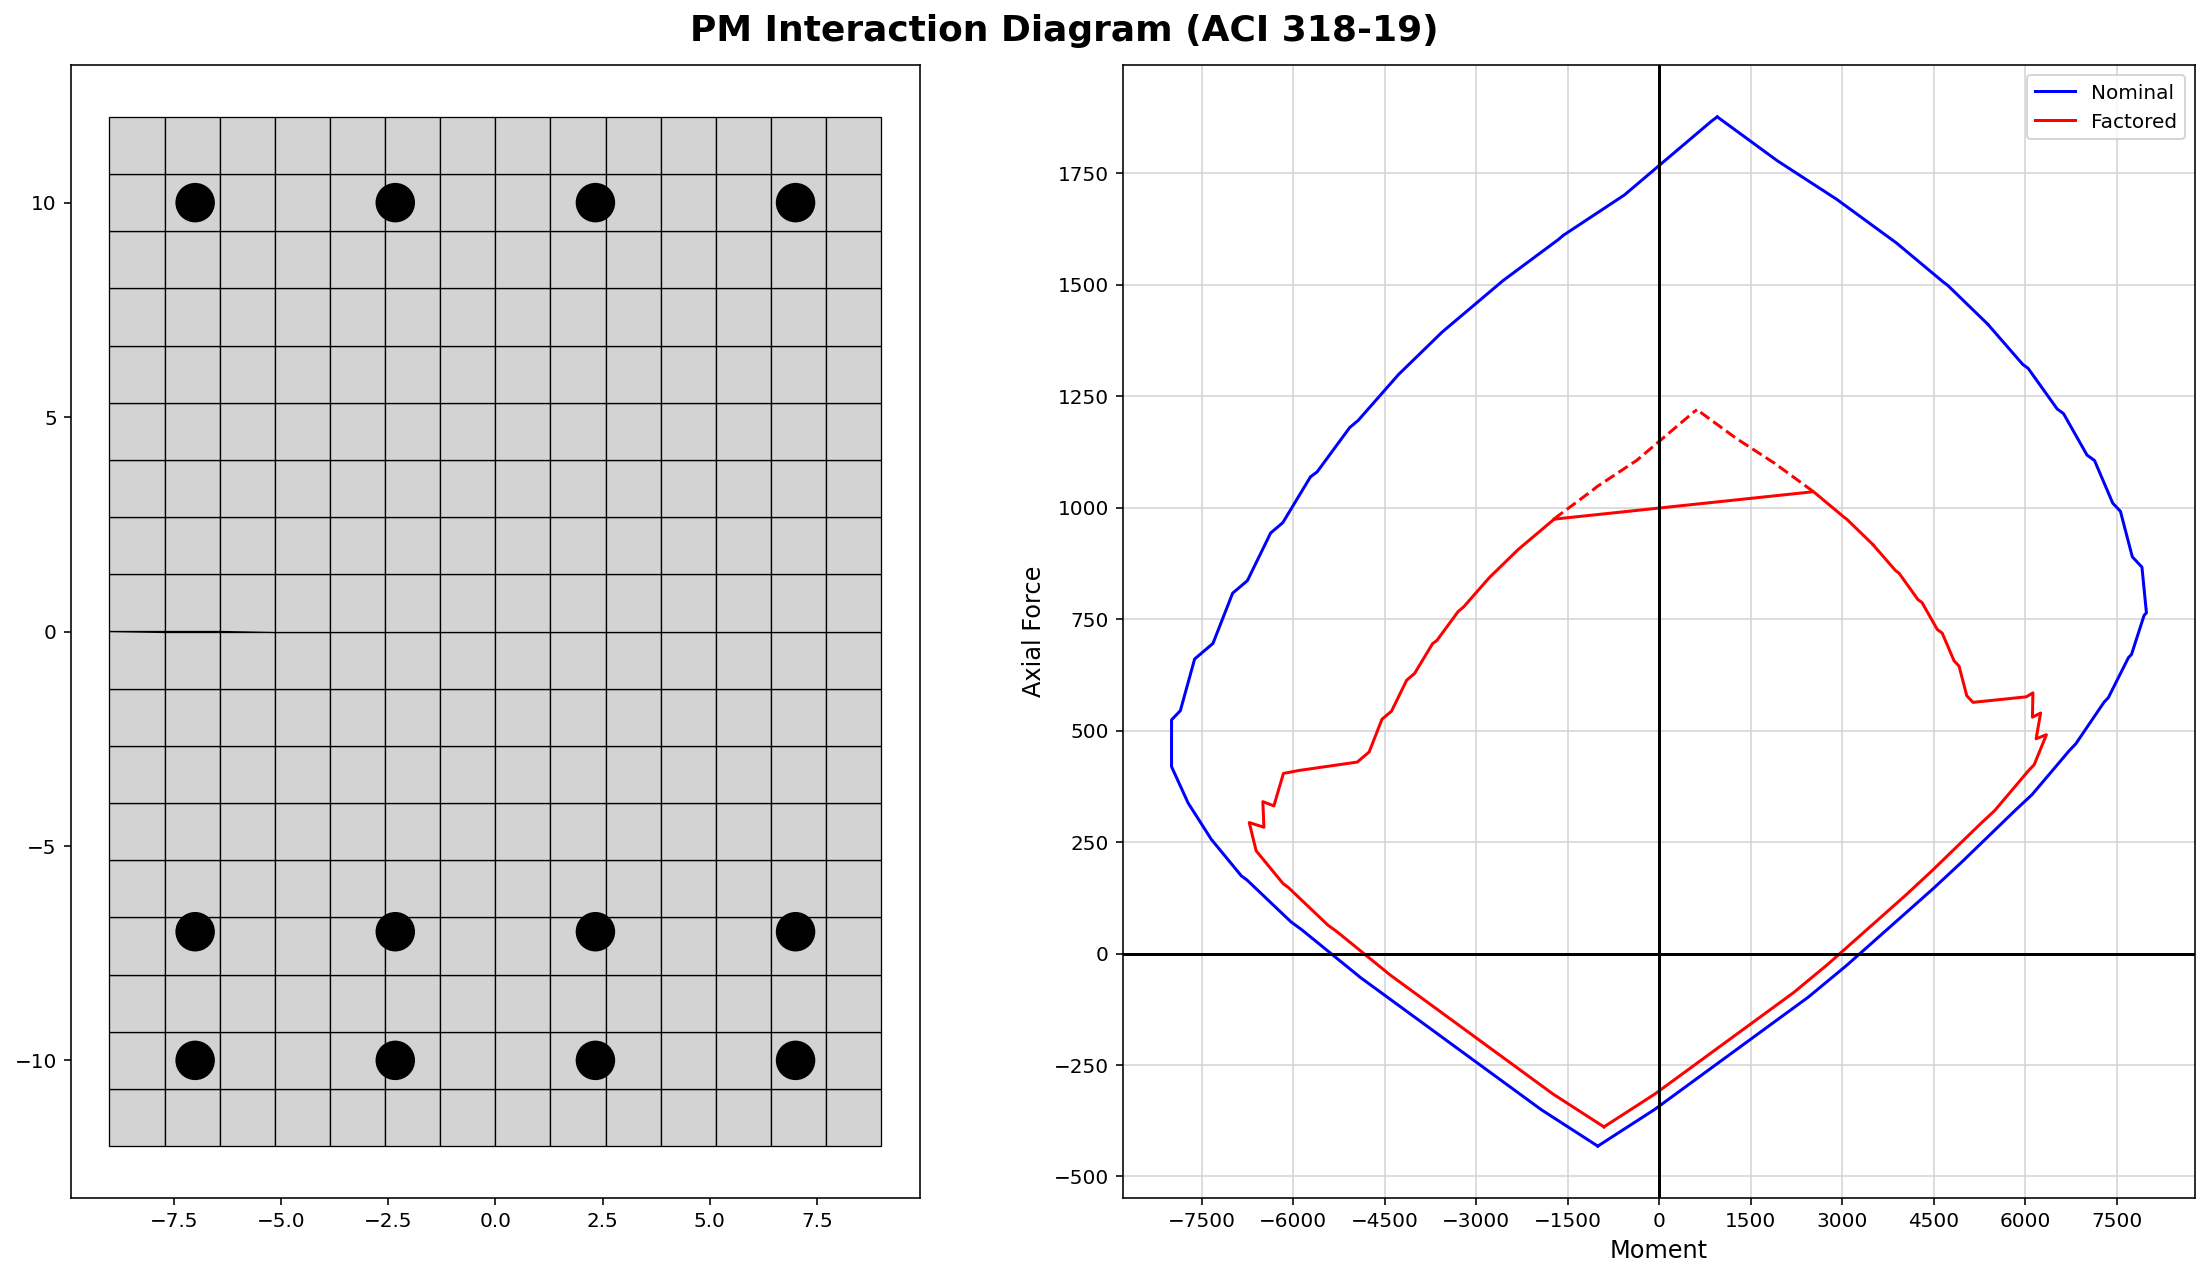
# PM Interaction surface analysis
PM_results = section1.run_PM_interaction(fpc=4, fy=60, Es=29000)
# plot results
fkit.plotter.plot_MK(section1)
fkit.plotter.plot_PM(section1)
fkit.plotter.plot_Icr(section1)
fkit.plotter.plot_MK_3D(section1) # NEW IN VERSION 2.0.0
The script above uses US imperial unit (kips, in, ksi). You may also use SI units (N, mm, MPa). The quick start script produces the following plots:
Installation
Option 1: Anaconda Python
This is the simplest way to get started.
- Download Anaconda python distribution: https://www.anaconda.com/download
- Download this package (click the green "Code" button and download zip file or download the latest release)
- Open and run "main.py" in Anaconda's Spyder IDE
Option 2: Regular Python
- Download python: https://www.python.org/
- Download this project to a folder of your choosing
git clone https://github.com/wcfrobert/fkit.git - Change directory into where you downloaded fkit
cd fkit - Create virtual environment
py -m venv venv - Activate virtual environment
venv\Scripts\activate - Install requirements
pip install -r requirements.txt - run fkit
py main.py
Note that pip install is available.
pip install fiberkit
Fiberkit was developed using python 3.12 (any version above 3.7 will probably work as well) with the following dependencies.
- Numpy
- Matplotlib
- Pandas
Usage
main_fiber.py - illustrates the available material models within fkit.
-
Hognestad et al (1951) - General purpose concrete
-
Mander et al (1988) - Recommended for confined concrete
-
Todeschini et al (1964) - Recommended for unconfined concrete
-
Bilinear - Simple bilinear model
-
Multilinear: Rex & Easterling (1996) - Six linear regions tracing out the recognizable steel stress-strain curve
-
RambergOsgood - Smooth power function. Can be used to fit experimental data
-
MenegottoPinto - Smooth power function. Slightly faster and more robust than RambergOsgood as no Newton-Raphson iteration is needed
-
Custom_Trilinear - A highly customizable trilinear model defined by three points
Each of the eight material models above can be assigned to either a Node fiber or a Patch fiber. Patch fibers have 4 vertices and occupies some area geometrically. On the other hand, node fibers are defined by a single point and the user must specify its area (usually used for rebar).
import fiberkit as fkit

# concrete patch fibers
Hognestad_unconfined  = fkit.patchfiber.Hognestad(fpc=4)
Todeschini_unconfined = fkit.patchfiber.Todeschini(fpc=4)
Hognestad_confined    = fkit.patchfiber.Hognestad(fpc=6.7, eo=0.006, emax=0.023)
Mander_confined       = fkit.patchfiber.Mander(fpc=6, eo=0.006, emax=0.023)

fkit.plotter.compare_fibers(fibers = [Hognestad_unconfined,Todeschini_unconfined],
                            labels = ["Hognestad_unconfined","Todeschini_unconfined"],
                            x_limit = [-0.005, 0.005])

fkit.plotter.compare_fibers(fibers = [Hognestad_confined,Mander_confined],
                            labels = ["Hognestad_confined","Mander_confined"],
                            x_limit = [-0.03, 0.03])

fkit.plotter.compare_fibers(fibers = [Hognestad_confined,Hognestad_unconfined],
                            labels = ["Hognestad_confined","Hognestad_unconfined"],
                            x_limit = [-0.03, 0.03])


# steel node fibers
ElasticPlastic  = fkit.nodefiber.Bilinear(fy=60, Es=29000, emax=0.16)
StrainHarden    = fkit.nodefiber.Bilinear(fy=60, fu=90, Es=29000, emax=0.16)
MultiLinear     = fkit.nodefiber.Multilinear(fy=60, fu=90, Es=29000)
RambergOsgood   = fkit.nodefiber.RambergOsgood(fy=60, n=25, Es=29000)
MenegottoPinto  = fkit.nodefiber.MenegottoPinto(fy=60, n=5, b=0.0043, Es=29000)
Trilinear       = fkit.nodefiber.Custom_Trilinear(stress1p=60, strain1p=0.002,
                                                  stress2p=90, strain2p=0.1,
                                                  stress3p=75, strain3p=0.16,
                                                  stress1n=-40, strain1n=-0.001,
                                                  stress2n=-5, strain2n=-0.002,
                                                  stress3n=-0, strain3n=-0.03)

fkit.plotter.compare_fibers(fibers = [ElasticPlastic, StrainHarden, MultiLinear],
                            labels = ["Elastic-Perfect-Plastic","Strain Hardening", "Multilinear"],
                            x_limit = [-0.05, 0.05])

fkit.plotter.compare_fibers(fibers = [ElasticPlastic, StrainHarden, MultiLinear],
                            labels = ["Elastic-Perfect-Plastic","Strain Hardening", "Multilinear"],
                            x_limit = [-0.17, 0.17])

fkit.plotter.compare_fibers(fibers = [RambergOsgood , MenegottoPinto , StrainHarden],
                            labels = ["RambergOsgood" , "MenegottoPinto" , "Bilinear"],
                            x_limit = [-0.05, 0.05])

fkit.plotter.compare_fibers(fibers = [RambergOsgood , MenegottoPinto , StrainHarden],
                            labels = ["RambergOsgood" , "MenegottoPinto" , "Bilinear"],
                            x_limit = [-0.17, 0.17])
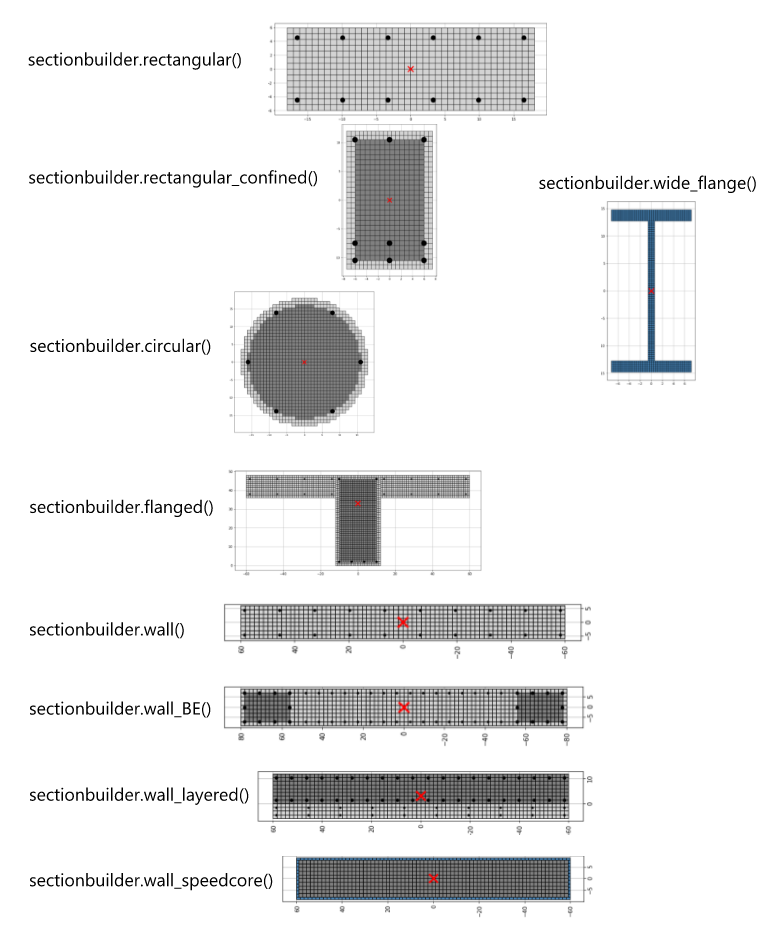
main_sectionbuilder.py - illustrates the sections that can be quickly created with sectionBuilder with a single function call. There are currently 9 parametric sections available. Refer to the documentation for more info.
import fiberkit as fkit


# define some fibers we will use later
fiber_unconfined       = fkit.patchfiber.Todeschini(fpc=5, eo=0.002, emax=0.006, default_color="lightgray")
fiber_confined         = fkit.patchfiber.Mander(fpc=6, eo=0.004, emax=0.014, default_color="gray")
fiber_structural_steel = fkit.patchfiber.Multilinear(fy=50, fu=80, Es=29000, default_color="steelblue")
fiber_rebar            = fkit.nodefiber.Bilinear(fy=60, fu=75, Es=29000, emax=0.16, default_color="black")

# rectangular
section1 = fkit.sectionbuilder.rectangular(
    width = 36,
    height = 12,
    cover = 1.5,
    top_bar = [0.3, 6, 1, 0],
    bot_bar = [0.3, 6, 1, 0],
    concrete_fiber = fiber_unconfined,
    steel_fiber = fiber_rebar)
fkit.plotter.preview_section(section1)

# rectangular_confined
section2 = fkit.sectionbuilder.rectangular_confined(
    width = 15,
    height = 24,
    cover = 1.5,
    top_bar = [0.6, 3, 1, 0],
    bot_bar = [0.6, 3, 2, 3],
    core_fiber = fiber_confined,
    cover_fiber = fiber_unconfined,
    steel_fiber = fiber_rebar)
fkit.plotter.preview_section(section2)

# circular
section3 = fkit.sectionbuilder.circular(
    diameter = 36,
    cover = 2,
    N_bar = 6,
    A_bar = 1.0,
    core_fiber = fiber_confined,
    cover_fiber = fiber_unconfined,
    steel_fiber = fiber_rebar)
fkit.plotter.preview_section(section3)

# flanged
section4 = fkit.sectionbuilder.flanged(
    bw = 24,
    bf = 120,
    h = 48,
    tf = 12,
    cover = 2,
    bot_bar = [0.6, 4, 1, 0],
    top_bar = [0.6, 2, 1, 0],
    slab_bar = [0.2, 12, 2, 9],
    core_fiber = fiber_confined,
    cover_fiber = fiber_unconfined,
    steel_fiber = fiber_rebar)
fkit.plotter.preview_section(section4)

# wall
section5 = fkit.sectionbuilder.wall(
    width=12,
    length=120,
    cover=1.5,
    wall_bar=[0.31, 12, 2],
    concrete_fiber = fiber_unconfined,
    steel_fiber = fiber_rebar)
fkit.plotter.preview_section(section5)

# wall_BE
section6 = fkit.sectionbuilder.wall_BE(
    width = 18,
    length = 160,
    cover = 2,
    BE_length = 24,
    wall_bar = [0.31, 6, 2],
    BE_bar = [1.0, 3, 4],
    concrete_fiber = fiber_unconfined,
    BE_fiber = fiber_confined,
    steel_fiber = fiber_rebar)
fkit.plotter.preview_section(section6)

# wall_layered
section7 = fkit.sectionbuilder.wall_layered(
    width1 = 6,
    width2 = 12,
    length = 120,
    cover = 1.5,
    wall_bar1 = [0.2, 12, 2],
    wall_bar2 = [0.6, 6, 2],
    concrete_fiber1 = fiber_unconfined,
    concrete_fiber2 = fiber_confined,
    steel_fiber1 = fiber_rebar,
    steel_fiber2 = fiber_rebar)
fkit.plotter.preview_section(section7)

# wall_speedcore
section8 = fkit.sectionbuilder.wall_speedcore(
    length=120,
    width=18,
    steel_thickness=1,
    concrete_fiber=fiber_confined,
    steel_fiber=fiber_structural_steel)
fkit.plotter.preview_section(section8)

# wide_flange
section9 = fkit.sectionbuilder.wide_flange(
    bf = 14,
    d = 14,
    tw = 1.0,
    tf = 1.5,
    steel_fiber = fiber_structural_steel)
fkit.plotter.preview_section(section9)

# W_AISC
section10 = fkit.sectionbuilder.W_AISC(
    shape = "W27X307",
    steel_fiber = fiber_structural_steel)
fkit.plotter.preview_section(section10)
main_full.py illustrates all of the major functionalities of fiberkit.
import fiberkit as fkit

#########################################
# Step 1: Define fiber material properties
#########################################
# define patch fiber material properties
fiber_unconfined = fkit.patchfiber.Hognestad(fpc=5)
fiber_confined   = fkit.patchfiber.Mander(fpc=6, eo=0.004, emax=0.014, default_color="gray")

# define node fiber material properties
fiber_steel      = fkit.nodefiber.Bilinear(fy=60, fu=90, Es=30000)

# preview fibers stress-strain curve
fkit.plotter.preview_fiber(fiber_unconfined, x_limit=[-0.008, 0.008])
fkit.plotter.preview_fiber(fiber_confined, x_limit=[-0.03, 0.03])
fkit.plotter.preview_fiber(fiber_steel, x_limit=[-0.03, 0.03])


#########################################
# Step 2: Define sections
#########################################
# Let's reproduce this section: https://opensees.berkeley.edu/wiki/index.php/Moment_Curvature_Example
# Most sections can be defined with SectionBuilder
section1 = fkit.sectionbuilder.rectangular_confined(width = 15,
                                                    height = 24,
                                                    cover = 1.5,
                                                    top_bar = [0.6, 3, 1, 0], #[bar_area, nx, ny, y_spacing]
                                                    bot_bar = [0.6, 3, 1, 0], #[bar_area, nx, ny, y_spacing]
                                                    core_fiber = fiber_confined,
                                                    cover_fiber = fiber_unconfined,
                                                    steel_fiber = fiber_steel,
                                                    mesh_nx=0.75,
                                                    mesh_ny=0.75)

# we can build on top of the section generated by SectionBuilder
section1.add_bar(coord = [6, 0], area = 0.6, fiber = fiber_steel)
section1.add_bar(coord = [-6, 0], area = 0.6, fiber = fiber_steel)

# Alternatively, the user can draw sections manually
section2 = fkit.Section()
section2.add_patch(xo=0, yo=0, b=18 ,h=18, nx=25, ny=25, fiber=fiber_unconfined)
section2.add_bar_group(xo=2, yo=2, b=14, h=14, nx=3, ny=3, area=0.6, perimeter_only=True, fiber=fiber_steel)

# preview section
fkit.plotter.preview_section(section1, show_tag=True)
fkit.plotter.preview_section(section2, show_tag=True)


#########################################
# Step 3: Moment curvature analysis
#########################################
# roughly estimate target curvature to which we will push the section
phi_target = 0.00125

# moment-curvature analysis
MK_results = section1.run_moment_curvature(phi_target = phi_target, P=-180)

# calculate cracked moment of inertia at each load step
Icr_results = section1.calculate_Icr(Es=29000, Ec=3605)

# extract all fiber data
df_nodefibers, df_patchfibers = section1.get_all_fiber_data()

# extract data of a specific fiber
fiber_data        = section1.get_patch_fiber_data(location=[0.0, 8.25])
fiber_data_top    = section1.get_patch_fiber_data(location="top")
fiber_data_bottom = section1.get_patch_fiber_data(location="bottom")
fiber_data_rebar3 = section1.get_node_fiber_data(tag=3)

# plot results
fkit.plotter.plot_MK(section1)
fkit.plotter.plot_Icr(section1)

# animate results
#fkit.plotter.animate_MK(section1)

# interactive visualization (new in v2.0.0)
fkit.plotter.plot_MK_3D(section1)

#########################################
# Step 4: PMM interaction analysis
#########################################
# generate PM interaction surface using ACI-318 provisions
PM_results = section1.run_PM_interaction(fpc=6, fy=60, Es=29000)

# plot PM interaction surface
fkit.plotter.plot_PM(section1, P=[50,400], M=[-500,3000])
Documentation
The user can access docstrings of any methods using the help() keyword in python:
help(fkit.patchfiber.Hognestad)
fkit.patchfiber.Hognestad?
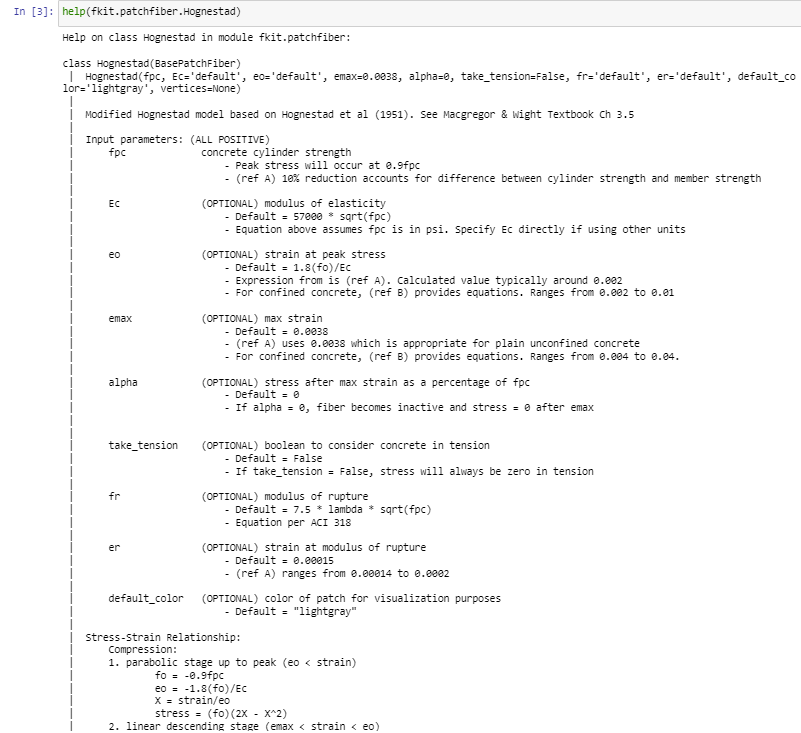
Here is a comprehensive list of all public methods available to the user.
Fiber Material Models: More Info
fiberkit.patchfiber.Hognestad(fpc, Ec="default", eo="default", emax=0.0038, alpha=0, take_tension=False, fr="default", er="default", default_color="lightgray")fiberkit.patchfiber.Todeschini(fpc, Ec="default", eo="default", emax=0.0038, alpha=0, take_tension=False, fr="default", er="default", default_color="lightgray")fiberkit.patchfiber.Mander(fpc, eo, emax, Ec="default", alpha=0, take_tension=False, fr="default", er="default", default_color="lightgray")fiberkit.patchfiber.Bilinear(fy, fu, Es, ey="default", emax=0.1, default_color="black")fiberkit.patchfiber.Multilinear(fy, fu, Es, ey1="default", ey2=0.008, stress1=0.83, stress2=0.98, stress3=1.00, stress4=0.84, strain1=0.03, strain2=0.07, strain3=0.10, strain4=0.16, default_color="black")fiberkit.patchfiber.RambergOsgood(fy, Es, n, emax=0.16, default_color="black")fiberkit.patchfiber.MenegottoPinto(fy, Es, b, n, emax=0.16, default_color="black")fiberkit.patchfiber.Custom_Trilinear(strain1p, strain2p, strain3p, stress1p, stress2p, stress3p, strain1n="default", strain2n="default", strain3n="default", stress1n="default", stress2n="default", stress3n="default", default_color="black")- ~
fiberkit.nodefiber.Bilinear(fy, fu, Es, ey="default", emax=0.1, default_color="black")fiberkit.nodefiber.Multilinear(fy, fu, Es, ey1="default", ey2=0.008, stress1=0.83, stress2=0.98, stress3=1.00, stress4=0.84, strain1=0.03, strain2=0.07, strain3=0.10, strain4=0.16, default_color="black")fiberkit.nodefiber.RambergOsgood(fy, Es, n, emax=0.16, default_color="black")fiberkit.nodefiber.MenegottoPinto(fy, Es, b, n, emax=0.16, default_color="black")fiberkit.nodefiber.Custom_Trilinear(strain1p, strain2p, strain3p, stress1p, stress2p, stress3p, strain1n="default", strain2n="default", strain3n="default", stress1n="default", stress2n="default", stress3n="default", default_color="black")
Section Definition: More Info
fiberkit.section.Section.add_patch(xo, yo, b, h, nx, ny, fiber)fiberkit.section.Section.add_bar_group(xo, yo, b, h, nx, ny, area, perimeter_only, fiber)fiberkit.section.Section.add_bar(coord, area, fiber)fiberkit.section.Section.mesh(rotate=0)
SectionBuilder: More Info
fiberkit.sectionbuilder.rectangular(width, height, cover, top_bar, bot_bar, concrete_fiber, steel_fiber, mesh_nx=0.5, mesh_ny=0.5)fiberkit.sectionbuilder.rectangular_confined(width, height, cover, top_bar, bot_bar, core_fiber, cover_fiber, steel_fiber, mesh_nx=0.5, mesh_ny=0.5)fiberkit.sectionbuilder.circular(diameter, cover, N_bar, A_bar, core_fiber, cover_fiber, steel_fiber, mesh_n=0.5)fiberkit.sectionbuilder.flanged(bw, bf, h, tf, cover, bot_bar, top_bar, slab_bar, core_fiber, cover_fiber, steel_fiber, mesh_nx=0.5, mesh_ny=0.5)fiberkit.sectionbuilder.wall(width, length, cover, wall_bar, concrete_fiber, steel_fiber, mesh_nx=0.5, mesh_ny=0.5)fiberkit.sectionbuilder.wall_BE(width, length, cover, BE_length, wall_bar, BE_bar, concrete_fiber, BE_fiber, steel_fiber, mesh_nx=0.5, mesh_ny=0.5)fiberkit.sectionbuilder.wall_layered(width1, width2, length, cover, wall_bar1, wall_bar2, concrete_fiber1, concrete_fiber2, steel_fiber1, steel_fiber2, mesh_nx=0.5, mesh_ny=0.5)fiberkit.sectionbuilder.wall_speedcore(length, width, steel_thickness, concrete_fiber, steel_fiber, mesh_nx=0.5, mesh_ny=0.5)fiberkit.sectionbuilder.wide_flange(bf, d, tw, tf, steel_fiber, mesh_nx=0.5, mesh_ny=0.5)fiberkit.sectionbuilder.W_AISC(shape, steel_fiber, mesh_nx=0.5, mesh_ny=0.5)
Analysis commands: More Info
fiberkit.section.Section.run_moment_curvature(phi_target, P=0, N_step=100, show_progress=False)fiberkit.section.Section.calculate_Icr(Es, Ec)fiberkit.section.Section.run_PM_interaction(fpc, fy, Es)fiberkit.section.Section.get_node_fiber_data(tag)fiberkit.section.Section.get_patch_fiber_data(location)fiberkit.section.Section.get_all_fiber_data()fiberkit.section.Section.export_data(save_folder="fkit_result_folder")
Visualizations: More Info
fiberkit.plotter.preview_fiber(fiber, xlim=[-0.01, 0.01])fiberkit.plotter.compare_fiber(fibers, labels, xlim=[-0.01, 0.01])fiberkit.plotter.preview_section(section, show_tag=False)fiberkit.plotter.plot_MK(section)fiberkit.plotter.plot_MK_3D(section)fiberkit.plotter.animate_MK(section)fiberkit.plotter.plot_Icr(section)fiberkit.plotter.plot_PM(section, P=None, M=None)
Notes and Assumptions
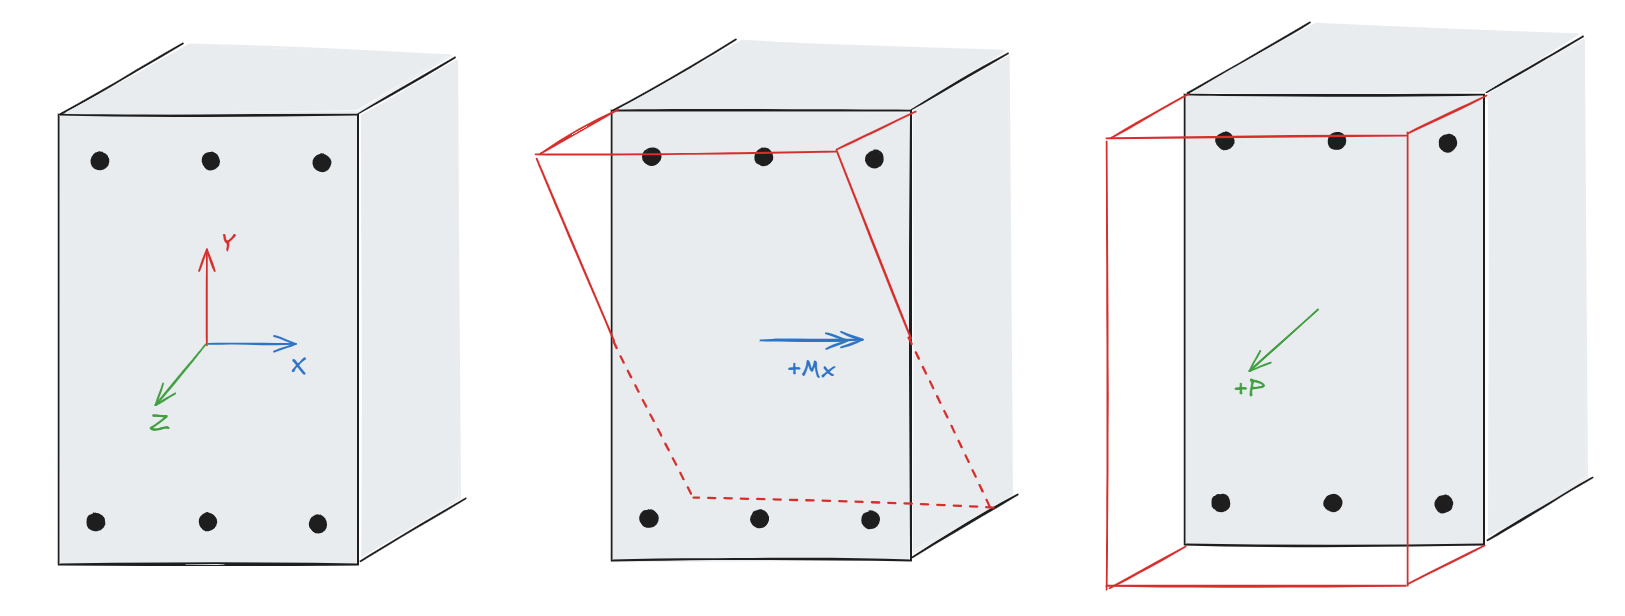
- Moment curvature analysis proceeds in the -ve Mx direction, where top fibers are increasingly compressed.
- Applied axial force and moment follows the right-hand convention:
- Positive (+) applied axial force P results in tension
- Positive (+) applied moment Mx results in tension on the top fibers, and compression on bottom fibers.
- Fiber stress and strain sign conventions:
- Positive (+) is tensile stress/strain
- Negative (-) is compressive stress/strain
- Please ensure consistent unit input:
- SI Unit: (N, mm, MPa)
- Imperial Unit: (kips, in, ksi)
- PM interaction analysis follows ACI 318-19 assumptions (e.g. rectangular stress block, elastic-perfect-plastic steel, spalling strain of 0.003, etc). Solution is independent of user-specified fiber materials as all concrete fibers are converted to exhibit rectangular stress block behavior, and all rebar fibers are converted to elastic-perfect-plastic behavior.
- Disclaimer: this is not enterprise-grade software. Please do NOT use it for work. Users assume full risk and responsibility for verifying that the results are accurate.
License
MIT License
Copyright (c) 2023 Robert Wang
Release history Release notifications | RSS feed


Download files
Download the file for your platform. If you're not sure which to choose, learn more about installing packages.
Source Distribution
Built Distribution
Filter files by name, interpreter, ABI, and platform.
If you're not sure about the file name format, learn more about wheel file names.
Copy a direct link to the current filters
File details
Details for the file fiberkit-2.0.0.tar.gz.
File metadata
- Download URL: fiberkit-2.0.0.tar.gz
- Upload date:
- Size: 11.8 MB
- Tags: Source
- Uploaded using Trusted Publishing? No
- Uploaded via: twine/6.1.0 CPython/3.12.9
File hashes
| Algorithm | Hash digest | |
|---|---|---|
| SHA256 |
6dd05d50c79dcd68aae3fb02dba9f7b8532b896cf5366b3a14edcf7630ce9019
|
|
| MD5 |
02e9e6b507bd328bce04a9037ca9c26f
|
|
| BLAKE2b-256 |
94d9445da4114b531e9e6c22ac8853a19731a34ad09b36628fd05e1a8b689587
|
File details
Details for the file fiberkit-2.0.0-py3-none-any.whl.
File metadata
- Download URL: fiberkit-2.0.0-py3-none-any.whl
- Upload date:
- Size: 59.1 kB
- Tags: Python 3
- Uploaded using Trusted Publishing? No
- Uploaded via: twine/6.1.0 CPython/3.12.9
File hashes
| Algorithm | Hash digest | |
|---|---|---|
| SHA256 |
d8cac31b3a1b38a7dec7f1a2ddf43cdaa71493d40cd3c41e23d96da744b18829
|
|
| MD5 |
37e455f5b20fc6902f751f47c43f2eef
|
|
| BLAKE2b-256 |
dc7cd4ce4ffded4ccf54f98f923ac1a902b1f7b937ea883ed902eb854d9f63e4
|


