
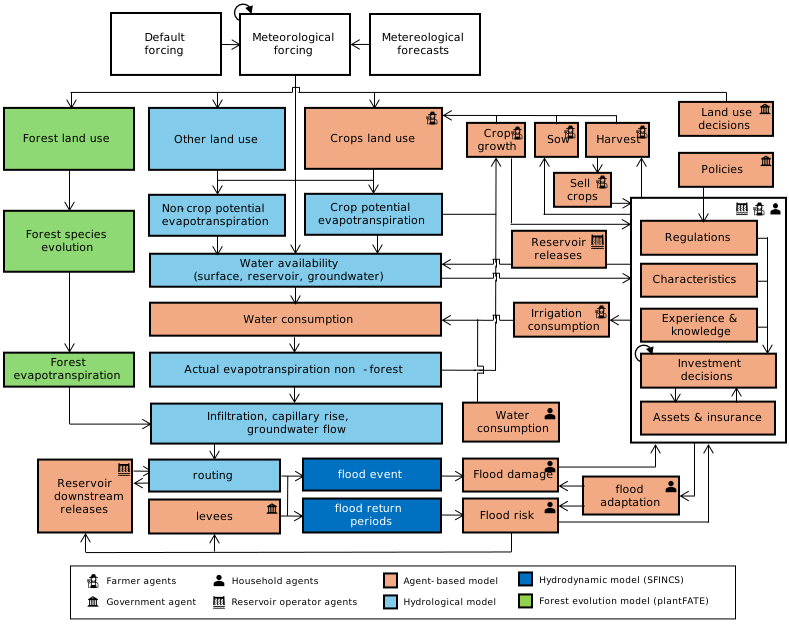
GEB (Geographical Environmental and Behavioural model) simulates the environment (e.g., hydrology, floods), the individual people, households and orginizations as well as their interactions at both small and large scale. The model does so through a "deep" coupling of an agent-based model a hydrological model, a vegetation model and a hydrodynamic model. You can find full documentation here.
The figure below shows a schematic overview of GEB.
Installation (not for development)
GEB can be installed with pip, including all dependencies on Windows, Linux and Mac OS X.
pip install geb
or with uv, which first needs to be installed by running:
on Linux and Mac OS X:
curl -LsSf https://astral.sh/uv/install.sh | sh
on Windows:
powershell -ExecutionPolicy ByPass -c "irm https://astral.sh/uv/install.ps1 | iex"
After, GEB can be installed with:
uv pip install geb --prerelease=allow
To run SFINCS (the hydrodynamic model), you also need to install Docker (on Windows) or Apptainer (on Linux and Mac OS X). To install Docker you need to obtain and install Docker from their website (https://www.docker.com/get-started) and make sure Docker or Apptainer is running.
Development installation and setup
To contribute to GEB, we recommend first cloning the repository from this repo using git clone. A couple of steps are necessary before you can clone. First, first install git. Make sure you are a member of the GEB-model and put the right user credentials in your git, by pasting the following in your git bash shell or VS code terminal:
git config --global user.name "USERNAME"
git config --global user.email "GITHUB EMAIL"
We need to connect to Github through SSH before we can clone the repo. For this, carefully follow all the steps to generate a SSH key and to add this SSH key to your GitHub account. Select the right operator system (Max, Windows or Linux). See “Notes when installing on a HPC cluster” for instructions on how to do this on a remote machine. After this, you are ready to clone the GEB repository!
Create a main GEB folder on your machine. Within this folder, create a folder where you would like to store the code and model, we call this the working directory. Note that this folder should NOT be placed into a cloud synchronized folder (e.g., OneDrive). In this working directory, create a folder called model, and place the model input files in this folder. The directory structure should look like this:
working directory
|   model
|   |   model.yml
|   |   build.yml│
|   |   input
|   |   (potential other files and folders)
Then, in the working directory, open a new terminal and run the following command to clone (download) all the code from the repository:
git clone git@github.com:GEB-model/GEB.git
Now the directory structure should look like this:
working directory
|   model
|   |   model.yml
|   |   build.yml
|   |   input
|   |   (potential other files and folders)
|   GEB
|   |   README.md
|   |   (all files and folders from the repository)
Then proceed with the following commands:
cd GEB  # switch the terminal to GEB code folder (../GEB/GEB)
git switch main  # switch to the main development branch by default, but may be changed to another branch
Now, install uv using the command as listed above, in “Installation (not for development)”. Then, execute:
uv sync --dev # install all dependencies using uv
You will now have a virtual environment (.venv) in the GEB folder with the right Python installation and all packages you need.
Now open a new Visual Studio Code window in the GEB code folder, “../GEB/GEB” (or use the "File -> Open Folder" dialog in Visual Studio Code).
code .
Visual Studio code should now prompts you to install the recommended extensions, which we recommend you do. After installing the Python extension VS Code should also automatically use the environment you created earlier. To test this, open a terminal in VS Code (Terminal -> New Terminal) and run:
geb --help
If this doesn’t work, press "Ctrl+Shift+P", search for “Select Interpreter”, and choose the .venv environment (probably “./.venv/bin/python”).
We have also prepared a configuration for the debugger in .vscode/launch.json.sample and a settings file in .vscode/settings.json.sample with some useful default settings. To activate these files, duplicate (i.e., not remove or rename) the files and rename to .vscode/launch.json and .vscode/settings.json respectively.
The debugger assumes that you have the data files for the model located in ../model (i.e., your model.yml is in ..model/). You may need to adjust the paths in .vscode/launch.json to match your setup. If the debugger doesn’t work, ensure that your VS Code is opened in the ../GEB/GEB folder (not in the parent folder ../GEB).
Happy gebbing! Explore the GEB documentation to setup a model. Let us know when you run into issues, and any contributions to GEB are more than welcome. You can find a list of active and past contributors at the bottom of this file.
Installation on a remote High Performance Computer (HPC)
When working with GEB on a High Performance Computing (HPC) cluster, you can follow the same steps as above, but instead on a local terminal you need to use a terminal connected to the HPC Cluster. You need to connect VS Code (or another code editor) to the cluster, for example with a tunnel or SSH connection (see these instructions for the VU ADA HPC. Moreover, you need to take some additional aspects into account.
- We recommend WinSCP as a file manager. Ensure to show hidden files (which include the .ssh folder) by going to
preferences,panels, and thenshow hidden files. - To ensure VS Code can find git software, put the following in your .bashrc file:
module load shared 2025 git/2.45.1-GCCcore-13.3.0
- To connect to Github with a SSH from the cluster, follow this same link as above, but choose “Linux” and execute the steps on a terminal connected to the cluster (for example, from an SSH connected VS code terminal). As a result, the .ssh folder and the ssh key will be made inside your cluster folder.
Cite as
Model framework
de Bruijn, J. A., Smilovic, M., Burek, P., Guillaumot, L., Wada, Y., and Aerts, J. C. J. H.: GEB v0.1: a large-scale agent-based socio-hydrological model – simulating 10 million individual farming households in a fully distributed hydrological model, Geosci. Model Dev., 16, 2437–2454, https://doi.org/10.5194/gmd-16-2437-2023, 2023.
Applications
Kalthof, M. W. M. L., de Bruijn, J., de Moel, H., Kreibich, H., and Aerts, J. C. J. H.: Adaptive behavior of farmers under consecutive droughts results in more vulnerable farmers: a large-scale agent-based modeling analysis in the Bhima basin, India, NHESS, https://doi.org/10.5194/nhess-25-1013-2025, 2025.
Building on the shoulders of giants
GEB builds on, couples and extends several models, depicted in the figure below.
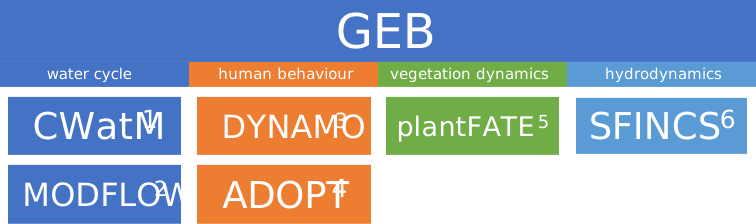
- Burek, Peter, et al. "Development of the Community Water Model (CWatM v1.04) A high-resolution hydrological model for global and regional assessment of integrated water resources management." (2019).
- Langevin, Christian D., et al. Documentation for the MODFLOW 6 groundwater flow model. No. 6-A55. US Geological Survey, 2017.
- Tierolf, Lars, et al. "A coupled agent-based model for France for simulating adaptation and migration decisions under future coastal flood risk." Scientific Reports 13.1 (2023): 4176.
- Streefkerk, Ileen N., et al. "A coupled agent-based model to analyse human-drought feedbacks for agropastoralists in dryland regions." Frontiers in Water 4 (2023): 1037971.
- Joshi, Jaideep, et al. "Plant-FATE-Predicting the adaptive responses of biodiverse plant communities using functional-trait evolution." EGU General Assembly Conference Abstracts. 2022.
- Leijnse, Tim, et al. "Modeling compound flooding in coastal systems using a computationally efficient reduced-physics solver: Including fluvial, pluvial, tidal, wind-and wave-driven processes." Coastal Engineering 163 (2021): 103796.
Developers (ordered by full-time equivalent working time on model)
Current or past contributors (in order of first to last contribution)
- Mikhail Smilovic
- Luca Guillaumot
- Romijn Servaas
- Thomas van Eldik
2 maintainers


Metadata
2 maintainers
Release files for geb 0.4
For a detailed explanation of source distributions (sdists) and built distributions (wheels), please see the package formats documentation.
Source distribution (sdist)
| File | Size | Uploaded | |
|---|---|---|---|
| geb-0.4.tar.gz | 397.6 kB | Details |
Built distribution (wheel)
| File | Interpreter | ABI | Platform | Reset |
|---|---|---|---|---|
| geb-0.4-py3-none-any.whl | Python 3 | none | any | Details |
Total release size: 836.5 kB
Release files / geb-0.4.tar.gz
| Download URL | geb-0.4.tar.gz |
|---|---|
| Size | 397.6 kB |
| Tags | Source |
|
SHA-256 checksum How to use checksums |
3ef88aa2717adf746ddd33d63575fcb333ec43a08a52bb5ceff24634b53bb623
|
|
BLAKE2b-256 checksum How to use checksums |
e75edc93b47619b50efb2f7bfa483cf52d0a62e33d58553798fc552f640f4da5
|
| Upload date | |
|
Uploaded using Trusted Publishing? What is trusted publishing? |
Yes |
| Uploaded via |
uv/0.12.5 {"installer":{"name":"uv","version":"0.12.5","subcommand":["publish"]},"python":null,"implementation":{"name":null,"version":null},"distro":{"name":"Ubuntu","version":"24.04","id":"noble","libc":null},"system":{"name":null,"release":null},"cpu":null,"openssl_version":null,"setuptools_version":null,"rustc_version":null,"ci":true}
|
Release files / geb-0.4-py3-none-any.whl
| Download URL | geb-0.4-py3-none-any.whl |
|---|---|
| Size | 438.9 kB |
| Tags | Python 3 |
|
SHA-256 checksum How to use checksums |
d6c179a3fe254194df3dc3a33ad827aa1b6f8098640149004efacc99e6542b59
|
|
BLAKE2b-256 checksum How to use checksums |
286cf01b25980eba063cbde019b6d59b0c57f048bc5a38b505c5b3d96575d6fb
|
| Upload date | |
|
Uploaded using Trusted Publishing? What is trusted publishing? |
Yes |
| Uploaded via |
uv/0.12.5 {"installer":{"name":"uv","version":"0.12.5","subcommand":["publish"]},"python":null,"implementation":{"name":null,"version":null},"distro":{"name":"Ubuntu","version":"24.04","id":"noble","libc":null},"system":{"name":null,"release":null},"cpu":null,"openssl_version":null,"setuptools_version":null,"rustc_version":null,"ci":true}
|














