Many Class Activation Map methods implemented in Pytorch. Including Grad-CAM, Grad-CAM++, Score-CAM, Ablation-CAM and XGrad-CAM


Project description
Class Activation Map methods implemented in Pytorch
Tested on Common CNN Networks and Vision Transformers!
| Method | What it does |
|---|---|
| GradCAM | Weight the 2D activations by the average gradient |
| GradCAM++ | Like GradCAM but uses second order gradients |
| XGradCAM | Like GradCAM but scale the gradients by the normalized activations |
| AblationCAM | Zero out activations and measure how the output drops (this repository includes a fast batched implementation) |
| ScoreCAM | Perbutate the image by the scaled activations and measure how the output drops |
| EigenCAM | Takes the first principle component of the 2D Activations (no class discrimination, but seems to give great results) |
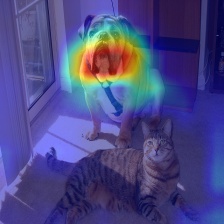
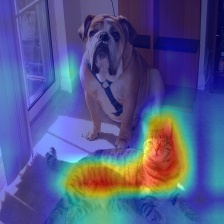
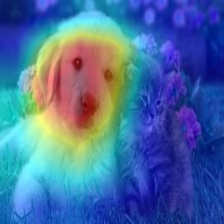
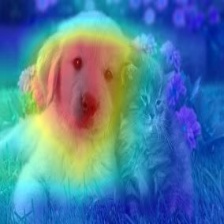
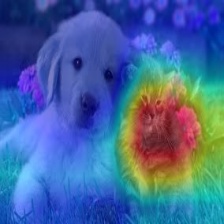
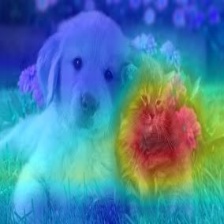
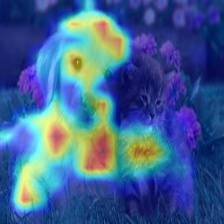
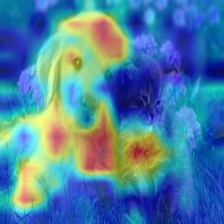
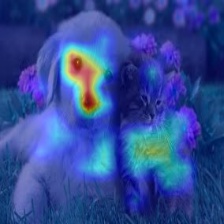
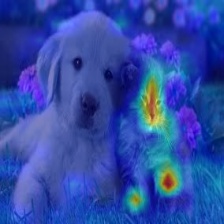
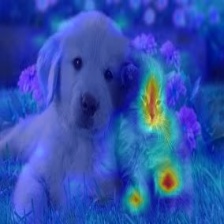
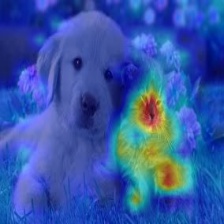
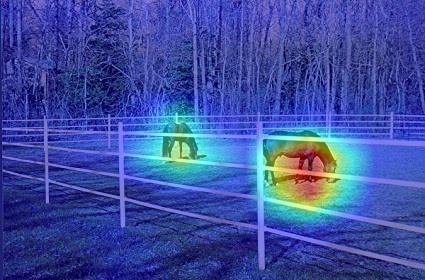
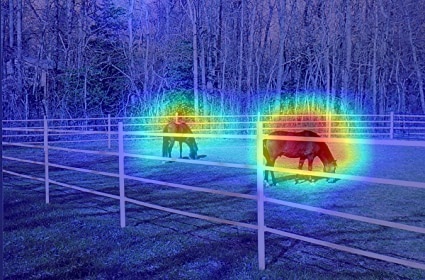
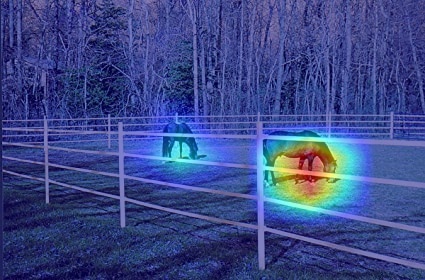
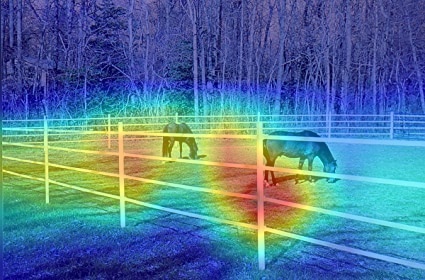
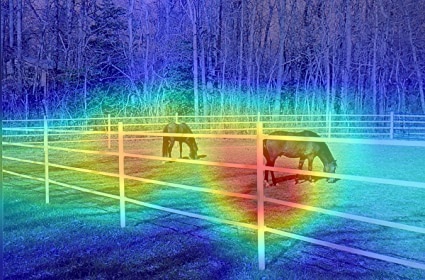
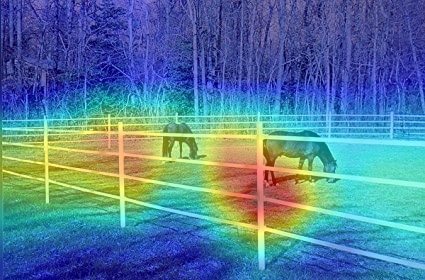
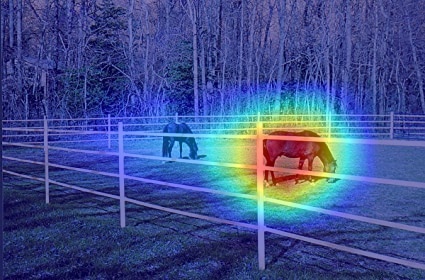
What makes the network think the image label is 'pug, pug-dog' and 'tabby, tabby cat':
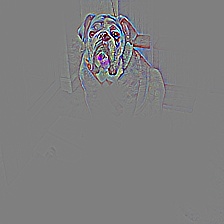
Combining Grad-CAM with Guided Backpropagation for the 'pug, pug-dog' class:
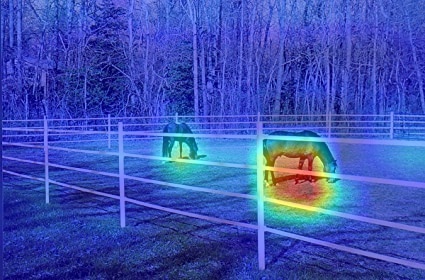
More Visual Examples
Resnet50:
| Category | Image | GradCAM | AblationCAM | ScoreCAM |
|---|---|---|---|---|
| Dog |  |
 |
 |
 |
| Cat | |
 |
 |
 |
Vision Transfomer (Deit Tiny):
| Category | Image | GradCAM | AblationCAM | ScoreCAM |
|---|---|---|---|---|
| Dog | |
 |
 |
 |
| Cat | |
 |
 |
 |
It seems that GradCAM++ is almost the same as GradCAM, in most networks except VGG where the advantage is larger.
| Network | Image | GradCAM | GradCAM++ | Score-CAM | Ablation-CAM | Eigen-CAM |
|---|---|---|---|---|---|---|
| VGG16 | 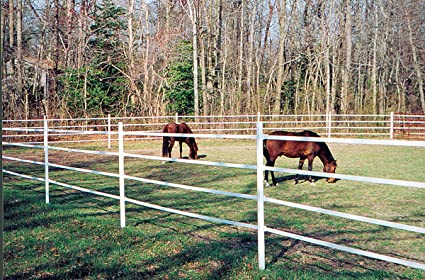 |
 |
 |
 |
 |
 |
| Resnet50 | |
 |
 |
 |
 |
 |
Chosing the Target Layer
You need to choose the target layer to compute CAM for. Some common choices are:
- Resnet18 and 50: model.layer4[-1]
- VGG and densenet161: model.features[-1]
- mnasnet1_0: model.layers[-1]
- ViT: model.blocks[-1].norm1
Using from code as a library
pip install grad-cam
from pytorch_grad_cam import GradCAM, ScoreCAM, GradCAMPlusPlus, AblationCAM, XGradCAM, EigenCAM
from pytorch_grad_cam.utils.image import show_cam_on_image
from torchvision.models import resnet50

model = resnet50(pretrained=True)
target_layer = model.layer4[-1]
input_tensor = # Create an input tensor image for your model..

# This should be constructed once:
cam = GradCAM(model=model, target_layer=target_layer, use_cuda=args.use_cuda)

# And then cam be used on many images:
grayscale_cam = cam(input_tensor=input_tensor, target_category=1)
visualization = show_cam_on_image(rgb_img, grayscale_cam)
Running the example script:
Usage: python cam.py --image-path <path_to_image> --method <method>
To use with CUDA:
python cam.py --image-path <path_to_image> --use-cuda
You can choose between:
GradCAM , ScoreCAM, GradCAMPlusPlus, AblationCAM, XGradCAM and EigenCAM.
Some methods like ScoreCAM and AblationCAM require a large number of forward passes, and have a batched implementation.
You can control the batch size with
cam.batch_size =
How does it work with Vision Transformers
See vit_example.py
In ViT the output of the layers are typically BATCH x 197 x 192. In the dimension with 197, the first element represents the class token, and the rest represent the 14x14 patches in the image. We can treat the last 196 elements as a 14x14 spatial image, with 192 channels.
To reshape the activations and gradients to 2D spatial images, we can pass the CAM constructor a reshape_transform function.
This can also be a starting point for other architectures that will come in the future.
GradCAM(model=model, target_layer=target_layer, reshape_transform=reshape_transform)

def reshape_transform(tensor, height=14, width=14):
    result = tensor[:, 1 :  , :].reshape(tensor.size(0),
        height, width, tensor.size(2))

    # Bring the channels to the first dimension,
    # like in CNNs.
    result = result.transpose(2, 3).transpose(1, 2)
    return result
Which target_layer should we chose for Vision Transformers?
Since the final classification is done on the class token computed in the last attention block, the output will not be affected by the 14x14 channels in the last layer. The gradient of the output with respect to them, will be 0!
We should chose any layer before the final attention block, for example:
target_layer = model.blocks[-1].norm1
Citation
If you use this for research, please cite. Here is an example BibTeX entry:
@misc{jacobgilpytorchcam,
  title={pytorch-cam},
  author={Jacob Gildenblat and contributors},
  year={2021},
  publisher={GitHub},
  howpublished={\url{https://github.com/jacobgil/pytorch-grad-cam}},
}
References
https://arxiv.org/abs/1610.02391
Grad-CAM: Visual Explanations from Deep Networks via Gradient-based Localization Ramprasaath R. Selvaraju, Michael Cogswell, Abhishek Das, Ramakrishna Vedantam, Devi Parikh, Dhruv Batra
https://arxiv.org/abs/1710.11063
Grad-CAM++: Improved Visual Explanations for Deep Convolutional Networks Aditya Chattopadhyay, Anirban Sarkar, Prantik Howlader, Vineeth N Balasubramanian
https://arxiv.org/abs/1910.01279
Score-CAM: Score-Weighted Visual Explanations for Convolutional Neural Networks Haofan Wang, Zifan Wang, Mengnan Du, Fan Yang, Zijian Zhang, Sirui Ding, Piotr Mardziel, Xia Hu
https://ieeexplore.ieee.org/abstract/document/9093360/
Saurabh Desai and Harish G Ramaswamy. Ablation-cam: Visual explanations for deep convolutional network via gradient-free localization. In WACV, pages 972–980, 2020
https://arxiv.org/abs/2008.02312
Axiom-based Grad-CAM: Towards Accurate Visualization and Explanation of CNNs Ruigang Fu, Qingyong Hu, Xiaohu Dong, Yulan Guo, Yinghui Gao, Biao Li
https://arxiv.org/abs/2008.00299
Eigen-CAM: Class Activation Map using Principal Components Mohammed Bany Muhammad, Mohammed Yeasin
Release history Release notifications | RSS feed


Download files
Download the file for your platform. If you're not sure which to choose, learn more about installing packages.
Source Distribution
File details
Details for the file grad-cam-1.2.4.tar.gz.
File metadata
- Download URL: grad-cam-1.2.4.tar.gz
- Upload date:
- Size: 1.6 MB
- Tags: Source
- Uploaded using Trusted Publishing? No
- Uploaded via: twine/3.4.1 importlib_metadata/3.10.0 pkginfo/1.7.0 requests/2.21.0 requests-toolbelt/0.9.1 tqdm/4.32.2 CPython/3.7.3
File hashes
| Algorithm | Hash digest | |
|---|---|---|
| SHA256 |
be44e4a3412bfb18ee3b8a89acb6fef88f02fb720ce43a10a706a01789acf20c
|
|
| MD5 |
a1207dece9a2f976bf51133106b14ab9
|
|
| BLAKE2b-256 |
e2a11f0099b2eb6538e5f91fcc57472be66388231b91aa399d51ca255b0a4114
|


