AI code completions and chat for JupyterLite
Verified details
These details have been verified by PyPIProject links
Owner
GitHub Statistics
Maintainers

Project description
jupyterlite-ai


AI code completions and chat for JupyterLab, Notebook 7 and JupyterLite ✨
a screencast showing the Jupyterlite AI extension in JupyterLite
Requirements
- JupyterLab >= 4.4.0 or Notebook >= 7.4.0
✨ Try it in your browser ✨
You can try the extension in your browser using JupyterLite:
See the Usage section below for more information on how to provide your API key.
Install
To install the extension, execute:
pip install jupyterlite-ai
To install requirements (JupyterLab, JupyterLite and Notebook):
pip install jupyterlite-ai[jupyter]
Usage
[!NOTE] This documentation applies to the upcoming 0.9.0 release. For the latest stable version, please refer to the 0.8.x branch.
AI providers typically require using an API key to access their models.
The process is different for each provider, so you may refer to their documentation to learn how to generate new API keys.
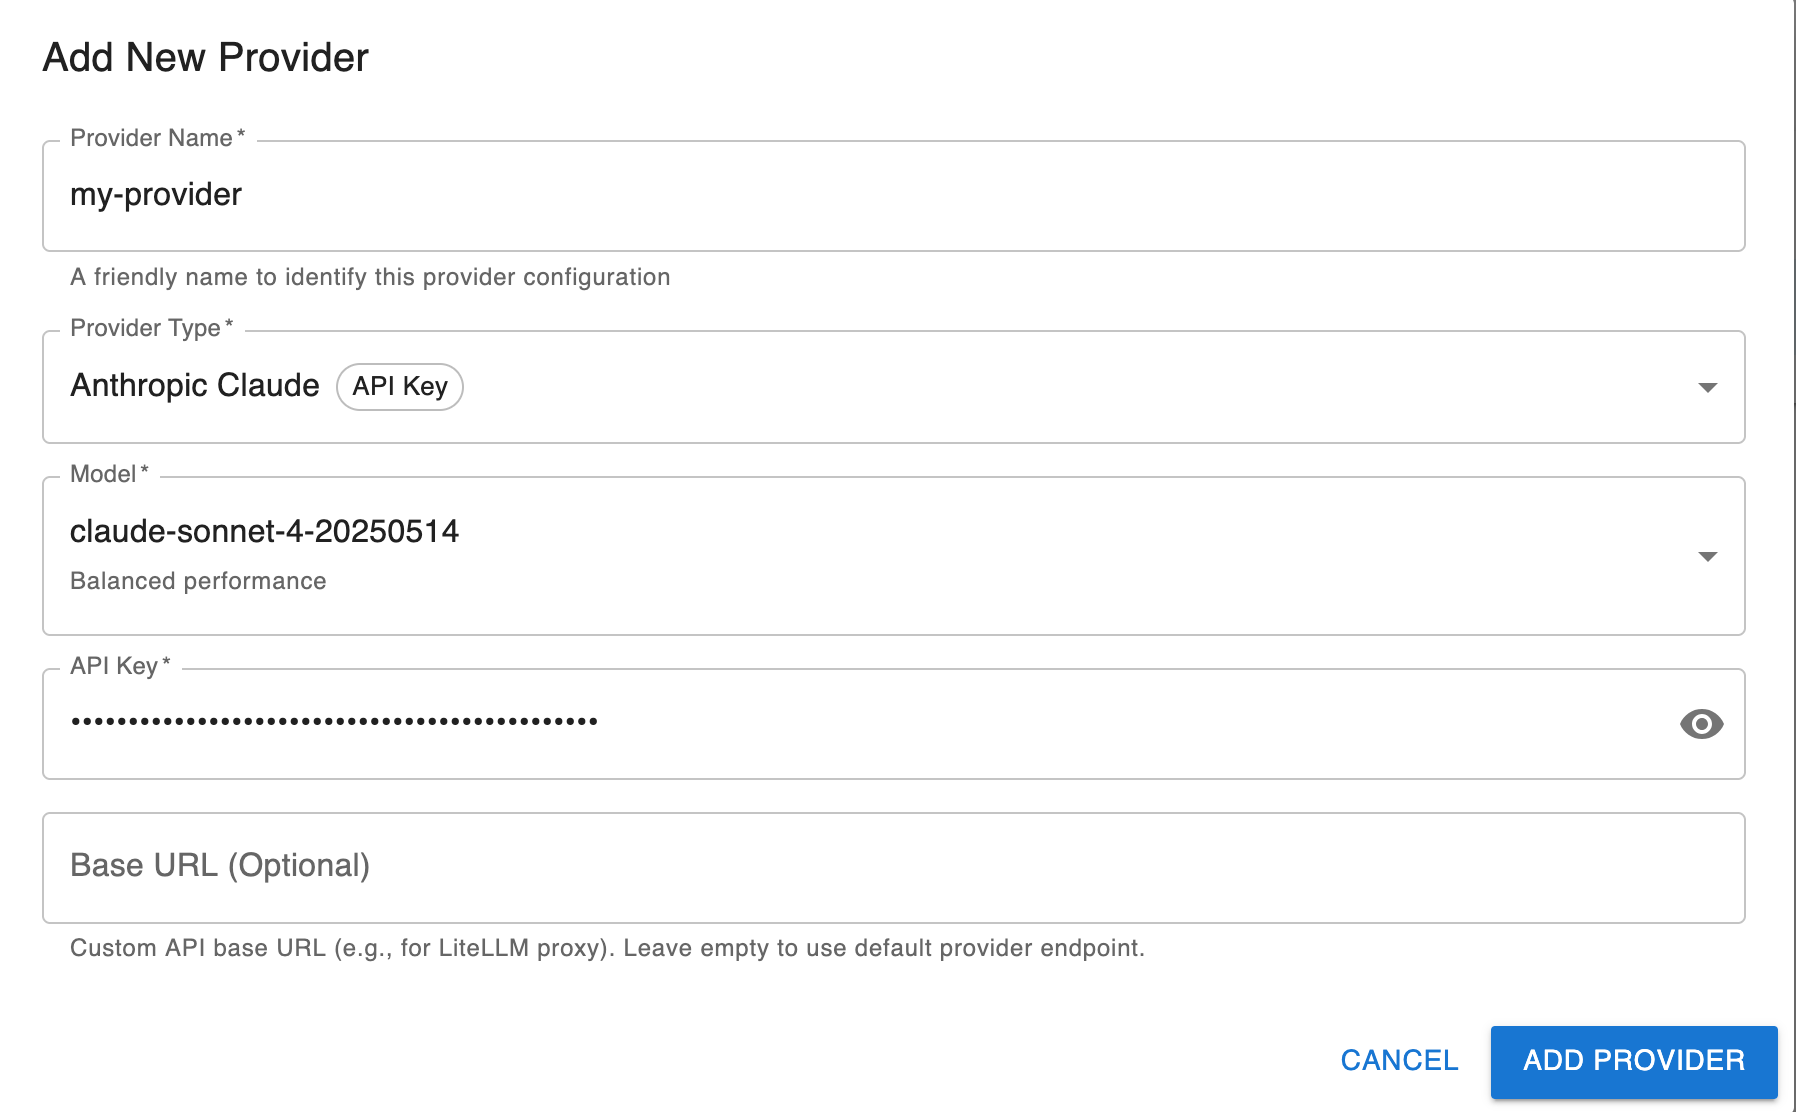
Using a provider with an API key (e.g. Anthropic, MistralAI, OpenAI)
- Open the AI settings and
- Click on "Add a new provider"
- Enter the details for the provider
- In the chat, select the new provider
Using Ollama
Ollama allows you to run open-weight LLMs locally on your machine.
Setting up Ollama
- Install Ollama following the instructions at https://ollama.com/download
- Pull a model, for example:
ollama pull llama3.2
- Start the Ollama server (it typically runs on
http://localhost:11434)
Configuring jupyterlite-ai to use Ollama
- In JupyterLab, open the AI settings panel and go to the Providers section
- Click on "Add a new provider"
- Select the Ollama provider
- Configure the following settings:
- Model: The model name you pulled (e.g.,
llama3.2)
- Model: The model name you pulled (e.g.,
Using a generic OpenAI-compatible provider
The Generic provider allows you to connect to any OpenAI-compatible API endpoint.
- In JupyterLab, open the AI settings panel and go to the Providers section
- Click on "Add a new provider"
- Select the Generic provider
- Configure the following settings:
- Base URL: The base URL of your API endpoint
- Model: The model name to use
- API Key: Your API key (if required by the provider)
Using LiteLLM Proxy
LiteLLM Proxy is an OpenAI-compatible proxy server that allows you to call 100+ LLMs through a unified interface.
Using LiteLLM Proxy with jupyterlite-ai provides flexibility to switch between different AI providers (OpenAI, Anthropic, Google, Azure, local models, etc.) without changing your JupyterLite configuration. It's particularly useful for enterprise deployments where the proxy can be hosted within private infrastructure to manage external API calls and keep API keys server-side.
Setting up LiteLLM Proxy
- Install LiteLLM:
Follow the instructions at https://docs.litellm.ai/docs/simple_proxy.
- Create a
litellm_config.yamlfile with your model configuration:
model_list:
  - model_name: gpt-5
    litellm_params:
      model: gpt-5
      api_key: os.environ/OPENAI_API_KEY

  - model_name: claude-sonnet
    litellm_params:
      model: claude-sonnet-4-5-20250929
      api_key: os.environ/ANTHROPIC_API_KEY
- Start the proxy server, for example:
litellm --config litellm_config.yaml
The proxy will start on http://0.0.0.0:4000 by default.
Configuring jupyterlite-ai to use LiteLLM Proxy
Configure the Generic provider (OpenAI-compatible) with the following settings:
- Base URL:
http://0.0.0.0:4000(or your proxy server URL) - Model: The model name from your
litellm_config.yaml(e.g.,gpt-5,claude-sonnet) - API Key (optional): If the LiteLLM Proxy server requires an API key, provide it here.
[!IMPORTANT] The API key must be configured on the LiteLLM Proxy server (in the
litellm_config.yamlfile). Providing an API key via the AI provider settings UI will not have any effect, as the proxy server handles authentication with the upstream AI providers.
[!NOTE] For more information about LiteLLM Proxy configuration, see the LiteLLM documentation.
Custom Providers
jupyterlite-ai supports custom AI providers through its provider registry system. Third-party providers can be registered programmatically in a JupyterLab extension.
Providers are based on the Vercel AI SDK, which provides a unified interface for working with different AI models.
Registering a Custom Provider
Example: Registering a custom OpenAI-compatible provider
import {
  JupyterFrontEnd,
  JupyterFrontEndPlugin
} from '@jupyterlab/application';
import { IProviderRegistry } from '@jupyterlite/ai';
import { createOpenAI } from '@ai-sdk/openai';

const plugin: JupyterFrontEndPlugin<void> = {
  id: 'my-extension:custom-provider',
  autoStart: true,
  requires: [IProviderRegistry],
  activate: (app: JupyterFrontEnd, registry: IProviderRegistry) => {
    const providerInfo = {
      id: 'my-custom-provider',
      name: 'My Custom Provider',
      apiKeyRequirement: 'required' as const,
      defaultModels: ['my-model'],
      supportsBaseURL: true,
      factory: (options: {
        apiKey: string;
        baseURL?: string;
        model?: string;
      }) => {
        const provider = createOpenAI({
          apiKey: options.apiKey,
          baseURL: options.baseURL || 'https://api.example.com/v1'
        });
        return provider(options.model || 'my-model');
      }
    };

    registry.registerProvider(providerInfo);
  }
};
The provider configuration object requires the following properties:
id: Unique identifier for the providername: Display name shown in the settings UIapiKeyRequirement: Whether an API key is'required','optional', or'none'defaultModels: Array of model names to show in the settingssupportsBaseURL: Whether the provider supports a custom base URLfactory: Function that creates and returns a language model (the registry automatically wraps it for chat usage)
Example: Using a custom fetch function
You can provide a custom fetch function to the provider, which is useful for adding custom headers, handling authentication, or routing requests through a proxy:
factory: (options: { apiKey: string; baseURL?: string; model?: string }) => {
  const provider = createOpenAI({
    apiKey: options.apiKey,
    baseURL: options.baseURL || 'https://api.example.com/v1',
    fetch: async (url, init) => {
      // Custom fetch implementation
      const modifiedInit = {
        ...init,
        headers: {
          ...init?.headers,
          'X-Custom-Header': 'custom-value'
        }
      };
      return fetch(url, modifiedInit);
    }
  });
  return provider(options.model || 'my-model');
};
API key management
To avoid storing the API keys in the settings, jupyterlite-ai uses jupyter-secrets-manager by default.
The secrets manager get the API keys from a connector in a secure way.
The default connector of the secrets manager is in memory, which means that the API keys are reset when reloading the page.
To prevent the keys from being reset on reload, there are two options:
- use a connector that fetches the keys on a remote server (using secure rest API, or web socket)
This is the recommended method, as it ensures the security of the keys and makes them accessible only to logged-in users.
But it requires some frontend and backend deployments:
- a server that can store and send the keys on demand
- a way to get authenticated to the server
- a frontend extension providing the connector, able to connect to the server side
- disable the use of the secrets manager from the AI settings panel
[!WARNING] The API keys will be stored in plain text using the settings system of Jupyterlab
Uninstall
To remove the extension, execute:
pip uninstall jupyterlite-ai
Contributing
Development install
Note: You will need NodeJS to build the extension package.
The jlpm command is JupyterLab's pinned version of
yarn that is installed with JupyterLab. You may use
yarn or npm in lieu of jlpm below.
# Clone the repo to your local environment
# Change directory to the jupyterlite_ai directory
# Install package in development mode
pip install -e "."
# Link your development version of the extension with JupyterLab
jupyter labextension develop . --overwrite
# Rebuild extension Typescript source after making changes
jlpm build
You can watch the source directory and run JupyterLab at the same time in different terminals to watch for changes in the extension's source and automatically rebuild the extension.
# Watch the source directory in one terminal, automatically rebuilding when needed
jlpm watch
# Run JupyterLab in another terminal
jupyter lab
With the watch command running, every saved change will immediately be built locally and available in your running JupyterLab. Refresh JupyterLab to load the change in your browser (you may need to wait several seconds for the extension to be rebuilt).
By default, the jlpm build command generates the source maps for this extension to make it easier to debug using the browser dev tools. To also generate source maps for the JupyterLab core extensions, you can run the following command:
jupyter lab build --minimize=False
Running UI tests
The UI tests use Playwright and can be configured with environment variables:
PWVIDEO: Controls video recording during tests (default:retain-on-failure)on: Record video for all testsoff: Do not record videoretain-on-failure: Only keep videos for failed tests
PWSLOWMO: Adds a delay (in milliseconds) between Playwright actions for debugging (default:0)
Example usage:
# Record all test videos
PWVIDEO=on jlpm playwright test

# Slow down test execution by 500ms per action
PWSLOWMO=500 jlpm playwright test

# Combine both options
PWVIDEO=on PWSLOWMO=1000 jlpm playwright test
Development uninstall
pip uninstall jupyterlite-ai
In development mode, you will also need to remove the symlink created by jupyter labextension develop
command. To find its location, you can run jupyter labextension list to figure out where the labextensions
folder is located. Then you can remove the symlink named @jupyterlite/ai within that folder.
Packaging the extension
See RELEASE
Project details
Verified details
These details have been verified by PyPIProject links
Owner
GitHub Statistics
Maintainers
Release history Release notifications | RSS feed


Download files
Download the file for your platform. If you're not sure which to choose, learn more about installing packages.
Source Distribution
Built Distribution
Filter files by name, interpreter, ABI, and platform.
If you're not sure about the file name format, learn more about wheel file names.
Copy a direct link to the current filters
File details
Details for the file jupyterlite_ai-0.9.0a3.tar.gz.
File metadata
- Download URL: jupyterlite_ai-0.9.0a3.tar.gz
- Upload date:
- Size: 1.1 MB
- Tags: Source
- Uploaded using Trusted Publishing? Yes
- Uploaded via: twine/6.2.0 CPython/3.12.11
File hashes
| Algorithm | Hash digest | |
|---|---|---|
| SHA256 |
9def1d7635efa8745bc5b16af77630c195240c5bc4bf15f9af782b791b1436a3
|
|
| MD5 |
0a32826d51c9686c86291e72d2aa67c8
|
|
| BLAKE2b-256 |
3edd40cde55cbbe8f6003f3b0d79f0d0a2ed9389f90276a1f55244d013e65696
|
File details
Details for the file jupyterlite_ai-0.9.0a3-py3-none-any.whl.
File metadata
- Download URL: jupyterlite_ai-0.9.0a3-py3-none-any.whl
- Upload date:
- Size: 547.9 kB
- Tags: Python 3
- Uploaded using Trusted Publishing? Yes
- Uploaded via: twine/6.2.0 CPython/3.12.11
File hashes
| Algorithm | Hash digest | |
|---|---|---|
| SHA256 |
2a8c5653c535dcf9fb23b9a1fbd68a19cabde6a441f0d44cb57fd54e739ad081
|
|
| MD5 |
31dd462af3b95a934add0166e15debed
|
|
| BLAKE2b-256 |
45775896c714f4a180c1fd649363e04f61cccdd4fcd4a6cec9f25e1f0c068394
|


