
Python library for landscape analysis with DEMs

Project description
landspy
Landscape analysis with Python
1. Purpose
The landspy library provides some useful Python classes and functions for topographic analysis, drainage network extraction and computation of important geomorphic indices from Digital Elevation Models (DEMs). The main goal of landspy is to provide a simple way to compute geomorphic indices for those researchers who are not familiar with complex computational techniques. This library aims to pave the way for tectonic geomorphologists who do not have deep programming skills, but who can play a very relevant role in the interpretation of these analyses in terms of their relationship with geology, tectonics and associated hazards.
This library is constantly growing, and we will include more analysis and functions in future versions.
2. Installation
The library can be installed via pip via pip or conda (we recommend to install via conda-forge) on Linux, Mac, and Windows.
pip installation
Install the package by typing the following command in a command terminal:
pip install landspy
When installed via pip, it is recommended to have GDAL previously installed in our environment. It will be necessary to have libgdal and its development headers installed if pip is expected to do a source build because no wheel is available for your specified platform and Python version.
To install the latest development version via pip, see our github project page.
conda installation (recommended)
We can install landspy via conda-forge. Once you have Anaconda or Miniconda installed, you should be able to install GDAL with:
conda install -c conda-forge landspy
QGIS installation
When installing landspy to use inside QGIS, we will use the pip installation. As most of the requirements will be already available in the Python QGIS environment, follow these steps:
-
Open OSGeo4W shell (packed with QGIS in the start menu)
-
If running a QGIS version lower than 3.18 (not needed for later versions). Type:
py3_env -
Install via pip by typing:
pip install landspy
3. Requirements
All dependencies should be installed along with landspy (See GDAL note for pip instalation).
4. Citation
We are preparing a
Pérez-Peña et al.: Lansdpy, a open-source library for landscape analysis in Python and QGIS. [In preparation]
5. Tutorials and Examples
To get an overview of how landspy works, we offer some tutorials to perform some of the most common tasks that can be done with it.
- Extraction of a drainage network
- Calulation of Chi-maps and ksn values
- Plot single channel profiles
- Create channels from a polyline shapefile
- Create channels from a drainage basin
- Create hypsometric curves
The associated python scripts are provided in the docs folder.
6. Examples
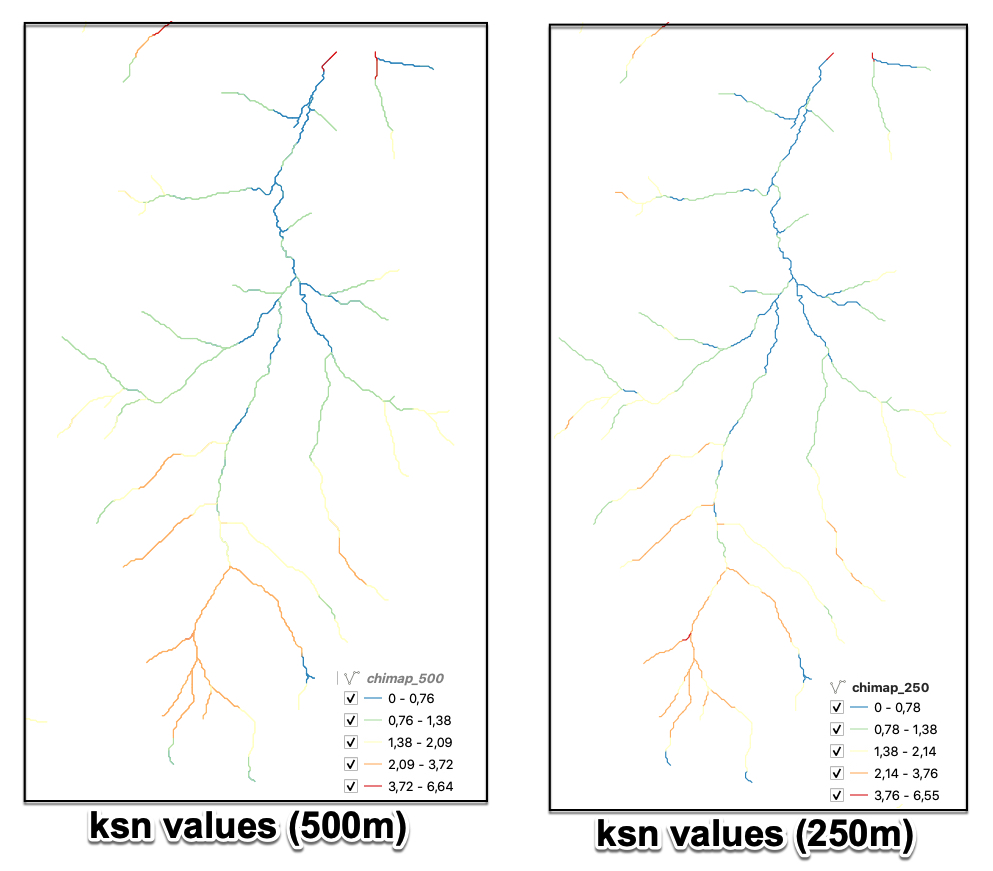
Creation of a Chi Map from a Digital Elevation Model
This is an example of how to generate a Chi Map in vector format from a DEM.
from landspy import DEM, Flow, Network
# Load the DEM and create the Flow and the Network
dem = DEM("data/jebja30.tif")
fd = Flow(dem)

# Create a Network object with a threshold of 1500 cells and reference m/n of 0.45
net = Network(fd, 1500, thetaref=0.45)

# Create a Chi Map in vector format for segments of 250 and 500 m
net.chiShapefile("data/chiMap_250.shp", 250)
net.chiShapefile("data/chiMap_500.shp", 500)
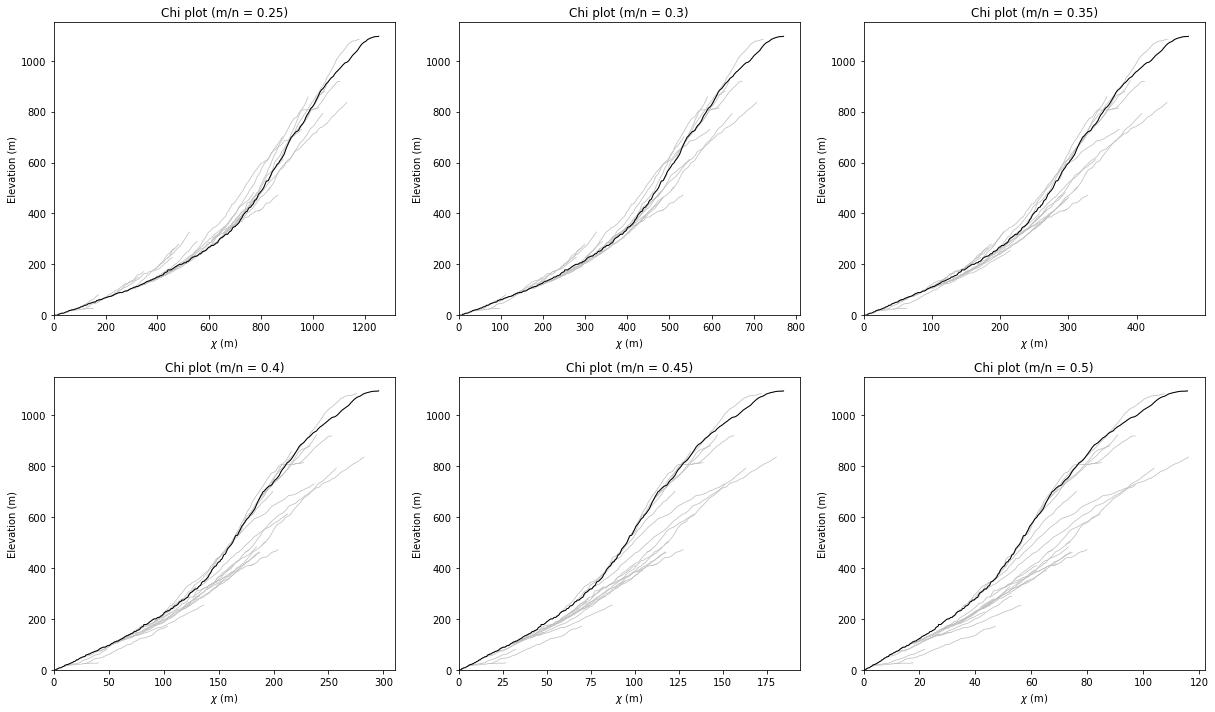
Analysis of different values of m/n for a basin
This is an example we analyze the best m/n value for Chi anlysis in a sample small basin
from landspy import Grid, DEM, Flow, Network, BNetwork
import matplotlib.pyplot as plt

# Load the DEM and create the Flow and the Network
dem = DEM("data/jebja30.tif")
fd = Flow(dem)

# Create a Network object with a threshold of 1500 cells and reference m/n of 0.45
net = Network(fd, 1500, thetaref=0.45)

# Load the Basins
basins = Grid("data/basins")

# Generate the BNetwork object for the basin with id=2
bnet = BNetwork(net, basins, bid =2 )

# Check different m/n values for chi analysis
mn_vals = [0.25, 0.3, 0.35, 0.4, 0.45, 0.5]

fig = plt.figure(figsize=(17, 10))

for n, mn in enumerate(mn_vals):
    bnet.calculateChi(mn)
    ax = fig.add_subplot(2, 3, n+1)
    bnet.chiPlot(ax)
    ax.set_title("Chi plot (m/n = {})".format(mn))
    ax.set_xlabel("$\\chi$ (m)")
    ax.set_ylabel("Elevation (m)")

plt.tight_layout()
7. Contact
You can contact me via geolovic@gmail.com vperez@ugr.es.
8. License
MIT License © 2022


Download files
Download the file for your platform. If you're not sure which to choose, learn more about installing packages.
Source Distribution
File details
Details for the file landspy-1.2.0.tar.gz.
File metadata
- Download URL: landspy-1.2.0.tar.gz
- Upload date:
- Size: 41.9 kB
- Tags: Source
- Uploaded using Trusted Publishing? No
- Uploaded via: twine/0.0.0 pkginfo/1.8.3 readme-renderer/37.2 requests/2.27.1 requests-toolbelt/0.9.1 urllib3/1.26.8 tqdm/4.62.3 importlib-metadata/3.10.1 keyring/23.4.0 rfc3986/2.0.0 colorama/0.4.4 CPython/3.7.6
File hashes
| Algorithm | Hash digest | |
|---|---|---|
| SHA256 |
bb24c1c3a2f7d941d5579c1cffea65e5b9beb9760db13d7d305e702605fe4015
|
|
| MD5 |
d1121cddd244e1dae40e701e84cba7d3
|
|
| BLAKE2b-256 |
8d2d1fb8f3fb2eeb79cb2dacc80907f249d710329338bfc9bc0f208c00c087ec
|






