
landspy
Landscape analysis with Python
1. Purpose
The landspy library provides some useful Python classes and functions for topographic analysis, drainage network extraction and computation of important geomorphic indices from Digital Elevation Models (DEMs). The main goal of landspy is to provide a simple way to compute geomorphic indices for those researchers who are not familiar with complex computational techniques. This library aims to pave the way for tectonic geomorphologists who do not have deep programming skills, but who can play a very relevant role in the interpretation of these analyses in terms of their relationship with geology, tectonics and associated hazards.
This library is constantly growing, and we will include more analysis and functions in future versions.
2. Installation
The library can be installed via pip on Linux, Mac, and Windows. Version 1.4.0 requires Python 3.10 or newer.
pip installation
Install the package by typing the following command in a command terminal:
pip install landspy
When installed via pip, it is recommended to have GDAL previously installed in our environment. It will be necessary to have libgdal and its development headers installed if pip is expected to do a source build because no wheel is available for your specified platform and Python version.
To install the latest development version via pip, see our github project page.
conda installation (recommended)
The conda-forge recipe is being prepared. Until it is accepted and published, install the native dependencies from conda-forge and landspy from PyPI:
conda create -n landspy -c conda-forge python=3.12 gdal numpy scipy matplotlib scikit-image shapely numba pip
conda activate landspy
python -m pip install landspy
After the recipe has been accepted and built, installation will be:
conda install -c conda-forge landspy
QGIS installation
When installing landspy to use inside QGIS, we will use the pip installation. As most of the requirements will be already available in the Python QGIS environment, follow these steps:
-
Open OSGeo4W shell (packed with QGIS in the start menu)
-
If running a QGIS version lower than 3.18 (not needed for later versions). Type:
py3_env -
Install via pip by typing:
pip install landspy
3. Requirements
All dependencies should be installed along with landspy (See GDAL note for pip instalation).
- GDAL
- NumPy >= 1.14.5
- SciPy >= 1.1.0
- scikit-image
- matplotlib >= 3.0.0
- Numba >= 0.53 (compiled Priority-Flood filling)
- Shapely >= 2
4. Citation
We are preparing a
Pérez-Peña et al.: Lansdpy, a open-source library for landscape analysis in Python and QGIS. [In preparation]
5. Tutorials and Examples
Filling a DEM with less memory
When the original elevations are no longer needed, replace the DEM's array with the filled result:
from landspy import DEM

dem = DEM("data/elevation.tif")
dem.fill(inplace=True)
dem.save("data/elevation_filled.tif")
dem.fill() still returns a separate DEM and preserves the original.
dem.fill(as_array=True, inplace=True) returns the array now held by dem.
The input data type and georeferencing are preserved. References
previously obtained through dem.readArray() still point to the old array;
release those references if the original data is no longer needed.
Filling uses eight-neighbour Priority-Flood, compiled with Numba, and a FIFO queue for cells within depressions. The first call for a data type may take longer while Numba compiles the loop; subsequent calls reuse compiled code. Auxiliary visitation and FIFO arrays require approximately five bytes per cell for rasters with fewer than 2**31 cells, plus a terrain-dependent heap. There is also a filled output array. All cells are processed as elevations, without a NoData mask or restoration step. Negative sentinel values inside depressions can therefore be raised by filling.
inplace=True releases the DEM's reference to the original array after filling;
it does not eliminate working memory or make filling an out-of-core operation.
Input elevations must not contain NaN values.
Flow(dem) fills the DEM once and reuses the filled elevations. To use a DEM
that has already been filled, call Flow(dem, filled=True); neither elevation
mode fills it again. raw_z=True keeps the input elevations for profiles and
gradients while drainage is calculated using the filled surface.
To get an overview of how landspy works, we offer some tutorials to perform some of the most common tasks that can be done with it.
- Extraction of a drainage network
- Calulation of Chi-maps and ksn values
- Plot single channel profiles
- Create channels from a polyline shapefile
- Create channels from a drainage basin
- Create hypsometric curves
The associated python scripts are provided in the docs folder.
6. Examples
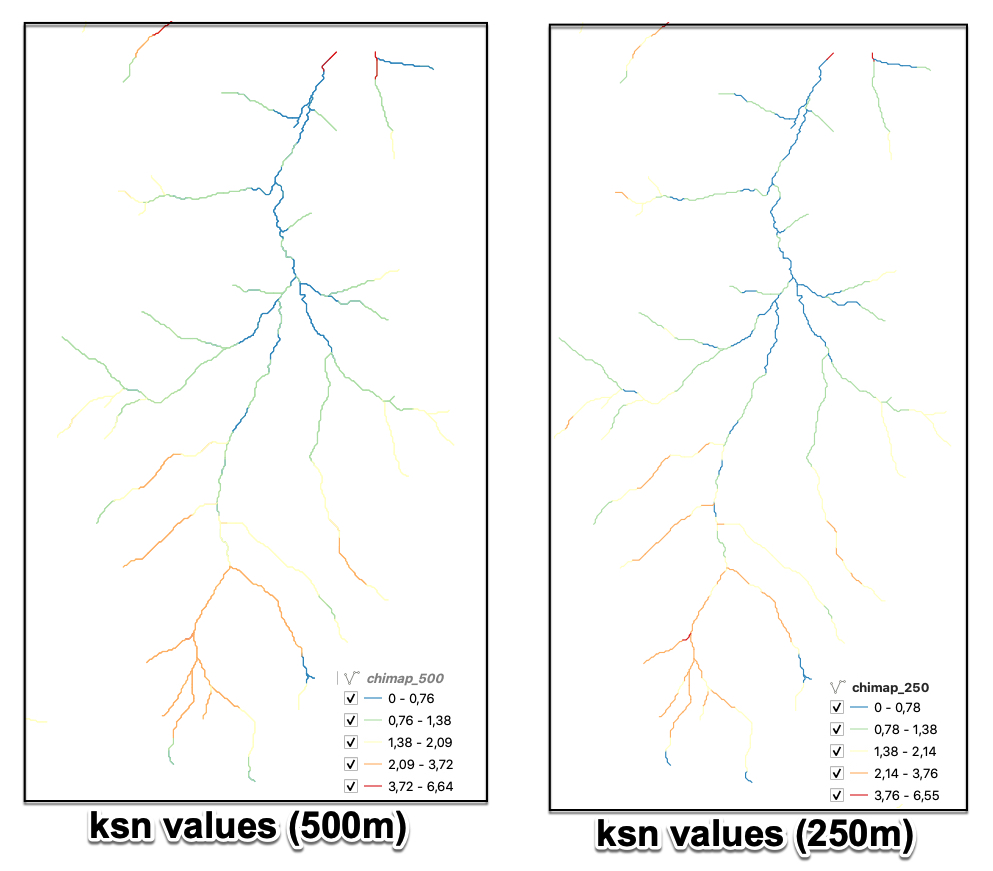
Creation of a Chi Map from a Digital Elevation Model
This is an example of how to generate a Chi Map in vector format from a DEM.
from landspy import DEM, Flow, Network
# Load the DEM and create the Flow and the Network
dem = DEM("data/jebja30.tif")
fd = Flow(dem)

# Create a Network object with a threshold of 1500 cells and reference m/n of 0.45
net = Network(fd, 1500, thetaref=0.45)

# Create a Chi Map in vector format for segments of 250 and 500 m
net.chiShapefile("data/chiMap_250.shp", 250)
net.chiShapefile("data/chiMap_500.shp", 500)
Analysis of different values of m/n for a basin
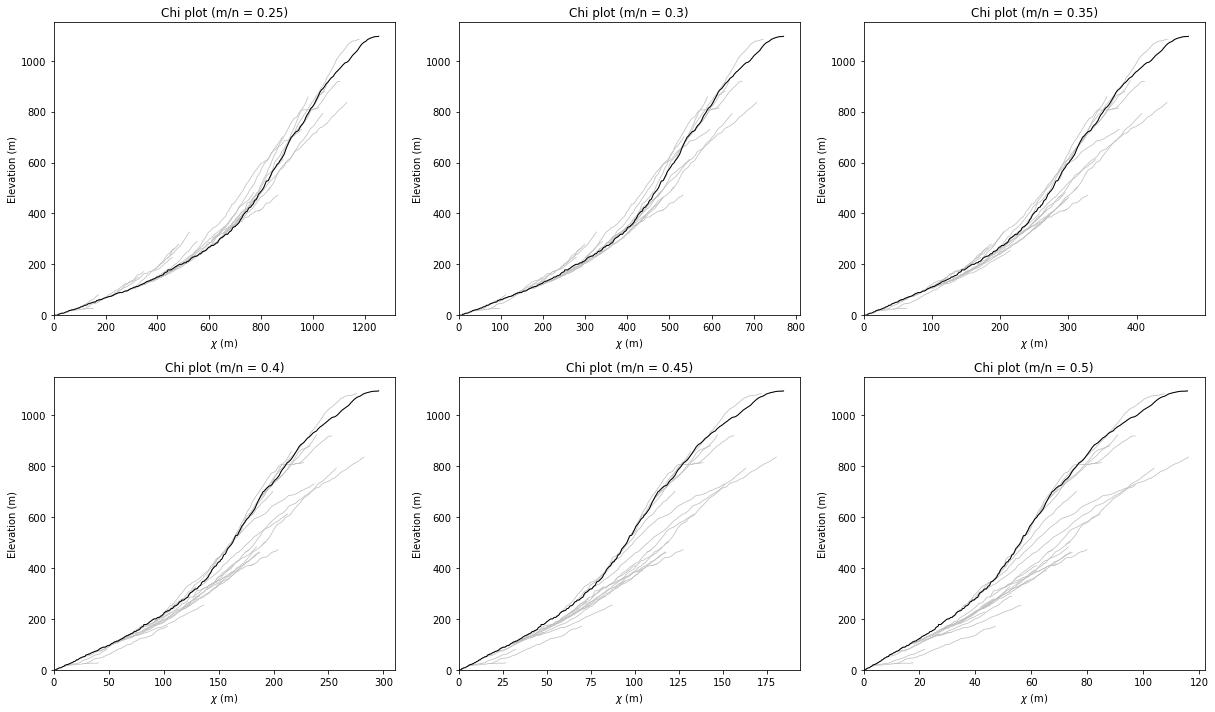
This is an example we analyze the best m/n value for Chi anlysis in a sample small basin
from landspy import Grid, DEM, Flow, Network, BNetwork
import matplotlib.pyplot as plt

# Load the DEM and create the Flow and the Network
dem = DEM("data/jebja30.tif")
fd = Flow(dem)

# Create a Network object with a threshold of 1500 cells and reference m/n of 0.45
net = Network(fd, 1500, thetaref=0.45)

# Load the Basins
basins = Grid("data/basins")

# Generate the BNetwork object for the basin with id=2
bnet = BNetwork(net, basins, bid =2 )

# Check different m/n values for chi analysis
mn_vals = [0.25, 0.3, 0.35, 0.4, 0.45, 0.5]

fig = plt.figure(figsize=(17, 10))

for n, mn in enumerate(mn_vals):
    bnet.calculateChi(mn)
    ax = fig.add_subplot(2, 3, n+1)
    bnet.chiPlot(ax)
    ax.set_title("Chi plot (m/n = {})".format(mn))
    ax.set_xlabel("$\\chi$ (m)")
    ax.set_ylabel("Elevation (m)")

plt.tight_layout()
7. Contact
You can contact me via geolovic@gmail.com vperez@ugr.es.
8. License
MIT License © 2022
1 maintainer

Metadata
1 maintainer
Release files for landspy 1.4.0
For a detailed explanation of source distributions (sdists) and built distributions (wheels), please see the package formats documentation.
Source distribution (sdist)
| File | Size | Uploaded | |
|---|---|---|---|
| landspy-1.4.0.tar.gz | 53.7 kB | Details |
Built distribution (wheel)
| File | Interpreter | ABI | Platform | Reset |
|---|---|---|---|---|
| landspy-1.4.0-py3-none-any.whl | Python 3 | none | any | Details |
Total release size: 107.9 kB
Release files / landspy-1.4.0.tar.gz
| Download URL | landspy-1.4.0.tar.gz |
|---|---|
| Size | 53.7 kB |
| Tags | Source |
|
SHA-256 checksum How to use checksums |
c148a12fb4eb6500db12501e83945ba425a487a105fa8301e04264e489cae03f
|
|
BLAKE2b-256 checksum How to use checksums |
44a63989676385b94447bcd8e26497120c5d993423ff9516eda2367ab8d5ad38
|
| Upload date | |
|
Uploaded using Trusted Publishing? What is trusted publishing? |
Yes |
| Uploaded via |
twine/7.0.0 CPython/3.13.14
|
Provenance
Provenance describes where a file came from. On PyPI, provenance is shared via attestations, which provide a verifiable record of the build or publishing details. View details, limitations and caveats.


PyPI Publish Attestation
PyPI verified that this artifact, at this checksum, originated from the publisher listed below.
Signed by GitHub Actions, verified by PyPI on Oct 8, 2026.
Transparency logRelease files / landspy-1.4.0-py3-none-any.whl
| Download URL | landspy-1.4.0-py3-none-any.whl |
|---|---|
| Size | 54.2 kB |
| Tags | Python 3 |
|
SHA-256 checksum How to use checksums |
d882be606269a131156a6e514ec5cff1059973132dc5e5b9111a2f76f4371aa7
|
|
BLAKE2b-256 checksum How to use checksums |
ef37f6f68708f0462113f8eab2bdb981d5f4c7fe7cb8aa9a995536b44beaed41
|
| Upload date | |
|
Uploaded using Trusted Publishing? What is trusted publishing? |
Yes |
| Uploaded via |
twine/7.0.0 CPython/3.13.14
|
Provenance
Provenance describes where a file came from. On PyPI, provenance is shared via attestations, which provide a verifiable record of the build or publishing details. View details, limitations and caveats.
PyPI Publish Attestation
PyPI verified that this artifact, at this checksum, originated from the publisher listed below.
Signed by GitHub Actions, verified by PyPI on Oct 8, 2026.
Transparency log













