Interactive CLI tool for multi-log analysis and export.

Project description
Logan-iq: Multi-Log Analysis Tool


An interactive command-line tool for parsing, filtering, summarizing, and exporting log files. Supports multiple log formats with flexible regex patterns and fully customizable user preferences.
⚠️ Installation Notice
Version 1.0.1 contains unintended scripts and should not be used.
Please install v1.0.2 or later for proper functionality and stability.
Features
- Parse logs using default or custom regex patterns
- Interactive and user-friendly CLI interface
- Filter logs by level, date range, or result limit
- Generate summary tables with counts per level or per day
- Export logs in CSV or JSON formats
- Clean, colorful, and easy-to-read terminal output
Install
Package is available on PyPI
  pip install logan-iq

  logan-iq interactive
This makes the logan-iq command available in your terminal and then runs the interactive mode.
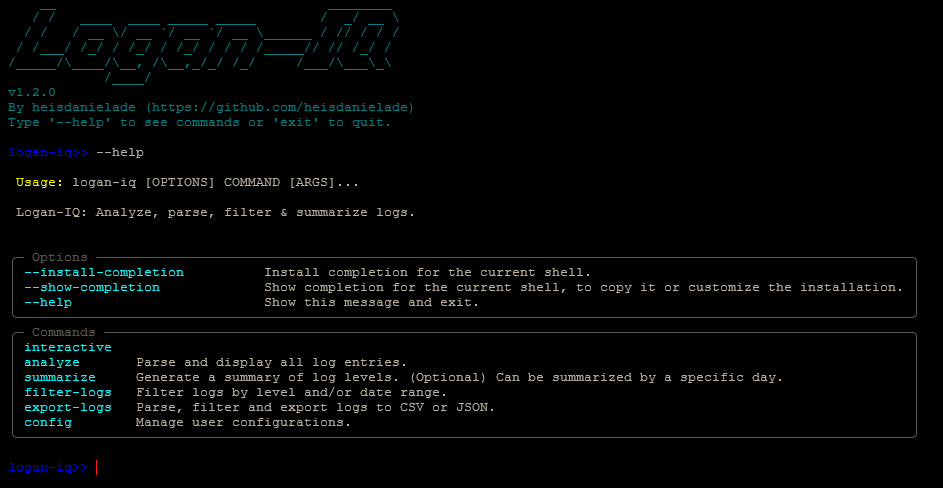
🖥️ Startup
How it Works
Core flow:
- Load Config or Defaults:
Loads user preferences from config.json if it exists. CLI arguments always override the config file. If no file is provided and no config exists, the app prompts the user to specify a file.
- Parse Log File:
Each log line is converted into a structured dictionary with fields like datetime, level, message,and optionally ip or other fields depending on the format.
- Filter (Optional):
Narrow results by log level, date range, or limit the number of entries displayed.
- Analyze or Summarize:
Display logs in a terminal table or generate summary reports.
- Export (Optional):
Export filtered data to CSV or JSON for further analysis.
Available Formats
You can supply your own regex directly via CLI or in saved configs custom_regex.
Or use the Built-in formats:
- simple → generic logs with
datetime,levelandmessage
2025-08-28 12:34:56 [INFO] Server started: Listening on port 8080
- apache → Apache access logs (common format)
192.200.2.2 - - [28/Aug/2025:12:34:56 +0000] "GET /index.html HTTP/1.1" 200 512
- nginx → Nginx access logs (combined format, includes referrer & user-agent)
192.100.1.1 - - [28/Aug/2025:12:34:56 +0000] "GET /index.html HTTP/1.1" 200 1024 "http://example.com" "Mozilla/5.0"
- json → JSON formatted logs (one object per line)
{
  "datetime": "2025-08-28 12:34:56",
  "level": "INFO",
  "message": "Server started",
  "method": "GET",
  "status": 200,
  "path": "/api/v1/users"
}
- custom → Any user-defined regex Example (inline via CLI):
logan-iq analyze --file logs/app.log --format custom --regex "^(?P<ts>\S+) (?P<level>\w+) (?P<msg>.*)$"
Or define in saved configs:
{
  "default_file": "logs/custom_app.log",
  "format": "custom",
  "custom_regex": "^(?P<ts>\\S+) (?P<level>\\w+) (?P<msg>.*)$"
}
Running the CLI
Once installed, commands can be run directly via logan-iq:
- Help
  logan-iq --help # General help

  # Command specific help
  logan-iq analyze --help
  logan-iq summarize --help
  logan-iq filter-logs --help
  logan-iq export-logs --help
  logan-iq config --help
  logan-iq config set --help
  logan-iq config show --help
  logan-iq config delete --help
- Interactive Mode
    logan-iq interactive

    logan-iq>> analyze --file app.log
    logan-iq>> summarize --file app.log --format simple
    logan-iq>> filter-logs --level ERROR --start 2025-11-01 --end 2025-11-08
    logan-iq>> export-logs csv --file app.log --output exported_logs/output.csv
    logan-iq>> export-logs json --file app.log --output exported_logs/output.json

    logan-iq>> config set --default-file app.log --format simple
    logan-iq>> config show
    logan-iq>> config delete --key default_file

    logan-iq>> exit
- Analyze Logs
logan-iq analyze --file/ path/to/logfile.log --format apache
- Custom Regex
logan-iq analyze --file app.log --format custom --regex "^(?P<ts>\\S+) (?P<msg>.*)$"
- Summarize Log Levels
logan-iq summarize --file path/to/logfile.log
- Filter Log Levels
logan-iq filter-logs --file app.log --level ERROR --start 2025-11-01 --end 2025-11-08
- Export Logs
logan-iq export-logs --file path/to/logfile.log --output csv
- Shorthand flags
You can also use shorthand flags like:
  -f     # --file
  -df    # --default-file
  -r     # --custom-regex
  -cr    # --custom-regex (for configs)
  -l     # --level
  -lm    # --limit
  -s     # --start
  -e     # --end
  -d     # --day
  -o     # --output
  -k     # --key
Configuration
On installation, a .logan-iq_config.json is created on the user's system in the root directory.
- To show configurations
    logan-iq interactive
    logan-iq>> config show
- To modify configurations
    logan-iq>> config set --default-file logs/access.log --format nginx
    logan-iq>> config set --format custom --custom-regex "^(?P<ts>\\S+) (?P<msg>.*)$"
Example with built-in format:
{
  "default_file": "logs/server_logs.log",
  "format": "nginx"
}
Example with custom format:
{
  "default_file": "logs/app.log",
  "format": "custom",
  "custom_regex": "^(?P<ts>\\S+) (?P<msg>.*)$"
}
-
CLI args always override config values.
-
If neither CLI args nor config exist, the app prompts for a file.
Deleting configuration entries
You can delete configuration entries using the config delete command.
- Delete a single key:
logan-iq config delete default_file
- Delete all keys (requires confirmation):
logan-iq config delete all
If you run the command without either --key or --all you'll receive a helpful message explaining the available options.
Dependencies
- CLI built with
Typer - Pretty tables via
Tabulate - Colored output via
PyFiglet - Unit testing via
Pytest
Contributing
Contributions are welcome!
NOTE: Codebase docs i.e., docstrings, comments, files... must be in ENGLISH)
- Fork the repo and clone it locally.
- Create a virtual environment and install dependencies:
pip install -e .. - Run tests:
pytest. - Create a branch from
main:git checkout -b feat/nameorgit checkout -b fix/name. - Make changes, write tests, and follow PEP8.
- Commit with clear messages and push your branch.
- Open a Pull Request for review.
- Report bugs via Issues with clear steps and logs.
- By contributing, you agree to the repo’s license and Code of Conduct.
- Be creative!
Release history Release notifications | RSS feed


Download files
Download the file for your platform. If you're not sure which to choose, learn more about installing packages.
Source Distribution
Built Distribution
Filter files by name, interpreter, ABI, and platform.
If you're not sure about the file name format, learn more about wheel file names.
Copy a direct link to the current filters
File details
Details for the file logan_iq-1.2.0.tar.gz.
File metadata
- Download URL: logan_iq-1.2.0.tar.gz
- Upload date:
- Size: 19.4 kB
- Tags: Source
- Uploaded using Trusted Publishing? No
- Uploaded via: twine/6.1.0 CPython/3.13.7
File hashes
| Algorithm | Hash digest | |
|---|---|---|
| SHA256 |
ae5a53e694d863170903c57a871c667064c4c221f7b1d09ad6b66f516ae26fae
|
|
| MD5 |
f71a534b4ca1143f42f766dfd73e2e18
|
|
| BLAKE2b-256 |
f29d7393bb80992fa7011bda9e231499ae8ae6dc3e4b8fab595f1d07f68fa937
|
File details
Details for the file logan_iq-1.2.0-py3-none-any.whl.
File metadata
- Download URL: logan_iq-1.2.0-py3-none-any.whl
- Upload date:
- Size: 21.6 kB
- Tags: Python 3
- Uploaded using Trusted Publishing? No
- Uploaded via: twine/6.1.0 CPython/3.13.7
File hashes
| Algorithm | Hash digest | |
|---|---|---|
| SHA256 |
e1cb64b59fc47c4ccd1cf9da986902a1d5bd09d39b4f341ba2cf550d74a9d71b
|
|
| MD5 |
68537e1f3fa231feea60d49a1d65b4a2
|
|
| BLAKE2b-256 |
52ed26527ec018e48d036c3a30c43e4c4afe9f5ab09d64b55eb04006cf64d494
|


