
Magpylib Studio
Build and explore magpylib magnet designs visually — in VS Code, in a notebook, or in code. Name the numbers that matter, drag a slider, and the whole design follows, with the field computed exactly in milliseconds.
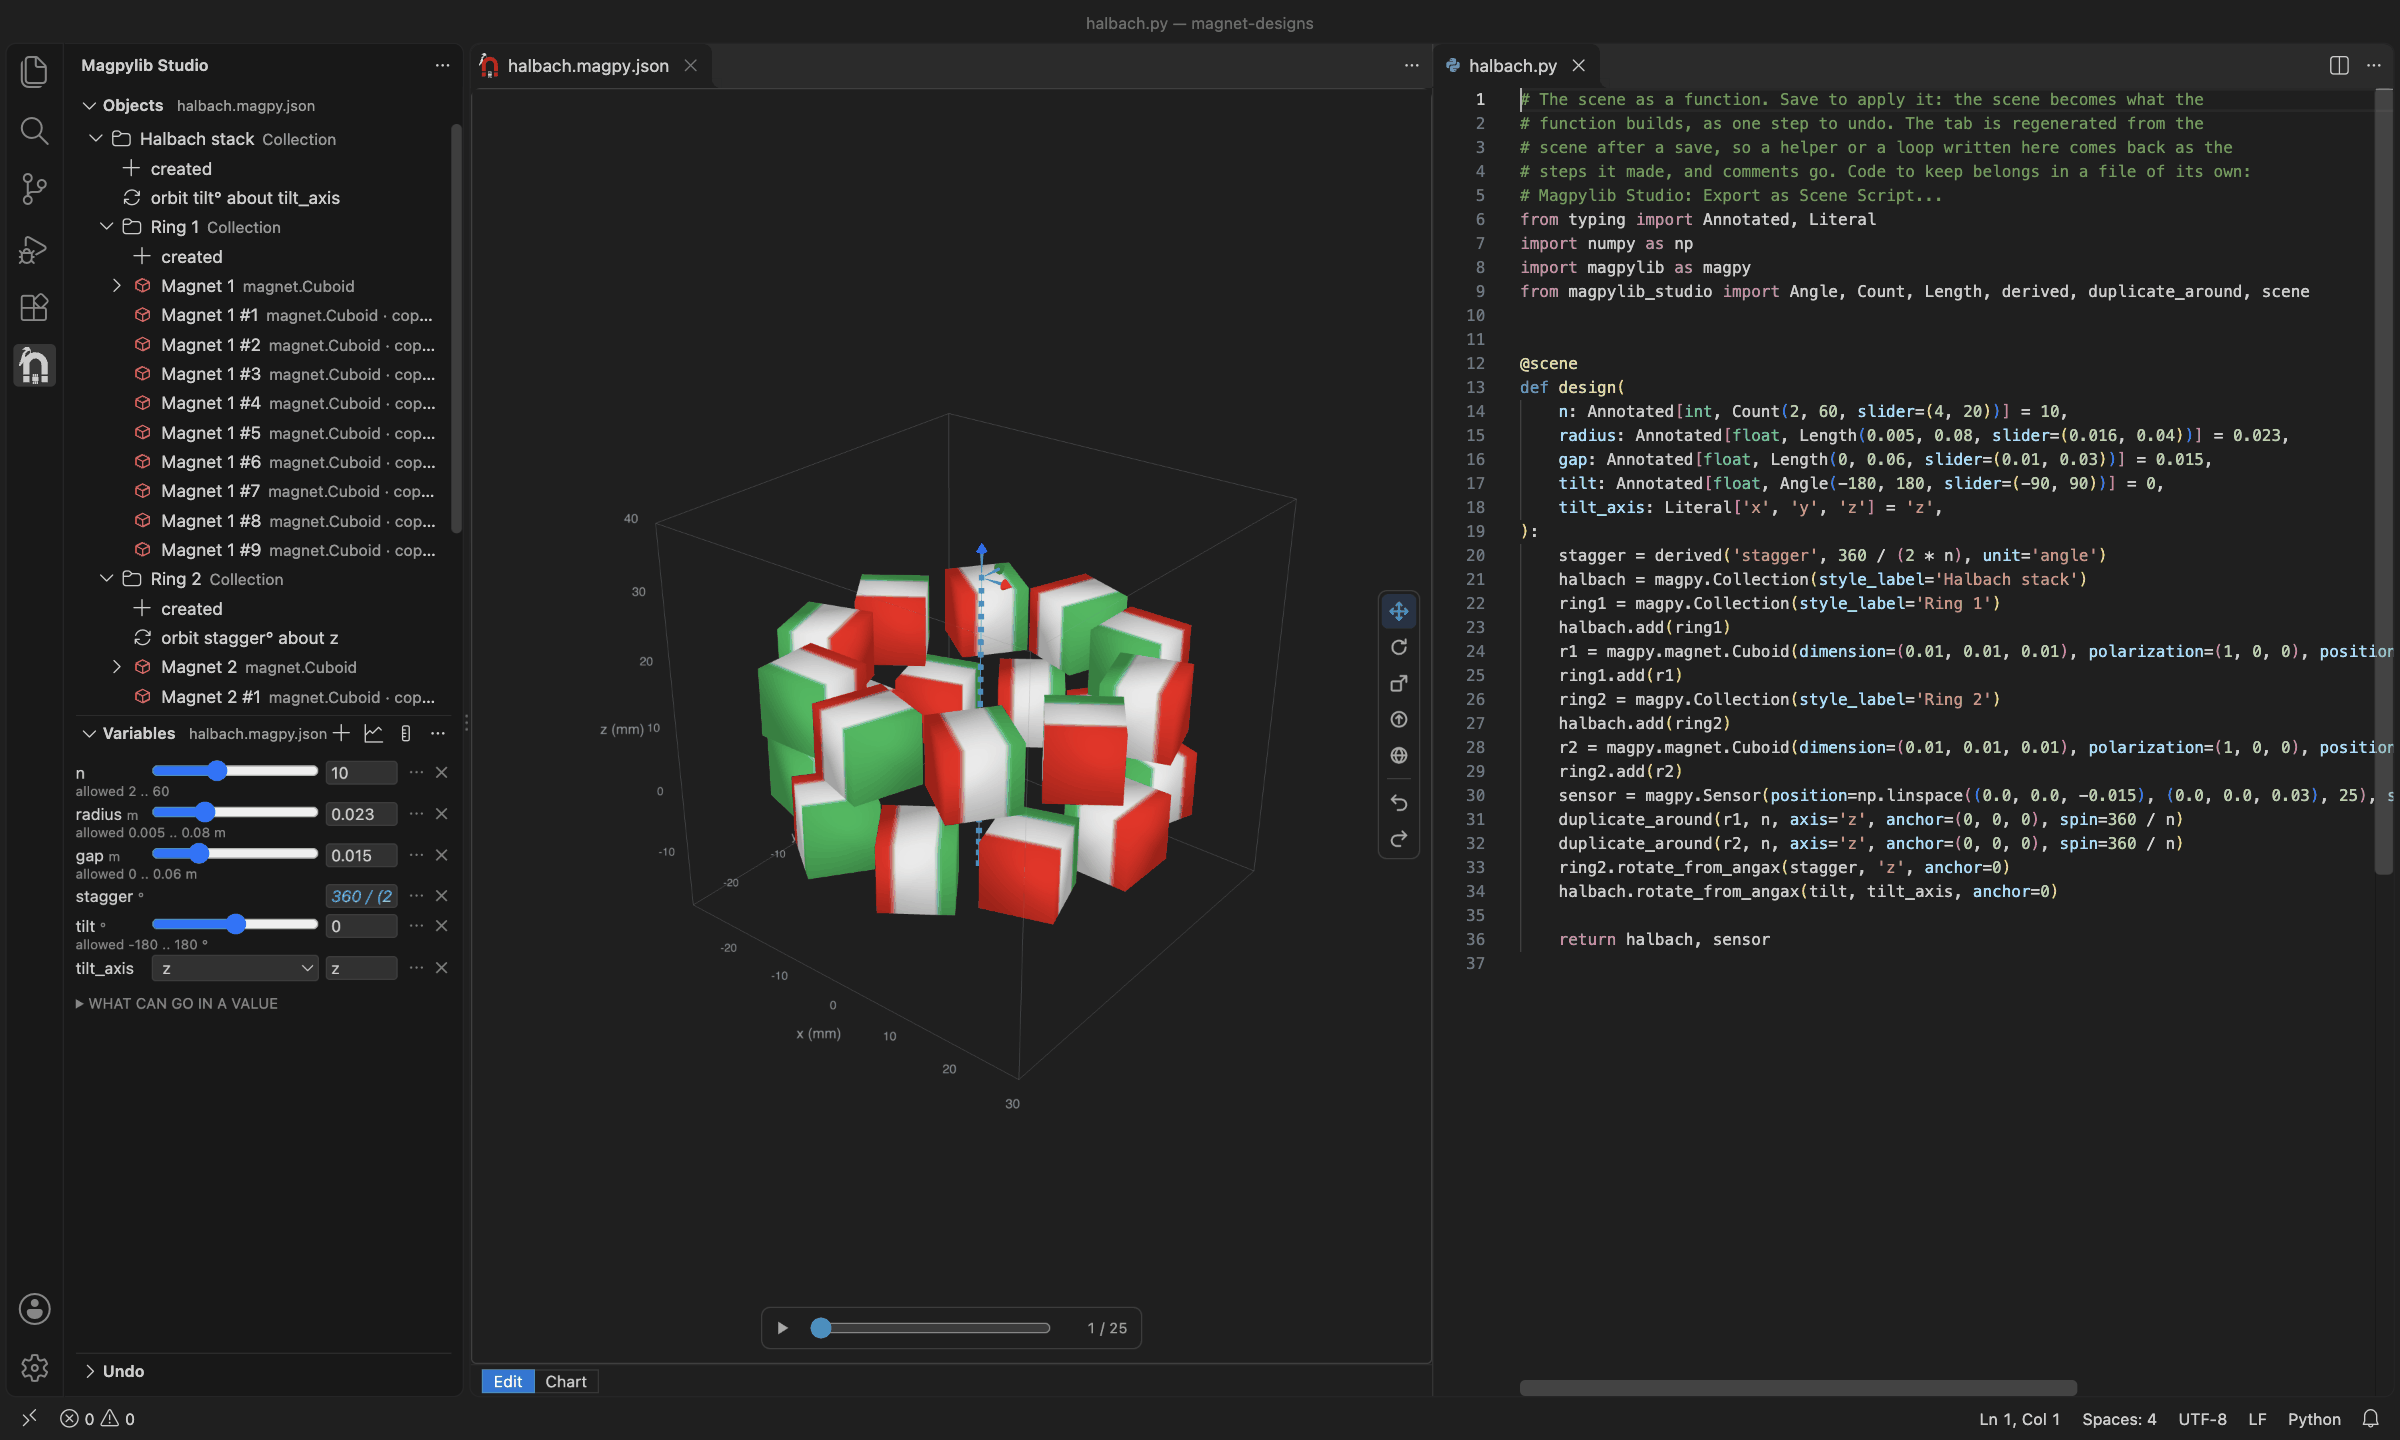
The Halbach example: two rings of ten magnets, each ring one magnet and one
pattern. Drag n and both rings rebuild.
What you can do
- Build a scene by hand. Add magnets, currents and sensors, group them, and move, turn and resize them in the 3D view.
- Make it parametric. Name the numbers that matter —
radius,gap,n— and write positions and sizes in terms of them. Drag a slider and everything follows. Values are SI unless you type a unit —15 mm,2 cm,800 mT— or show the whole scene in mm and mT. - Pattern, don't copy. A ring of twenty magnets is one magnet and one "repeat around an axis" step, so changing the magnet changes them all.
- See the field. Along a sensor path, as a map over a plane, or swept against a variable.
- Undo anything. Every scene keeps the steps that built it; step back through them, or change an early one.
- Switch to code and back. The script tab shows the scene as Python and applies your edits when you save. Export plain magpylib for anyone, or the scene as code to keep.
- Let an AI assistant help. A coding agent can write the scene in code, read its field and sweep its variables, and hand it to you to open in the studio (see below).
Get started in VS Code
- Install the extension: search for Magpylib Studio in the Extensions view,
or run
code --install-extension magpylib.magpylib-studio-vscode. - Open a folder, click the magpylib icon in the Activity Bar, and choose Load Example Scene.
- The first time, it offers to Install the Engine (the Python side) for you. Nothing to set up beforehand.
More in the extension's guide.
Use it in a notebook
The same 3D view, in Jupyter, marimo, VS Code notebooks or Colab:
pip install "magpylib-studio[widget]"
pip install "magpylib @ git+https://github.com/magpylib/magpylib@main"  # until magpylib's next release
import magpylib as magpy
from magpylib_studio.widget import SceneWidget

cube = magpy.magnet.Cuboid(polarization=(0, 0, 1), dimension=(0.01, 0.01, 0.01))
SceneWidget(cube)  # look around it; the pencil in its corner edits it
SceneWidget(cube, editable=True)  # or move, turn and resize it from the start
More in the notebook guide.
Write a scene in code
A scene is a plain magpylib function whose parameters are the variables:
from typing import Annotated

import magpylib as magpy
from magpylib_studio import Count, Length, duplicate_around, scene
from magpylib_studio.widget import SceneWidget


@scene
def ring(
    n: Annotated[int, Count(2, 60, slider=(4, 20))] = 10,
    radius: Annotated[float, Length(0.005, 0.08)] = 0.023,
):
    group = magpy.Collection(style_label="Ring")
    magnet = magpy.magnet.Cuboid(
        dimension=(0.01, 0.01, 0.01), polarization=(1, 0, 0), position=(radius, 0, 0)
    )
    group.add(magnet)
    duplicate_around(magnet, count=n, axis="z", spin=360 / n)
    return group


ring(n=12).getB((0, 0, 0))  # plain magpylib: real objects, a real field
ring.build().save(
    "ring.magpy.json"
)  # the document: n and radius are sliders in the studio
SceneWidget(ring, editable=True)  # the scene in a notebook, a slider per parameter
Called, it is magpylib. Built, it is the studio's document, every parameter a slider. More in the guide, and a complete example in examples/scene_demo.py.
Let a coding agent write it
The package carries an Agent Skill that teaches coding
agents — Claude Code, Codex, Copilot and others — to write scenes as such
functions, read the field and sweep a variable, and hand you the result to open
in the studio. In a project that depends on magpylib-studio:
uvx library-skills # pick magpylib-studio; for Claude Code, install into .claude/skills
Install the Python package only
pip install magpylib-studio
Python 3.11 or newer, and magpylib 5.2 or newer.
Learn more
| If you want to… | Read |
|---|---|
| use the VS Code extension | the extension's guide |
| use the 3D view in a notebook | docs/guide/notebook.md |
| write scenes in code | the guide |
| know how it works inside | docs/architecture.md |
| contribute | CONTRIBUTING.md |
| see where the project is going | docs/roadmap.md |
| see what was decided, and why | docs/decisions.md |
License
BSD-3-Clause, like the other packages built on magpylib. See LICENSE.
1 maintainer

Metadata
1 maintainer
Release files for magpylib-studio 0.5.0
For a detailed explanation of source distributions (sdists) and built distributions (wheels), please see the package formats documentation.
Source distribution (sdist)
| File | Size | Uploaded | |
|---|---|---|---|
| magpylib_studio-0.5.0.tar.gz | 1.8 MB | Details |
Built distribution (wheel)
| File | Interpreter | ABI | Platform | Reset |
|---|---|---|---|---|
| magpylib_studio-0.5.0-py3-none-any.whl | Python 3 | none | any | Details |
Total release size: 2.3 MB
Release files / magpylib_studio-0.5.0.tar.gz
| Download URL | magpylib_studio-0.5.0.tar.gz |
|---|---|
| Size | 1.8 MB |
| Tags | Source |
|
SHA-256 checksum How to use checksums |
57e99f656dde75ccf49009130a8f797521ceb6aba8aeb8fd515cbaecb8e5eeea
|
|
BLAKE2b-256 checksum How to use checksums |
312d415429371c5c2394dae2e61c5d0a70592f94cf3662b83b92eeac8b609b36
|
| Upload date | |
|
Uploaded using Trusted Publishing? What is trusted publishing? |
Yes |
| Uploaded via |
twine/7.0.0 CPython/3.13.14
|
Provenance
Provenance describes where a file came from. On PyPI, provenance is shared via attestations, which provide a verifiable record of the build or publishing details. View details, limitations and caveats.


PyPI Publish Attestation
PyPI verified that this artifact, at this checksum, originated from the publisher listed below.
Signed by GitHub Actions, verified by PyPI on Oct 12, 2026.
Transparency logRelease files / magpylib_studio-0.5.0-py3-none-any.whl
| Download URL | magpylib_studio-0.5.0-py3-none-any.whl |
|---|---|
| Size | 500.8 kB |
| Tags | Python 3 |
|
SHA-256 checksum How to use checksums |
62f4f781510323e022f3bf86dc65824e4f0379c90cc83ee4d94d4738c9fa75c3
|
|
BLAKE2b-256 checksum How to use checksums |
a138c7b3eeeee996dafde07ca14340f7dd444779f1b946f224590c9dbda2215c
|
| Upload date | |
|
Uploaded using Trusted Publishing? What is trusted publishing? |
Yes |
| Uploaded via |
twine/7.0.0 CPython/3.13.14
|
Provenance
Provenance describes where a file came from. On PyPI, provenance is shared via attestations, which provide a verifiable record of the build or publishing details. View details, limitations and caveats.
PyPI Publish Attestation
PyPI verified that this artifact, at this checksum, originated from the publisher listed below.
Signed by GitHub Actions, verified by PyPI on Oct 12, 2026.
Transparency log













