A generic multi-tool MCP Agent with Time, Weather, Dictionary, Calculator, etc.

Project description
MCPAgentAI 🚀


MCPAgentAI is a standardized tool wrapping framework for implementing and managing diverse tools in a unified way. It is designed to help developers quickly integrate and launch tool-based use cases.
Key Features
- 🔧 Standardized Wrapping: Provides an abstraction layer for building tools using the MCP protocol.
- 🚀 Flexible Use Cases: Easily add or remove tools to fit your specific requirements.
- ✨ Out-of-the-Box Tools: Includes pre-built tools for common scenarios:
- 🕑 Time utilities
- ☁️ Weather information (API)
- 📚 Dictionary lookups
- 🧮 Calculator for mathematical expressions
- 💵 Currency exchange (API)
- 📈 Stocks Data: Access real-time and historical stock market information.
- 🤖 ElizaOS Integration: Seamlessly connect and interact with ElizaOS for enhanced automation.
- 🐦 Twitter Management: Automate tweeting, replying, and managing Twitter interactions.
Tech Stack 🛠️
- Python: Core programming language
- MCP Framework: Communication protocol
- Docker: Containerization
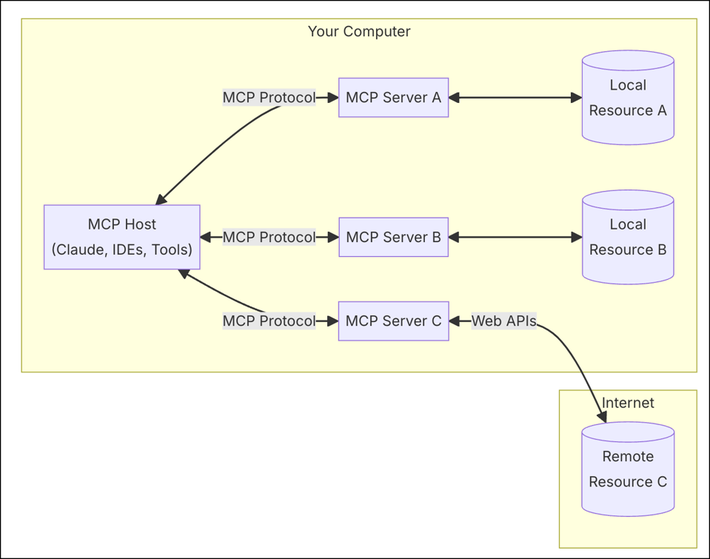
🤔 What is MCP?
The Model Context Protocol (MCP) is a cutting-edge standard for context sharing and management across AI models and systems. Think of it as the language AI agents use to interact seamlessly. 🧠✨
Here’s why MCP matters:
- 🧩 Standardization: MCP defines how context can be shared across models, enabling interoperability.
- ⚡ Scalability: It’s built to handle large-scale AI systems with high throughput.
- 🔒 Security: Robust authentication and fine-grained access control.
- 🌐 Flexibility: Works across diverse systems and AI architectures.
 source
Installation 📦
Install via PyPI
pip install mcpagentai
Usage 💻
Run Locally
mcpagentai --local-timezone "America/New_York"
Run in Docker
-
Build the Docker image:
docker build -t mcpagentai . -
Run the container:
docker run -i --rm mcpagentai
Docker Environment Variables for Twitter Integration 🐦
When running MCPAgentAI within Docker, it's essential to configure environment variables for Twitter integration. These variables are divided into two categories:
1. Agent Node Client Credentials
These credentials are used by the Node.js client within the agent for managing Twitter interactions, so the src/mcpagentai/tools/twitter/client_agent.py
Twitter credentials for Agent Node Client
ENV TWITTER_USERNAME=
ENV TWITTER_PASSWORD=
ENV TWITTER_EMAIL=
2. Tweepy (Twitter API v2) Credentials
These credentials are utilized by Tweepy for interacting with Twitter's API v2 so the src/mcpagentai/tools/twitter/api_agent.py
Twitter API v2 credentials for Tweepy
ENV TWITTER_API_KEY=
ENV TWITTER_API_SECRET=
ENV TWITTER_ACCESS_TOKEN=
ENV TWITTER_ACCESS_SECRET=
ENV TWITTER_CLIENT_ID=
ENV TWITTER_CLIENT_SECRET=
ENV TWITTER_BEARER_TOKEN=
ElizaOS Integration 🤖
MCPAgentAI offers seamless integration with ElizaOS, providing enhanced automation capabilities through Eliza Agents. There are two primary ways to integrate Eliza Agents:
1. Directly Use Eliza Agents from MCPAgentAI
This approach allows you to use Eliza Agents without running the Eliza Framework in the background. It simplifies the setup by embedding Eliza functionality directly within MCPAgentAI.
Steps:
- Configure MCPAgentAI to Use Eliza MCP Agent:
In your Python code, add Eliza MCP Agent to the
MultiToolAgent:from mcpagentai.core.multi_tool_agent import MultiToolAgent from mcpagentai.tools.eliza_mcp_agent import eliza_mcp_agent multi_tool_agent = MultiToolAgent([ # ... other agents eliza_mcp_agent ])
Advantages:
- Simplified Setup: No need to manage separate background processes.
- Easier Monitoring: All functionalities are encapsulated within MCPAgentAI.
- Highlight Feature: Emphasizes the flexibility of MCPAgentAI in integrating various tools seamlessly.
2. Run Eliza Framework from MCPAgentAI
This method involves running the Eliza Framework as a separate background process alongside MCPAgentAI.
Steps:
-
Start Eliza Framework:
bash src/mcpagentai/tools/eliza/scripts/run.sh -
Monitor Eliza Processes:
bash src/mcpagentai/tools/eliza/scripts/monitor.sh -
Configure MCPAgentAI to Use Eliza Agent: In your Python code, add Eliza Agent to the
MultiToolAgent:from mcpagentai.core.multi_tool_agent import MultiToolAgent from mcpagentai.tools.eliza_agent import eliza_agent multi_tool_agent = MultiToolAgent([ # ... other agents eliza_agent ])
Tutorial: Selecting Specific Tools
You can configure MCPAgentAI to run only certain tools by modifying the agent configuration in your server or by updating the server.py file to only load desired agents. For example:
from mcpagentai.tools.time_agent import TimeAgent
from mcpagentai.tools.weather_agent import WeatherAgent
from mcpagentai.core.multi_tool_agent import MultiToolAgent

multi_tool_agent = MultiToolAgent([
    TimeAgent(),
    WeatherAgent()
])
This setup will only enable **Time** and **Weather** tools.
Integration Example: Claude Desktop Configuration
You can integrate MCPAgentAI with Claude Desktop using the following configuration (claude_desktop_config.json), note that local ElizaOS repo is optional arg:
{
    "mcpServers": {
        "mcpagentai": {
            "command": "docker",
            "args": ["run", "-i", "-v", "/path/to/local/eliza:/app/eliza", "--rm", "mcpagentai"]
        }
    }
}
Development 🛠️
-
Clone this repository:
git clone https://github.com/mcpagents-ai/mcpagentai.git
cd mcpagentai
-
(Optional) Create a virtual environment:
python3 -m venv .venv
source .venv/bin/activate
-
Install dependencies:
pip install -e .
-
Build the package:
python -m build
Contributing 🤝
We welcome contributions! Please open an issue or pull request.
License: MIT
Enjoy! 🎉
Release history Release notifications | RSS feed


Download files
Download the file for your platform. If you're not sure which to choose, learn more about installing packages.
Source Distribution
Built Distribution
Filter files by name, interpreter, ABI, and platform.
If you're not sure about the file name format, learn more about wheel file names.
Copy a direct link to the current filters
File details
Details for the file mcpagentai-0.4.4.tar.gz.
File metadata
- Download URL: mcpagentai-0.4.4.tar.gz
- Upload date:
- Size: 39.3 kB
- Tags: Source
- Uploaded using Trusted Publishing? No
- Uploaded via: twine/6.0.1 CPython/3.13.1
File hashes
| Algorithm | Hash digest | |
|---|---|---|
| SHA256 |
5174e5eb5ce647445148a3fbb9950c3cb6f5542e1e1d2d55e926bc4a7016eb9a
|
|
| MD5 |
7d8a0b4d8e61b6562e1086c929affd8f
|
|
| BLAKE2b-256 |
ceee9f8b55971d5607f6f26fb0be5f8b893dd93f5ec73e6f56305e30a5962709
|
File details
Details for the file mcpagentai-0.4.4-py3-none-any.whl.
File metadata
- Download URL: mcpagentai-0.4.4-py3-none-any.whl
- Upload date:
- Size: 33.7 kB
- Tags: Python 3
- Uploaded using Trusted Publishing? No
- Uploaded via: twine/6.0.1 CPython/3.13.1
File hashes
| Algorithm | Hash digest | |
|---|---|---|
| SHA256 |
ae97089c8f9689f90447618375cef45a408e4c582c503b46034cec257aa850d3
|
|
| MD5 |
1cb2f72a6081c77e7d3bc46128df6c0b
|
|
| BLAKE2b-256 |
14c779680f220e037aba89b8239af0e2b08b4093320e964d56396ebad481ed5e
|


