







Table of Contents
- 1. Introduction
- 2. Installation
- 3. Using MEDiml
- 4. Tutorials
- 5. IBSI Standardization
- 6. Acknowledgement
- 7. Authors
- 8. Statement
1. Introduction
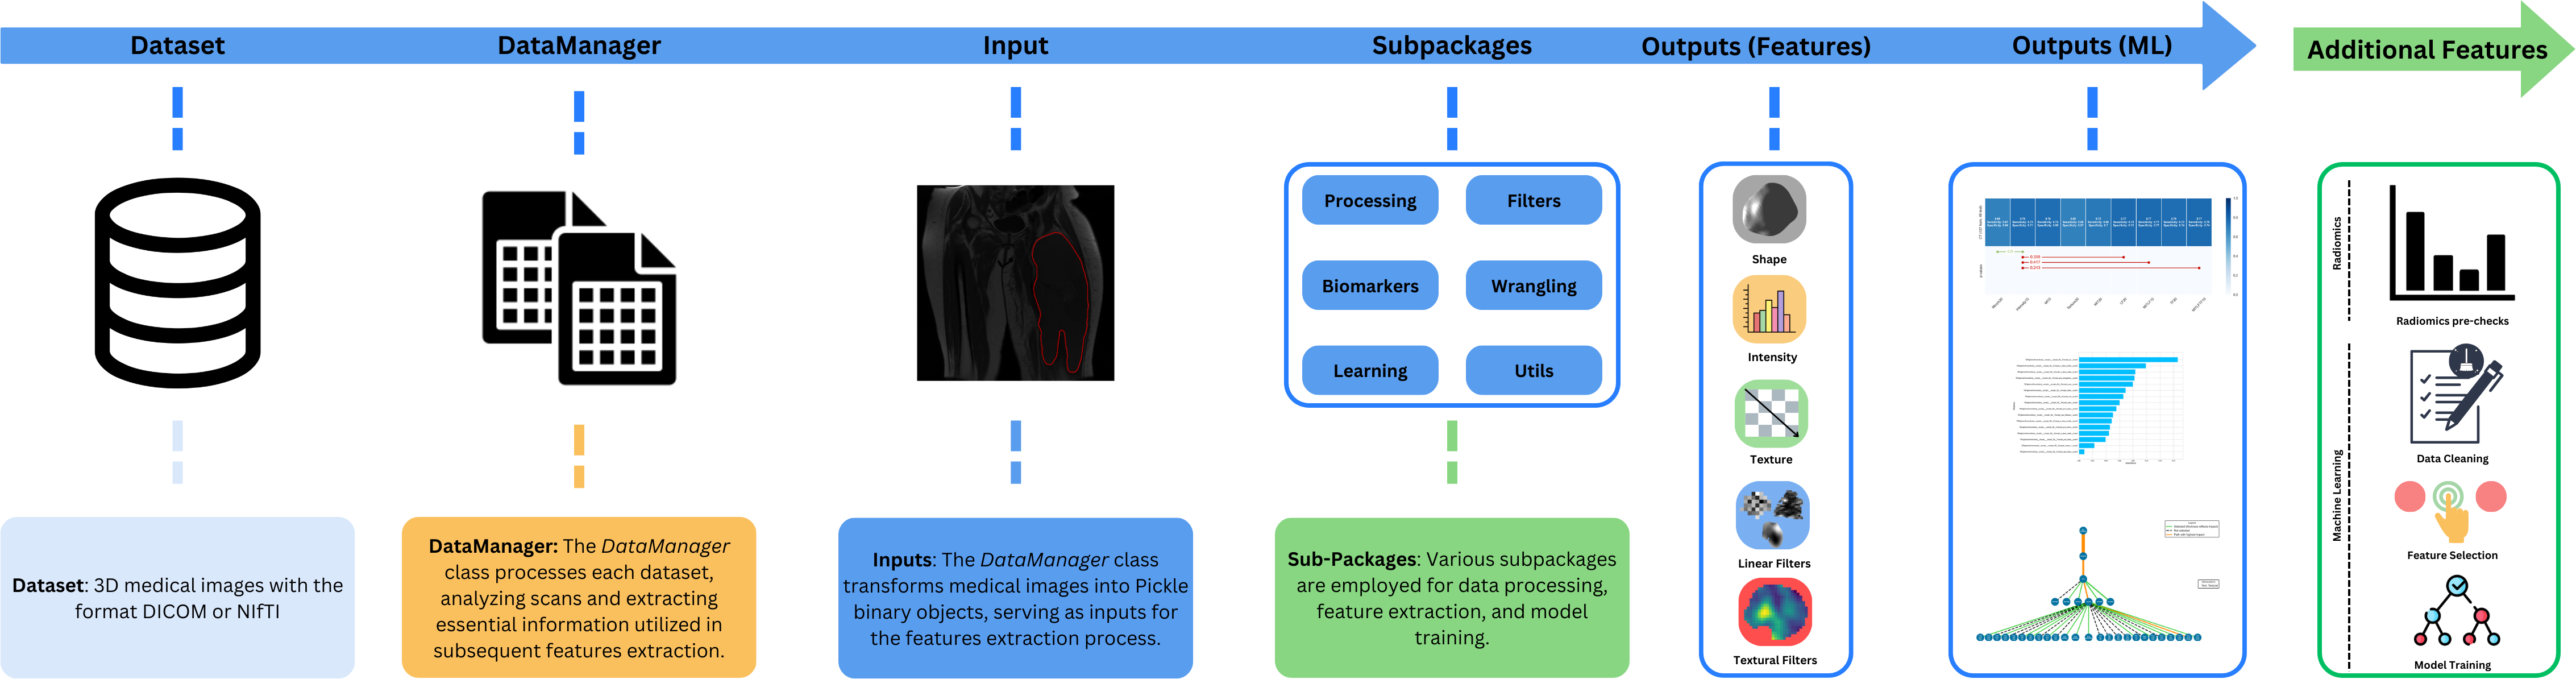
MEDiml is an open-source Python package that can be used for processing multi-modal medical images (MRI, CT or PET) and for extracting their radiomic features. This package is meant to facilitate the processing of medical images and the subsequent computation of all types of radiomic features while maintaining the reproducibility of analyses. This package has been standardized with the IBSI norms.
2. Installation
Python installation
The MEDiml package requires Python 3.8 or more. If you don't have it installed on your machine, follow the instructions here to install it.
Package installation
You can easily install the MEDiml package from PyPI using:
pip install MEDiml
For more installation options (Conda, Poetry...) check out the installation documentation.
3. Using MEDiml
MEDiml can be used either as a command line tool for batch radiomics extraction, or as a Python package that you import directly into your own scripts and notebooks for finer-grained control over the processing and feature extraction pipeline.
3.1 Using MEDiml through the command line
After installation, you can launch radiomics extraction directly from the terminal:
radiomics <path/to/input> <path/to/settings_file> <path/save> --use-niftis --n-batch 4 --skip-existing
By default, every scan found in the input folder is processed, and all the ROIs of a scan are
combined into a single region (i.e. {ROI_1}+{ROI_2}). To process a specific list of scans and
ROIs instead, pass a CSV file with the
optional --path-csv argument:
radiomics <path/to/input> <path/to/settings_file> <path/save> --path-csv <path/to/csv_file>
The command wraps the existing BatchExtractor workflow and selects the appropriate input format automatically. The full list of arguments, required ones first, is described below:
| Argument | Required | Description |
|---|---|---|
path_input |
Yes | Path to the input dataset folder containing the scans to process. |
path_settings |
Yes | Path to the radiomics extraction settings file. |
path_save |
Yes | Path to the folder where the extracted feature files will be written. |
--path-csv |
No | Path to a CSV file mapping specific scans to specific ROIs (columns: PatientID, ImagingScanName, ImagingModality, ROIname). If omitted, every scan found in the input folder is processed and all of its ROIs are combined into a single region. |
--use-niftis |
No | Process NIfTI files instead of DICOM files. This is the default behavior and is mutually exclusive with --use-dicoms. |
--use-dicoms |
No | Process DICOM files instead of NIfTI files. Mutually exclusive with --use-niftis. |
--n-batch |
No | Number of CPU cores to use for extraction. Defaults to 4. |
--skip-existing |
No | Skip scans whose features already exist in the output folder. |
3.2 Using MEDiml through code
import os
import pickle

import MEDiml

# Load MEDiml DataManager
dm = MEDiml.DataManager(path_dicoms=os.getcwd())

# Process the DICOM files and retrieve the MEDiml object
med_obj = dm.process_all_dicoms()[0]

# Extract ROI mask from the object. `name_roi` is optional: when it is omitted,
# the union of all the ROIs found in the object is used.
vol_obj_init, roi_obj_init = MEDiml.processing.get_roi_from_indexes(
            med_obj,
            name_roi='{ED}+{ET}+{NET}',
            box_string='full')

# Extract features from the imaging data
local_intensity = MEDiml.biomarkers.local_intensity.extract_all(
                img_obj=vol_obj_init.data,
                roi_obj=roi_obj_init.data,
                res=[1, 1, 1]
            )

# Update radiomics results class
med_obj.update_radiomics(loc_int_features=local_intensity)

# Saving radiomics results
med_obj.save_radiomics(
                scan_file_name='STS-UdS-001__T1.MRscan.npy',
                path_save=os.getcwd(),
                roi_type='GrossTumorVolume',
                roi_type_label='GTV',
            )
4. Tutorials
We have created many tutorial notebooks to assist you in learning how to use the different parts of the package. More details can be found in the documentation.
5. IBSI Standardization
The image biomarker standardization initiative (IBSI) is an independent international collaboration that aims to standardize the extraction of image biomarkers from acquired imaging. The IBSI therefore seeks to provide image biomarker nomenclature and definitions, benchmark datasets, and benchmark values to verify image processing and image biomarker calculations, as well as reporting guidelines, for high-throughput image analysis. We participate in this collaboration with our package to make sure it respects international nomenclatures and definitions. The participation was separated into two chapters:
-
IBSI Chapter 1
The IBSI chapter 1 is dedicated to the standardization of commonly used radiomic features. It was initiated in September 2016 and reached completion in March 2020. We have created two jupyter notebooks for each phase of the chapter and made them available for the users to run the IBSI tests for themselves. The tests can also be explored in interactive Colab notebooks that are directly accessible here:
- Phase 1:
- Phase 2:
- Phase 1:
-
IBSI Chapter 2
The IBSI chapter 2 was launched in June 2020 and reached completion in February 2024. It is dedicated to the standardization of commonly used imaging filters in radiomic studies. We have created two jupyter notebooks for each phase of the chapter and made them available for the users to run the IBSI tests for themselves and validate image filtering and image biomarker calculations from filter response maps. The tests can also be explored in interactive Colab notebooks that are directly accessible here:
- Phase 1:
- Phase 2:
Our team named UdeS (a.k.a. Université de Sherbrooke) has already submitted the benchmarked values to the IBSI uploading website.
- Phase 1:
Miscellaneous
You can avoid the next steps (Jupyter installation) if you already have a Jupyter Notebook setup available.
You can view and run the tests locally by installing the Jupyter Notebook application on your machine:
python -m pip install jupyter
Then access the IBSI tests folder using:
cd notebooks/ibsi/
Finally, launch Jupyter Notebook to navigate through the IBSI notebooks using:
jupyter notebook
Make sure to run the notebooks with a Jupyter kernel that has MEDiml installed. If that's not the case, you can simply install it from within the notebook by running the following in a code cell:
! pip install MEDiml
6. Acknowledgement
MEDiml is an open-source package developed at the MEDomicsLab laboratory with the collaboration of the international consortium MEDomics. We welcome any contribution and feedback. Furthermore, we wish that this package could serve the growing radiomics research community by providing a flexible as well as IBSI standardized tool to reimplement existing methods and develop new ones.
7. Authors
- MEDomicsLab: Research laboratory at Université de Sherbrooke & McGill University.
- MEDomics: MEDomics consortium.
8. Statement
This package is part of https://github.com/medomics, a package providing research utility tools for developing precision medicine applications.
Copyright (C) 2024 MEDomics consortium

GPL3 LICENSE SYNOPSIS

Here's what the license entails:

1. Anyone can copy, modify and distribute this software.
2. You have to include the license and copyright notice with each and every distribution.
3. You can use this software privately.
4. You can use this software for commercial purposes.
5. If you dare build your business solely from this code, you risk open-sourcing the whole code base.
6. If you modify it, you have to indicate changes made to the code.
7. Any modifications of this code base MUST be distributed with the same license, GPLv3.
8. This software is provided without warranty.
9. The software author or license can not be held liable for any damages inflicted by the software.
More information on about the LICENSE can be found here
1 maintainer

Metadata
1 maintainer
Release files for mediml 0.19.0
For a detailed explanation of source distributions (sdists) and built distributions (wheels), please see the package formats documentation.
Source distribution (sdist)
| File | Size | Uploaded | |
|---|---|---|---|
| mediml-0.19.0.tar.gz | 235.3 kB | Details |
Built distribution (wheel)
| File | Interpreter | ABI | Platform | Reset |
|---|---|---|---|---|
| mediml-0.19.0-py3-none-any.whl | Python 3 | none | any | Details |
Total release size: 508.6 kB
Release files / mediml-0.19.0.tar.gz
| Download URL | mediml-0.19.0.tar.gz |
|---|---|
| Size | 235.3 kB |
| Tags | Source |
|
SHA-256 checksum How to use checksums |
6394c5a9daef1f03e8ee07919bca118f9c981d56f9e42579dc1b23d9f200cbed
|
|
BLAKE2b-256 checksum How to use checksums |
c369cbdd6827fe86bbb2ae412bf9a5eb6329fee8e0553e45b2425b57ac06980e
|
| Upload date | |
|
Uploaded using Trusted Publishing? What is trusted publishing? |
No |
| Uploaded via |
twine/6.2.0 CPython/3.9.18
|
Release files / mediml-0.19.0-py3-none-any.whl
| Download URL | mediml-0.19.0-py3-none-any.whl |
|---|---|
| Size | 273.3 kB |
| Tags | Python 3 |
|
SHA-256 checksum How to use checksums |
d0b824853bd34c55a1757b3b8d8a68e538337e3f9f46ca06e2ad5adad90de8b9
|
|
BLAKE2b-256 checksum How to use checksums |
54ae85005a9206c684b300459c711ed93ae3b0f91055331a3c036e35e4b264bf
|
| Upload date | |
|
Uploaded using Trusted Publishing? What is trusted publishing? |
No |
| Uploaded via |
twine/6.2.0 CPython/3.9.18
|














