

mlmm-toolkit: An End-to-End ML/MM ONIOM Platform for Automated Enzymatic Reaction Mechanism Analysis


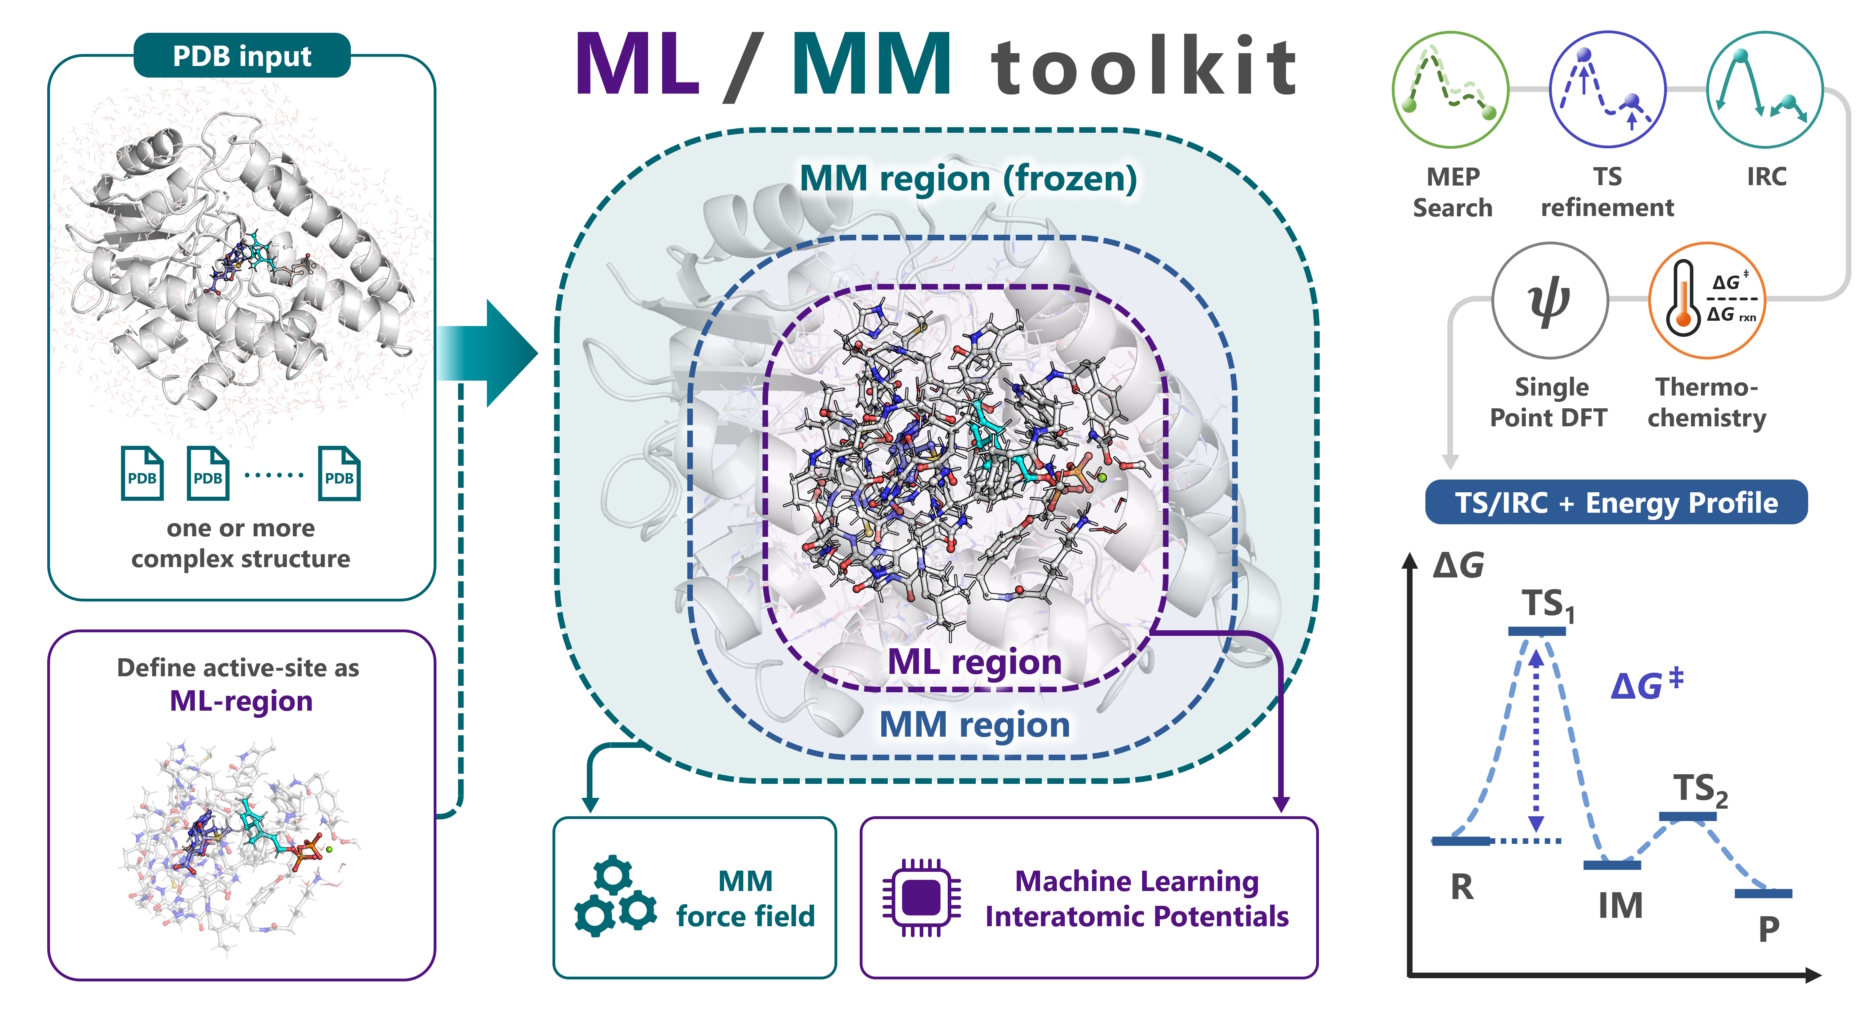
mlmm-toolkit is a Python CLI toolkit for analyzing reaction mechanisms in enzyme complexes with ML/MM, an ONIOM combination of machine-learning interatomic potentials (MLIPs) and molecular mechanics (MM), starting from PDB/mmCIF structures. It replaces the QM region of conventional QM/MM with a machine-learning interatomic potential (MLIP, default: UMA) while keeping the surrounding protein under an analytical Amber force field (hessian_ff).
You can test a reaction mechanism in a single command like:
mlmm all -i R.pdb P.pdb -c 'SAM,GPP' -l 'SAM:1,GPP:-3' --tsopt --thermo
Starting from the reactant (R) and product (P) structures of the full system, the command above runs:
ML/MM model setup (ML-region selection + MM parameter preparation) → Minimum energy path (MEP) search → TS optimization → IRC → Thermochemistry
Features
- Find a reaction path and its TS from two or more full-system structures you built, without defining a reaction coordinate (Endpoint mode).
- Build the path from one structure by driving a reaction coordinate you choose (Scan-list mode).
- Start the TS search directly from a TS candidate (TS-only mode).
- Split a multi-step reaction into steps, each with its own TS (path-search).
- Set up the ML region, the Amber topology, and the MM layers from a PDB file automatically (Building the ML region and layers).
- Choose the MLIP: UMA, ORB, MACE, or AIMNet2 (MLIP backends).
- Refine the TS with GPU-accelerated DFT/MM in the same tool (DFT backend).
- Export to and import from Gaussian ONIOM and ORCA QM/MM input (oniom-export / oniom-import).
- Run each stage on its own as a subcommand (CLI subcommands).
- Let AI agents run the workflow with the bundled skills (Agent skills).
Installation
- OS: Linux. Native Windows is not supported because AmberTools (
tleap) is not available there. - Python: 3.11 or later, 3.12 recommended. ORB requires 3.11 or 3.12.
- GPU: an NVIDIA GPU.
- AmberTools (
tleap): builds the topology inmm-parmandall; not needed when you reuse a matching--parm7. - C++20 compiler: for the default
hessian_ffMM backend;cxx-compilerin the conda command below installs it. - pdbfixer: needed only for
mm-parm --add-h.
Full requirements and step-by-step setup: docs/installation.md.
# 1. New env + AmberTools + CUDA-enabled PyTorch, all from conda-forge
#    (cuda129 instead of cuda130 when nvidia-smi shows CUDA below 13.0)
conda create -n mlmm-toolkit -c conda-forge --override-channels python=3.12 ambertools=24.8 "numpy>=2,<2.5" pdbfixer cxx-compiler cyipopt "pytorch=2.13.0=cuda130*" cuda-nvcc -y
conda activate mlmm-toolkit

# 2. Install mlmm-toolkit and headless Chrome (for PNG export of plots)
pip install mlmm-toolkit
plotly_get_chrome -y

# 3. Authenticate Hugging Face once (only required for the default UMA backend)
#    Accept the FAIR Chemistry License v1 at https://huggingface.co/facebook/UMA, then:
hf auth login                               # interactive
# OR, for non-interactive CI/HPC jobs: export HF_TOKEN=hf_xxx
Avoid AmberTools conflicts: on clusters with a system AmberTools module loaded, run
module unload amberbefore installing to prevent a ParmEd conflict with the conda-installed AmberTools.
Optional extras (install only what you need):
| Extra | Adds |
|---|---|
[orb] / [aimnet] |
Orb / AIMNet2 MLIP backend (-b orb / -b aimnet2) — not HF-gated |
[dft] / [dft-cuda12] |
DFT calculator and standalone command with native CUDA 13 / CUDA 12 GPU4PySCF |
[pdbfixer] |
PDBFixer extra (alternative to the conda install above) |
[openmm] |
OpenMM low-level backend, including virtual-site water models |
The MACE backend (-b mace) does not install into the same environment as UMA; create a dedicated environment as described in docs/installation.md.
CUDA module loads, alternative-backend recipes, DMF/cyipopt setup, Plotly Chromium, and HPC job-script templates: docs/installation.md and docs/device-hpc.md.
Preparing an Enzyme-Substrate System
For most systems the only hard requirement is a PDB with explicit hydrogens (at the intended protonation state). mlmm all then builds the MM topology, selects the ML region, and runs the whole pipeline in one command — see Quick Examples for the three input modes (multi-structure R → P, single-structure scan, TS-only). The preparation steps below are optional.
-
Build a structural model of the complex. Download coordinates from the Protein Data Bank. If an experimental structure is not available, use structure-prediction programs such as AlphaFold3, Boltz2, or Chai; docking programs; or GUI software such as PyMOL. Add hydrogens at the intended protonation state (or let
mm-parm --add-h --ph 7add them), and match-l RES:CHARGEto the H count actually present (e.g. SAM with 23 H =SAM:1, 22 H =SAM:0). For multi-structure (R → P) runs, every PDB must share the same atoms in the same order. -
(Optional) Build the MM topology yourself — it is automatic by default.
mlmm all(viamlmm mm-parm) generates the Amber.parm7/.rst7from the PDB automatically; unknown residues (ligands, cofactors) are parameterized with GAFF2 / AM1-BCC — pass formal charges with-l 'RES:CHARGE'. Build the topology by hand when it helps — a custom force field, special solvation, or a system the automatic route cannot handle — then pass it with--parm7. To mimic aqueous conditions, solvate the complex and remove water molecules beyond ~6 Å (see the OpenMM cookbook / tleap). -
(Optional) Define the ML region yourself.
mlmm allextracts the ML region from-c/--centerand-r/--radiusautomatically. To define it yourself instead, build an ML-region PDB — withmlmm extractor any molecular viewer — and feed it tomlmm all(or the per-stage subcommands) with--model-pdb; this skips the automatic extraction:mlmm extract -i complex.pdb -c 'SAM,GPP' -r 6.0 -l 'SAM:1,GPP:-3' -o ml_region.pdb
Important: the ML-region PDB is a subset of the full-system atoms: keep their order, names, residue IDs, and chain IDs unchanged, do not add link H, and use the same selection for every state (in PyMOL, tick "Original atom order" when exporting). See How to construct a reliable
model.pdb.
Quick Examples
The source repository includes full-system COMT and BezA endpoint mechanisms, a methyltransferase scan, and a 122-atom ML/MM fixture; see examples/. The commands below use the BezA structures and run from the repository root.
# Endpoint mode (R + P → MEP, with TS + thermochemistry)
mlmm all -i examples/beza/1.R.pdb examples/beza/3.P.pdb -c 'SAM,GPP,MG' -l 'SAM:1,GPP:-3' \
    --tsopt --thermo --out-dir result_mep

# Scan-list mode (single structure → staged bond scan → MEP)
mlmm all -i examples/beza/1.R.pdb -c 'SAM,GPP,MG' -l 'SAM:1,GPP:-3' \
    -s '[("SAM 320 CS1","GPP 321 C7",1.60)]' --tsopt --thermo --out-dir result_scan

# TS-only validation (your own TS candidate → tsopt → IRC → freq)
mlmm all -i TS_candidate_layered.pdb --parm7 complex.parm7 -q 1 --tsopt --thermo --out-dir result_tsonly
For Gaussian ONIOM / ORCA QM/MM input-deck export and import, use oniom-export / oniom-import. For a walkthrough, see docs/getting-started.md and docs/quickstart-all.md.
Each stage (mm-parm → extract → define-layer → opt → path-opt → tsopt → irc → freq → dft) also runs as its own subcommand; see CLI Subcommands for the per-stage pages.
Output
Each calculation command writes to its own directory, ./result_<command>/ by default (for example ./result_opt/, ./result_tsopt/, or ./result_path_opt/); -o/--out-dir sets another. The preparation commands extract and mm-parm write their files to the current directory; define-layer writes next to its input by default.
A non-dry all run writes the deliverables reached by its enabled stages to ./result_all/:
segments/seg_NN/{reactant,ts,product}.*— the canonical R / TS / P structures to citemep_trj.pdb/mep_trj.xyz— the merged reaction path;energy_diagram_MEP.png— barrier diagramsummary.log/summary.json- Reusable inputs for follow-up runs:
ml_region.pdb(--model-pdb),mm_parm/*.parm7(--parm7),layered/(B-factor-annotated full-system PDBs) - Directly inspectable model systems before/after link-H insertion:
ml_region_without_linkH.xyzandml_region_with_linkH.xyz, plus matching .pdb files for PDB input
Pipeline scratch lives under _work/; keep it if you may redo the post-processing with --resume-segment. Full layout and filename conventions: docs/output-layout.md.
Colab GUI workspace
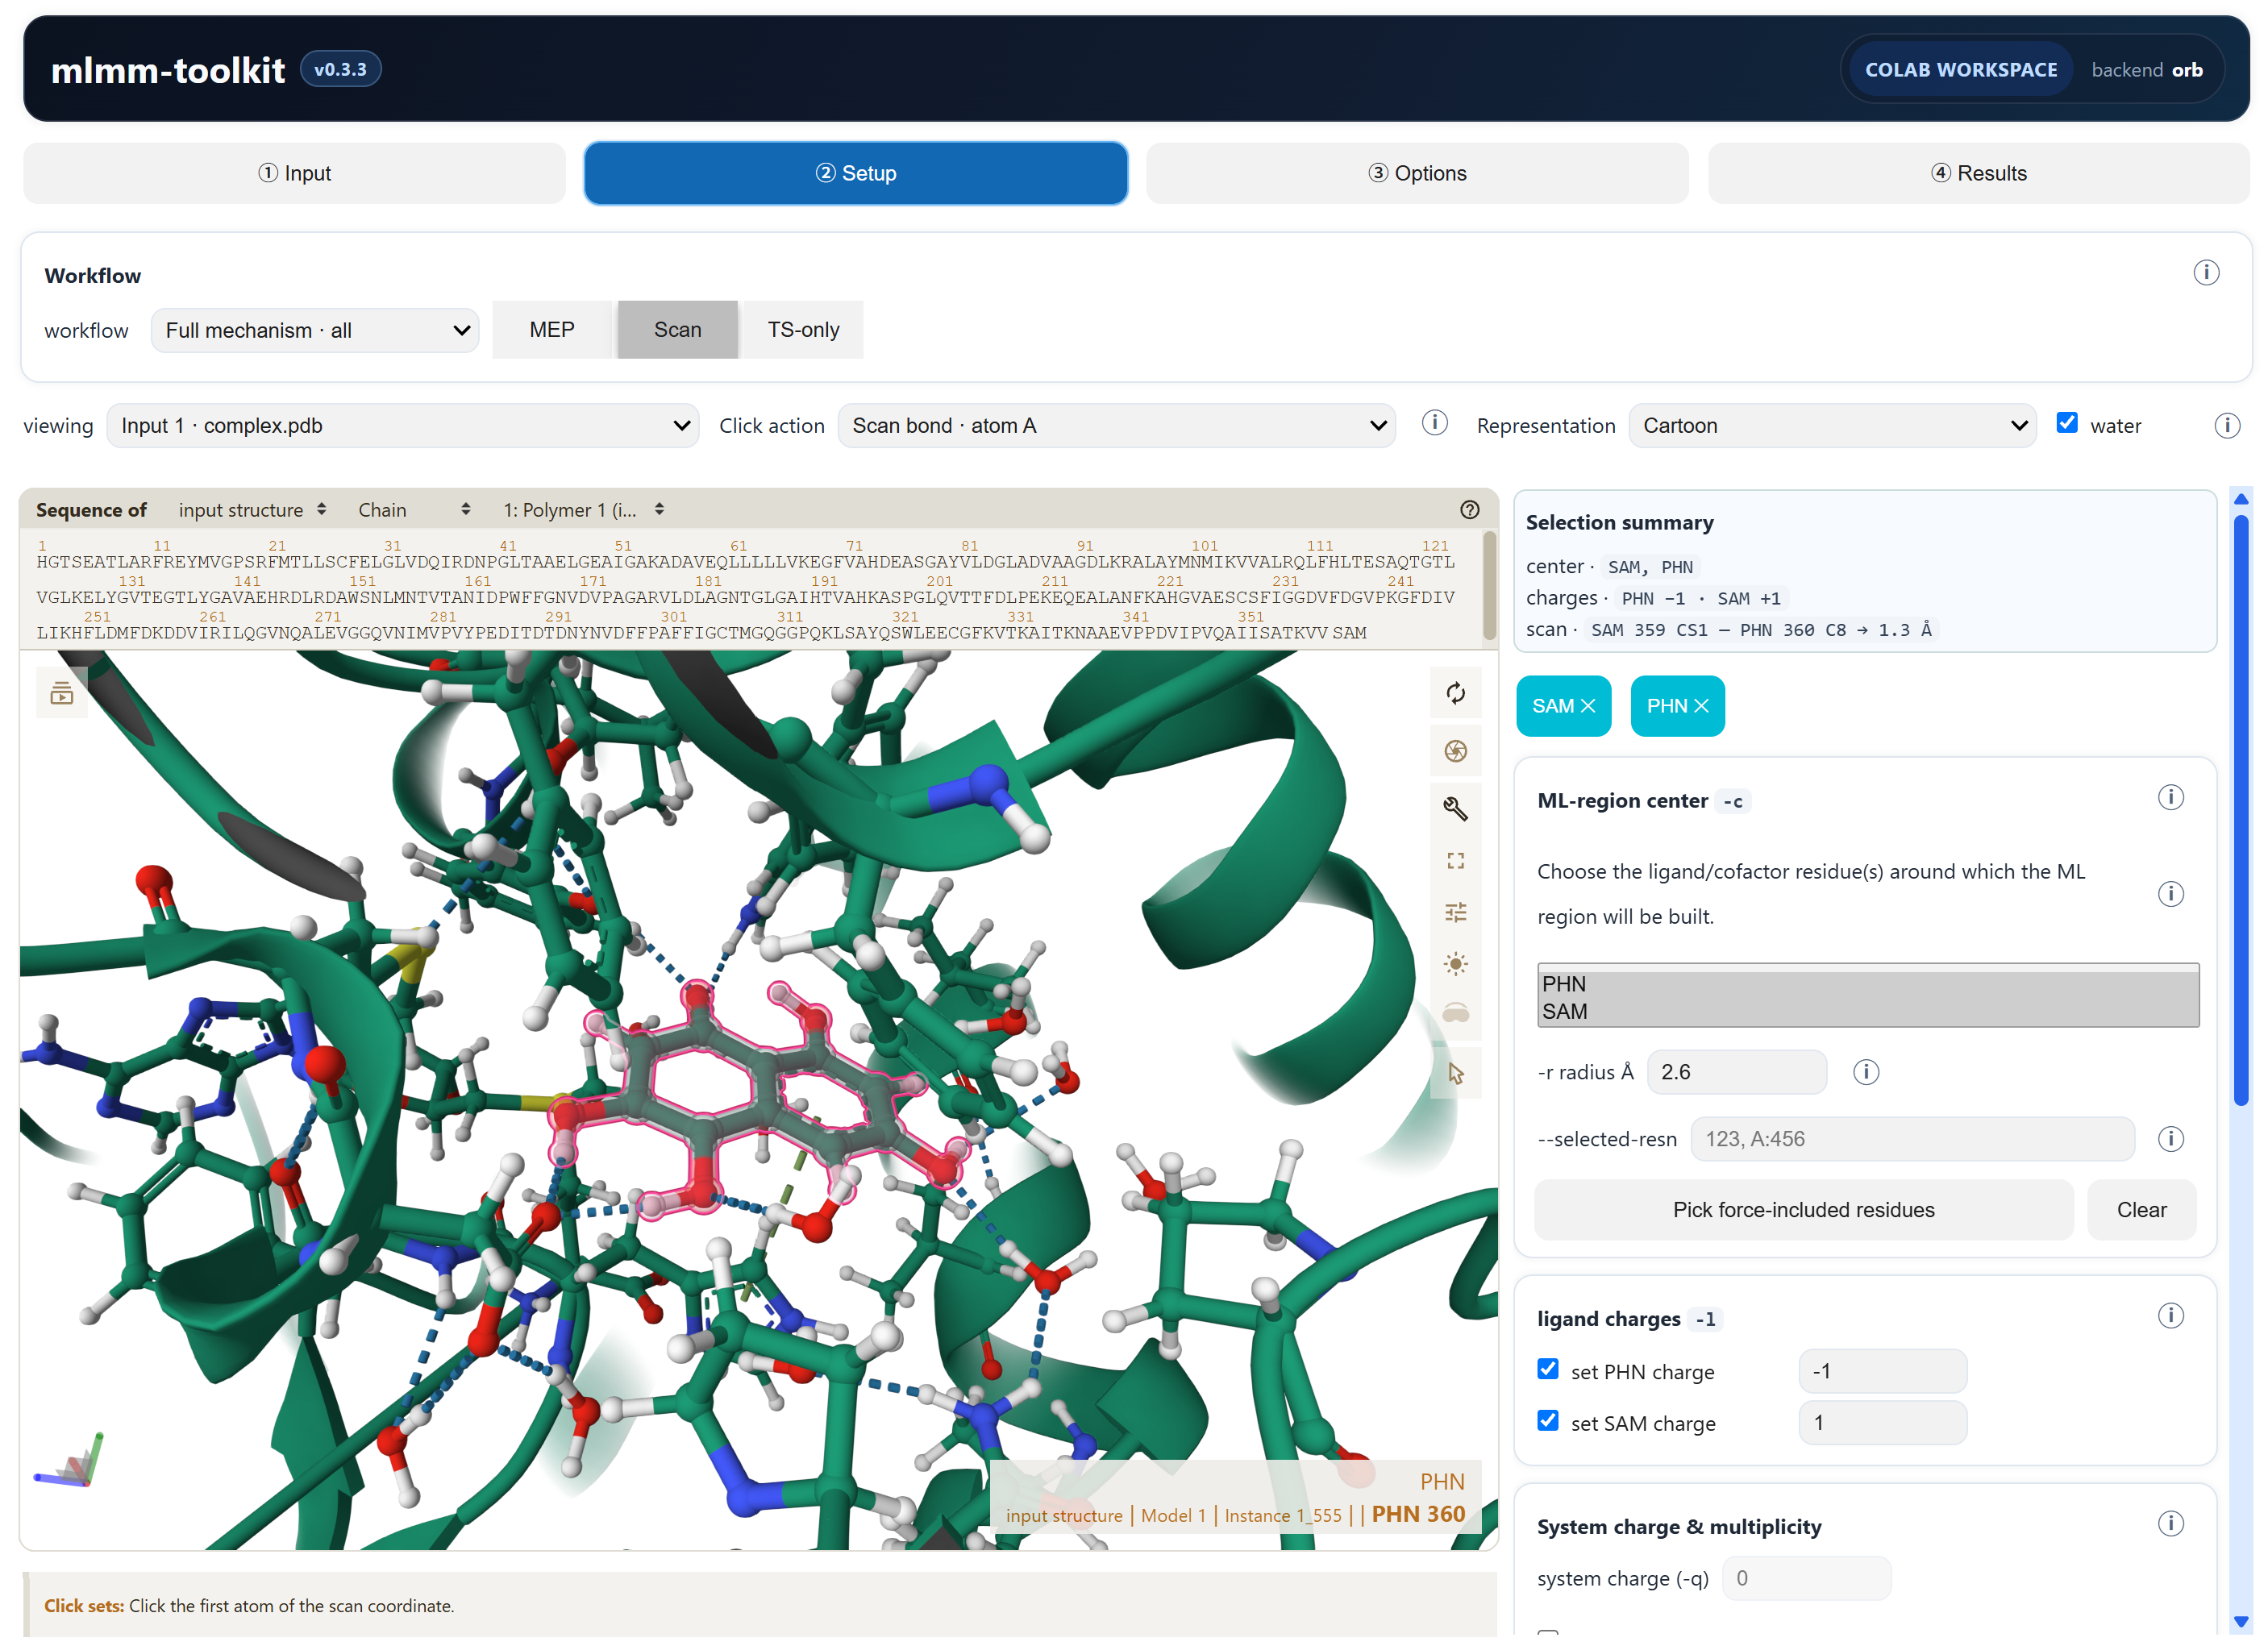
An interactive GUI workspace is available in Google Colab. It brings full-system coordinates and topology input, ML-region setup, Mol* visualization and atom picking, controls generated from the live CLI, execution, and linked MEP/IRC/result inspection into one notebook. Choose a GPU runtime and open the Colab GUI workspace.
CLI Subcommands
| Subcommand | Role | Doc |
|---|---|---|
all (default) |
End-to-end: extract → MM topology/layers → MEP → TS → IRC → freq → DFT | all |
mm-parm |
Generate parm7/rst7 via AmberTools | mm-parm |
extract |
Extract active-site pocket | extract |
define-layer |
Assign 3-layer ML/MM B-factor encoding | define-layer |
fix-altloc |
Resolve PDB alternate conformations | fix-altloc |
add-elem-info |
Repair PDB element columns (77–78) | add-elem-info |
opt |
Geometry optimization (L-BFGS / RFO) | opt |
tsopt |
TS optimization (Dimer / RS-P-RFO) | tsopt |
path-opt |
MEP via GSM or DMF | path-opt |
path-search |
Recursive MEP search with refinement | path-search |
scan / scan2d / scan3d |
1D / 2D / 3D bond-distance scans | scan · scan2d · scan3d |
freq |
Vibrational analysis + thermochemistry | freq |
irc |
IRC (EulerPC) | irc |
dft |
Single-point DFT | dft |
sp |
Single-point ML/MM ONIOM | sp |
bond-summary |
Compare structures, report bond changes | bond-summary |
trj2fig / energy-diagram |
Energy plot / R→TS→P diagram | trj2fig · energy-diagram |
oniom-export |
Gaussian ONIOM / ORCA QM/MM input-deck export | oniom-export |
oniom-import |
Gaussian ONIOM / ORCA QM/MM input-deck import | oniom-import |
How the ML/MM calculator works (ONIOM energy, link atoms, units, and the Python API): docs/mlmm-calc.md.
Documentation
- Getting Started · Installation · Quickstart: all · Building the ML region and layers · DFT backend · Troubleshooting
- Full site: https://t-0hmura.github.io/mlmm_toolkit/
Agent Skills
skills/ holds Agent Skills that let an AI coding agent run mlmm-toolkit workflows and subcommands. Copy the skill folders into .claude/skills/ or ~/.claude/skills/ for Claude Code, or into .agents/skills/ or ~/.agents/skills/ for Codex. The list and an example copy command are in skills/README.md.
Getting Help
mlmm --help                       # top-level
mlmm <subcmd> --help              # core options
mlmm <subcmd> --help-advanced     # full option set
Issues: https://github.com/t-0hmura/mlmm_toolkit/issues.
Related tools
| Tool | Use case |
|---|---|
| pdb2reaction | Pure-MLIP reaction paths for cluster models and small molecules from PDB / XYZ / GJF. |
| uma_pysis | Lightweight YAML-driven UMA–pysisyphus interface for quick/exploratory reaction-mechanism studies (GS / TS / IRC / ΔG). |
Known limitations
- MACE + UMA cannot coexist (
e3nnversion conflict). Use separate conda envs. - DFT/MM is practical for an ML region of up to about 500 atoms for a single point and about 300 atoms for an optimization on an HPC GPU, and up to about 200 atoms on a consumer GPU (ωB97M-V/def2-SVP, the default; from experience).
- MACE and ORB need fp64 (
--precision fp64, their default); in fp32, extra imaginary modes appear more often. fp64 is slow on consumer GPUs: on HPC GPUs, ORB in fp64 is very cost-effective, and on a consumer GPU, UMA in fp32 gives the best balance. - CPU-only execution is supported but usually much slower than GPU.
- The bundled pysisyphus is a modified fork; do not install upstream pysisyphus in the same environment.
Citation
@article{ohmura2025mlmm,
  author  = {Ohmura, Takuto and Inoue, Sei and Terada, Tohru},
  title   = {ML/MM toolkit -- Towards Accelerated Mechanistic Investigation of Enzymatic Reactions},
  journal = {ChemRxiv}, year = {2025}, doi = {10.26434/chemrxiv-2025-jft1k}
}
Contributing
Issues and pull requests are welcome — see CONTRIBUTING.md.
License
GNU General Public License v3 or later (GPL-3.0-or-later).
1 maintainer

Metadata
1 maintainer
Release files for mlmm-toolkit 0.4.0
For a detailed explanation of source distributions (sdists) and built distributions (wheels), please see the package formats documentation.
Source distribution (sdist)
| File | Size | Uploaded | |
|---|---|---|---|
| mlmm_toolkit-0.4.0.tar.gz | 4.0 MB | Details |
Built distribution (wheel)
| File | Interpreter | ABI | Platform | Reset |
|---|---|---|---|---|
| mlmm_toolkit-0.4.0-py3-none-any.whl | Python 3 | none | any | Details |
Total release size: 5.3 MB
Release files / mlmm_toolkit-0.4.0.tar.gz
| Download URL | mlmm_toolkit-0.4.0.tar.gz |
|---|---|
| Size | 4.0 MB |
| Tags | Source |
|
SHA-256 checksum How to use checksums |
1d0db4b8167846688a69a59da8a76bb8b663ba43413a6ba27ebf3e21c67356b4
|
|
BLAKE2b-256 checksum How to use checksums |
bfec416c190f7ed295e23fca152c59b08aaf0a12de887c3b40f1e8c9646542dd
|
| Upload date | |
|
Uploaded using Trusted Publishing? What is trusted publishing? |
Yes |
| Uploaded via |
twine/7.0.0 CPython/3.13.14
|
Provenance
Provenance describes where a file came from. On PyPI, provenance is shared via attestations, which provide a verifiable record of the build or publishing details. View details, limitations and caveats.


PyPI Publish Attestation
PyPI verified that this artifact, at this checksum, originated from the publisher listed below.
Signed by GitHub Actions, verified by PyPI on Oct 12, 2026.
Transparency logRelease files / mlmm_toolkit-0.4.0-py3-none-any.whl
| Download URL | mlmm_toolkit-0.4.0-py3-none-any.whl |
|---|---|
| Size | 1.3 MB |
| Tags | Python 3 |
|
SHA-256 checksum How to use checksums |
d04a40a70fcd36fb996e74da55e675c5d58820376f20e2c4591bafbbff2c482e
|
|
BLAKE2b-256 checksum How to use checksums |
31c225d119523fb817380466d50daba7447dafa363906a17485ae9210f6b4a4a
|
| Upload date | |
|
Uploaded using Trusted Publishing? What is trusted publishing? |
Yes |
| Uploaded via |
twine/7.0.0 CPython/3.13.14
|
Provenance
Provenance describes where a file came from. On PyPI, provenance is shared via attestations, which provide a verifiable record of the build or publishing details. View details, limitations and caveats.
PyPI Publish Attestation
PyPI verified that this artifact, at this checksum, originated from the publisher listed below.
Signed by GitHub Actions, verified by PyPI on Oct 12, 2026.
Transparency log













