Web-based development tool for managing and editing Nodes and Dataflows in the MoFA framework

Project description
MoFA_Stage
English | 中文
MoFA_Stage is a web-based development tool for managing and editing Nodes and Dataflows in the MoFA framework.
Features
-
Agent Management
- Browse Agent list
- Create and copy Agents
- Edit Agent files
- Run and stop Agents
- View execution logs
-
Terminal Access
- Web terminal
- SSH connections
- ttyd integration
-
Code Editing
- Text editor
- File browser
- VSCode Server integration (optional)
Technology Stack
Backend
- Python + Flask
- WebSocket support
- SSH terminal integration
- RESTful API
Frontend
- Vue 3 + Element Plus
- Monaco editor
Third-party Services
- ttyd (recommended)
- code-server (optional)
Quick Start
Environment Requirements
System Support
- Linux (supports apt-get and yum package managers)
- macOS
- Windows is not currently supported, WSL (Windows Subsystem for Linux) is recommended
Software Requirements
- Python 3.8 or higher
- Node.js 14 or higher
- MoFA framework installed
Installation and Run Scripts
The project provides two scripts:
-
install: One-click installation of all dependencies
chmod +x install
./install
Automatically installs backend/frontend dependencies with options for Docker or traditional installation. After installation, it will prompt whether to run, selecting yes will execute the run script. For local deployment, choose non-docker deployment.
-
run: One-click service startup
chmod +x run
./run
Supports both Docker and traditional deployment modes. For local deployment, choose non-docker deployment.
Docker Deployment (Recommended)
Using Docker avoids all environment issues for the fastest deployment:
# Simply run the installation script to choose docker deployment
./install
./run

# Or configure separately:

# One-line frontend deployment
docker run -d -p 3000:80 liyao1119/mofa-stage-frontend

# Start backend
cd backend && python app.py
🚀 Quick Start (30-second deployment)
Method 1: Using Official Image (Recommended)
# 1. Pull and start frontend
docker run -d -p 3000:80 --name mofa-frontend \
  --add-host=host.docker.internal:host-gateway \
  liyao1119/mofa-stage-frontend:latest

# 2. Clone repository and start backend
git clone https://github.com/mofa-org/mofa-stage.git
cd mofa-stage/backend
pip install -r requirements.txt
python app.py

# 3. Access system
# Open browser: http://localhost:3000
Method 2: Local Build
# 1. Clone code
git clone https://github.com/mofa-org/mofa-stage.git
cd mofa-stage

# 2. Use installation script (supports Docker mode selection)
./install

# 3. Start services
./run
📋 System Requirements
- Docker Desktop (Download)
- Python 3.8+ (backend only)
- 4GB available memory
Development Mode (Manual Startup)
- Start the backend
cd backend
python app.py
- Start the frontend (development mode)
cd frontend
npm run dev
Access http://localhost:3000.
Production Deployment
- Build the frontend
cd frontend
npm run build  # Generates in the dist directory
- Deployment methods (choose one)
Using Nginx
server {
    listen 80;

    # Static files
    location / {
        root /path/to/mofa_stage/frontend/dist;
        try_files $uri $uri/ /index.html;
    }

    # API forwarding
    location /api {
        proxy_pass http://localhost:5002;
        proxy_set_header Host $host;
        proxy_set_header X-Real-IP $remote_addr;
    }

    # WebSocket
    location /api/webssh {
        proxy_pass http://localhost:5001;
        proxy_http_version 1.1;
        proxy_set_header Upgrade $http_upgrade;
        proxy_set_header Connection "upgrade";
    }
}
Simple Deployment
Using Python's built-in HTTP server:
cd frontend/dist
python -m http.server 3000
Start the backend:
cd backend
python app.py
Common Issues
Port Occupation
If you encounter port occupation issues, you can use this command to release ports:
for port in 3000 5001 5002 7681; do
    pid=$(lsof -t -i:$port)
    if [ -n "$pid" ]; then
        kill -9 $pid
        echo "Released port $port"
    fi
done
Port Description
| Service | Port | Description |
|---|---|---|
| Frontend | 3000 | Web interface |
| Backend API | 5002 | Flask service |
| WebSSH | 5001 | SSH terminal |
| ttyd | 7681 | Web terminal |
| VS Code | 8080 | Code editor |
ttyd Installation Failure
If ttyd automatic installation fails, you can refer to the ttyd GitHub page for manual installation.
Docker-Specific Issues
Q: Port already in use?
# Check process using port 3000
lsof -i :3000
# Or change port mapping
docker run -d -p 8000:80 ...
Q: Container cannot connect to backend? Make sure backend service is running:
cd backend && python app.py
Q: How to update to latest version?
docker pull liyao1119/mofa-stage-frontend:latest
docker stop mofa-frontend
docker rm mofa-frontend
# Re-run docker run command
Q: How to view container logs?
docker logs mofa-frontend
Docker Advanced Configuration
Custom Build
cd frontend
# Build after modifying configuration
docker build -t my-mofa-frontend .
docker run -d -p 3000:80 my-mofa-frontend
Troubleshooting
-
Check if Docker is running properly
docker ps -
Check network connections
curl http://localhost:3000
curl http://localhost:5002/api/settings
-
Restart container
docker restart mofa-frontend
Directory Structure
mofa-stage/
├── backend/
│   ├── app.py              # Main application
│   ├── config.py           # Configuration
│   ├── routes/             # API routes
│   │   ├── agents.py       # Agent management
│   │   ├── terminal.py     # Terminal features
│   │   ├── webssh.py       # SSH connections
│   │   ├── vscode.py       # VSCode integration
│   │   ├── settings.py     # Settings management
│   │   ├── ttyd.py         # ttyd integration
│   │   └── mermaid.py      # Chart rendering
│   ├── utils/              # Utility modules
│   │   ├── mofa_cli.py     # MoFA command wrapper
│   │   ├── file_ops.py     # File operations
│   │   └── ttyd_manager.py # ttyd management
│   └── requirements.txt    # Python dependencies
├── frontend/
│   ├── src/
│   │   ├── views/          # Page components
│   │   ├── components/     # UI components
│   │   ├── api/            # API calls
│   │   ├── store/          # State management
│   │   └── router/         # Routing
│   └── package.json        # Node.js dependencies
├── install.sh              # Installation script
└── run.sh                  # Startup script
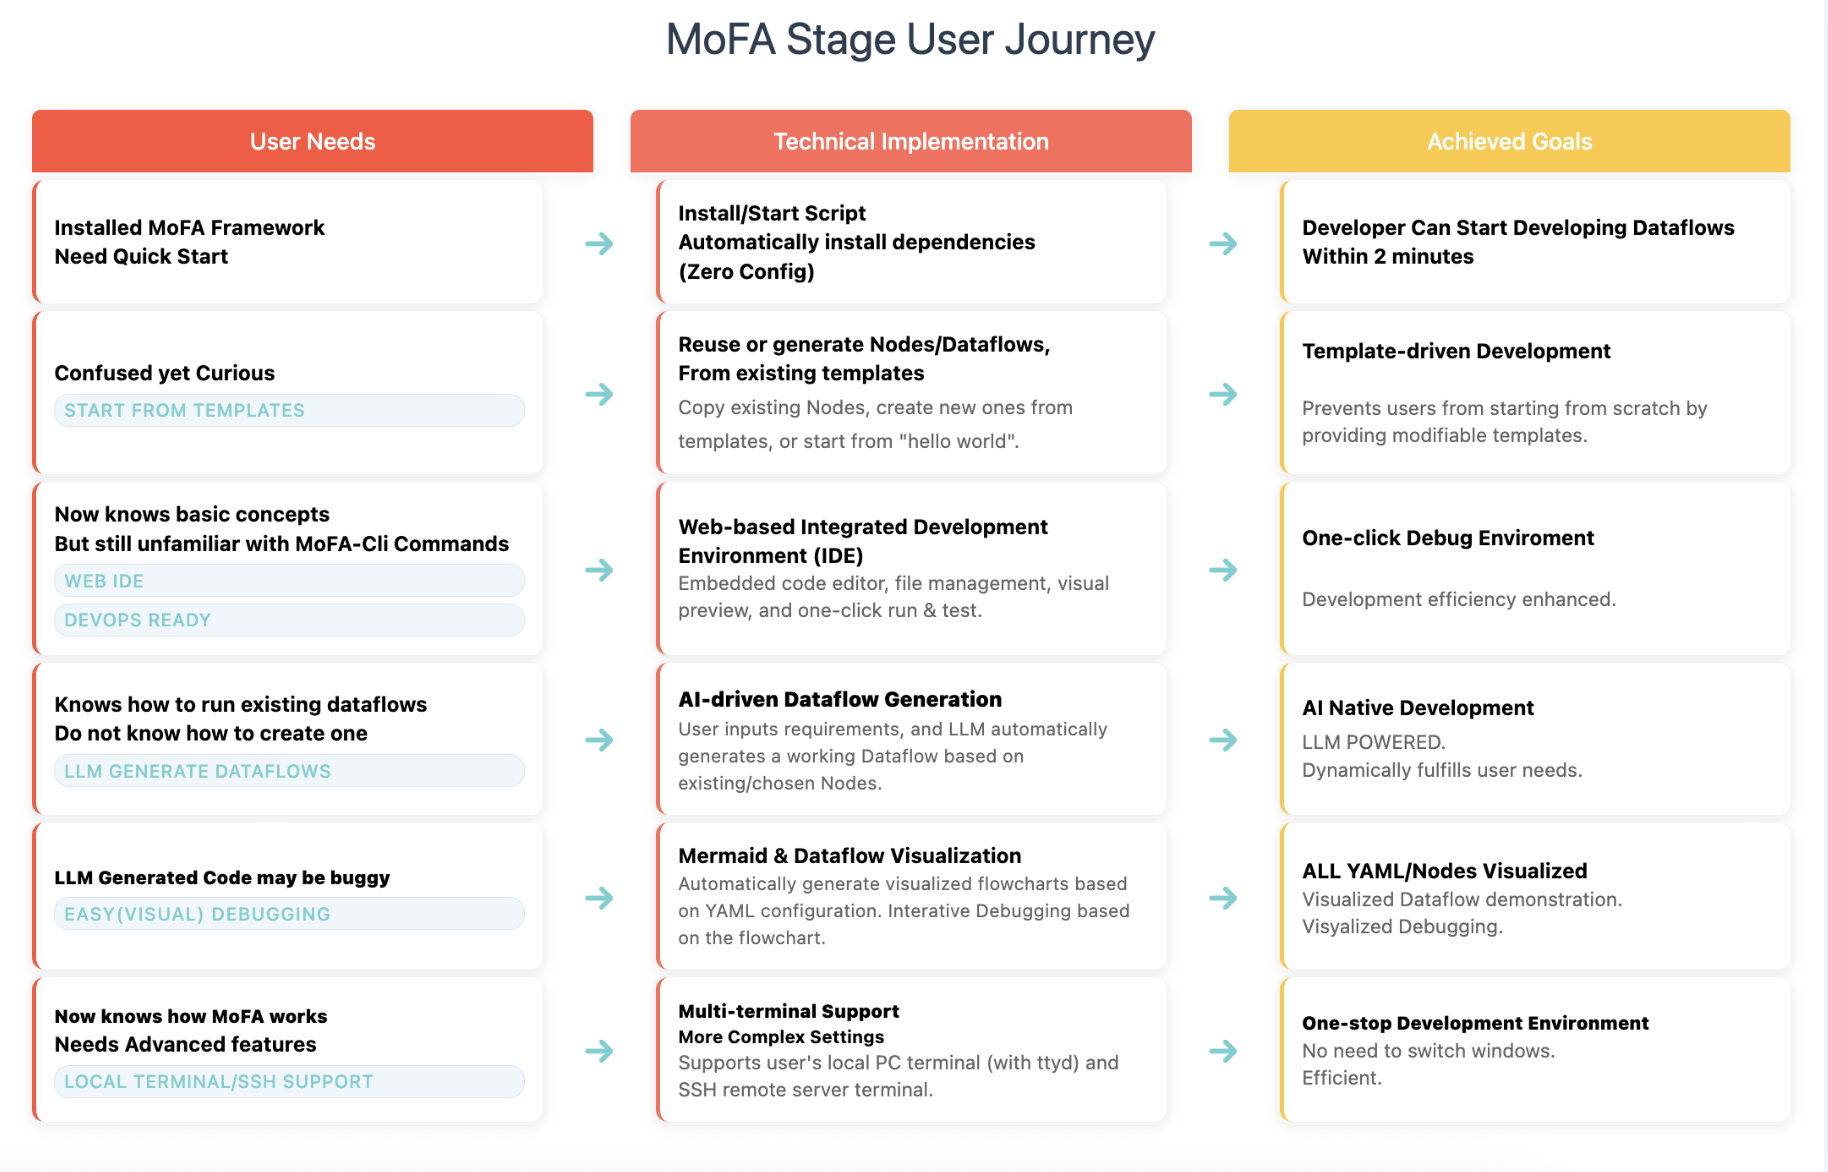
User Journey
graph TD
    A[🔧 Environment Setup] --> B[⚙️ System Configuration]
    B --> C[🤖 Agent Development]
    C --> D[🔄 Dataflow Orchestration]
    D --> E[🔍 Debugging & Optimization]

    A --> A1[Install MoFA Framework]
    A --> A2[Launch MoFA Stage]
    A --> A3[Access Web Interface]

    B --> B1[Configure MoFA Path]
    B --> B2[Select Terminal Mode]
    B --> B3[Test Connections]

    C --> C1[Browse Agent List]
    C --> C2[Create New Agent]
    C --> C3[Edit Agent Code]
    C --> C4[Test Agent]

    D --> D1[Create Dataflow]
    D --> D2[Connect Agents]
    D --> D3[Set Parameters]
    D --> D4[Run Dataflow]

    E --> E1[View Execution Logs]
    E --> E2[Use Terminal Debugging]
    E --> E3[Performance Monitoring]
    E --> E4[Version Management]


Download files
Download the file for your platform. If you're not sure which to choose, learn more about installing packages.
Source Distribution
Built Distribution
Filter files by name, interpreter, ABI, and platform.
If you're not sure about the file name format, learn more about wheel file names.
Copy a direct link to the current filters
File details
Details for the file mofa_stage-0.5.1.tar.gz.
File metadata
- Download URL: mofa_stage-0.5.1.tar.gz
- Upload date:
- Size: 49.8 MB
- Tags: Source
- Uploaded using Trusted Publishing? No
- Uploaded via: twine/6.1.0 CPython/3.10.18
File hashes
| Algorithm | Hash digest | |
|---|---|---|
| SHA256 |
85d173235fbd71e7de75602110818ff12915087836f82b18b9500380acb033bc
|
|
| MD5 |
925dccfcb117a666393203443eea81c7
|
|
| BLAKE2b-256 |
7e4d62fe932dd2ad12375ce1104ed6137ae5217d30a79381ec8c76eac887626d
|
File details
Details for the file mofa_stage-0.5.1-py3-none-any.whl.
File metadata
- Download URL: mofa_stage-0.5.1-py3-none-any.whl
- Upload date:
- Size: 32.1 MB
- Tags: Python 3
- Uploaded using Trusted Publishing? No
- Uploaded via: twine/6.1.0 CPython/3.10.18
File hashes
| Algorithm | Hash digest | |
|---|---|---|
| SHA256 |
ecbba6ba903be68dead183369848d1891061ecc3a523ab1dd04c502bbe60503a
|
|
| MD5 |
9590c4ca718eeac9c4788481f08a7abe
|
|
| BLAKE2b-256 |
e48a3845c3f44dd695d30453a671fa5f87a0da8ef7b2769fd6c3fa4cd20c5652
|


