
This release is a pre-release and may not be stable for production use.
MOLT
Thermally aware, memory-efficient QLoRA fine-tuning for consumer NVIDIA GPUs.





MOLT provides a Windows-first workflow to prepare data, validate workload fit, fine-tune supported local language models, safely resume interrupted runs, and export adapters. It includes hardware telemetry, thermal controls, verified checkpointing, and experimental optimized execution paths.
Latest release: 0.11.0a8 · Source-available research alpha.
Install the versioned release below; main may include unreleased changes.
Validate workloads before production use.
Current evidence
On the development RTX 4060 Laptop GPU, six-pair matched diagnostic screens produced the following means against the tested Unsloth configuration:
| Model family | Training time | Board energy | PyTorch allocator peak |
|---|---|---|---|
| Qwen | 38.42% lower | 21.90% lower | 8.13% lower |
| Llama-family | 46.54% lower | 39.23% lower | 5.66% lower |
| Gemma | 73.38% lower | 47.51% lower | 0.47% lower |
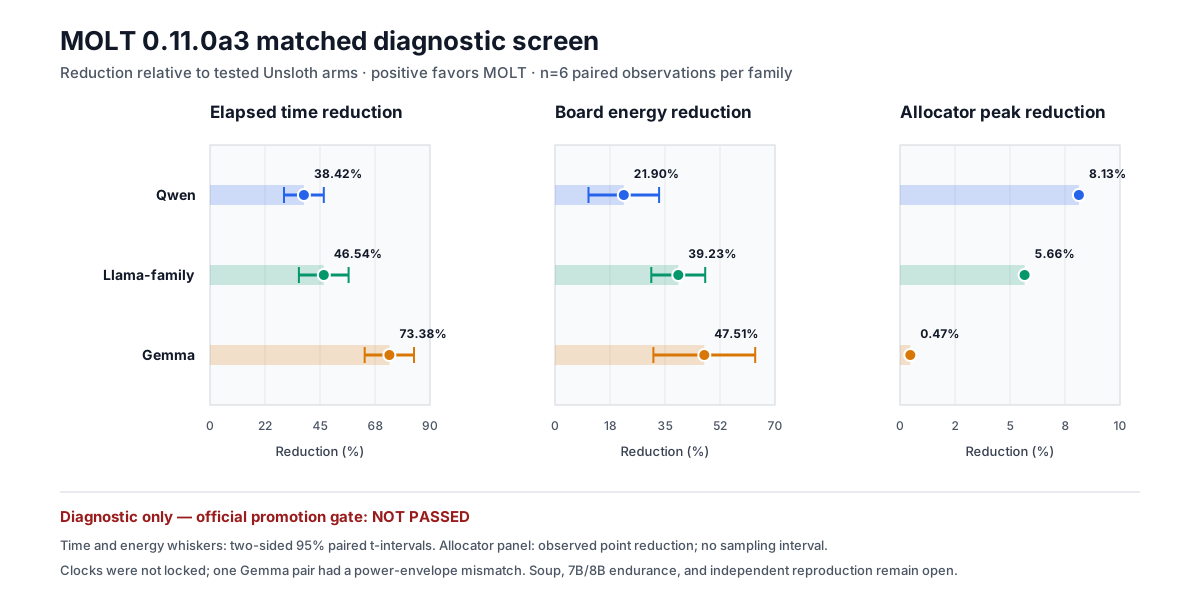
See the single reproduction page, calculation method, and machine-readable aggregate.
Every recorded pair favored MOLT for elapsed time and energy. These results are diagnostic evidence, not a universal performance claim: graphics clocks were not locked, one Gemma competitor arm had a power-limit transient, Soup has not yet been compared, and 7B/8B endurance and independent reproduction remain open.
Public documentation covers supported interfaces, observable behavior, and reproducible measurements. Internal optimization rationale and development profiling records are not part of the documented API.
Requirements
- Windows 10 or Windows 11, 64-bit
- Python 3.12
- A supported NVIDIA GPU and compatible driver
- Git for source installation
- Internet access and several GB of free disk space during installation
Model weights and datasets are not downloaded automatically.
Installation
Recommended: managed per-user installation
Open PowerShell and run this single command. It downloads the immutable Alpha 8 installer and runs it outside the repository:
$p="$env:TEMP\molt-install.ps1"; Invoke-WebRequest https://raw.githubusercontent.com/PraveenNimilka/MOLT/v0.11.0-alpha.8/install-global.ps1 -OutFile $p; if ((Get-FileHash $p -Algorithm SHA256).Hash -ne "275591f0bbb05ce164b96387c61b1d1a572cda9479e8ca7a60e399ca7cc74119") { throw "MOLT installer hash mismatch" }; powershell -NoProfile -ExecutionPolicy Bypass -File $p
The installer creates one runtime at %LOCALAPPDATA%\MOLT\runtime, puts one
launcher at %LOCALAPPDATA%\MOLT\bin, moves that launcher to the front of the
user PATH, installs the CUDA 12.8 PyTorch build and all supported training
extras, and runs dependency, CUDA-backward, and compiled-backward checks. Its
persistent uv cache prevents every project from downloading PyTorch again.
Verify the installation:
molt --version
molt doctor
Manage the installation from any directory:
molt update
molt repair
molt uninstall
Reproducible source installation
git clone --branch v0.11.0-alpha.8 --depth 1 https://github.com/PraveenNimilka/MOLT.git
Set-Location MOLT
powershell -NoProfile -ExecutionPolicy Bypass -File .\install.ps1
.\.venv\Scripts\molt.exe doctor
The installer creates a project-local environment, uses the locked dependency set, verifies the downloaded bootstrap script, checks CUDA backward execution, and checks the optimized backend when enabled. It does not modify GPU drivers, antivirus settings, fan curves, or persistent power settings.
To omit the optional optimized backend:
powershell -NoProfile -ExecutionPolicy Bypass -File .\install.ps1 -EagerOnly
winget install MOLT is a distribution target, not a currently published
command; Microsoft must accept a versioned package manifest before it can be
advertised. See the complete installation guide for troubleshooting.
First training run
Want one copy-and-run example? Follow the complete beginner recipe, then watch the 75-second measured workflow demonstration and inspect its full sanitized log.
For the simplest workflow, run:
molt
Use Up/Down and Enter, choose Train, select the local model directory and
training data, then keep the recommended settings or customize the important
ones. Raw .txt, .jsonl, and .parquet data is prepared automatically. MOLT
runs a two-step fit check, waits for a stable starting temperature, and starts
the full run only after the checks pass. During training, Ctrl+C opens a safe
stop menu and offers a verified resumable checkpoint.
CPU temperature is displayed when the operating system or a supported hardware
monitor exposes a real CPU package sensor. On Windows systems without one, MOLT
shows CPU sensor unavailable; it never substitutes an ACPI zone or invented
value. GPU cooling and the GPU abort boundary remain active.
The explicit commands below remain available for reproducible and automated workflows.
1. Check the machine
molt doctor
molt info
Resolve any reported CUDA or optional-dependency error before continuing.
2. Prepare a local model
Download a supported Hugging Face-format Qwen, Llama-family, or Gemma-family model into a local directory. Review and accept the model's own license.
Example layout:
C:\Models\Qwen2.5-0.5B\
  config.json
  tokenizer.json
  model.safetensors
3. Prepare training data
MOLT accepts UTF-8 .txt, .jsonl, and .parquet. Common text, chat
messages, and prompt/completion records are recognized.
molt prepare C:\Data\training.jsonl `
  --model C:\Models\Qwen2.5-0.5B `
  --output C:\MoltRuns\prepared
The output directory contains prepared token data and a starter training.json.
MOLT will not overwrite an existing preparation directory.
4. Run a two-step fit test
molt fit-test --config C:\MoltRuns\prepared\training.json
This validates real forward, backward, and optimizer steps at the configured geometry. It is not an endurance test.
5. Validate without allocating the full workload
molt train --config C:\MoltRuns\prepared\training.json --dry-run
6. Start training
molt train --config C:\MoltRuns\prepared\training.json
Start with a small context and step count. Model fit depends on architecture, rank, context, batch size, precision, optimizer, and available VRAM.
7. Inspect or resume
molt runs
molt resume
MOLT stages checkpoints before publication and verifies their recorded hashes before loading. Integrity checks do not make an untrusted checkpoint authentic.
8. Evaluate and export
molt evaluate --help
molt export --help
QLoRA runs can export a PEFT-compatible safetensors adapter. The original base model is still required for inference.
Experimental scratch pretraining is limited to MOLT's compact native causal decoder configuration. It is not presented as a general pretraining framework for arbitrary third-party architectures.
Operating safely
- Treat models, datasets, configuration files, and checkpoints as untrusted.
- Do not enable third-party remote model code unless you trust its publisher.
- Keep important checkpoints backed up outside the active run directory.
- Use
molt optimize-gpuonly after reading its prompt and requirements; MOLT never changes clock settings implicitly. - Do not treat a dry run or dependency check as proof that a model fits in VRAM.
- Do not publish private paths, data, credentials, or model weights in bug reports.
Report vulnerabilities through GitHub's private security-advisory workflow. See SECURITY.md.
CLI overview
molt --help
molt prepare --help
molt fit-test --help
molt train --help
molt resume --help
molt export --help
The stable customer path is:
install -> doctor -> prepare -> fit-test -> train -> evaluate -> export
Research and benchmark commands are experimental and can change between alpha releases.
Release boundary
- Automated tests cover the public runtime and verify that the checked-in benchmark figure matches its data. See the release checks for results.
- Static source scanning found no high-severity issue.
- The auditable Python dependency set has no known reported vulnerability.
- GitHub Actions are commit-pinned and PyPI publishing uses short-lived OIDC.
- The final controlled-clock, Soup, large-model endurance, and independent comparison gates are not complete.
Read the 0.11.0a8 release notes, CLI reference, support policy, and licensing boundary. Dependency attribution and branding rules are recorded in THIRD_PARTY_NOTICES.md and TRADEMARKS.md.
License
Current MOLT source is available under the PolyForm Shield License 1.0.0. It is source-available, not OSI open source, and restricts use to provide a product that competes with the licensor. Models, datasets, and dependencies retain their own licenses. Public Python packages can be inspected; the license is a legal boundary, not technical copy prevention. Obtain qualified legal advice for commercial reliance.
1 maintainer

Download files
Download the file for your platform. If you're not sure which to choose, learn more about installing packages.
Source Distribution
Built Distribution
Filter files by name, interpreter, ABI, and platform.
If you're not sure about the file name format, learn more about wheel file names.
Copy a direct link to the current filters
File details
Details for the file moltengine-0.11.0a8.tar.gz.
File metadata
- Download URL: moltengine-0.11.0a8.tar.gz
- Upload date:
- Size: 138.5 kB
- Tags: Source
- Uploaded using Trusted Publishing? Yes
- Uploaded via:
twine/7.0.0 CPython/3.13.14
File hashes
| Algorithm | Hash digest | |
|---|---|---|
| SHA256 |
930a0cface571d63135d162323f16aac175b8373f751e5f78d385d0ea9d8aff7
|
|
| MD5 |
b8ff483118fb166ed1d6b3d34414791e
|
|
| BLAKE2b-256 |
897d87afca073d3126b4c041a921b72b7478b42c7011ad5c56c1965ae8abcc1d
|
Provenance
The following attestation bundles were made for moltengine-0.11.0a8.tar.gz:
Publisher:
publish.yml on PraveenNimilka/MOLT
-
Statement:
-
Statement type:
https://in-toto.io/Statement/v1 -
Predicate type:
https://docs.pypi.org/attestations/publish/v1 -
Subject name:
moltengine-0.11.0a8.tar.gz -
Subject digest:
930a0cface571d63135d162323f16aac175b8373f751e5f78d385d0ea9d8aff7 - Sigstore transparency entry: 2761050427
- Sigstore integration time:
-
Permalink:
PraveenNimilka/MOLT@5b1e6e233e5aa8566d6f19678a5cfe2b335f456d -
Branch / Tag:
refs/tags/v0.11.0-alpha.8 - Owner: https://github.com/PraveenNimilka
-
Access:
public
-
Token Issuer:
https://token.actions.githubusercontent.com -
Runner Environment:
github-hosted -
Publication workflow:
publish.yml@5b1e6e233e5aa8566d6f19678a5cfe2b335f456d -
Trigger Event:
push
-
Statement type:
File details
Details for the file moltengine-0.11.0a8-py3-none-any.whl.
File metadata
- Download URL: moltengine-0.11.0a8-py3-none-any.whl
- Upload date:
- Size: 176.3 kB
- Tags: Python 3
- Uploaded using Trusted Publishing? Yes
- Uploaded via:
twine/7.0.0 CPython/3.13.14
File hashes
| Algorithm | Hash digest | |
|---|---|---|
| SHA256 |
3e6967cd27f06ccb277f3edc1554cce2e8b1b5c8a9b6ea082fba7341847c4b0d
|
|
| MD5 |
702ba2d3e5f64b14d0fb38100b1aadaf
|
|
| BLAKE2b-256 |
e74f24f1952e47c6ac04dabebba0250e65cc889519185f703da227bf337c57fa
|
Provenance
The following attestation bundles were made for moltengine-0.11.0a8-py3-none-any.whl:
Publisher:
publish.yml on PraveenNimilka/MOLT
-
Statement:
-
Statement type:
https://in-toto.io/Statement/v1 -
Predicate type:
https://docs.pypi.org/attestations/publish/v1 -
Subject name:
moltengine-0.11.0a8-py3-none-any.whl -
Subject digest:
3e6967cd27f06ccb277f3edc1554cce2e8b1b5c8a9b6ea082fba7341847c4b0d - Sigstore transparency entry: 2761050647
- Sigstore integration time:
-
Permalink:
PraveenNimilka/MOLT@5b1e6e233e5aa8566d6f19678a5cfe2b335f456d -
Branch / Tag:
refs/tags/v0.11.0-alpha.8 - Owner: https://github.com/PraveenNimilka
-
Access:
public
-
Token Issuer:
https://token.actions.githubusercontent.com -
Runner Environment:
github-hosted -
Publication workflow:
publish.yml@5b1e6e233e5aa8566d6f19678a5cfe2b335f456d -
Trigger Event:
push
-
Statement type:














