
mpl-richtext
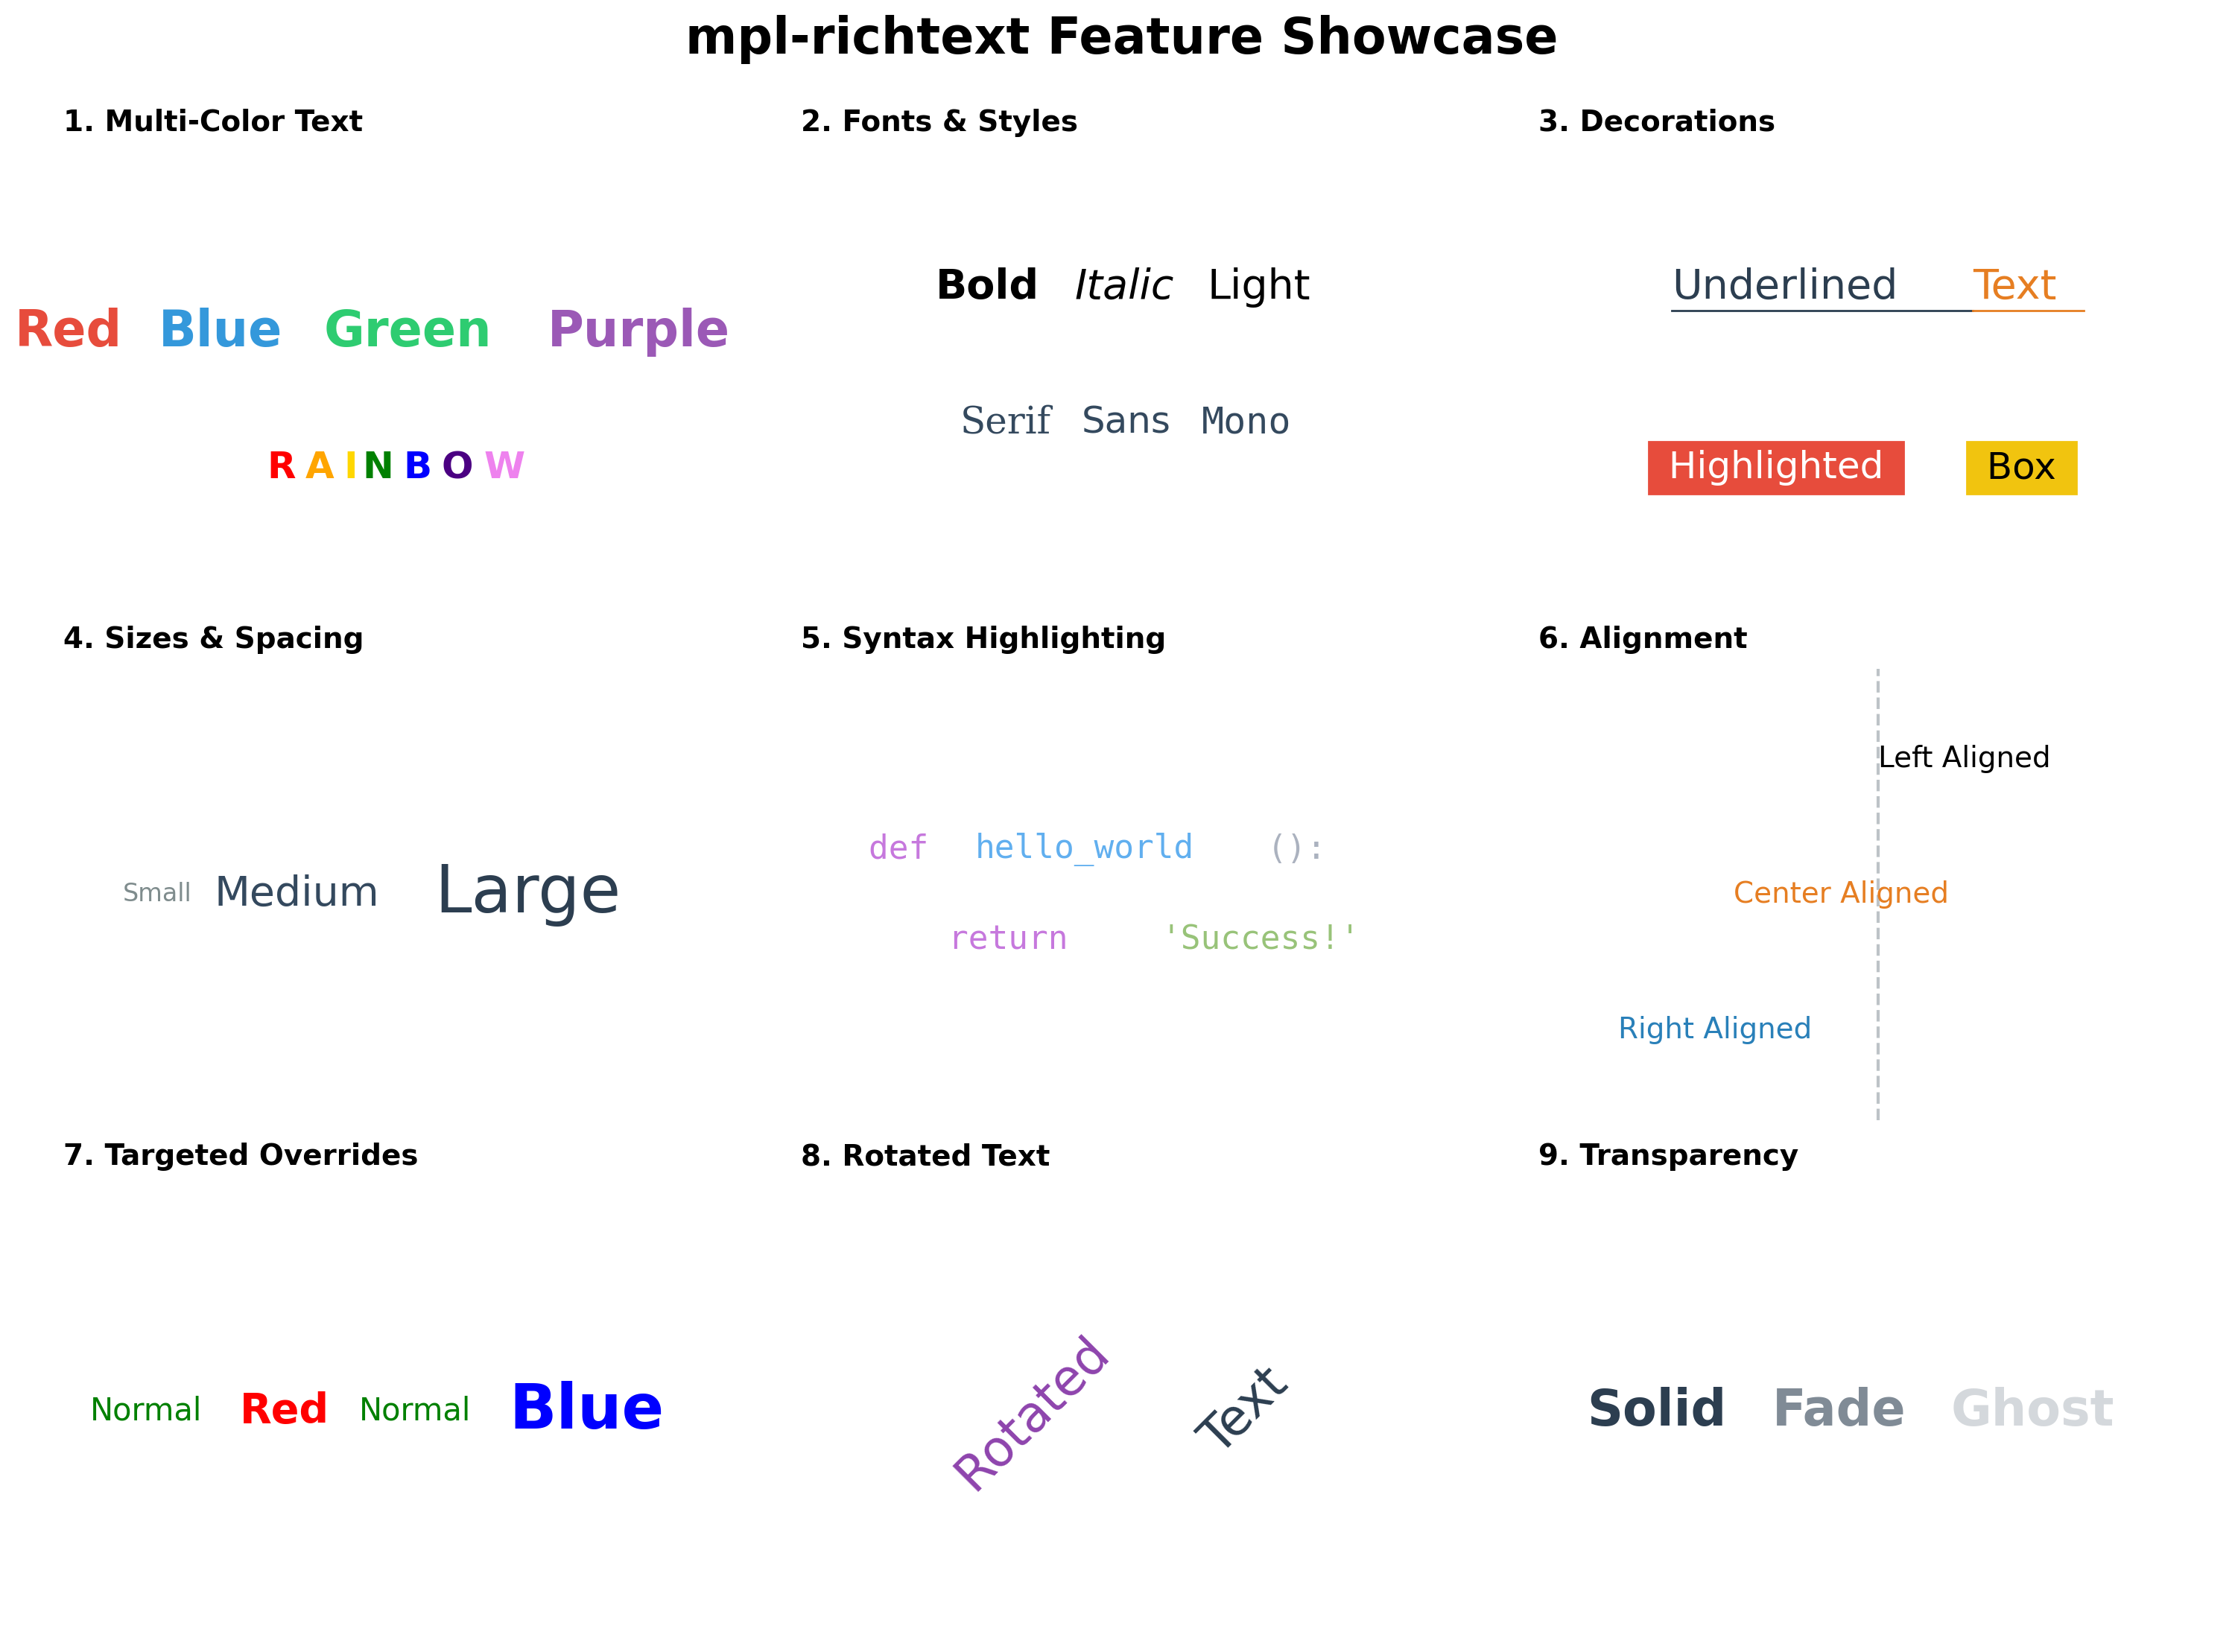
Rich text rendering for Matplotlib - Create beautiful multi-color, multi-style text in a single line.


Why mpl-richtext?
Standard Matplotlib only supports single-color text. To create multi-colored text, you need to manually position each piece and calculate spacing - tedious and error-prone!
mpl-richtext solves this by letting you specify colors and styles for each text segment in one simple function call.
Installation
pip install mpl-richtext
Quick Start
import matplotlib.pyplot as plt
from mpl_richtext import richtext

fig, ax = plt.subplots()

# Create multi-colored text in one line!
richtext(0.5, 0.5,
         strings=["hello", ", ", "world"],
         colors=["red", "blue", "green"],
         ax=ax, fontsize=20, transform=ax.transAxes)

plt.show()
Features
✨ Multi-color text - Different colors for each word or character
🎨 Multi-style text - Mix font sizes, weights, families, and styles (italic/oblique)
🚀 Index-based styling - Cleaner API with property aliases (NEW in v0.2.0)
🇳🇵 Nepali/Devanagari support - Native complex script rendering with HarfBuzz
📦 Flexible input - Lists, dicts, or tuples for colors and properties
📏 Auto word-wrapping - Specify box_width for automatic text wrapping
🎯 Full alignment - Left, center, right horizontal and vertical alignment
✨ Decorations - Support for underlines and background colors
🔄 Transformations - Support for text rotation
👻 Transparency - Support for alpha values per segment
⚡ Easy to use - Simple API, works with any Matplotlib axes
API Reference
richtext(x, y, strings, colors=None, ax=None, **kwargs)
Parameters:
-
x, y :
float
Starting position of the text -
strings :
list of str
List of text segments, e.g.,["hello", ", ", "world"] -
colors :
str,list, ordict, optional
Colors for each segment. Can be:- Single string:
"red"(applies to all) - List:
["red", "blue", "green"](one per segment) - Dict:
{0: "red", 2: "green"}(specific indices) - Tuple keys:
{(0, 2): "red"}(multiple indices same color)
- Single string:
-
ax :
matplotlib.axes.Axes, optional
Axes to draw on. IfNone, uses current axes. -
kwargs : Additional properties
- Global:
box_width,linespacing,ha,va,transform,zorder - Per-segment:
fontsize/fontsizes,fontweight/fontweights,fontfamily/fontfamilies, etc. - Any property can be:
- Single value (applies to all)
- List (one per segment, auto-extends)
- Dict (specific indices)
- Global:
Returns:
list of Text- List of created matplotlib Text objects
✨ Index-Based Styling API (New in v0.2.0)
For complex multi-style text, use the styles parameter for cleaner, more readable code:
Old API (Still Works)
richtext(x, y, ["Company", " (Category)"],
         colors={0: 'blue', 1: 'gray'},
         fontsizes={0: 14, 1: 10},
         fontweights={0: 'bold', 1: 'normal'})
New API (Cleaner)
richtext(x, y, ["Company", " (Category)"],
         {0: {'color': 'blue', 'size': 14, 'weight': 'bold'},
          1: {'color': 'gray', 'size': 10, 'weight': 'normal'}})
Property Aliases
Use friendly short names instead of full matplotlib property names:
| Alias | Full Name | Example |
|---|---|---|
size |
fontsize |
{'size': 20} |
weight |
fontweight |
{'weight': 'bold'} |
family |
fontfamily |
{'family': 'monospace'} |
style |
fontstyle |
{'style': 'italic'} |
Flexible Mixing
Combine global defaults, property dicts, and styles dict for maximum flexibility:
richtext(x, y, ["A", "B", "C", "D"],
         fontsize=10,                           # Global default
         colors={1: 'orange'},                  # Target specific segment
         styles={2: {'color': 'purple', 'size': 18, 'weight': 'bold'}},
         ax=ax)
Priority Order: styles dict > individual kwargs > global defaults
Tuple Keys for Multiple Indices
Apply the same styles to multiple indices using tuple keys:
richtext(x, y, ["A", "B", "C", "D", "E"],
         {(0, 2, 4): {'color': 'red', 'size': 20, 'weight': 'bold'},
          (1, 3): {'color': 'blue', 'size': 12}},
         ax=ax)

# Results: A, C, E are red/20/bold
#          B, D are blue/12
This is more concise than repeating the same styles:
# Instead of this verbose version:
{0: {'color': 'red', 'size': 20},
 2: {'color': 'red', 'size': 20},
 4: {'color': 'red', 'size': 20}}

# Use this:
{(0, 2, 4): {'color': 'red', 'size': 20}}
Usage Examples
Title and Subtitle:
richtext(x, y,
         ["Main Title", " (Subtitle)"],
         {0: {'size': 14, 'weight': 'bold', 'color': '#2C4A6E'},
          1: {'size': 10, 'weight': 'normal', 'color': '#556B2F'}},
         ha='center', va='center', ax=ax)
Syntax Highlighting:
richtext(x, y,
         ["def ", "function", "(", "arg", "):"],
         {0: {'color': '#C678DD', 'weight': 'bold'},
          1: {'color': '#61AFEF'},
          2: {'color': '#ABB2BF'},
          3: {'color': '#E06C75'},
          4: {'color': '#ABB2BF'}},
         fontsize=14, family='monospace', ax=ax)
🇳🇵 Nepali/Devanagari Support
mpl-richtext provides native support for complex scripts including Nepali, Hindi, Sanskrit, and other Devanagari-based languages through HarfBuzz text shaping.
Why Special Support?
Devanagari script requires complex text shaping where:
- Characters combine and transform based on context
- Ligatures form automatically (e.g., क + ् + ष = क्ष)
- Vowel marks (matras) position correctly
- Rendering order differs from logical order
Standard matplotlib struggles with these complexities. mpl-richtext automatically handles this!
Features
✅ Automatic Detection - Detects Devanagari characters and applies proper shaping
✅ Accurate Metrics - Correct width and height measurements for layout
✅ Font Support - Works with Noto Sans Devanagari, Devanagari fonts
✅ Zero Config - Just use Nepali text, it works automatically!
Usage
import matplotlib.pyplot as plt
from mpl_richtext import richtext
import matplotlib.font_manager as fm

# Set up Nepali font
plt.rcParams['font.family'] = 'sans-serif'
plt.rcParams['font.sans-serif'] = ['Noto Sans Devanagari', 'DejaVu Sans']

fig, ax = plt.subplots()

# Create Nepali text with styling
richtext(0.5, 0.7,
         ["मुख्य शीर्षक", " (उपशीर्षक)"],
         {0: {'size': 14, 'weight': 'bold', 'color': '#2C4A6E'},
          1: {'size': 10, 'weight': 'normal', 'color': '#556B2F'}},
         ha='center', va='center', ax=ax)

plt.show()
Mixed English-Nepali
richtext(0.5, 0.5,
         ["Hello: ", "नमस्ते संसार ", "2082 माघ 24"],
         {0: {'size': 16, 'weight': 'bold', 'color': 'orange'},
          1: {'size': 14, 'weight': 'normal', 'color': 'blue'},
          2: {'size': 14, 'weight': 'bold', 'color': 'green'}},
         ax=ax)
Font Setup for Nepali
Install Noto Sans Devanagari:
# Ubuntu/Debian
sudo apt-get install fonts-noto

# macOS
brew install --cask font-noto-sans-devanagari

# Windows
# Download from Google Fonts: https://fonts.google.com/noto/specimen/Noto+Sans+Devanagari
Using Custom Fonts:
import matplotlib.font_manager as fm

# Load custom Nepali font
nepali_font = fm.FontProperties(fname='/path/to/NepaliFont.ttf')

richtext(x, y, ["नेपाली पाठ"], {},
         fontproperties=nepali_font,
         fontsize=16, ax=ax)
Technical Details
- Shaping Engine: Uses uharfbuzz for OpenType shaping
- Supported Scripts: Devanagari (U+0900–U+097F), Devanagari Extended, Vedic Extensions
- Automatic Fallback: Falls back to native matplotlib if HarfBuzz unavailable
- Performance: Efficient caching and optimized rendering
Contributing
Contributions are welcome! Please feel free to submit a Pull Request.
- Fork the repository
- Create your feature branch (
git checkout -b feature/AmazingFeature) - Commit your changes (
git commit -m 'Add some AmazingFeature') - Push to the branch (
git push origin feature/AmazingFeature) - Open a Pull Request
License
This project is licensed under the MIT License - see the LICENSE file for details.
Links
- PyPI: https://pypi.org/project/mpl-richtext/
- GitHub: https://github.com/ra8in/mpl-richtext
- Issues: https://github.com/ra8in/mpl-richtext/issues
Made with ❤️ for the Matplotlib community
1 maintainer

Metadata
1 maintainer
Release files for mpl-richtext 0.2.1
For a detailed explanation of source distributions (sdists) and built distributions (wheels), please see the package formats documentation.
Source distribution (sdist)
| File | Size | Uploaded | |
|---|---|---|---|
| mpl_richtext-0.2.1.tar.gz | 249.2 kB | Details |
Built distribution (wheel)
| File | Interpreter | ABI | Platform | Reset |
|---|---|---|---|---|
| mpl_richtext-0.2.1-py3-none-any.whl | Python 3 | none | any | Details |
Total release size: 267.8 kB
Release files / mpl_richtext-0.2.1.tar.gz
| Download URL | mpl_richtext-0.2.1.tar.gz |
|---|---|
| Size | 249.2 kB |
| Tags | Source |
|
SHA-256 checksum How to use checksums |
fe4711d4f15ce404aacf8cead1d16c4c159c381a909730cfacbbf019780e3ae8
|
|
BLAKE2b-256 checksum How to use checksums |
23d4e76739897a96dff184151854f21caf4ba2474dbaebb41e340d4335481ece
|
| Upload date | |
|
Uploaded using Trusted Publishing? What is trusted publishing? |
Yes |
| Uploaded via |
twine/7.0.0 CPython/3.13.14
|
Provenance
Provenance describes where a file came from. On PyPI, provenance is shared via attestations, which provide a verifiable record of the build or publishing details. View details, limitations and caveats.


PyPI Publish Attestation
PyPI verified that this artifact, at this checksum, originated from the publisher listed below.
Signed by GitHub Actions, verified by PyPI on Sep 6, 2026.
Transparency logRelease files / mpl_richtext-0.2.1-py3-none-any.whl
| Download URL | mpl_richtext-0.2.1-py3-none-any.whl |
|---|---|
| Size | 18.6 kB |
| Tags | Python 3 |
|
SHA-256 checksum How to use checksums |
ee4d31567ff9ffa4a95a3f565715fe1602470c7d8ff1f849a7bace55d2b5e078
|
|
BLAKE2b-256 checksum How to use checksums |
4eec76f300bc81d0d5a5f394be4fa8113f696a9ef4ced52f3685559141394fe0
|
| Upload date | |
|
Uploaded using Trusted Publishing? What is trusted publishing? |
Yes |
| Uploaded via |
twine/7.0.0 CPython/3.13.14
|
Provenance
Provenance describes where a file came from. On PyPI, provenance is shared via attestations, which provide a verifiable record of the build or publishing details. View details, limitations and caveats.
PyPI Publish Attestation
PyPI verified that this artifact, at this checksum, originated from the publisher listed below.
Signed by GitHub Actions, verified by PyPI on Sep 6, 2026.
Transparency log













