
Simple BTRFS Snapshot Tools

Project description
Minimal Quick Start:
- On python 3.11+, install
pipx, elsepip, and per your distro.- With
pipx, runpipx upgrade my-snaps || pipx install my-snaps- With
pip, runpip install --upgrade my-snaps --user- If
~/.local/bin/is not on your $PATH, then make it so.- Run
my-snaps; for each subvolume that you wish to snapshot, create a snapshot with=Updatesuffix (and as many as you wish to keep normally).- Subsequently before updates, run
my-snapsand typer(replace-all) to replace the eldest=Updatesnaps per subvolume with new snaps.- For regular balancing, run
bt-smart-balance -ionce to installanacronjob.
my-snaps - Simple Tools for BTRFS snapshots
my-snapsassists creating snapshots and replacing the snapshots for the simplest BTRFS use cases (e.g., just before software updates).my-restoreassists restoring snapshots to back out changes to the systembt-smart-balanceis meant to be run regularly (say weekly) to keep your BTRFS balanced. Although bundled withmy-snaps, it is unrelated to snapshots, per se.
Prerequisites. To use these tools, you must have an appropriate BTRFS setup:
- Your mounted top-level subvolume names must not contain '.' (i.e., periods).
- Your snapshot names must be one of the forms:
{subvolume}.{date-string}{subvolume}.{date-string}={label}
- Your snapshots must reside in a top-level subvolume ending with "snapshots"; and it must normally be mounted at
/.snapshots - Labels define sets of snapshots that independently managed.
- note: you cannot use the characters "." or "/" in the snapshot names and labels
- Suggested labels:
- =Update - created prior to a system update
- =Daily - scheduled daily snapshots (and similarly for other periods)
Here is a compliant BTRFS setup showing it subvolumes/snapshots:
top-levels: eos@cache  eos@home  eos@log  eos@my-opt  eos@root  eos@snapshots

eos@snapshots:
'eos@home.2024-01-13-093817=Update'    'eos@root.2024-01-10-174732=Update'
'eos@home.2024-01-14-085102=Daily'     'eos@root.2024-01-13-084102=Daily'
'eos@home.2024-01-15-201554=Update'    'eos@root.2024-01-13-093817=Update'
'eos@my-opt.2024-01-13-093817=Update'  'eos@root.2024-01-14-085102=Daily'
'eos@my-opt.2024-01-14-085102=Daily'
Installation. See the Quick Start. After install, run some tests per "Initial and Regression Testing"
my-snaps
my-snaps can be used for simple snapshot maintenance. After running, it may look like this:
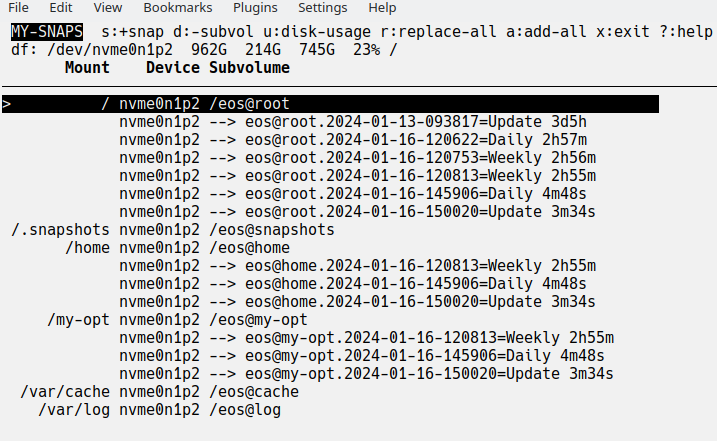
- In the header, the BTRFS partitions are shown with
df -hinfo (showing Size, Used, Avail, Use%, and Mounted on); run df separately to remind you of the fields when needed. - On your very first run, highlight each subvolume for which you wish snapshots, and press
sto create one (use one of your standard labels) rreplaces your eldest snapshot of the same label for each top-level subvolume that has any snapshots.areplaces a snapshot of the same label for each top-level subvolume that has any snapshots.- to describe snapshots, add a short label when prompted (e.g., "=Update").
d: to remove highlighted subvolume (usually pick a snapshot); you cannot remove mounted subvolumes; if there are nested subvolumes, those are removed too.u: to get disk usage (this can take quite a while and is not perfect)?: to get help on all keys and navigation
NOTE: actions often require confirmation to ensure accidental keystrokes do not clobber your system.
Non-interactive use: my-snaps can be run non-interactively with these options:
-por--printdumps your top-level subvolumes and their snapshots-s{N}or--add-snap-max={N}adds a new snapshot for each subvolume with snapshots and removes the eldest until there are no more than{N}.-l{label}or--label={label}to set the label of the snapshots involved.--cron={period}adds ananacronjob to add snapshots at the given period with appropriate defaulted-sand-Lor you can specify those. Notes:anacronmust be installed ... it is usually bundled in of acronpackage such ascronie.- jobs are stored in
/etc/cron.{period}/{period}.snaps. To change jobs settings, edit those or just reinstall with new options. - each time the job is run, its output goes to
/tmp/.my-snaps-{period}.txt - removal of the
anacronjobs is done manually
my-restore
my-restore is used to restore one or more of your snapshots. When launched, you see something like this:
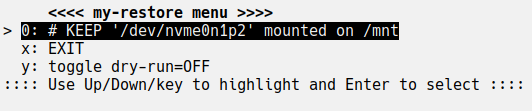
Choose the desired BTRFS partition to mount on /mnt (after running umount /mnt if occupied).
Next you'll see a screen like this:
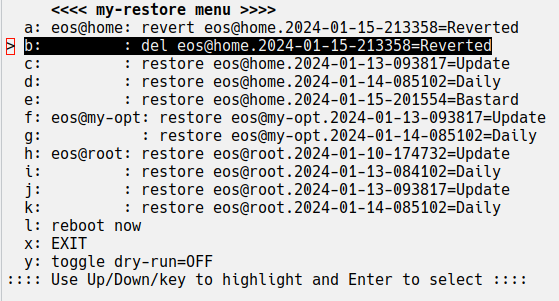
- Highlight and press enter on the desired choice to effect the given action:
- restore: promotes the snapshot to current
- revert: moves the reversion back to current
- del: deletes the reversion; note: delay deletion until a restore passes muster.
- when done with restores, reboot the system.
- to verify what would be done when choosing an action, you can put the tool in "dry-run" mode.
Theory: To restore a snapshot of the subvolume called "{subv}":
- normally, {subv} is renamed "{subv}.YYYY-MM-DD-HHMMSS=Reverted"; buf, if already reverted, {subv} simply removed, and
- secondly, a new, writable {subv} is created from the chosen read-only snapshot.
------------- IMPORTANT NOTES -------------
When a restore is tested and deemed satisfactory then clean up.
- To clean up, launch
my-snapsormy-restoreand delete "=Reverted" subvolumes. - Warning: Failing to clean up will confuse the next
my-restoreand waste space.
When a restore is tested and deemed unsatisfactory:
- Launch
my-snapsand adjust the restored snapshots as desired (e.g., restore a different snapshot or revert the reverted tip). - Then reboot, test, and iterate until you are done and then clean up.
In the case that an update or restore will not boot, then:
- boot the live installer.
- install these tools per the instructions.
- use
my-restoreto return to a working system and reboot and eventually clean up the reverted subvolumes on the installed system.
Initial and Regression Testing
Do not assume the BTRFS scripts work for you and then be in a pickle later. After install:
-
Run
my-snapsand ensure:- all the top-level subvolumes are showing, and
- the expected snapshots are showing, and
- add snapshots for the volumes you may wish to restore.
-
If
my-snapsis working, runmy-restoreand, after device selection, that the "restore" entries look right, and -
If all looks well, restore and then revert one of your subvolumes (returning all subvolumes as they were).
If there are issues, ensure snapshots are in a subvolume ending with @snapshots which is normally mounted at /.snapshots, and snapshots are named {subvol}.{timespec}[=Label] where {timespec} has only numbers, dashes and colons.
If you installed periodic snap scripts:
- test with
sudo run-parts --debug -v /etc/cron.daily(or whichever directory) - run
ls -ltr /tmp/.my-snaps-*to check that it was run recently by looking at timestamps.
Best Practices for Using this Simple Snapshot Strategy
my-snapsandmy-restoresupport the most simple BTRFS snapshot strategy (for update protection and limited file recovery). To guard against huge catastrophes, add complementary strategies such as these so you can quickly reinstall if needed:- keep your important document it the cloud (e.g., Google Drive)
- keep critical configuration on github (e.g., using How to Store Dotfiles - A Bare Git Repository | Atlassian Git Tutorial or a dotfile manager).
- create a list or script of post-install tasks to add/remove apps (save with your dotfiles or in the cloud)
- BTW, the above complementary strategies have even more value if you have multiple installs (e.g., a desktop, a 24/7 server, and a few laptops all running similarly with the same apps an basic config).
- For more comprehensive protection, consider
snapper,btrbk,btrfsmaintenance, and google for others.
Special Behavior for BTRFS + Systemd-boot + pacman + dracut
In the titled circumstance, BTRFS snapshots of root will not boot. Something like:
Booting a live installer, mounting the BTRFS subvols and /efi, and running
reinstall-kernelsis needed (plus some /efi cleanup).
To get around that, first setup a pacman hook to copy /efi to /.efi-back when the kernel is updated:
# place in /etc/pacman.d/hooks/95-efibackup_post.hook
[Trigger]
Operation = Upgrade
Operation = Install
Operation = Remove
Type = Path
Target = usr/lib/modules/*/vmlinuz

[Action]
Depends = rsync
Description = Backing up post /efi...
When = PostTransaction
Exec = /usr/bin/bash -c 'rsync -a -H --del /efi/ /.efi-back/'
Then, when replacing the root subvolume, /efi will be restored from its /.efi-back if that directory exists.
--
bt-smart-balance
bt-smart-balance [-h] [-a ALLOCATED_PCT_MIN] [-w WASTED_PCT_MIN] [-m MOUNT_POINT] [-i]

options:
  -h, --help            show this help message and exit
  -a ALLOCATED_PCT_MIN, --allocated-pct-min ALLOCATED_PCT_MIN
                        min allocated percent to balance [0<=val<=99]
  -w WASTED_PCT_MIN, --wasted-pct-min WASTED_PCT_MIN
                        min wasted percent to balance [0<=val<=99]
  -m MOUNT_POINT, --mount-point MOUNT_POINT
                        BTRFS mount point
  -i, --install-anacron-job
                        creates a script in /etc/cron.weekly with current args
bt-smart-balance starts a BTRFS balance if the wasted% or allocated% is over
the given thresholds. It can be run manually, but suggested use is to manually run
it only once with the -i option to install it as a weekly anacron job.
To change balance criteria, re-run with new options.
To decide to balance, it runs sudo btrfs filesystem usage / and calculates
- ALLOCATED_PCT as allocated/size*100
- WASTED_PCT as (allocated-used)/size*100
Release history Release notifications | RSS feed


Download files
Download the file for your platform. If you're not sure which to choose, learn more about installing packages.
Source Distribution
Built Distribution
Filter files by name, interpreter, ABI, and platform.
If you're not sure about the file name format, learn more about wheel file names.
Copy a direct link to the current filters
File details
Details for the file my_snaps-1.0.9.tar.gz.
File metadata
- Download URL: my_snaps-1.0.9.tar.gz
- Upload date:
- Size: 223.4 kB
- Tags: Source
- Uploaded using Trusted Publishing? No
- Uploaded via: python-requests/2.31.0
File hashes
| Algorithm | Hash digest | |
|---|---|---|
| SHA256 |
8aa3aeb672e1e7865d0380e46d30289fa5bcd718f71915491a915f076e6dc2af
|
|
| MD5 |
aa163200e7dfdf818c854fe8776f8d28
|
|
| BLAKE2b-256 |
144cf239d4a36deef2c69e33673fa76ea393a20892ccce057d4ddb3dfa9bc70f
|
File details
Details for the file my_snaps-1.0.9-py3-none-any.whl.
File metadata
- Download URL: my_snaps-1.0.9-py3-none-any.whl
- Upload date:
- Size: 25.7 kB
- Tags: Python 3
- Uploaded using Trusted Publishing? No
- Uploaded via: python-requests/2.31.0
File hashes
| Algorithm | Hash digest | |
|---|---|---|
| SHA256 |
0abb8bafdaf26f39c5b31f88c0bab0fe415e8b34bdb238ceeffdfd1f89afc85b
|
|
| MD5 |
edc345503fdce01ea2f148ee7eeb0206
|
|
| BLAKE2b-256 |
4e45c8dfb92a2053b086db09e5510db2b9d265c64a6958db013a1fa4a7af2dc6
|






