A simple plugin to batch segment cells with cellpose
Project description
napari-serialcellpose
This napari plugin allows you to segment single images or series of images using built-in or custom Cellpose models as well as to analyze the properties of these segmented regions ("region properties"). Properties can be visualized for a single image or a complete experiment in the form of histograms that can also be filtered (e.g. based on area size, mean intensity etc.) Thanks to the napari-skimage-regionprops plugin, properties of segmented objects can be interactively explored at a single object level.
Main goal
The main goal of this plugin is to simplify the classical image processing pipeline of image segmentation followed by region analysis via Cellpose. It allows to quickly get a quantification of a set of images without the need for any scripting.
Installation
In order to use this plugin, whe highly recommend to create a specific environment and to install the required software in it. You can create a conda environment using:
conda create -n serialcellpose python=3.8.5 napari -c conda-forge
Then activate it and install the plugin:
conda activate serialcellpose
pip install git+https://github.com/guiwitz/napari-serialcellpose.git
Potential issue with PyTorch
Cellpose and therefore the plugin and napari can crash without warning in some cases with torch==1.12.0. This can be fixed by reverting to an earlier version using:
pip install torch==1.11.0
GPU
In order to use a GPU:
-
Uninstall the PyTorch version that gets installed by default with Cellpose:
pip uninstall torch -
Make sure your have up-to-date drivers for your NVIDIA card installed.
-
Re-install a GPU version of PyTorch via conda using a command that you can find here (this takes care of the cuda toolkit, cudnn etc. so no need to install manually anything more than the driver). The command will look like this:
conda install pytorch torchvision cudatoolkit=11.3 -c pytorch
Plugin Updates
To update the plugin, you only need to activate the existing environment and install the new version:
conda activate serialcellpose
pip install git+https://github.com/guiwitz/napari-serialcellpose.git -U
Usage: segmentation
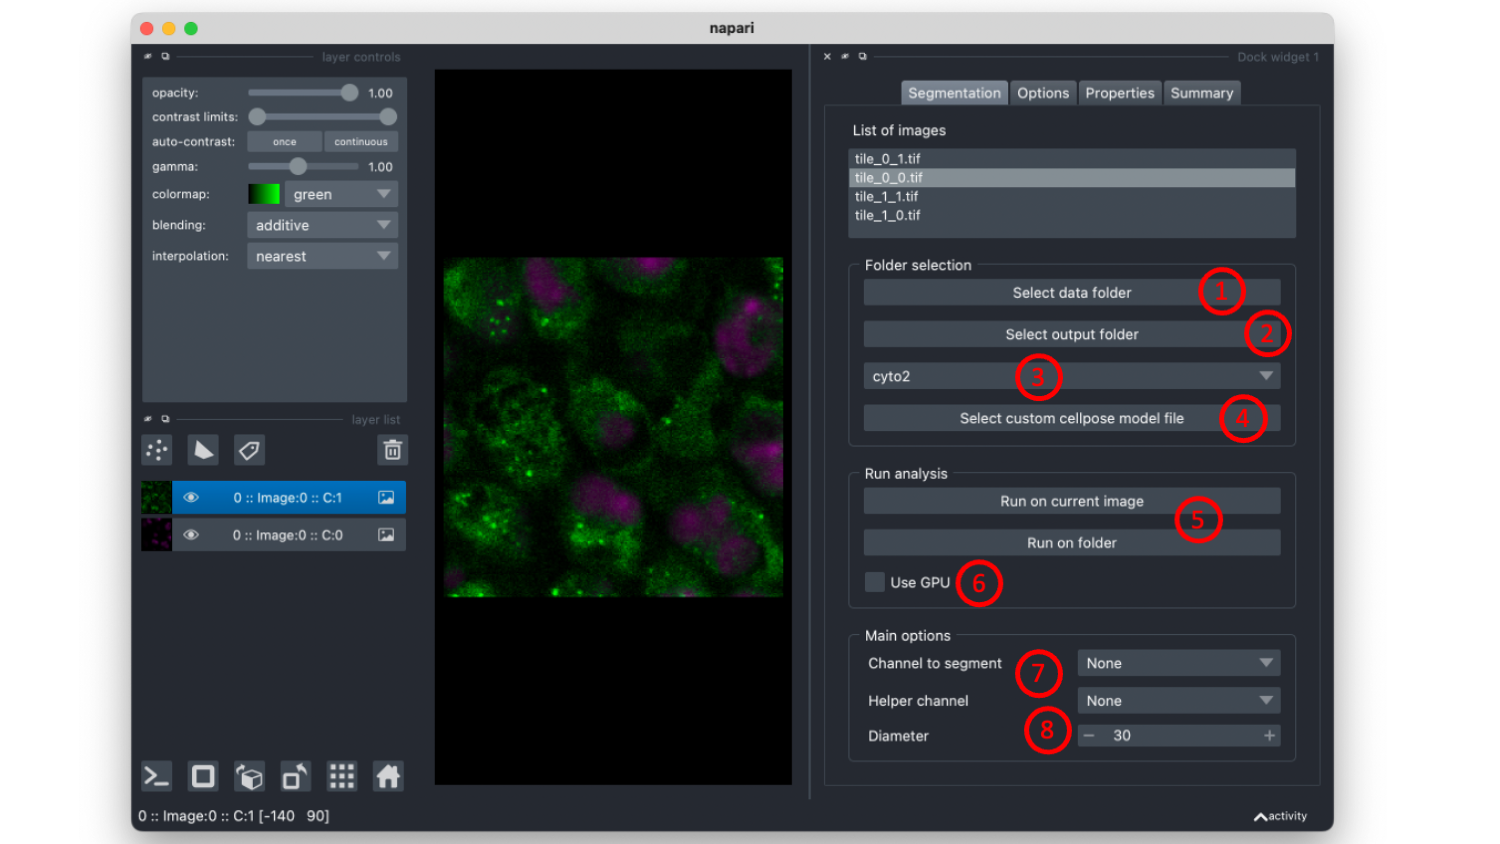
The main interface is shown below. The sequence of events should be the following:
- Select a folder containing images. The list of files within that folder will appear in the area above. You can also just drag and drop a folder or an image in that area. When selecting an image, it gets displayed in the viewer. Images are opened via aicsimageio. You can use grayscale images, RGB images or multi-channel images. In the latter case, make sure each channel opens as a separate layer when you open them using the napari-aicsimagio importer.
- If you want to save the segmentation and tables with properties, select a folder that will contain the output.
- Select the type of cellpose model.
- If you use a custom model, select its location.
- Run the analysis on the currently selected image or on all files in the folder.
Options
- Select if you want to use a GPU or not.
- If you are using multi-channel images, you can specify which channel to segment and optionally which to use as "nuclei" channel to help cell segmentation.
- In case you are using one of the built-in models, you can set the estimated diameter of your objects.
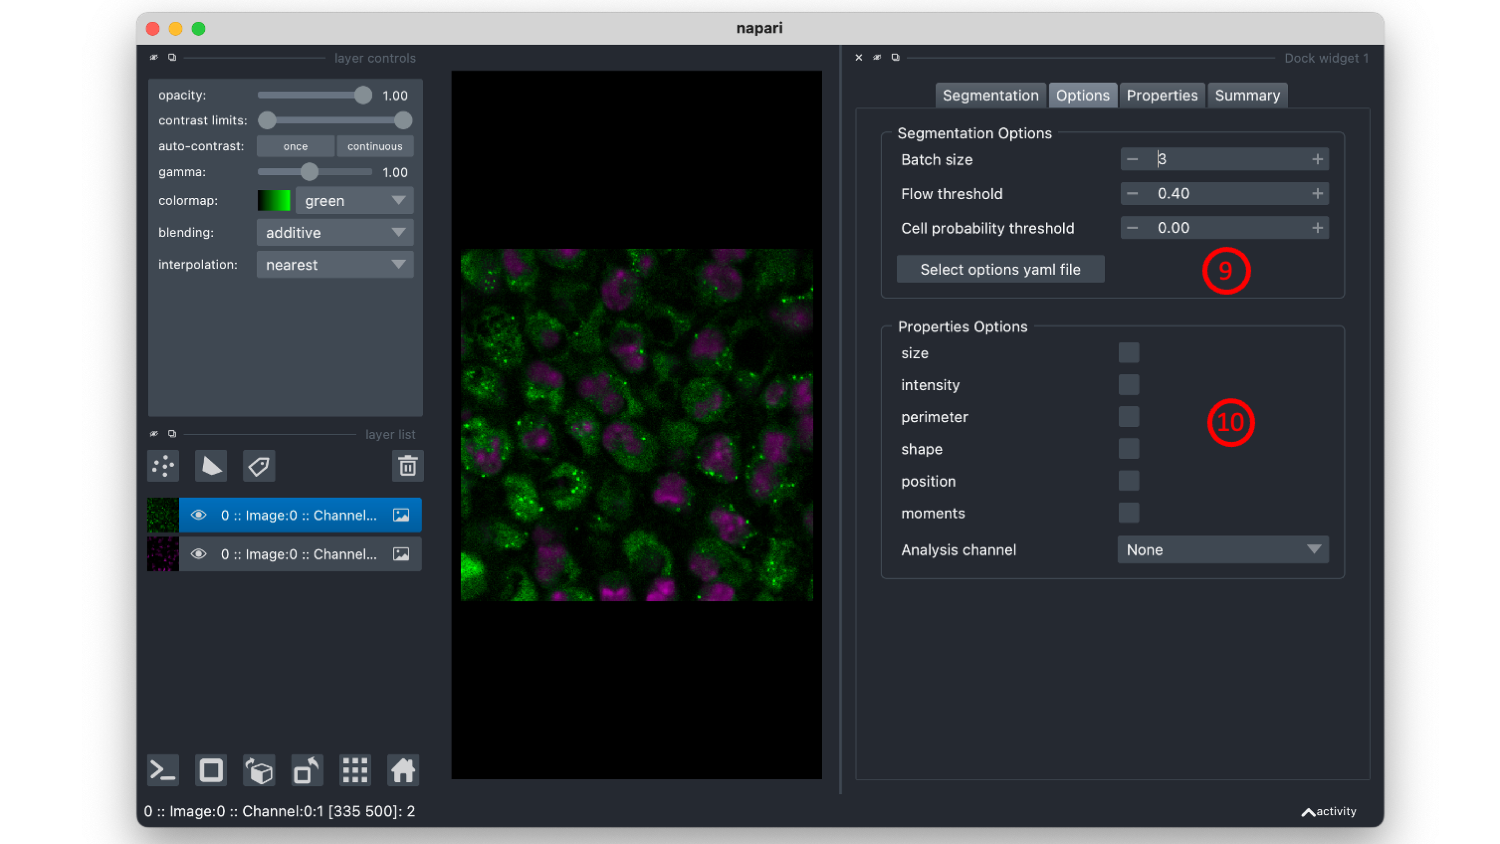
- In the Options tab you will find a few more options for segmentation, including the two thresholds
flow_thresholdandcellprob_threshold. You can also decide to discard objects touching the border. Using theSelect options yml fileyou can select a.ymlfile which contains a list of additional options to pass to theevalmethod of the Cellpose model. Note that options specified in the yml file will override options set in the GUI. The file my_options.yml is an example of such a file where for example thediameter(also available in the GUI) andresample(not available in the GUI) options are set.
Properties
- After segmentation, properties of the objects can automatically be computed. You can select which properties should be computed in the Options tab. As defined in
napari-skimage-regionpropsproperties are grouped by types. If you want to measure intensity properties such as mean intensity, you have to specify which channel (Analysis channel) you want to perform the measurement on.
Output
The results of the analysis are saved in the folder chosen in #2. The segmentation mask is saved with the same name as the original image with the suffix _mask.tif. A table with properties is saved in the subfolder tables also with the same name as the image with the suffix props.csv. If you run the plugin on multiple files in a folder, a summary.csv file is also generated which compiles all the data.
Usage: post-processing
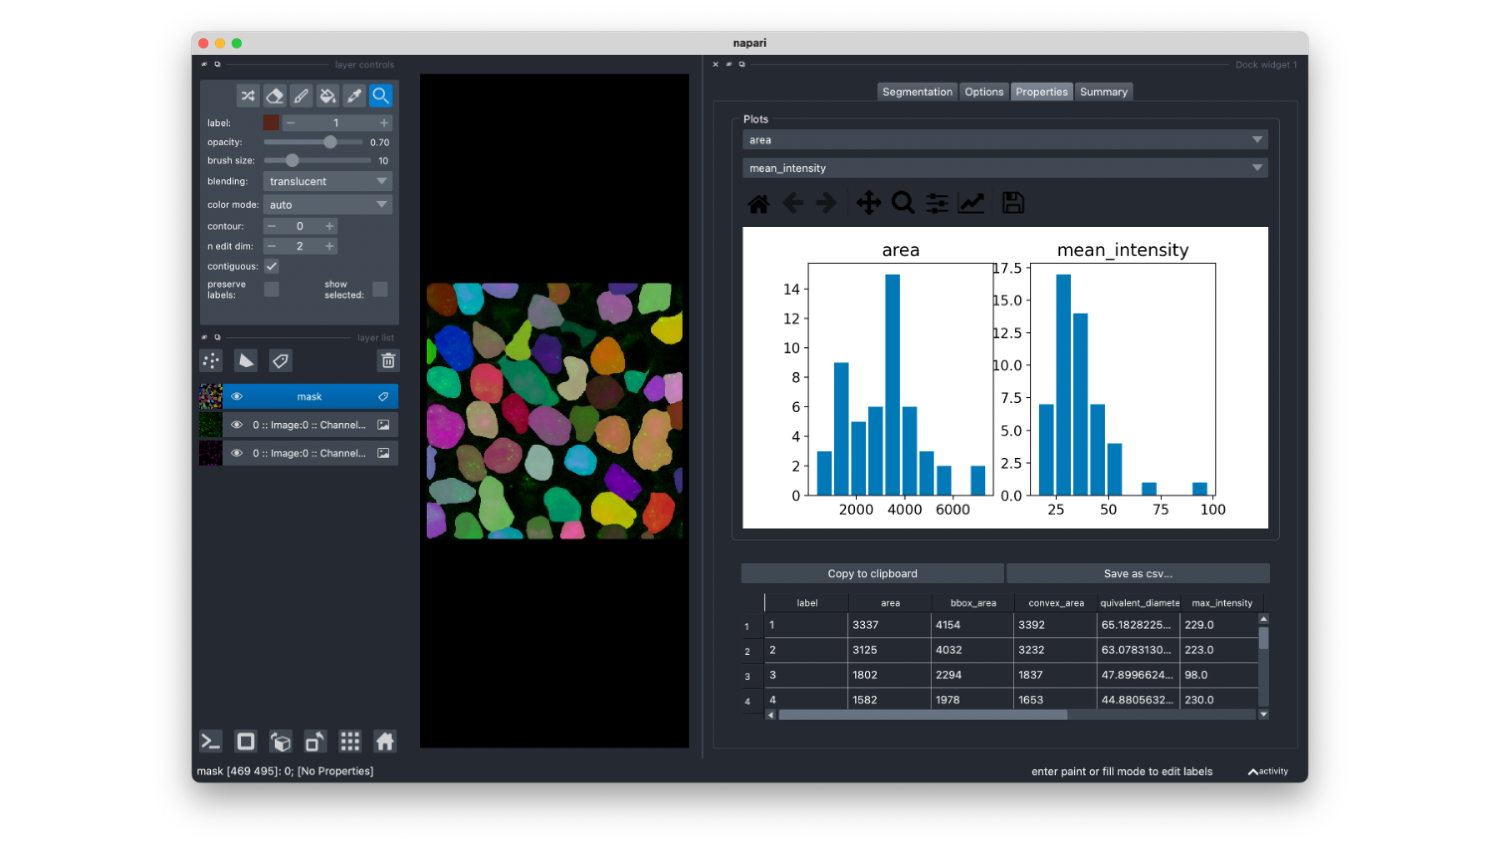
After the analysis is done, when you select an image, the corresponding segmentation mask is shown on top of the image as shown below. This also works for saved segmentations: in that case you just select a folder with data and the corresponding output folder.
Properties
If you head to the Properties tab, you will find there two histograms showing the distribution of two properties that you can choose from a list at the top of the window. Below the plot you find the table containing information for each cell (each line is a cell).
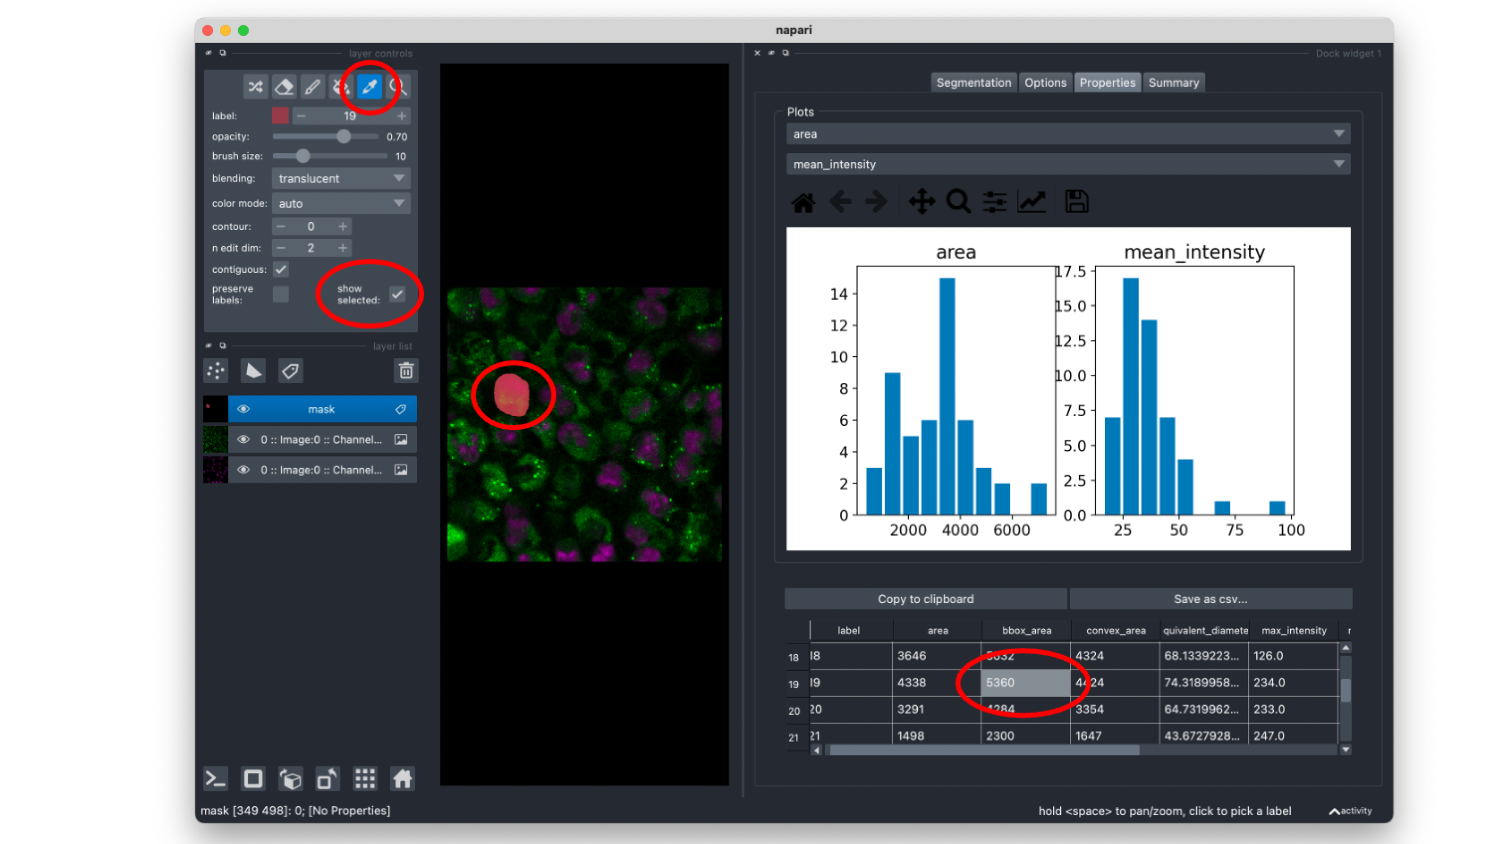
As shown below, if you select the box show selected, you can select items in the properties table and it will highlight the corresponding cell in the viewer. If you select the pipet tool, you can also select a cell and see the corresponding line in the table highlighted.
Summary
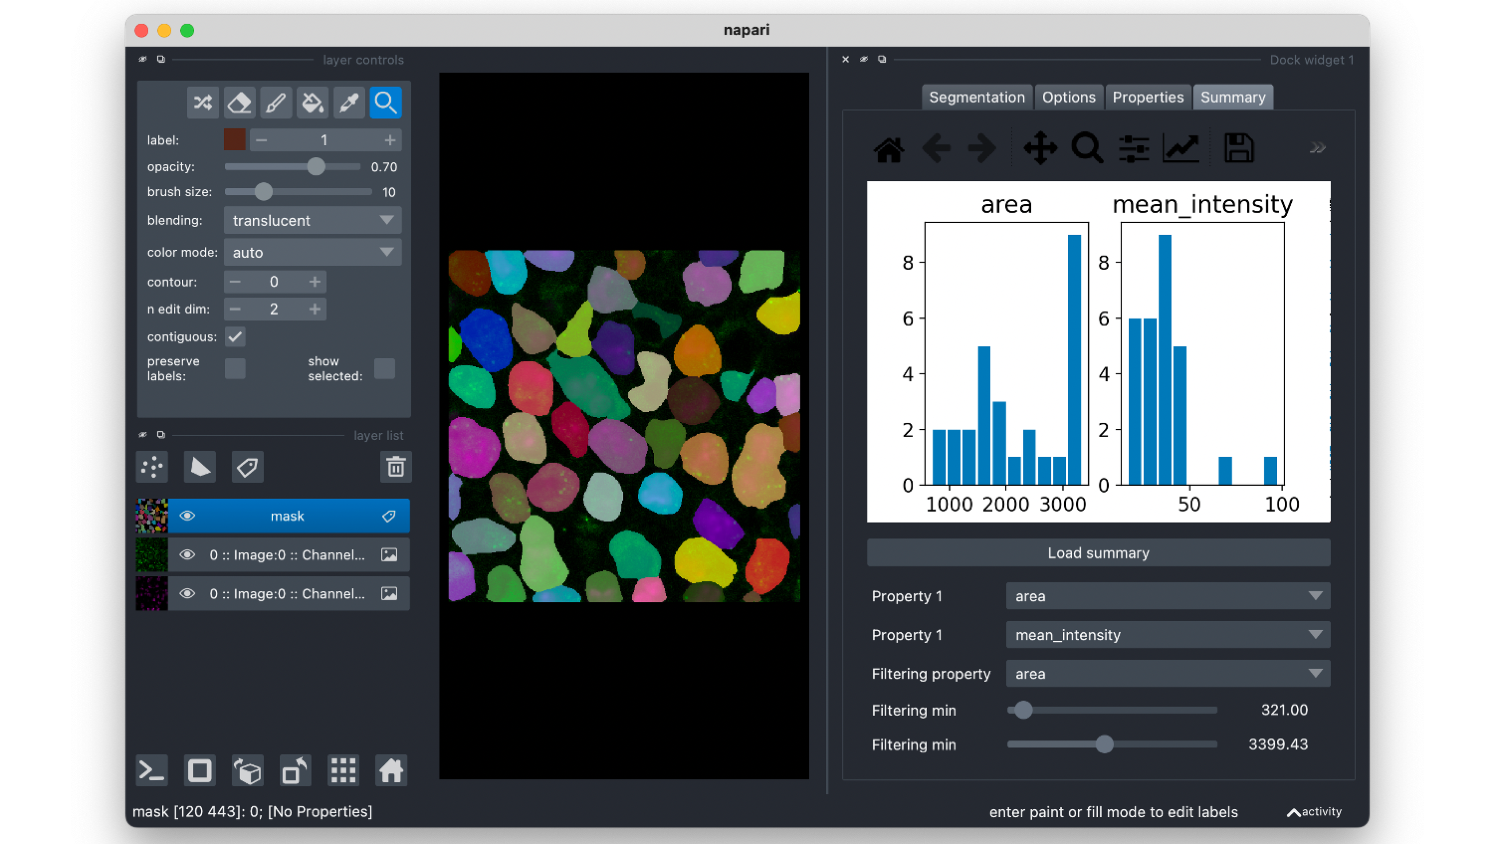
Finally if you select the Summary tab, and click on Load summary, it will load all data of the current output folder and create histograms of two properties that can be selected. An additional property can be used for filtering the data. Using the sliders, one can set a minimum and maximum threshold on the "filtering property", which will create a sub-selection of the data.
Data
Sample data were acquired by Fabian Blank at the DBMR, University of Bern.
License
Distributed under the terms of the BSD-3 license, "napari-serialcellpose" is free and open source software
Issues
If you encounter any problems, please file an issue along with a detailed description.
Project details
Download files
Download the file for your platform. If you're not sure which to choose, learn more about installing packages.
Source Distribution
Built Distribution
File details
Details for the file napari-serialcellpose-0.2.0.tar.gz.
File metadata
- Download URL: napari-serialcellpose-0.2.0.tar.gz
- Upload date:
- Size: 4.4 MB
- Tags: Source
- Uploaded using Trusted Publishing? No
- Uploaded via: twine/4.0.1 CPython/3.10.5
File hashes
| Algorithm | Hash digest | |
|---|---|---|
| SHA256 | bf7c437d9084b564d3a76b56c1470c3278dbc48424a0ffc7c952d4baec2189fa |
|
| MD5 | f0f643ae78cd311f69d0a32192caec33 |
|
| BLAKE2b-256 | 5f7548c685afec123d3dee2d9646e454ae3010ae697023e4c2c7567747e5c813 |
File details
Details for the file napari_serialcellpose-0.2.0-py3-none-any.whl.
File metadata
- Download URL: napari_serialcellpose-0.2.0-py3-none-any.whl
- Upload date:
- Size: 1.0 MB
- Tags: Python 3
- Uploaded using Trusted Publishing? No
- Uploaded via: twine/4.0.1 CPython/3.10.5
File hashes
| Algorithm | Hash digest | |
|---|---|---|
| SHA256 | d6eb0866403ee9b6178c5c9d9ff026233cef8cd19b10a480ccc3c5b7f143fc75 |
|
| MD5 | ae4d83ac1b9d25f486927a0da05e0f46 |
|
| BLAKE2b-256 | e1c3bc0e486eb176a0c99df3cd8980cebaa74ba0f8ff920cc51239e38a84318a |


