NetFL enables simulation of Federated Learning experiments within Fog/Edge computing environments.

Project description
NetFL
NetFL is a framework that extends Fogbed by integrating Flower, enabling simulation of Federated Learning experiments within Fog/Edge computing environments. It supports the modeling of heterogeneous and resource-constrained edge scenarios, incorporating factors such as computational disparities among clients and dynamic network conditions, including bandwidth limitations, latency variations, and packet loss. This facilitates realistic evaluations of FL systems under non-ideal, real-world conditions.
Installation
Requirements: Ubuntu 22.04 LTS or later, Python 3.9.
1. Set up Containernet
Refer to the Containernet documentation for further details.
Install Ansible:
sudo apt-get install ansible
Clone the Containernet repository:
git clone https://github.com/containernet/containernet.git
Run the installation playbook:
sudo ansible-playbook -i "localhost," -c local containernet/ansible/install.yml
Create and activate a virtual environment:
python3 -m venv venv
source venv/bin/activate
Note: The virtual environment must be activated before installing or using any Python packages, including Containernet and NetFL.
Install Containernet into the active virtual environment:
pip install containernet/.
2. Install NetFL
While the virtual environment is still active, run:
pip install netfl
Running an Experiment with NetFL and Fogbed
Follow the steps below to set up and run an experiment using NetFL. This is an example using the MNIST dataset. You can find more examples in the examples folder:
1. Define the Dataset, the Model, and the Training Configurations
from keras import layers, models
from flwr.server.strategy import Strategy, FedAvg

from netfl.core.task import Dataset, Task, TrainConfig, DatasetInfo


class MNIST(Task):
    def dataset_info(self) -> DatasetInfo:
        return DatasetInfo(
            huggingface_path="ylecun/mnist",
            item_name="image",
            label_name="label",
        )

    def dataset(self, raw_dataset: Dataset) -> Dataset:
        normalized_dataset = Dataset(
            x_train=(raw_dataset.x_train / 255.0),
            x_test=(raw_dataset.x_test / 255.0),
            y_train=raw_dataset.y_train,
            y_test=raw_dataset.y_test,
        )
        return normalized_dataset

    def model(self) -> models.Model:
        model = models.Sequential([
            layers.Input(shape=(28, 28)),
            layers.Flatten(),
            layers.Dense(128, activation="relu"),
            layers.Dense(10, activation="softmax")
        ])
        model.compile(
            optimizer="adam",
            loss="sparse_categorical_crossentropy",
            metrics=["accuracy"],
        )
        return model

    def aggregation_strategy(self) -> Strategy:
        return self._aggregation_strategy_factory(FedAvg)

    def train_config(self) -> TrainConfig:
	    return TrainConfig(
            batch_size=32,
            epochs=1,
            fraction_evaluate=1.0,
            fraction_fit=1.0,
            learning_rate=0.001,
            min_available=4,
            max_available=4,
            num_rounds=10,
            seed=42,
            shuffle=True,
            test_size=0.2,
        )


class MainTask(MNIST):
    pass
2. Start Fogbed Workers and Define the Experiment Network Topology
Refer to the Fogbed documentation for detailed instructions on starting workers.
3. Create and Run the Experiment
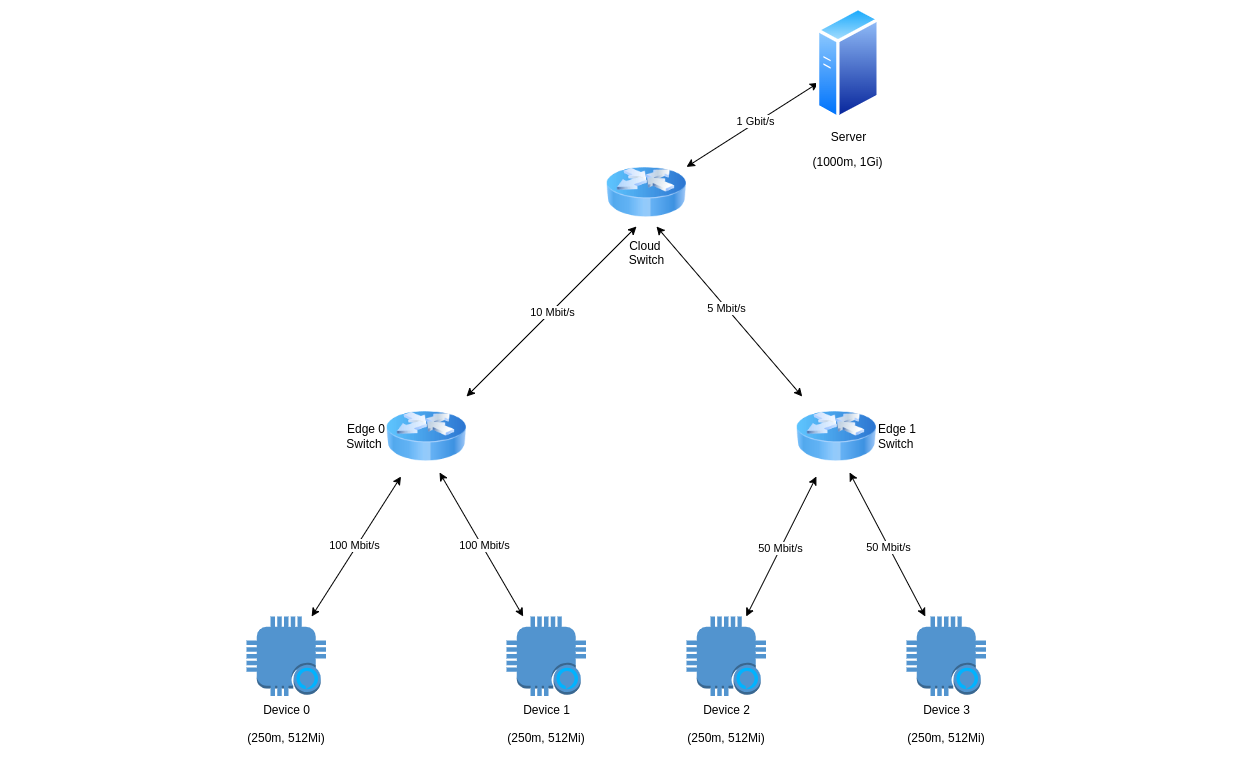
from fogbed import CloudResourceModel, EdgeResourceModel, HardwareResources
from netfl.infra.experiment import Experiment
from task import MainTask

exp = Experiment(
    main_task=MainTask(),
    max_cpu=2.0,
    max_memory=3072,
)

worker = exp.add_worker(ip="192.168.0.100", port=5000)

cloud = exp.add_virtual_instance(
    name="cloud",
    resource_model=CloudResourceModel(max_cu=1.0, max_mu=1024)
)

edge_0 = exp.add_virtual_instance(
    name="edge_0",
    resource_model=EdgeResourceModel(max_cu=0.5, max_mu=1024)
)

edge_1 = exp.add_virtual_instance(
    name="edge_1",
    resource_model=EdgeResourceModel(max_cu=0.5, max_mu=1024)
)

server = exp.create_server(
    resources=HardwareResources(cu=1.0,  mu=1024),
    link_params={"bw": 1000, "delay": "2ms"},
)

edge_0_devices = [
    exp.create_device(
        resources=HardwareResources(cu=0.25,  mu=512),
        link_params={"bw": 100, "delay": "10ms"},
    ) for _ in range(2)
]

edge_1_devices = [
    exp.create_device(
        resources=HardwareResources(cu=0.25,  mu=512),
        link_params={"bw": 50, "delay": "5ms"},
    ) for _ in range(2)
]

exp.add_docker(server, cloud)

exp.add_docker(edge_0_devices[0], edge_0)
exp.add_docker(edge_0_devices[1], edge_0)

exp.add_docker(edge_1_devices[0], edge_1)
exp.add_docker(edge_1_devices[1], edge_1)

worker.add(cloud)
worker.add(edge_0)
worker.add(edge_1)

worker.add_link(
    cloud,
    edge_0,
    bw=10, delay="100ms", loss=1, max_queue_size=100, use_htb=True,
)

worker.add_link(
    cloud,
    edge_1,
    bw=5, delay="50ms", loss=1, max_queue_size=100, use_htb=True,
)

try:
    exp.start()
    print("The experiment is running...")
    input("Press enter to finish")
except Exception as ex:
    print(ex)
finally:
    exp.stop()
Running a Simple Example with a Basic Network Topology Using Docker
1. Create the Main Task
In the project root directory, create or modify a NetFL Task and name the file task.py. Refer to the examples in the examples folder for guidance on task creation.
2. Create the Infrastructure
Use Docker Compose to set up the infrastructure, including the server and clients:
docker compose up -d
3. View Training Results
To check the server logs, run:
docker logs server
Training logs are also stored in the logs folder within the project root directory.
4. Shut Down the Infrastructure
To stop and remove all running containers, use the following command:
docker compose down
More information
Release history Release notifications | RSS feed


Download files
Download the file for your platform. If you're not sure which to choose, learn more about installing packages.
Source Distribution
Built Distribution
Filter files by name, interpreter, ABI, and platform.
If you're not sure about the file name format, learn more about wheel file names.
Copy a direct link to the current filters
File details
Details for the file netfl-0.2.0.tar.gz.
File metadata
- Download URL: netfl-0.2.0.tar.gz
- Upload date:
- Size: 58.3 kB
- Tags: Source
- Uploaded using Trusted Publishing? No
- Uploaded via: twine/6.1.0 CPython/3.12.4
File hashes
| Algorithm | Hash digest | |
|---|---|---|
| SHA256 |
76806af063892c1b92e223884f6365ab643acf54092d54b34092ab3ee614c3fc
|
|
| MD5 |
13e0a046582178999dab2242b9beebf9
|
|
| BLAKE2b-256 |
5051e16b584deaad5dca7b320a5c3b9d0b594d799c5ff2813ef2f456e333fb6f
|
File details
Details for the file netfl-0.2.0-py3-none-any.whl.
File metadata
- Download URL: netfl-0.2.0-py3-none-any.whl
- Upload date:
- Size: 14.5 kB
- Tags: Python 3
- Uploaded using Trusted Publishing? No
- Uploaded via: twine/6.1.0 CPython/3.12.4
File hashes
| Algorithm | Hash digest | |
|---|---|---|
| SHA256 |
df130bfb88a79c3df20d7258ced97f2a7cbfdfb10c0d6fa43c54d96cf92bc430
|
|
| MD5 |
396efc90d866ad8983a8b4da3978188e
|
|
| BLAKE2b-256 |
181ee444c55106749dfdf7f3cbe404c77d2a66db3082399d57c79f226dd4c45d
|


