Notion Client extension to import notion Database into pandas Dataframe

Project description
Notion2Pandas


Notion2Pandas is a Python 3 package that extends the capabilities of the excellent notion-sdk-py by Ramnes, It enables the seamless import of a Notion database into a pandas dataframe and vice versa, requiring just a single line of code.
Installation
pip install notion2pandas
Usage
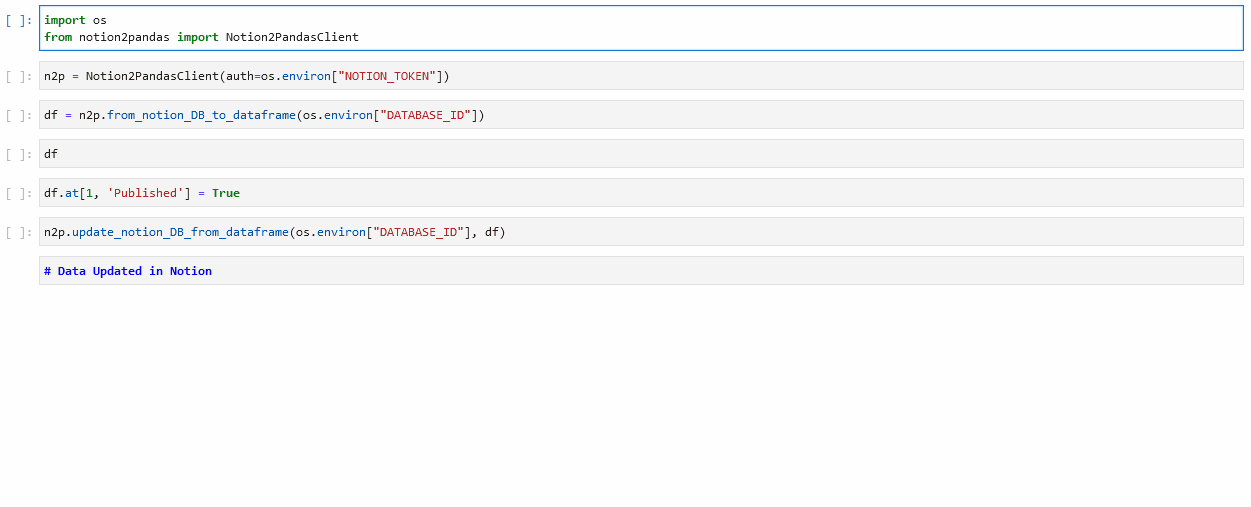
- As shown in the gif, you just need to import the Notion2PandasClient class.
from notion2pandas import Notion2PandasClient
- Create an instance by passing your authentication token.
n2p = Notion2PandasClient(auth=os.environ["NOTION_TOKEN"])
- Use the 'from_notion_DB_to_dataframe' method to get the data into a dataframe.
df = n2p.from_notion_DB_to_dataframe(os.environ["DATABASE_ID"])
- When you're done working with your dataframe, use the 'update_notion_DB_from_dataframe' method to save the data back to Notion.
n2p.update_notion_DB_from_dataframe(os.environ["DATABASE_ID"], df)
- If you need a queried or sorted database, you can create your filter / sort object with this structure and pass it to the from_notion_DB_to_dataframe method:
published_filter = {"filter": {
            "property": "Published",
            "checkbox": {
                "equals": True
            }
        }}

df = n2p.from_notion_DB_to_dataframe(os.environ["DATABASE_ID"], published_filter)
PageID and Row_Hash
As you can see, in the pandas dataframe there are two additional columns compared to those in the original database, PageID and Row_Hash. As you can imagine, PageID it's the ID related to the page of that entry in Notion. Row_Hash is a value calculated based on the fields' values of the entry, this value is used by the update_notion_DB_from_dataframe function to determine if a row in the dataframe has been modified, and if not, it avoids making the API call to Notion for that row. Any change to those functions can lead to malfunctions, so please do not change them!
Utility functions
Notion2Pandas is a class that extend Client from notion_client, so you can find every feature present in notion_client. In addition to the functions for importing and exporting dataframes, I've added some other convenient functions that wrap the usage of the notion_client functionality and allow them to be used more directly. These are:
- get_database_columns(database_ID)
- create_page(page_ID)
- update_page(page_ID, **kwargs)
- retrieve_page(page_ID)
- delete_page(page_ID)
- delete_rows_and_pages(dataframe, rows_to_delete_indexes)
- retrieve_block(block_ID)
- retrieve_block_children_list(block_ID)
- update_block(block_ID, field, field_value_updated)
Read Write Functions
Notion2Pandas has the ability to transform a Notion database into a Pandas dataframe without having to specify how to parse the data. However, in some cases, the default parsing may not be what you want to achieve. Therefore, it's possible to specify how to parse the data. In Notion2Pandas, each data type in Notion is associated with a tuple consisting of two functions: one for reading the data and the other for writing it.
In this example, I'm changing the functions for reading and writing dates so that I can work only with the start date.
def date_read_only_start(notion_property):
    return notion_property.get('date').get('start') if notion_property.get('date') is not None else ''
def date_write_only_start(row_value):
    return {'date': {'start': row_value} if row_value != '' else None}, True

n2p.set_lambdas('date',date_read_only_start, date_write_only_start)
These function can accept up to three input arguments:
notion_propertyfor read functions,row_valuefor write functions: the data being read or written.column_name: the name of the column, used to identify exactly where to apply the function.n2p: the notion2pandas client instance.
Read functions only return the value to insert into the DataFrame, while write functions return the value to write to Notion and a boolean indicating whether the property needs to be updated.
To override functions for a specific data type but apply them only to certain columns, you can use the column_name argument to determine which logic to apply for each field. For example:
"""
Since 'Test table 1' is a relation field limited to just one relation;
we want a string instead of a list with only one element
"""
import ast

def relation_read(notion_property: dict, column_name: str) -> str:
    relations = notion_property.get('relation', [])
    relation_ids = [relation.get('id') for relation in relations]
    if column_name == 'Test table 1':
        if len(relation_ids) > 0:
            return relation_ids[0]
        return ''
    return str(relation_ids)

def relation_write(row_value: str, column_name: str):
    if row_value == '':
        return {"relation": []}, True
    if column_name == 'Test table 1':
        return {"relation": [{"id": row_value}]}, True
    notion_relations = ast.literal_eval(row_value)
    relation_ids = [{"id": notion_relation} for
                notion_relation in notion_relations]

    return {"relation": relation_ids}, True
Note: Ensure that the three input arguments are always in the order (notion_property, column_name, n2p) and that no additional arguments are included beyond these three.
My suggestion for changing the read and write functions is to take the original function directly from the n2p_read_write.py code and modify it until the desired result is achieved. These are the names of the keys associated to each kind of Notion Data:
| NotionData | Functions key |
|---|---|
| Title | title |
| Rich Text | rich_text |
| Check box | checkbox |
| Number | number |
| Date | date |
| Date Range | date_range |
| Select | select |
| Multi Select | multi_select |
| Status | status |
| People | people |
| Phone number | phone_number |
| URL | url |
| Relation | relation |
| Roll Up | rollup |
| Files | files |
| Formula | formula |
| String | string |
| Unique ID | unique_id |
| Button | button |
| Created by | created_by |
| Created time | created_time_read_write_lambdas |
| Last edited by | last_edited_by |
| Last edited time | last_edited_time |
Adding and removes rows
If you add a row to the dataframe and then update the Notion database from it, Notion2Pandas is capable of adding the new row to the database.
(⚠) When adding a new row to the pandas DataFrame, specify an empty string as the default value for PageID and zero for Row_Hash
If a row is removed, Notion2Pandas will not automatically delete the row during the update. In this case, you can use the method delete_rows_and_pages by passing to it the notion2pandas dataframe and the list of indexes of the pages you want to delete; the method will delete the rows in the dataframe and the pages in the notion database.
Adding page data to the dataframe
Sometimes, you may want to add data to the dataframe related to the Notion page or even from within the page itself. This data is not directly accessible from the page's entry in the database, but notion2pandas provides a way to include it during the dataframe creation process. For each column you want to add to the dataframe, you can define a function that retrieves the desired data and inserts it into the corresponding column.
from notion2pandas import Notion2PandasClient

def get_cover_page(notion_page):
    cover_obj = notion_page.get('cover')
    if cover_obj == None:
        return ''
    cover_type = cover_obj.get('type')
    if cover_type == 'external':
        return cover_obj.get('external').get('url')
    if cover_type == 'file':
        return cover_obj.get('file').get('url')
    return ''

def get_icon_page(notion_page):
    icon_obj = notion_page.get('icon')
    if icon_obj == None:
        return ''
    icon_type = icon_obj.get('type')
    if icon_type == 'external':
        return icon_obj.get('external').get('url')
    if icon_type == 'file':
        return icon_obj.get('file').get('url')
    if icon_type == 'emoji':
        return icon_obj.get('emoji')
    return ''

def get_image_url(notion_blocks):
    if notion_blocks == None:
        return ''
    for block in notion_blocks.get('results'):
        if block.get('type') == 'image':
            image = block.get('image')
            image_type = image.get('type')
            if image_type == 'file':
                return image.get('file').get('url')
    return ''

custom_page_prop = {
    'icon': get_icon_page,
    'cover': get_cover_page
}

custom_block_prop = {
    'inside_image': get_image_url
}

n2p = Notion2PandasClient(auth= 'token')
df = n2p.from_notion_DB_to_dataframe_kwargs('page_id', columns_from_page = custom_page_prop, columns_from_blocks = custom_block_prop)
In this example, we add three columns to the dataframe: the icon, the cover image, and the first image found within the page in a block. As you can see, the first step is to define the functions that extract the necessary data from the Notion page. Then, we create two dictionaries: one for the columns that retrieve data from the page itself, and another for the columns that pull data from the blocks within the page. Afterward, we use the from_notion_DB_to_dataframe_kwargs method, which returns the dataframe containing both the database data and the additional data we've specified.
Be aware that using either of these parameters will result in one API call per row (so using both means two API calls per row). This can be particularly slow when dealing with very large tables.
These columns are considered read-only, meaning that changing their values in the dataframe will not update them on Notion when using the update_notion_DB_from_dataframe method. So if you want to change the values of this data, use the appropriate methods.
Notion Executor
When notion2pandas needs to execute a method that uses the Notion API, it uses a method called _notionExecutor. This method is designed to retry the Notion API call at regular intervals if something goes wrong (network issues, rate limits reached, internal server errors, etc.) until a maximum number of attempts is reached. You can set the maximum number of attempts and the interval between attempts through the notion2pandas class constructor as shown in this example.
n2p = Notion2PandasClient(auth= token, secondsToRetry= 20, maxAttemptsExecutioner= 10)
These arguments are optional and their default values are 30 for secondsToRetry and 3 for maxAttemptsExecutioner
Logging
Notion2PandasClient uses the built-in logger of NotionClient to provide helpful debug and info messages during execution.
You can configure the verbosity of the logging system in two ways:
1. Set the log level (recommended for most use cases)
You can set the logging level directly when instantiating the client by passing the log_level parameter:
import logging
from notion2pandas import Notion2PandasClient

n2p = Notion2PandasClient(auth="your_token", log_level=logging.DEBUG)
2. Pass a custom logger
If you want full control over the logging behavior—such as formatting, log destinations (file, stdout, etc.), or using multiple handlers—you can provide your own custom logger instance:
import logging
from notion2pandas import Notion2PandasClient

# Create a custom logger
logger = logging.getLogger("notion2pandas")
logger.setLevel(logging.DEBUG)  # Set the desired level

# Create handler (e.g., output to stdout)
handler = logging.StreamHandler()

# Optional: define a custom log format
formatter = logging.Formatter("[%(levelname)s] %(asctime)s - %(message)s")
handler.setFormatter(formatter)

# Add handler to logger
logger.addHandler(handler)

# Pass the logger to the client
n2p = Notion2PandasClient(auth="your_token", logger=logger)
Note: If both logger and log_level are provided, the custom logger takes precedence and controls the output.
Roadmap
For the upcoming releases, I plan to release:
- Managing the limit of 2700 API calls in 15 minutes
- Asynchronous client version of notion2pandas
- Custom Dataframe
Changelog history
You can view the version changelog on the changelog page.
Support
Notion2Pandas is an open-source project; anyone can contribute to the project by reporting issues or proposing merge requests. I will commit to evaluating every proposal and responding to all. If you disagree with the decisions made and the direction the project may take, you are free to fork the project, and you will have my blessing!
Release history Release notifications | RSS feed


Download files
Download the file for your platform. If you're not sure which to choose, learn more about installing packages.
Source Distribution
Built Distribution
Filter files by name, interpreter, ABI, and platform.
If you're not sure about the file name format, learn more about wheel file names.
Copy a direct link to the current filters
File details
Details for the file notion2pandas-1.6.3.tar.gz.
File metadata
- Download URL: notion2pandas-1.6.3.tar.gz
- Upload date:
- Size: 25.5 kB
- Tags: Source
- Uploaded using Trusted Publishing? No
- Uploaded via: twine/6.2.0 CPython/3.12.12
File hashes
| Algorithm | Hash digest | |
|---|---|---|
| SHA256 |
ab39d1defa6cf0bd9afc6521dc4d2f98fa69ad18f32b747fda81450189748501
|
|
| MD5 |
3fa0cbc375507f73c16df39f61e3147b
|
|
| BLAKE2b-256 |
91f569d1b0a0ed8790b91773d30197c1c1882e70ec4e1d3da8841630a835692e
|
File details
Details for the file notion2pandas-1.6.3-py3-none-any.whl.
File metadata
- Download URL: notion2pandas-1.6.3-py3-none-any.whl
- Upload date:
- Size: 19.3 kB
- Tags: Python 3
- Uploaded using Trusted Publishing? No
- Uploaded via: twine/6.2.0 CPython/3.12.12
File hashes
| Algorithm | Hash digest | |
|---|---|---|
| SHA256 |
ceceb3fe4c08dccbb6a6c5c7ee765e4f89a02ab97a3794a3d383ddc105bedead
|
|
| MD5 |
73920e9a0ec9653df88ebee083cfbf65
|
|
| BLAKE2b-256 |
a99658b9bfc24f1832b629fcd55278880a226019abe022ea8064878888c0c3d6
|


