A simple GUI for Open PIV.

Project description
Simple GUI for Open PIV
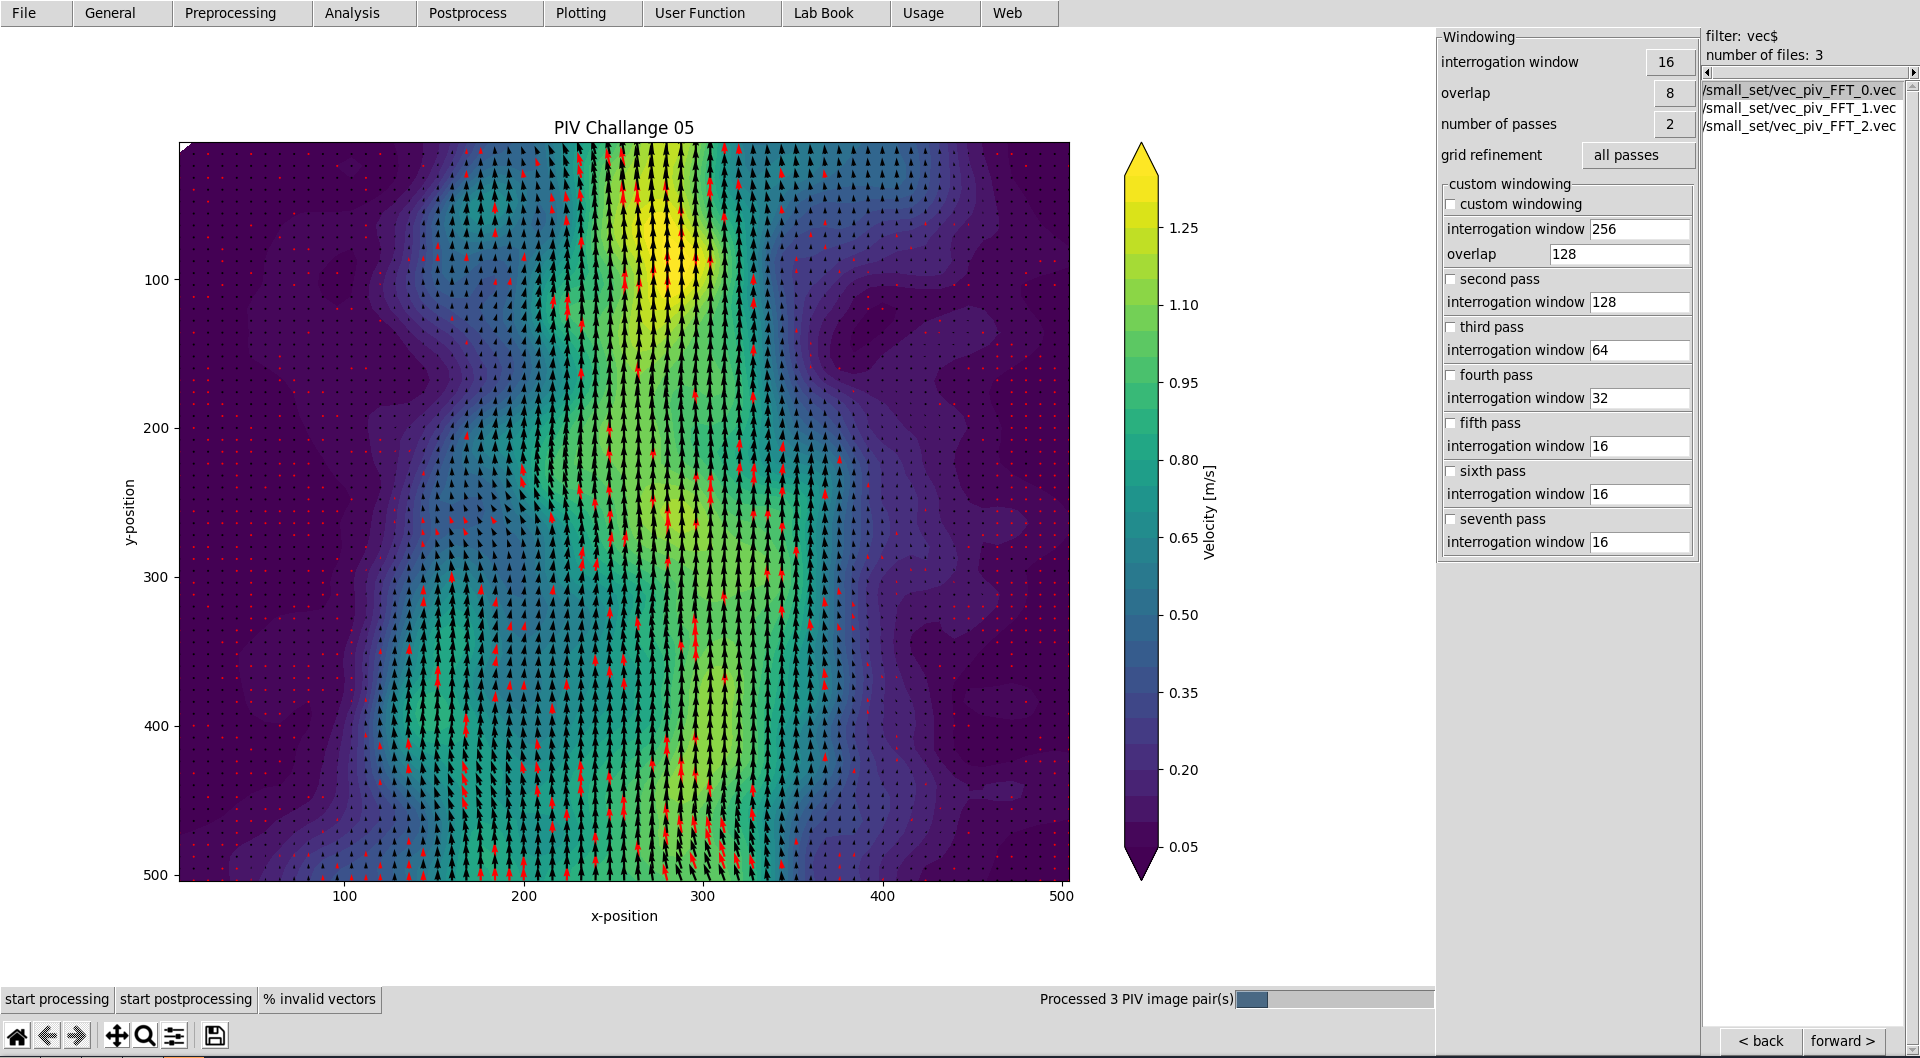
This graphical user interface provides an efficient workflow for evaluating and postprocessing particle image velocimetry (PIV) images. OpenPivGui relies on the Python libraries provided by the OpenPIV project.
Installation
You may use Pip to install OpenPivGui:
pip3 install openpivgui
Launching
Launch OpenPivGui by executing:
python3 -m openpivgui.OpenPivGui
Quick start
Video tutorial
Spend less than eight minutes to learn how to use and extend OpenPivGui:
https://video.fh-muenster.de/Panopto/Pages/Viewer.aspx?id=309dccc2-af58-44e0-8cd3-ab9500c5b7f4
Usage
- Press the top left button »select files« and choose some images. Use Ctrl + Shift for selecting mutliple files.
- To inspect the images, click on the links in the file-list on the right side of the OpenPivGui window.
- Walk through the riders, select the desired functions, and edit the corresponding parameters.
- Press »start processing« to start the evaluation.
- Inspect the results by clicking on the links in the file-list.
- Use the »back« and »forward« buttons to inspect intermediate results. Use the »back« and »forward« buttons also to list the image files again, and to repeat the evaluation.
- Use »dump settings« to document your project. You can recall the settings anytime by pressing »load settings«. The lab-book entries are also restored from the settings file.
Adaption
First, get the source code. There are two possibilities:
- Clone the git repository:
git clone https://github.com/OpenPIV/openpiv_tk_gui.git
- Find out, where pip3 placed the source scripts and edit them in place:
pip3 show openpivgui
In both cases, cd into the subdirectory openpivgui and find the main scripts to edit:
OpenPivParams.pyOpenPivGui.py
Usually, there are two things to do:
- Adding new variables and a corresponding widgets to enable users to modify its values.
- Adding a new method (function).
Adding new variables
Open the script OpenPivParams.py. Find the method __init__(). There, you find a variable, called default of type dict. All widgets like checkboxes, text entries, and option menues are created based on the content of this dictionary.
By adding a dictionary element, you add a variable. A corresponding widget is automatically created. Example:
'corr_window':             # key
    [3020,                 # index
     'int',                # type
     32,                   # value
     (8, 16, 32, 64, 128), # hints
     'window size',        # label
     'Size in pixel.'],    # help
In OpenPivGui.py, you access the value of this variable via p['corr_window']. Here, p is the instance name of an OpenPivParams object. Typing
print(self.p['corr_window'])
will thus result in:
32
The other fields are used for widget creation:
- index: An index of 3xxx will place the widget on the third rider (»PIV«).
- type:
None: Creates a new notebook rider.bool: A checkbox will be created.str[]: Creates a listbox.text: Provides a text area.float,int,str: An entry widget will be created.
- hints: If hints is not
None, an option menu is provided withhints(tuple) as options. - label: The label next to the manipulation widget.
- help: The content of this field will pop up as a tooltip, when the mouse is moved over the widget.
Adding a new method
Open the script OpenPivGui. There are two main possibilities, of doing something with the newly created variables:
-
Extend the existing processing chain.
-
Create a new method.
Extend existing processing chain
Find the function definition start_processing(). Add another if statement and some useful code.
Create a new method
Find the function definition __init_buttons(). Add something like:
ttk.Button(f,
           text='button label',
           command=self.new_func).pack(
		       side='left', fill='x')
Add the new function:
def new_func(self):
    # do something useful here
    pass
Troubleshooting
I can not install OpenPivGui.
Try pip instead of pip3 or try the --user option:
pip install --user openpivgui
Did you read the error messages? If there are complaints about missing packages, install them prior to OpenPivGui.
pip3 install missing-package
Something is not working properly.
Ensure, you are running the latest version:
pip3 install --upgrade openpivgui
Something is still not working properly.
Start OpenPivGui from the command line:
python3 -m openpivgui.OpenPivGui
Check the command line for error messages. Do they provide some useful information?
I can not see a file list.
If the GUI does not look like the screenshot on Github, it may hide some widgets. Toggle to full-screen mode or try to check the compact layout option on the »General« rider.
I do not understand, how the »back« and »forward« buttons work.
All output files are stored in the same directory as the input files. To display a clean list of a single processing step, the content of the working directory can be filtered. The »back« and »forward« buttons change the filter. The filters are defined as a list of comma separated regular expressions in the variable »navigation pattern« on the »General« tab.
Examples:
png$ Show only files that end on the letters »png«.
piv_[0-9]+\.vec$ Show only files that end on »piv_«, followed by a number and ».vec«. These are usually the raw results.
sig2noise_repl\.vec$ Final result after applying a validation based on the signal to noise ratio and filling the gaps.
You can learn more about regular expressions by reading the Python3 Regular Expression HOWTO.
I would like to reset my parameters to standard values.
Close OpenPivGui, find the file .open_piv_gui.json in your home directory, remove it, and restart OpenPivGui. All variables should be reset. Because of the leading dot, this file is hidden on Mac OS and Linux. Use ls -l in your terminal to see it or select »show system files« or the like in your file browser.
I get »UnidentifiedImageError: cannot identify image file«
This happens, when a PIV evaluation is started and the file list contains vector files instead of image files. Press the »back« button until the file list contains image files.
I get »UnicodeDecodeError: 'utf-8' codec can't decode byte 0xff in position 85: invalid start byte«
This happens, when PIV evaluation is NOT selected and the file list contains image files. Either press the »back button« until the file list contains vector files or select »direct correlation« on the PIV rider.
Release history Release notifications | RSS feed


Download files
Download the file for your platform. If you're not sure which to choose, learn more about installing packages.
Source Distribution
Built Distribution
Filter files by name, interpreter, ABI, and platform.
If you're not sure about the file name format, learn more about wheel file names.
Copy a direct link to the current filters
File details
Details for the file openpivgui-0.2.0.tar.gz.
File metadata
- Download URL: openpivgui-0.2.0.tar.gz
- Upload date:
- Size: 19.5 kB
- Tags: Source
- Uploaded using Trusted Publishing? No
- Uploaded via: twine/3.1.1 pkginfo/1.5.0.1 requests/2.23.0 setuptools/46.1.3 requests-toolbelt/0.9.1 tqdm/4.45.0 CPython/3.6.9
File hashes
| Algorithm | Hash digest | |
|---|---|---|
| SHA256 |
b0adaaeb1853c97286d66ec2fe66f83dab0eddf684aa1bb19821bb0a6b86909a
|
|
| MD5 |
602cd194d5b24e723c52e7a9ca5fb75a
|
|
| BLAKE2b-256 |
1ec0ba5e0c64142422b867660e54470eb59a86951b75264a78713b5673e0fc63
|
File details
Details for the file openpivgui-0.2.0-py3-none-any.whl.
File metadata
- Download URL: openpivgui-0.2.0-py3-none-any.whl
- Upload date:
- Size: 25.0 kB
- Tags: Python 3
- Uploaded using Trusted Publishing? No
- Uploaded via: twine/3.1.1 pkginfo/1.5.0.1 requests/2.23.0 setuptools/46.1.3 requests-toolbelt/0.9.1 tqdm/4.45.0 CPython/3.6.9
File hashes
| Algorithm | Hash digest | |
|---|---|---|
| SHA256 |
03f7095a6a8c37c5da3c0222d663b40d70b8aea49f7e3bd91ae95ba65decd501
|
|
| MD5 |
a0a0fec3d51a3517887219afbb94007f
|
|
| BLAKE2b-256 |
7507c6a7788e5361a341cdaa9c64454cdb983ce0622238607817f510eb1c2c86
|


