
This release is a pre-release and may not be stable for production use.
Panoptic 👀


This documentation is also available in French
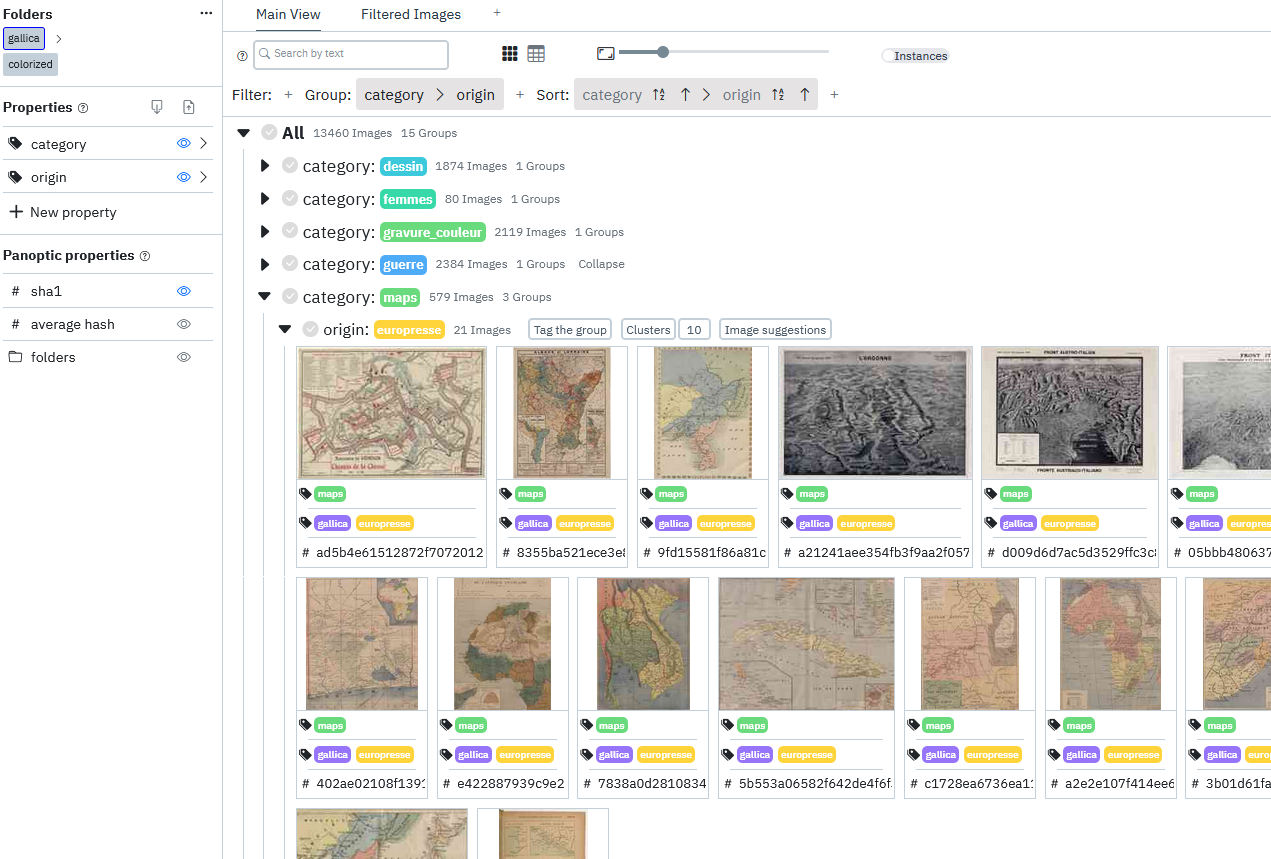
Table of Contents
1. Description
Panoptic is a tool for exploring and annotating large image corpora, utilizing image analysis and machine learning tools to facilitate these tasks.
Since it requires deep learning libraries, it is recommended to use it on a computer with minimal computing capabilities.
Warning: Panoptic is still in active development and currently only a prototype. You may encounter bugs, so we recommend using this tool only for testing and not relying on it for significant academic work.
2. Installation
2.1 Via pip
Recommended way if you already have Python! We also recommend creating a virtualenv to avoid any existing conflicts.
Regardless of your OS, you will need Python 3.10 or higher; we recommend using version 3.12.
If you are on MacOS, you may need to install the x-tools command line tools. Open a terminal and run the following command: `xcode-select --install` Once installed, you can continue with the Panoptic installation.
Generally, you just need to open a terminal and run the following commands to install and then launch Panoptic:
pip3 install panopticpanoptic
2.2 Automatic Installation and Launch Scripts (recommended)
The script may ask for your password to install dependencies. This is necessary if you are missing system dependencies to install Panoptic (python, pip, and/or venv).
2.2.1 Windows
We have a prebuilt launcher hosted here: you can use it to install and then launch Panoptic. Note that you might have a warning message from windows but if you're here, we assume you trust us, if you don't you can still use the python installer!
2.2.2 Linux
Here are the three commands to run to install Panoptic on Linux:
wget https://raw.githubusercontent.com/CERES-Sorbonne/Panoptic/refs/heads/main/install/start_panoptic_linux.sh -O start_panoptic_linux.sh
chmod +x start_panoptic_linux.sh
./start_panoptic_linux.sh
For more detailed steps:
- Download the automatic installation and launch script for Panoptic by clicking the following link: start_panoptic_linux.sh or directly from the terminal with the following command:
wget https://raw.githubusercontent.com/CERES-Sorbonne/Panoptic/refs/heads/main/install/start_panoptic_linux.sh -O start_panoptic_linux.sh
- Make the script executable by using the file properties or with the following command:
chmod +x start_panoptic_linux.sh
- Run the script (double-click the file or use the following command):
./start_panoptic_linux.sh
You can also specify Panoptic launch parameters using the following command:
./start_panoptic_linux.sh [-y|--yes|--assume-yes] [-r|--reinstall] [-s|--start-only] [-u|--uninstall] [--no-bin-copy] [--no-update-script] [-h|--help]
Available options are:
-y,--yesor--assume-yes: Use this option to automatically accept all confirmation requests.-ror--reinstall: Use this option to reinstall Panoptic.-sor--start-only: Use this option to launch Panoptic without reinstalling.-uor--uninstall: Use this option to uninstall Panoptic (does not delete data or system dependencies).--no-bin-copy: Use this option to not copy the Panoptic launch script to the/usr/local/bindirectory.--no-update-script: Use this option to not update the Panoptic launch script in the/usr/local/bindirectory.-hor--help: Use this option to display help.
Post-installation
After installation, you can launch Panoptic using the following command:
start-panoptic
You can also specify Panoptic launch parameters using the following command:
start-panoptic [-y|--yes|--assume-yes] [-r|--reinstall] [-s|--start-only] [-u|--uninstall] [--no-bin-copy] [-no-update-script] [-h|--help]
Available options are:
-y,--yesor--assume-yes: Use this option to automatically accept all confirmation requests.-ror--reinstall: Use this option to reinstall Panoptic.-sor--start-only: Use this option to launch Panoptic without reinstalling.-uor--uninstall: Use this option to uninstall Panoptic (does not delete data or system dependencies).--no-bin-copy: Use this option to not copy the Panoptic launch script to the/usr/local/bindirectory.--no-update-script: Use this option to not update the Panoptic launch script in the/usr/local/bindirectory.-hor--help: Use this option to display help.
2.2.3 MacOS
Here are the three commands to run to install Panoptic on macOS:
curl -O https://raw.githubusercontent.com/CERES-Sorbonne/Panoptic/refs/heads/main/install/start_panoptic_mac.sh
chmod +x start_panoptic_mac.sh
./start_panoptic_mac.sh
For more detailed steps:
- Download the automatic installation and launch script for Panoptic by clicking the following link: start_panoptic_mac.sh
- Make the script executable by using the file properties or with the following command:
chmod +x start_panoptic_mac.sh
- Run the script (double-click the file or use the following command):
./start_panoptic_mac.sh
Post-installation
After installation, you can launch Panoptic by going back to the folder where you executed the installation script and running the following command:
./start-panoptic.sh
2.3 Docker Installation
If you encountered issues with the standard installation, or prefer using Docker, an image is available. First, you need to:
2.3.1 Install Docker
Differences from the Python version
In the Docker version, there is no small interface for adding folders or managing projects; you need to directly specify the folders to Docker to work with:
2.3.2 Option 1: One folder for images and Panoptic data
This requires creating a special folder named "images" within the folder you provide to Panoptic as input. In the following example, you would need a folder named images inside /path/to/your/folder, resulting in /path/to/your/folder/images.
Then run the following command (with Docker already running):
docker run -it -p 8000:8000 -v /path/to/your/folder:/data --name panoptic ceressorbonne/panoptic
2.3.3 Option 2: Separate folders for images and Panoptic data
docker run -it -p 8000:8000 \
-v /path/to/images:/images \
-v /path/to/panoptic/data:/data \
--name panoptic ceressorbonne/panoptic
Once launched, visit http://127.0.0.1:8000 in your browser to access Panoptic.
2.3.4 Post-installation (Docker)
To relaunch Panoptic with Docker after the initial installation:
docker start -ai panoptic
You can also specify Panoptic launch parameters as follows:
docker run -it -p 8000:8000 -v /path/to/your/folder:/data --name panoptic ceressorbonne/panoptic [-y|--yes|--assume-yes] [-r|--reinstall] [-s|--start-only] [-u|--uninstall] [--no-bin-copy] [--no-update-script] [-h|--help]
Available options are the same as for the Linux installation.
2.4 Development Installation
If you want to contribute to Panoptic's development or test the latest unpublished features, you can clone the GitHub repository and install Panoptic in development mode.
2.4.1 Backend Development Only
To test and modify the backend, we provide a pre-built frontend in the backend's html folder.
- Navigate to the
panoptic_backfolder. - To install dependencies:
python3 setup.py installto simply use Panoptic.pip3 install -e .for development.pip3 install -r requirements.txtand addpanoptic_backtoPYTHON_PATHfor development as well.
- Run the backend with
python panoptic/main.py.
2.4.2 Frontend and Backend Development
- First, complete the backend installation steps.
- Navigate to the
panoptic_frontfolder. - Run
npm install. - Start the frontend server with
npm run dev. - Before starting the backend, set the environment variable
PANOPTIC_ENVtoDEVto use the development frontend.
License
This project is licensed under the GNU-GPL3 - see the LICENSE file for details.
1 maintainer

Release files for panoptic 1.0.0rc3
For a detailed explanation of source distributions (sdists) and built distributions (wheels), please see the package formats documentation.
Source distribution (sdist)
| File | Size | Uploaded | |
|---|---|---|---|
| panoptic-1.0.0rc3.tar.gz | 2.1 MB | Details |
Built distribution (wheel)
| File | Interpreter | ABI | Platform | Reset |
|---|---|---|---|---|
| panoptic-1.0.0rc3-py3-none-any.whl | Python 3 | none | any | Details |
Total release size: 4.3 MB
Release files / panoptic-1.0.0rc3.tar.gz
| Download URL | panoptic-1.0.0rc3.tar.gz |
|---|---|
| Size | 2.1 MB |
| Tags | Source |
|
SHA-256 checksum How to use checksums |
415712b1ff38dfdfe0706b316f8c86a679f55e71e7bcce8c5b69be6edf6b0f33
|
|
BLAKE2b-256 checksum How to use checksums |
014abf99f285184ebe4d4eef0077749fb1b1bf729c4faa034ce5ccf846016ad8
|
| Upload date | |
|
Uploaded using Trusted Publishing? What is trusted publishing? |
No |
| Uploaded via |
twine/7.0.0 CPython/3.13.14
|
Release files / panoptic-1.0.0rc3-py3-none-any.whl
| Download URL | panoptic-1.0.0rc3-py3-none-any.whl |
|---|---|
| Size | 2.2 MB |
| Tags | Python 3 |
|
SHA-256 checksum How to use checksums |
0238fc092173f32ff957d8e815db9c6206d06a7a14eea45364bd4235b1f7e7aa
|
|
BLAKE2b-256 checksum How to use checksums |
342fdfd09ca3c800839a5f02a2bc4b3ba5f2fa47414de5dfcd471425f63469b6
|
| Upload date | |
|
Uploaded using Trusted Publishing? What is trusted publishing? |
No |
| Uploaded via |
twine/7.0.0 CPython/3.13.14
|














