A Python library for generating and correcting exams using Playwright and OpenCV.

Project description
Pexams: Python Exam Generation and Correction
Pexams is a library for generating beautiful multiple-choice exam sheets and automatically correcting them from scans using computer vision. It is similar to R/exams, but written in Python and using Playwright for high-fidelity PDF generation instead of LaTeX. It has the following advantages: it has more features, is faster, is easier to install, easier to customize, and it is much less prone to compilation errors than R/exams.
NOTE: This library is still in development and is not yet ready for production use. Although everything should work, there may be some bugs, missing features, or breaking changes in future versions.
Visual examples
You can view an example of a fully generated exam PDF here.
Below is an example of a simulated answer sheet and the annotated, corrected version that the library produces.
| Simulated Scan | Corrected Scan |
|---|---|
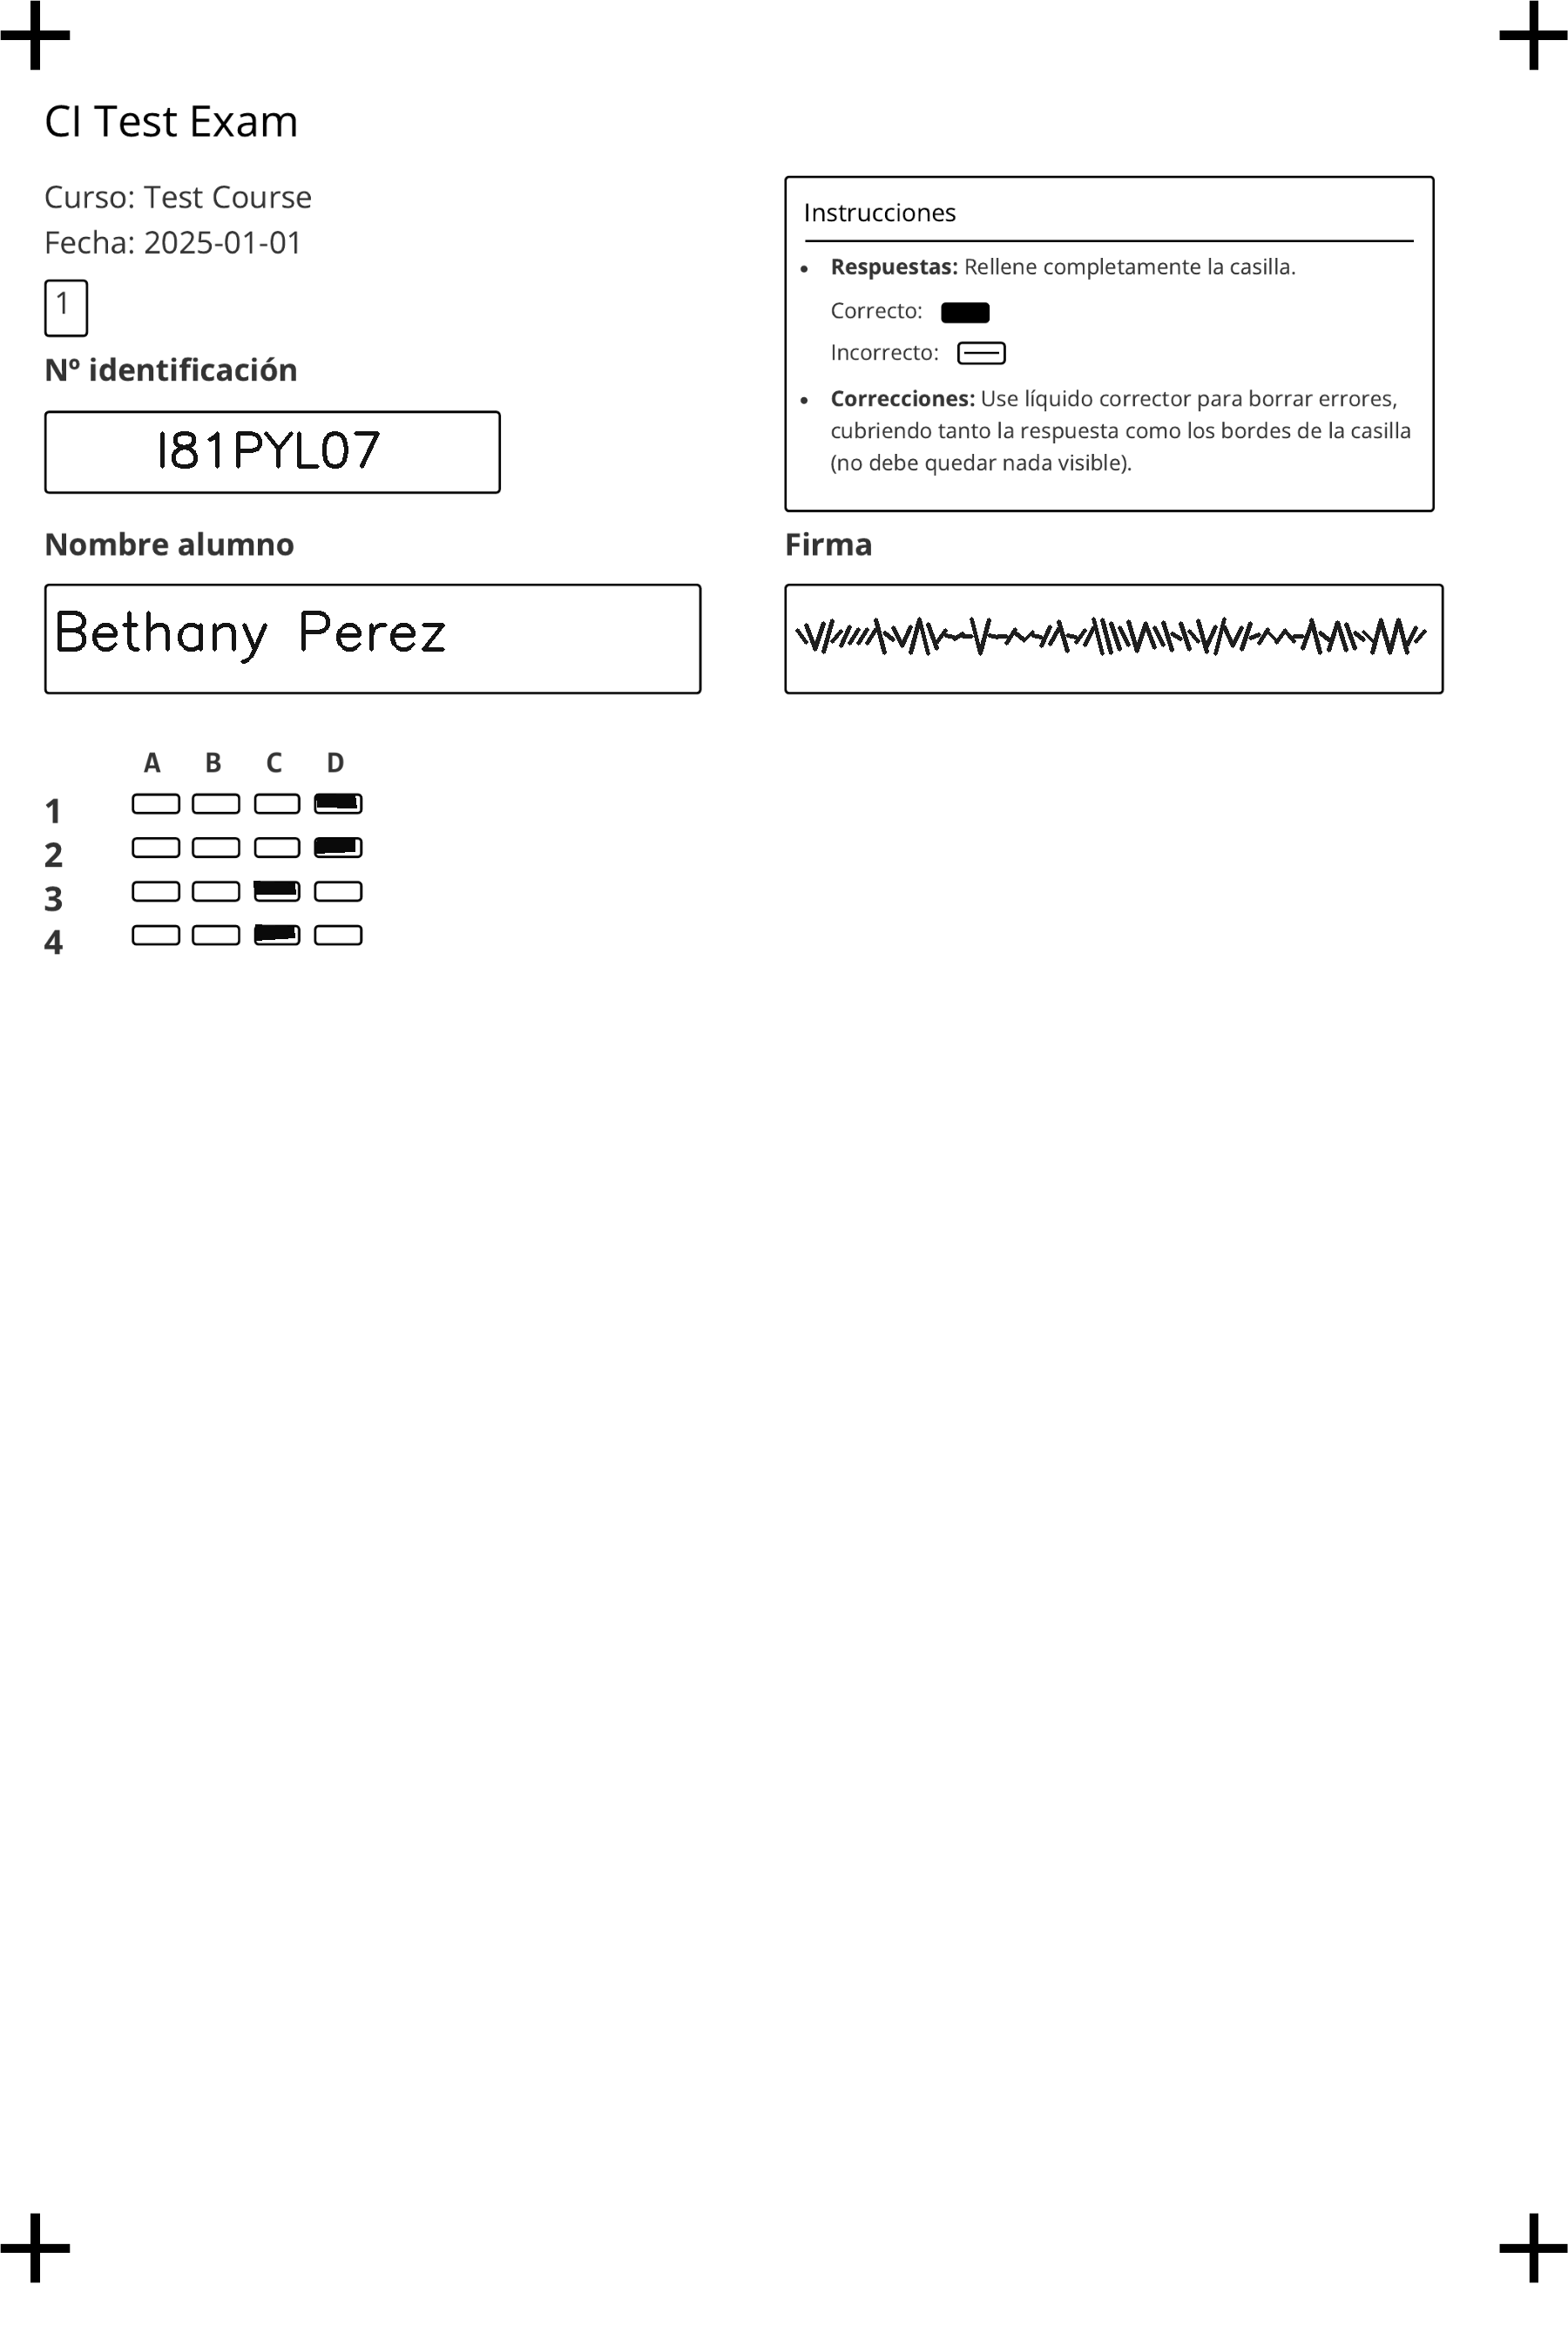 |
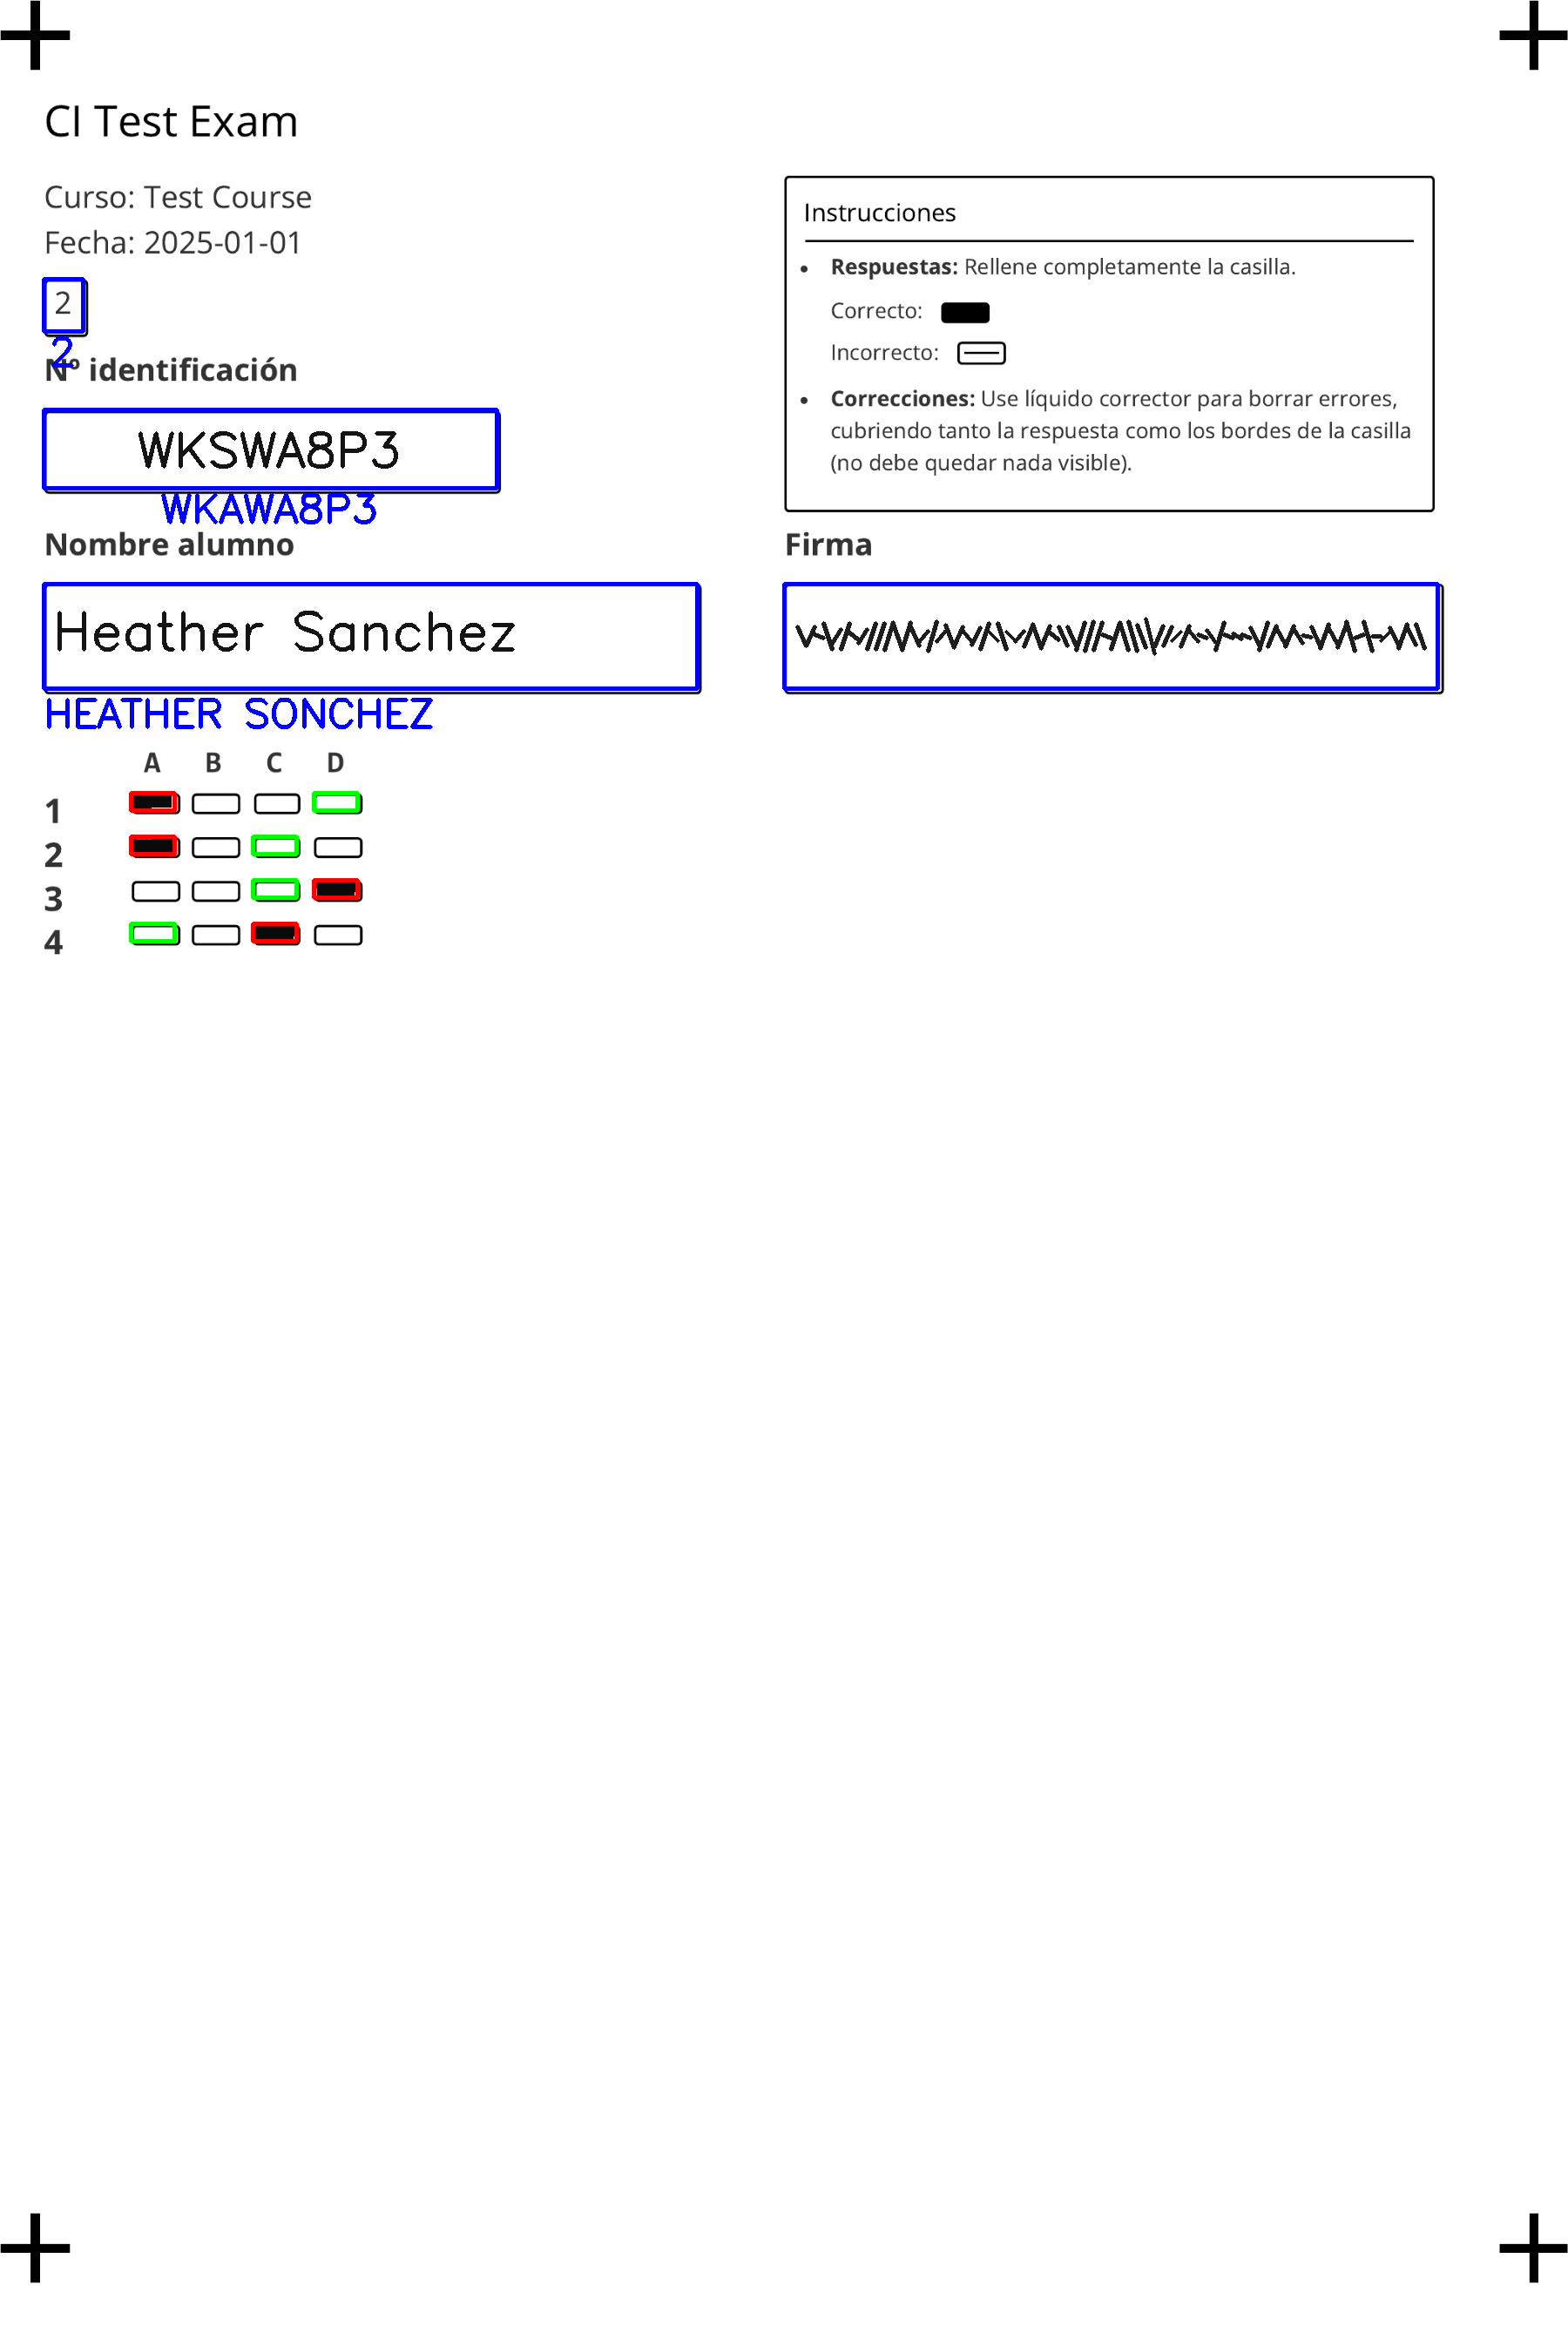 |
The analysis module also generates a plot showing the distribution of answers for each question, which helps in identifying problematic questions, as well as a plot showing the distribution of marks, which helps in assessing the fairness of the exam.
| Answer distribution | Marks distribution |
|---|---|
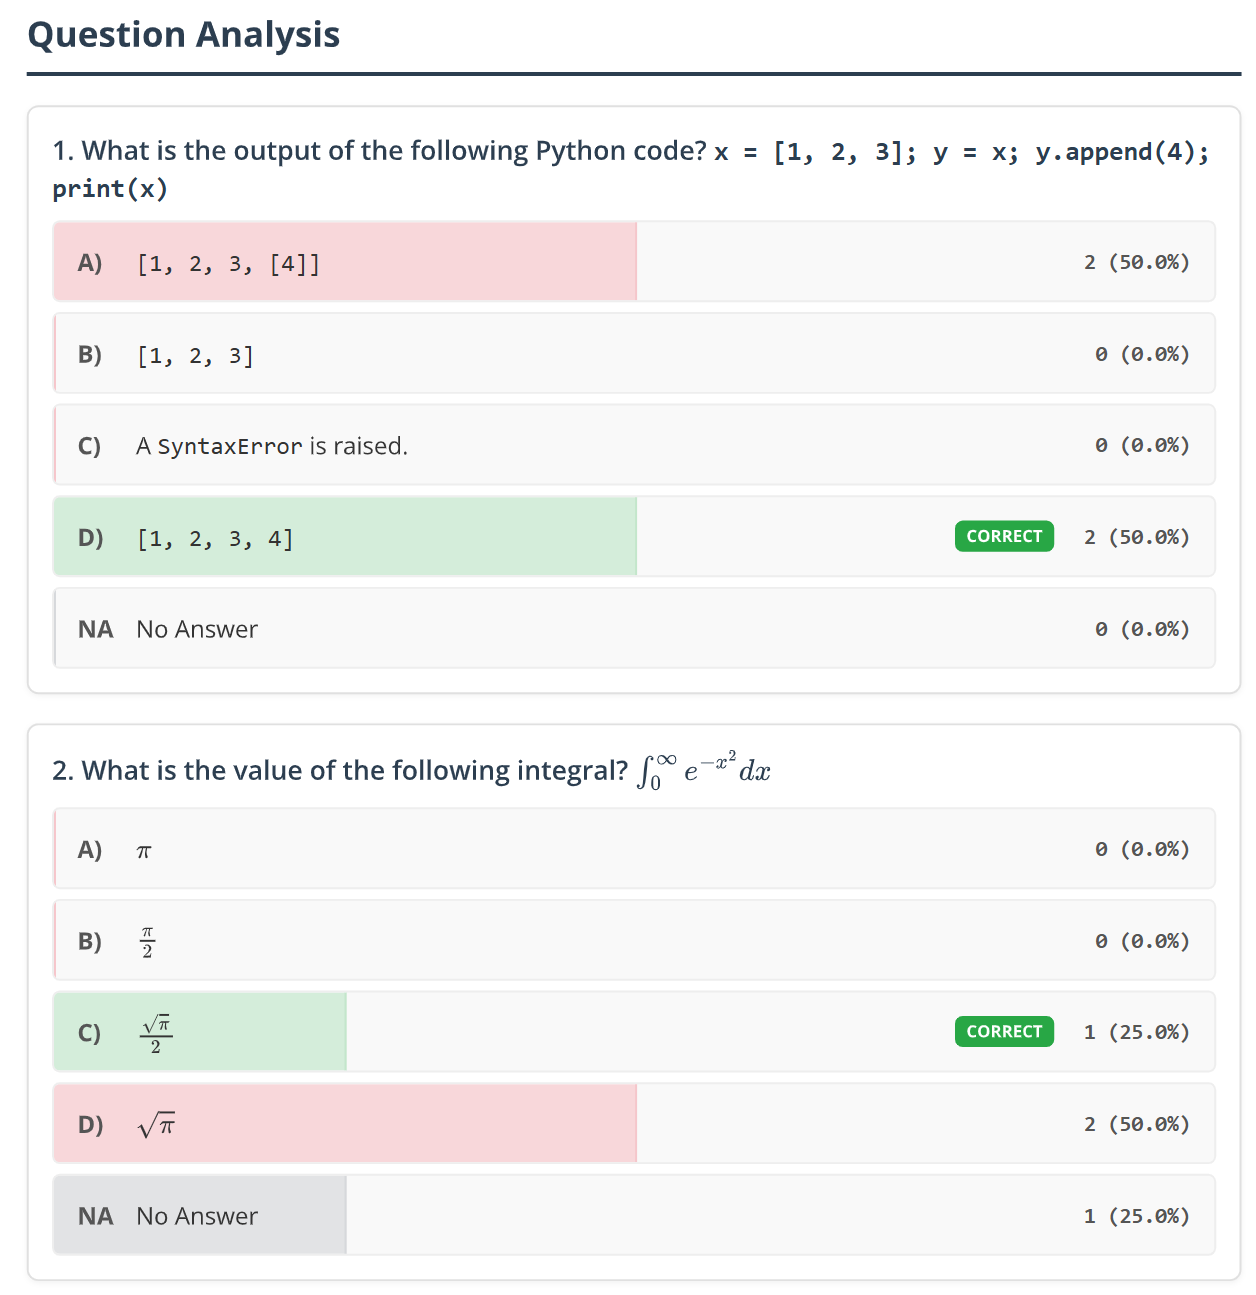 |
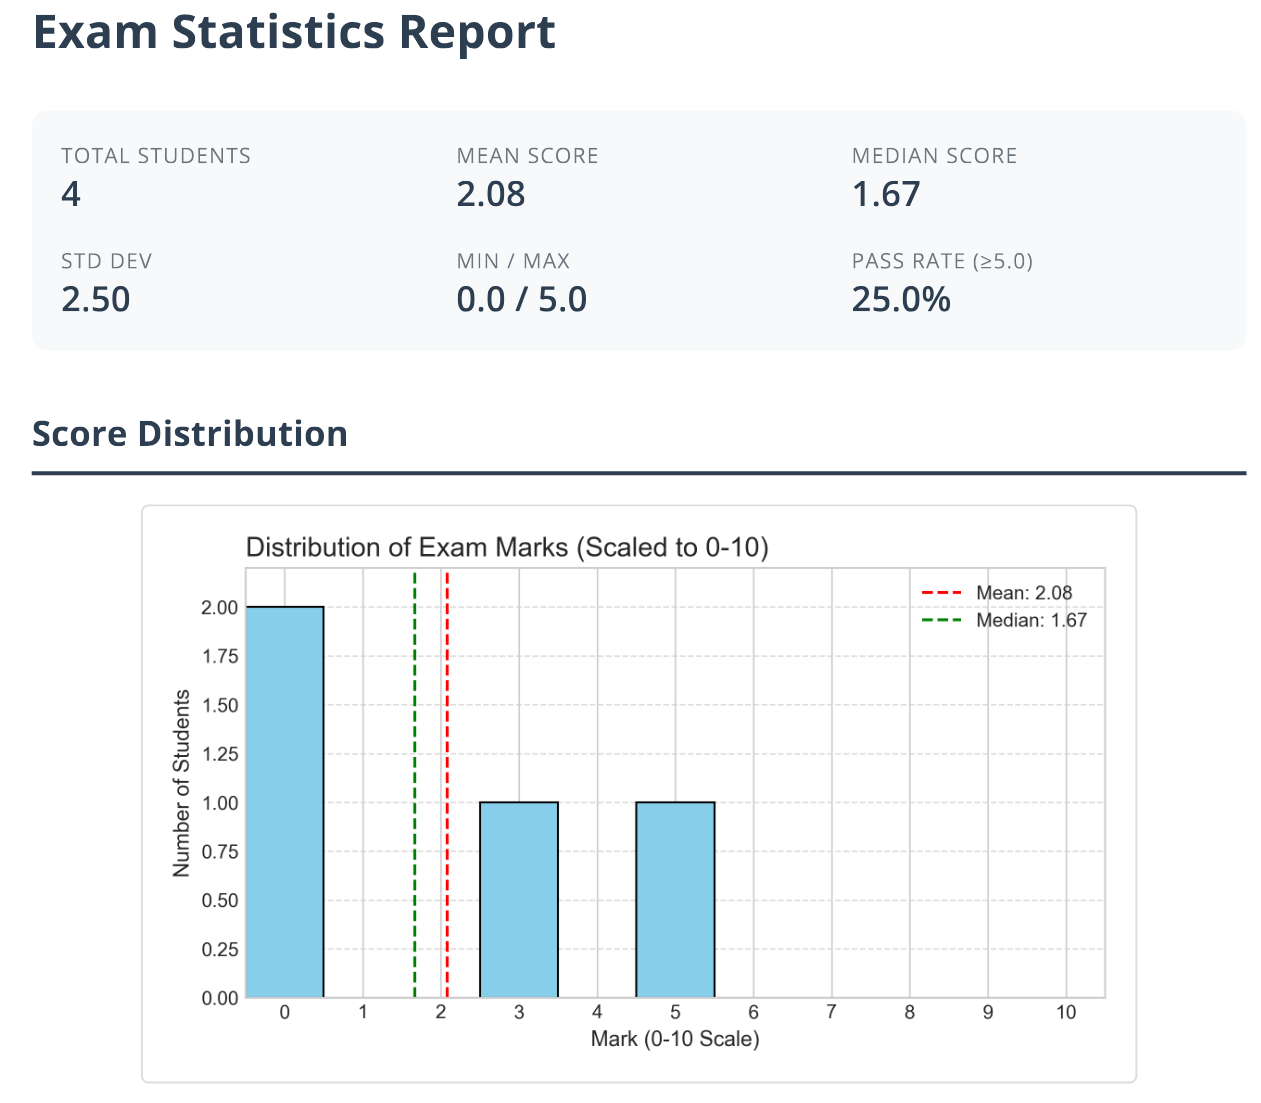 |
Features
Exam generation and Export
- Multiple exam models: Generate multiple unique exam models from a single source file, with automatic shuffling of questions and answers.
- Formats support:
- Input: Write questions in Markdown (preferred) or JSON.
- Export: Export questions to
rexams,wooclap,gift,moodle(xml), ormdformats.
- Rich content support: Write questions in Markdown and include:
- LaTeX equations: Seamlessly render math formulas using MathJax (
$...$). - Images: Embed images in your questions from local files.
- Code snippets: Include code snippets (`...`).
- LaTeX equations: Seamlessly render math formulas using MathJax (
- Customizable layout:
- Arrange questions in one, two, or three columns.
- Adjust the base font size to fit your needs.
- Customizable answer sheet:
- Student ID field is a single box for handwritten ID, using OCR.
- Internationalization support for exam labels (supported:
en,es,ca,de,fr,it,nl,pt,ru,zh,ja).
- High-fidelity PDFs: Uses Playwright to produce clean, modern, and reliable PDF documents from HTML/CSS.
Correction & analysis
- Automated correction: Correct exams from a single PDF containing all scans or from a folder of individual images.
- Robust image processing: Uses
OpenCVwith fiducial markers for reliable, automatic perspective correction and alignment, theTrOCRvision transformer model for OCR of the student ID, name, and model ID, and custom position detection for the answers. - Detailed reports: Generates a
correction_results.csvfile with detailed scores and answers for each student. - Insightful visualizations: Automatically produces plots for:
- Mark distribution: A histogram to assess overall student performance.
- Answer distribution: A horizontal bar plot to analyze performance on each question and identify potential issues.
- Flexible scoring: Easily void specific questions during the analysis if needed, either by removing it from the score calculation completely or by voiding it "nicely" (can only increase the score if the question is correct, otherwise the question is removed from the score calculation).
- Mark Filling & Fuzzy Matching: Automatically fill an input CSV/Excel file with student marks, matching students by ID with fuzzy matching (Levenshtein distance) support for robustness against OCR errors.
Development & testing
- Simulated scans: Automatically generate a set of fake, filled-in answer sheets to test the full correction and analysis pipeline.
- End-to-end testing: A simple
pexams testcommand runs a full generate-correct-analyze cycle using bundled sample data and testing exports/fuzzy matching. - Easy debugging: Keep the intermediate HTML files to inspect the exam content and layout before PDF conversion, by setting the
--log-level DEBUGflag.
Installation
The library has been tested on Python 3.11.
1. Install the library
You can install the library from PyPI:
pip install pexams
Alternatively, you can clone the repository and install it in editable mode, which is useful for development:
git clone https://github.com/OscarPellicer/pexams.git
cd pexams
pip install -e .
2. Install Playwright browsers
pexams uses Playwright to convert HTML to PDF. You need to download the necessary browser binaries by running:
playwright install chromium
This command only needs to be run once.
3. Install Poppler
You may also need to install Poppler, which is needed to convert PDFs to images during the correction phase and for generating simulated scans:
- Windows:
conda install -c conda-forge poppler(alternatively, you can download the Poppler binaries from the Poppler Windows repository) - macOS:
brew install poppler - Debian/Ubuntu:
sudo apt-get install poppler-utils
Quick start
The pexams test command provides a simple way to run a full cycle and see the library in action. It uses a bundled sample file and media to generate, correct, and analyze a sample exam.
pexams test --output-dir ./my_test_output
This will create a my_test_output directory containing the generated exams, simulated scans, correction results, and analysis plots.
Usage
1. The questions file (Markdown)
The preferred input format is a Markdown file (.md) with the following structure:
## question_id
> 
Question text...
* Correct answer
* Wrong answer 1
* Wrong answer 2
**Explanation:**
Optional explanation text...
Notes:
- The first answer in the list is treated as the correct one (it will be shuffled during exam generation).
- Images must be in a blockquote
> ![...]. - Question ID can be a string or integer.
2. CLI commands
pexams generate
Generates exam PDFs or exports questions to other formats.
pexams generate <input_file> --to <format> --output-dir <path> [OPTIONS]
Arguments:
input_file: (Positional) Path to the input file (Markdown or JSON).--to <format>: Output format. Options:pexams(default, PDF generation),rexams,wooclap,gift,md, ormoodle(xml).--output-dir <path>: Directory to save the output.
Common Options (for all formats):
--log-level <level>: Set the logging level (DEBUG, INFO, WARNING, ERROR).
Options for pexams format:
--num-models <int>: Number of different exam models to generate (default: 4).--exam-title <str>: Title of the exam (default: "Final Exam").--exam-course <str>: Course name for the exam (optional).--exam-date <str>: Date of the exam (optional).--columns <int>: Number of columns for the questions (1, 2, or 3; default: 1).--font-size <str>: Base font size for the exam (e.g., '10pt', '12px'; default: '10pt').--total-students <int>: Total number of students for mass PDF generation (default: 0).--extra-model-templates <int>: Number of extra template sheets (answer sheet only) to generate per model (default: 0).--lang <str>: Language for the answer sheet labels (e.g., 'en', 'es'; default: 'en').--keep-html: If set, keeps the intermediate HTML files used for PDF generation.--generate-fakes <int>: Generates a number of simulated scans with fake answers for testing the correction process (default: 0).--generate-references: If set, generates a reference scan with the correct answers marked for each model.--custom-header <str>: Markdown string or path to a Markdown file to insert before the questions (e.g., instructions).
Comprehensive Example
pexams generate my_questions.md --output-dir ./generated_exam \
    --exam-title "Computer Systems - Midterm Exam" \
    --exam-course "Master in Computer Engineering" \
    --exam-date "2025-12-19" \
    --num-models 4 \
    --font-size "9pt" \
    --lang "es" \
    --columns 2 \
    --total-students 22 \
    --extra-model-templates 2 \
    --generate-fakes 1 \
    --generate-references \
    --keep-html \
    --custom-header "**Instructions:** Incorrect answers will be penalized by **-0.25 points** (a correct answer is +1 point). You are only allowed to have a pen, corrector fluid, and your ID card on top of the table."
pexams correct
Corrects scanned exams, runs analysis, and optionally fills marks into a student list.
pexams correct --input-path <path> --exam-dir <path> --output-dir <path> [OPTIONS]
Comprehensive Example:
pexams correct \
    --input-path ./generated_exam/simulated_scans \
    --exam-dir ./generated_exam \
    --output-dir ./generated_exam/correction_results \
    --input-csv ./grades.csv \
    --id-column "Student ID" \
    --mark-column "Midterm Mark" \
    --fuzzy-id-match 80 \
    --penalty 0.25 \
    --input-encoding "utf-8"
- The
--input-pathcan be a single PDF file or a folder of images (PNG, JPG). - The
--exam-dirmust contain theexam_model_*_questions.jsonfiles generated alongside the exam PDFs.
Mark Filling Arguments:
--input-csv <path>: Path to an input CSV/XLSX/TSV file containing student IDs.--id-column <name>: Column name in input file containing student IDs.--mark-column <name>: Column name to fill with marks (will be created if missing).--fuzzy-id-match <0-100>: Threshold for fuzzy matching of IDs (default 100 = exact match only).--input-encoding <str>: Encoding of the input CSV file (defaultutf-8). Useful if you encounter encoding errors, in which case you can trylatin1orutf-8-sig.--input-sep <str>: Separator for the input CSV file (default,). If your CSV uses semicolons (common in Europe), pass--input-sep semior--input-sep ";".--output-decimal-sep <str>: Decimal separator for the output marks (default.). Use,if your locale requires comma decimals (e.g.,--output-decimal-sep ",").--simplify-csv: If set, the output CSV (*_with_marks.csv) will only keep the columns specified by--id-column,--name-column, and--mark-column. This is useful for creating a clean file for importing into a gradebook.--name-column <name>: Column name in input file containing student names. Required if--simplify-csvis used.
Scoring Arguments:
--penalty <float>: Score penalty for wrong answers (e.g.,0.25). Default is0.0. Formula:score = correct_answers - (wrong_answers * penalty). Note thatwrong_answersdoes not include blank/unanswered questions.
Other Arguments:
--void-questions <str>: Comma-separated list of question numbers to exclude from scoring.--void-questions-nicely <str>: Comma-separated list of question IDs to void "nicely".--only-analysis: Skip the image processing step (OCR/OMR) and proceed directly to the analysis and grading phase using an existingcorrection_results.csv.
Manual Correction Workflow
If you find errors in the automatic correction (e.g., an incorrect student ID or a misread answer), you can manually fix them without re-running the time-consuming image processing.
- Open the
correction_results.csvfile in the output directory. - Manually edit the values (e.g., correct a student ID or change an answer from 'A' to 'B' or 'NA').
- Save the CSV file.
- Run the
correctcommand again with the--only-analysisflag.
pexams correct \
    --exam-dir ./generated_exam \
    --output-dir ./generated_exam/correction_results \
    --only-analysis \
    --penalty 0.25
This will re-read the corrected CSV, recalculate all scores (applying penalties, void questions, etc.), regenerate the plots, and update the final marks.
Recommended Scan Settings
For best results with the automatic correction, please use the following settings when scanning the answer sheets:
- Resolution: 300 DPI is recommended. Lower resolutions (e.g., 150 DPI) might work but are less reliable for OCR.
- Color Mode: Grayscale is highly recommended. Do NOT use "Black and White" (1-bit / Threshold) mode, as it destroys the details needed for accurate bubble detection and OCR. Color scans also work but produce larger files without significant benefit.
- Format: PDF (multi-page) or images (PNG/JPG).
pexams test
Runs a full generate/correct/analyze cycle using bundled sample data, and tests exports and fuzzy matching.
pexams test [OPTIONS]
Python API Usage
In addition to the CLI, you can use pexams as a Python library.
1. Generating Exams
To generate exams, use the pexams.generate_exams.generate_exams function.
from pexams import generate_exams
from pexams.schemas import PexamQuestion, PexamExam
from pexams.main import _load_and_prepare_questions

# You can load questions from a MD file
# questions = _load_and_prepare_questions("path/to/your/questions.md")

# Or define them manually
questions = [
    PexamQuestion(
        id="q1",
        text="What is 2+2?",
        options=[
            {"text": "4", "is_correct": True}, # First is correct
            {"text": "3", "is_correct": False},
        ]
    )
]

# Generate 2 exam models and save them in the ./my_exams directory
generate_exams.generate_exams(
    questions=questions,
    output_dir="./my_exams",
    num_models=2,
    exam_title="Quiz 1"
)
2. Correcting Exams
To correct exams, you first need to load the solutions that were generated, then call pexams.correct_exams.correct_exams.
from pexams import correct_exams, utils

exam_dir = "./my_exams" # The output from generate_exams
solutions_full, solutions_simple, max_score = utils.load_solutions(exam_dir)

correct_exams.correct_exams(
    input_path="./my_exams/simulated_scans", # Path to PDF or folder of images
    solutions_per_model=solutions_simple,
    output_dir="./correction_output",
    questions_dir=exam_dir
)
3. Analyzing Results
After correction, you can run the analysis using pexams.analysis.analyze_results.
from pexams import analysis

analysis.analyze_results(
    csv_filepath="./correction_output/correction_results.csv",
    exam_dir="./my_exams", # Automatically loads solutions
    output_dir="./correction_output"
)
Contributing
Pull requests are welcome! Please feel free to submit an issue or pull request.
Contact
oscar.pellicer at uv dot es
TODO
- Create a set of layouts allowing for more answers per question, or overall more questions (more compact), etc.
- Add cli argument to change the scoring system, such as using German grading (1-6) instead of the default 0-10, or using a 100-point scale instead of the default 0-10.
Release history Release notifications | RSS feed


Download files
Download the file for your platform. If you're not sure which to choose, learn more about installing packages.
Source Distribution
Built Distribution
Filter files by name, interpreter, ABI, and platform.
If you're not sure about the file name format, learn more about wheel file names.
Copy a direct link to the current filters
File details
Details for the file pexams-0.9.0.tar.gz.
File metadata
- Download URL: pexams-0.9.0.tar.gz
- Upload date:
- Size: 108.9 kB
- Tags: Source
- Uploaded using Trusted Publishing? No
- Uploaded via: twine/6.1.0 CPython/3.13.7
File hashes
| Algorithm | Hash digest | |
|---|---|---|
| SHA256 |
62233694368e15fdc4de66507d12ea6ef925411ad17d6985fb5add6c2383d7bf
|
|
| MD5 |
860cd0f2d05c1889dcaf6cb9d9dd6d4a
|
|
| BLAKE2b-256 |
76cbb017edab82bb58a7620dde00418aa768a1b0930a5bb5fcc81ff835c8db05
|
File details
Details for the file pexams-0.9.0-py3-none-any.whl.
File metadata
- Download URL: pexams-0.9.0-py3-none-any.whl
- Upload date:
- Size: 107.9 kB
- Tags: Python 3
- Uploaded using Trusted Publishing? No
- Uploaded via: twine/6.1.0 CPython/3.13.7
File hashes
| Algorithm | Hash digest | |
|---|---|---|
| SHA256 |
ee56ea0f2964d41e8fc3ad0cec0228713f3a5509341eeda44726074d40bc0177
|
|
| MD5 |
e18121d3f3ccaba4aa67cf055489928f
|
|
| BLAKE2b-256 |
ecc37a79061bdfc59c0bf4c39397d9ea95c0a391b2c5599c0f485f4579a2738b
|


