
Prashna

Prashna is a live Q&A and quiz tool for trainers, teachers and speakers who run a workshop, a class or a talk. Prashna (प्रश्न) is Sanskrit for question.
In a room, most people do not ask questions out loud. From the front, you cannot tell who is following and who is lost. With Prashna, people use their phones to ask questions without giving their names, and to answer short quizzes. You see what the room wants to know and what it understood.
What Prashna does
- Anonymous Q&A. Participants post questions and upvote each other's. The moderator responds in text or out loud. A removed question is hidden from participants and kept for the record.
- Quizzes and polls, run by the moderator. Single- or multiple-choice questions, polls with no correct answer, optional images and anonymous answers. The moderator reveals the results one question at a time. Editing a quiz never changes the results of a past run.
- Projector view. The screen at the front of the room shows the join code, a QR code for the participant link, the top questions, and the current quiz question in step with the moderator.
- Export. The admin can export sessions, questions, attendee profiles, feedback, quiz runs and quizzes as JSON or as an Excel workbook.
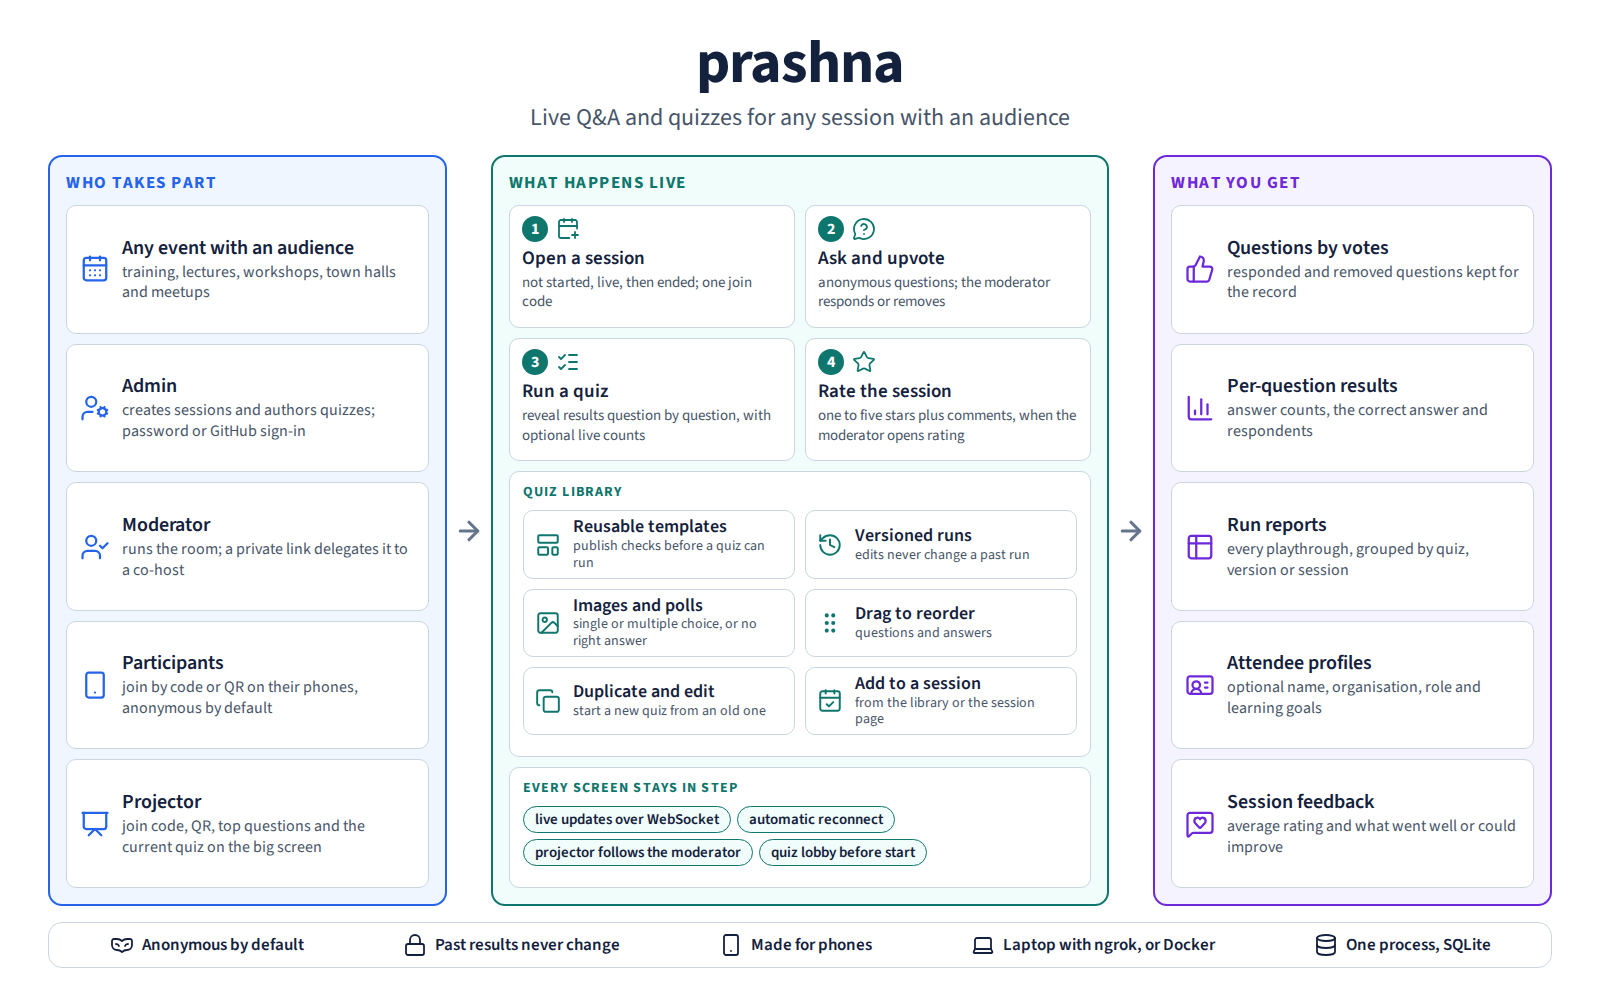
How Prashna runs a session. An admin sets it up and a moderator runs the room. Participants join on their phones, and the projector shows the room the same state. At the end you have the ranked questions, the quiz results, the attendee profiles and the feedback.
Why Prashna
- It runs on your own laptop. One command installs it. You need no server and no subscription.
- Your audience can reach it over the internet. Prashna works with
Cloudflare and ngrok tunnels. Start it with
--tunnel cloudflareor--tunnel ngrok, and it puts the public address in the join link and QR code. Installcloudflaredorngrokfirst. - Your data stays on your machine. Prashna stores its data in a folder on your computer.
- It is free and open source, under the MIT License.
Install
Choose one of these. Each installs the same prashna command.
One command, on macOS, Linux, or Windows. This works on a machine without Python. It installs uv, which fetches Python if needed.
On macOS and Linux:
curl -LsSf https://sankara.net/prashna/install.sh | sh
On Windows, in PowerShell:
powershell -ExecutionPolicy ByPass -c "irm https://sankara.net/prashna/install.ps1 | iex"
The landing page https://sankara.net/prashna/ shows the same commands.
Already have uv? This command installs the same prashna command. It
is the same on macOS, Linux, and Windows:
uv tool install prashna
To try Prashna first, this command runs it without installing the
prashna command:
uvx prashna
It keeps using the version that uv already has. To get the newest version, run:
uvx prashna@latest
Already have Python 3.11 or newer? Install without uv, using pipx:
pipx install prashna
Or use pip inside a virtual environment in the folder .prashna in your
home folder. A plain pip install into the system Python is refused on
Debian, Ubuntu, and some other Linux distributions
("externally-managed-environment"); the virtual environment avoids that.
On macOS and Linux, create the environment, then install Prashna into it:
python3 -m venv ~/.prashna
~/.prashna/bin/pip install prashna
On Windows, in PowerShell:
py -m venv $HOME\.prashna
$HOME\.prashna\Scripts\pip install prashna
Start and update
Start Prashna:
prashna
If you installed it into a virtual environment, start it from there. On macOS and Linux:
~/.prashna/bin/prashna
On Windows:
$HOME\.prashna\Scripts\prashna
To update an installation made with the one-command installer or with uv, run:
uv tool upgrade prashna
To update the virtual environment, stop Prashna first. On macOS and Linux:
~/.prashna/bin/pip install --upgrade prashna
On Windows:
$HOME\.prashna\Scripts\pip install --upgrade prashna
The user guide gives the update and uninstall commands for every install method.
Quick tutorial
This tutorial takes about ten minutes. You can do it alone on your laptop, with a second browser window as the participant.
1. Start Prashna and create the admin
Run prashna. On the first run, Prashna prints a one-time setup link in
the terminal and opens it in your browser. On that page, choose the
admin's username and password (at least 8 characters), then click
Create admin. The setup link works only once. After that, sign in at
http://127.0.0.1:8000/.
The terminal also shows the data folder, where Prashna keeps its database. Keep the terminal open: Prashna runs until you press Ctrl+C.
2. Create a session
A session is one gathering, for example one class or one talk. Under Your sessions, type a title in the New session title box and click + New session. Click the new row to open the session page.
On the session page, click Start session when the audience is ready.
3. Open the projector page
On the session page, click Projector at the top. The projector page opens in a new tab. Show that tab on the screen that the room sees. It shows the join code, a QR code, the top questions and the current quiz question. Click the QR code to enlarge it.
4. Let the audience join
People scan the QR code with their phone camera, or open the participant link. The link is under Participants join at: in the Invite participants card, inside Set up on the session page. People can also type the session code on the Prashna home page. They need no account and no app.
Phones can reach Prashna only after you put it online (step 7). To try it alone first, click Participant view at the top of the session page.
5. Ask and upvote
On the participant page, type a question under Your question and click Ask. A question is anonymous unless the participant ticks Show my name. Other participants click the ▲ beside a question to upvote it. The questions with the most votes rise to the top.
On the session page, the Questions card lists the questions. Type a reply if you want to, and click Mark responded. Click Remove to hide a question from participants.
6. Run a short quiz
- Click Quiz library at the top of the home page. Type a title in the New quiz title box and click + New.
- In the editor, click the + button to add a question, and type the question. Click + Answer for each answer. Tick Correct beside the right answer, or tick Poll (no correct answer) for a poll.
- Click Add to session ▾ on the quiz's row and choose your session.
- On the session page, in the Quiz card, click Start. The question appears on the phones and on the projector page.
- When people have answered, click Reveal results →. Voting on that question closes, and the projector page shows the results. Click Next question →, and on the last question, Finish quiz →.
7. Put Prashna online for your audience
By default, Prashna listens only on your own computer
(http://127.0.0.1:8000). Phones cannot open that address. Choose one of
these ways to let them in.
Over the internet, with a tunnel
Stop Prashna with Ctrl+C, then
start it with a Cloudflare quick tunnel. This needs the cloudflared
program and no account:
prashna --tunnel cloudflare
Or use ngrok, signed in to your ngrok account:
prashna --tunnel ngrok
Prashna prints the public address (Participants join at: https://…).
The participant link and the QR code use that address. You keep using
http://127.0.0.1:8000 yourself. Ctrl+C stops Prashna and the tunnel.
On the same Wi-Fi network
Start Prashna so that other devices on the network can reach it:
prashna --host 0.0.0.0
Then find your laptop's address on the network, for example
192.168.1.20, in your network settings. On the session page, open
Set up and type http://192.168.1.20:8000 (with your address) in the
Base URL box. The participant link and the QR code then use that
address. Anyone on the same network can reach Prashna while it runs.
The user guide explains how to install cloudflared and ngrok, and how
the two tunnels differ.
User guide
The user guide covers everything else. It explains the roles, quizzes and polls, feedback, sharing moderation with a co-host, and tunnels. It also covers where your data is, export, backup and restore, updating, uninstalling, resetting the admin password, and troubleshooting. To run Prashna in Docker, see the container guide.
The landing page is https://sankara.net/prashna/.
Licence
Prashna is under the MIT License. See LICENSE.
For contributors: the development guide covers setup, tests, checks and releases.
1 maintainer

Metadata
1 maintainer
Release files for prashna 0.6.1
For a detailed explanation of source distributions (sdists) and built distributions (wheels), please see the package formats documentation.
Source distribution (sdist)
| File | Size | Uploaded | |
|---|---|---|---|
| prashna-0.6.1.tar.gz | 112.5 kB | Details |
Built distribution (wheel)
| File | Interpreter | ABI | Platform | Reset |
|---|---|---|---|---|
| prashna-0.6.1-py3-none-any.whl | Python 3 | none | any | Details |
Total release size: 231.8 kB
Release files / prashna-0.6.1.tar.gz
| Download URL | prashna-0.6.1.tar.gz |
|---|---|
| Size | 112.5 kB |
| Tags | Source |
|
SHA-256 checksum How to use checksums |
86ec186a16d517823ecbeab01dbd5b7c34343810ded55d43cf79d1de77412ce6
|
|
BLAKE2b-256 checksum How to use checksums |
6011886b5f7aa0f4929e670a87e674f678e86fbaa0476880a47169a531e36625
|
| Upload date | |
|
Uploaded using Trusted Publishing? What is trusted publishing? |
Yes |
| Uploaded via |
uv/0.13.1 {"installer":{"name":"uv","version":"0.13.1","subcommand":["publish"]},"python":null,"implementation":{"name":null,"version":null},"distro":{"name":"Ubuntu","version":"24.04","id":"noble","libc":null},"system":{"name":null,"release":null},"cpu":null,"openssl_version":null,"setuptools_version":null,"rustc_version":null,"ci":true}
|
Release files / prashna-0.6.1-py3-none-any.whl
| Download URL | prashna-0.6.1-py3-none-any.whl |
|---|---|
| Size | 119.4 kB |
| Tags | Python 3 |
|
SHA-256 checksum How to use checksums |
e2a248d6bf23536425118190ba09e5fa42135aad728ccda26bc4ec0c1a3913ea
|
|
BLAKE2b-256 checksum How to use checksums |
1c75bf690427cf84ff1593cf8ea4130dfeb166c18f2f27d12f7a82bacacd8c32
|
| Upload date | |
|
Uploaded using Trusted Publishing? What is trusted publishing? |
Yes |
| Uploaded via |
uv/0.13.1 {"installer":{"name":"uv","version":"0.13.1","subcommand":["publish"]},"python":null,"implementation":{"name":null,"version":null},"distro":{"name":"Ubuntu","version":"24.04","id":"noble","libc":null},"system":{"name":null,"release":null},"cpu":null,"openssl_version":null,"setuptools_version":null,"rustc_version":null,"ci":true}
|














