Local image privacy masking — detect and redact sensitive info (IDs, phones, keys, etc.) before images leave your machine.

Project description
privacy-mask
Detect and redact sensitive information in images — 100% local, 100% offline.


Your images never leave your machine. privacy-mask intercepts screenshots before they are sent to AI services, automatically detecting and masking phone numbers, ID cards, API keys, and 40+ other sensitive patterns.
🇨🇳 中文文档 / Chinese Documentation
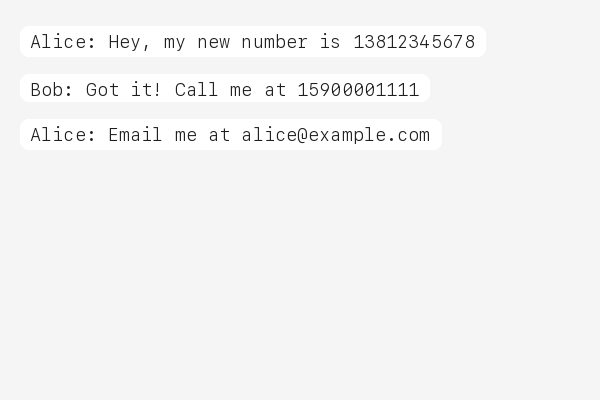
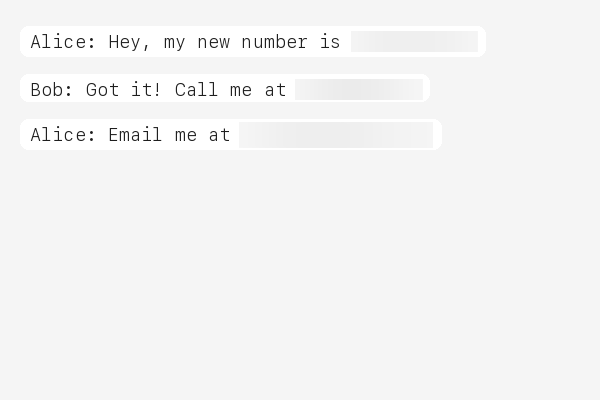
Demo
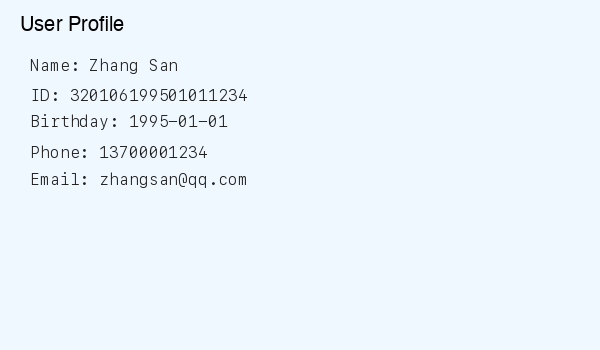
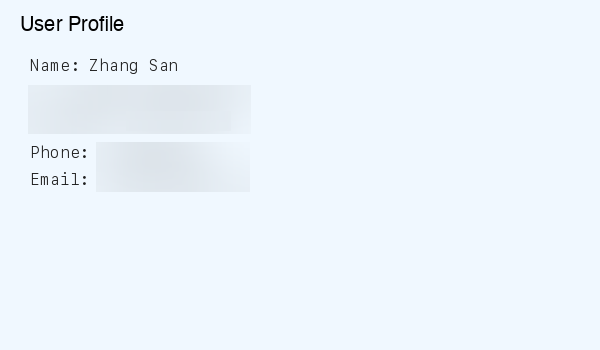
Before / After
| Original | Masked |
|---|---|
 |
 |
 |
 |
 |
 |
Why?
When you share screenshots with AI assistants, you might accidentally expose:
- Personal IDs — national ID numbers, passports, social security numbers
- Phone numbers & emails — yours or your users'
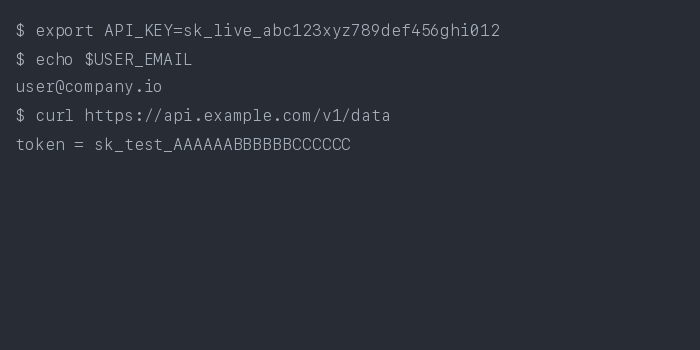
- API keys & tokens — AWS, GitHub, Stripe, database credentials
- Financial data — bank card numbers, IBAN codes
Cloud-based redaction services require uploading your images — defeating the purpose. privacy-mask processes everything locally before any data leaves your machine, making it the only approach that truly protects your privacy.
This matters for compliance too: GDPR, HIPAA, and other regulations require that sensitive data be protected at the point of origin.
Quick Start
# Install (regex engine only)
pip install privacy-mask

# Install with NER engine (recommended)
pip install privacy-mask[ner]

# Mask a screenshot
privacy-mask mask screenshot.png

# One-time setup: auto-mask all images before AI upload
privacy-mask install
That's it. After privacy-mask install, every image you share with your AI coding assistant is automatically masked before upload.
# Toggle masking on/off
privacy-mask off       # Temporarily disable
privacy-mask on        # Re-enable
privacy-mask status    # Check current state
Agent Integration
privacy-mask follows the agentskills.io SKILL.md standard and works with 20+ AI coding tools that run locally:
| Platform | How it works |
|---|---|
| Claude Code | pip install privacy-mask && privacy-mask install or /plugin marketplace add fullstackcrew-alpha/privacy-mask then /plugin install privacy-mask@privacy-mask |
| Cursor | SKILL.md auto-detected in project |
| VS Code Copilot | SKILL.md auto-detected in project |
| Gemini CLI | SKILL.md auto-detected in project |
| OpenHands | CLI available via shell |
| Goose | SKILL.md auto-detected |
| Roo Code | SKILL.md auto-detected |
| aider | CLI available via shell |
| Cline | SKILL.md auto-detected |
| Windsurf | SKILL.md auto-detected |
| OpenClaw | clawhub install privacy-mask or SKILL.md auto-detected |
Note: privacy-mask only works with local agents. Web-based AI (ChatGPT Web, Gemini Web) uploads images to cloud servers before processing — local masking cannot help there. This tool is designed for agents that run on your machine.
Troubleshooting
UserPromptSubmit hook error
If you see this error when sending images in Claude Code, it means the privacy-mask hook timed out before finishing. This is a known issue — the NER engine needs time to load the GLiNER model (~170MB) on first run. The image is usually still masked successfully despite the error message.
Fix: increase the hook timeout in ~/.claude/settings.json:
{
  "hooks": {
    "UserPromptSubmit": [
      {
        "matcher": "",
        "hooks": [
          {
            "type": "command",
            "command": "bash ~/.claude/hooks/privacy-mask.sh",
            "timeout": 60000
          }
        ]
      }
    ]
  }
}
The default timeout is 30000ms (30s). We recommend 60000ms (60s) for NER engine, or 30000ms if you only use the regex engine.
Alternative: switch to regex engine for faster processing (~2-5s vs ~20-30s):
# Edit ~/.claude/hooks/privacy-mask.sh or config.json
# Set detection engine to regex
privacy-mask mask screenshot.png --detection-engine regex
To change the default engine, edit mask_engine/data/config.json:
{
  "detection": { "engine": "regex" }
}
Detection Engines
privacy-mask supports two detection engines, switchable via config or CLI:
| Engine | Description | Install |
|---|---|---|
| NER (default) | Zero-shot Named Entity Recognition via GLiNER. Detects person names, addresses, organizations, dates of birth, medical conditions, and more — without regex. | pip install privacy-mask[ner] |
| Regex | 47 hand-tuned regex rules covering 15+ countries. No extra dependencies. | pip install privacy-mask |
# Default: NER engine (requires privacy-mask[ner])
privacy-mask mask screenshot.png

# Switch to regex engine
privacy-mask mask screenshot.png --detection-engine regex
You can also set the default engine in config.json:
{
  "detection": { "engine": "ner" }
}
What It Detects
NER Engine
Configurable entity types (zero-shot, no training needed):
- Person names, street addresses, organization names
- Dates of birth, medical conditions, license plate numbers
- Custom entity types via
config.jsonner.entity_types
Regex Engine
47 regex rules covering 15+ countries:
| Category | Rules |
|---|---|
| IDs | Chinese ID card & passport, HK/TW ID, US SSN, UK NINO, Canadian SIN, Indian Aadhaar & PAN, Korean RRN, Singapore NRIC, Malaysian IC |
| Phone | Chinese mobile & landline, US phone, international (+prefix) |
| Financial | Bank card (UnionPay/Visa/MC), Amex, IBAN, SWIFT/BIC |
| Developer Keys | AWS access key, GitHub token, Slack token, Google API key, Stripe key, JWT, database connection strings, generic API keys, SSH/PEM private keys |
| Crypto | Bitcoin address (legacy + bech32), Ethereum address |
| Other | Email, birthday, IPv4/IPv6, MAC address, UUID, Chinese license plate, passport MRZ, URL auth tokens, WeChat/QQ IDs |
How It Works

-
OCR — Dual-engine: Tesseract + RapidOCR extract text with bounding boxes. Multi-strategy preprocessing (grayscale, binarization, contrast enhancement) with confidence-based merge for maximum accuracy.
-
Line Grouping — OCR results are grouped into logical text lines using vertical overlap analysis.
-
Detect — Switchable engine:
- NER (default) — GLiNER zero-shot NER identifies entities (names, addresses, etc.) without regex
- Regex — 47 compiled regex rules scan for structured patterns (IDs, phone numbers, API keys)
-
Mask — Matched regions are blurred (default) or filled with solid color. Output is saved as a new file or overwrites the original.
CLI Usage
# Basic: mask → screenshot_masked.png
privacy-mask mask screenshot.png

# Overwrite original
privacy-mask mask screenshot.png --in-place

# Detection only, no masking
privacy-mask mask screenshot.png --dry-run

# Black fill instead of blur
privacy-mask mask screenshot.png --method fill

# Choose OCR engine (tesseract, rapidocr, or combined)
privacy-mask mask screenshot.png --engine tesseract

# Choose detection engine (ner or regex)
privacy-mask mask screenshot.png --detection-engine regex

# Custom config
privacy-mask mask screenshot.png --config my_rules.json

# Output path
privacy-mask mask screenshot.png -o /tmp/safe.png
Output is JSON:
{
  "status": "success",
  "input": "screenshot.png",
  "output": "screenshot_masked.png",
  "detections": [
    {"label": "PHONE_CN", "text": "***", "bbox": [10, 20, 100, 30]},
    {"label": "EMAIL", "text": "***", "bbox": [10, 50, 200, 30]}
  ],
  "summary": "Masked 2 regions: 1 PHONE_CN, 1 EMAIL"
}
Configuration
Rules are defined in config.json. You can pass a custom config:
privacy-mask mask image.png --config my_config.json
Each rule has a name, pattern (regex), and optional flags. Example:
{
  "rules": [
    {
      "name": "MY_CUSTOM_ID",
      "pattern": "CUSTOM-\\d{8}",
      "flags": ["IGNORECASE"]
    }
  ]
}
See the bundled config.json for all 47 rules.
Requirements
- Python 3.10+
- Tesseract OCR
- macOS:
brew install tesseract - Ubuntu:
sudo apt install tesseract-ocr - Windows: Download installer
- macOS:
Contributing
Contributions are welcome! See CONTRIBUTING.md for details.
License
MIT


Download files
Download the file for your platform. If you're not sure which to choose, learn more about installing packages.
Source Distribution
Built Distribution
Filter files by name, interpreter, ABI, and platform.
If you're not sure about the file name format, learn more about wheel file names.
Copy a direct link to the current filters
File details
Details for the file privacy_mask-0.3.5.tar.gz.
File metadata
- Download URL: privacy_mask-0.3.5.tar.gz
- Upload date:
- Size: 44.0 kB
- Tags: Source
- Uploaded using Trusted Publishing? No
- Uploaded via: twine/6.2.0 CPython/3.12.13
File hashes
| Algorithm | Hash digest | |
|---|---|---|
| SHA256 |
61204a396a52a0cfe69905fbaca7415fad213a59e83863d11c0f98b22621289a
|
|
| MD5 |
93cb5d3ac4f51a53c5db097b6b9d99ad
|
|
| BLAKE2b-256 |
88d450bd32d6a4e25cccbba4c4bc4485cf0f22d5804b4bb172f64f7c6fad6f1e
|
File details
Details for the file privacy_mask-0.3.5-py3-none-any.whl.
File metadata
- Download URL: privacy_mask-0.3.5-py3-none-any.whl
- Upload date:
- Size: 30.5 kB
- Tags: Python 3
- Uploaded using Trusted Publishing? No
- Uploaded via: twine/6.2.0 CPython/3.12.13
File hashes
| Algorithm | Hash digest | |
|---|---|---|
| SHA256 |
90cc34d073c47649347d5e14f553df0c85401e85f6a5338d28cc5d0f547a86e3
|
|
| MD5 |
48ba9311da7ed9d1b9353aa581a9a166
|
|
| BLAKE2b-256 |
6a25f3d348fa7201444e04cb76e7feb1488eb341a61a65832debe04670f50e69
|


