PyGAD: A Python library for implementing the genetic algorithm.

Project description
PyGAD
PyGAD is an open source Python library/project for implementing the genetic algorithm based on NumPy. The source code is available at GitHub.
The library has a single module named pygad.py which contains a class named GA. Simply, to run the genetic algorithm all you need to do is to create an instance of this class and pass the appropriate parameters to its constructor. This class has all the required parameters and methods for implementing the genetic algorithm.
The documentation starts by discussing the available parameters in addition to the steps of using the library.
Supported Parameters
The single module available in the PyGAD library is named pygad.py and contains a class named GA. For creating an instance of this class, there are a number of parameters that allows the user to customize the genetic algorithm. Before running the GA, the parameters must be prepared. The list of all supported parameters is as follows:
num_generations: Number of generations.sol_per_pop: Number of solutions (i.e. chromosomes) within the population.num_parents_mating: Number of solutions to be selected as parents.num_genes: Number of genes in the solution/chromosome.fitness_func: A function for calculating the fitness value for each solution.parent_selection_type="sss": The parent selection type. Supported types aresss(for steady state selection),rws(for roulette wheel selection),sus(for stochastic universal selection),rank(for rank selection),random(for random selection), andtournament(for tournament selection).keep_parents=-1: Number of parents to keep in the current population.-1(default) means keep all parents in the next population.0means keep no parents in the next population. A valuegreater than 0means keep the specified number of parents in the next population. Note that the value assigned tokeep_parentscannot be< - 1or greater than the number of solutions within the populationsol_per_pop.K_tournament=3: In case that the parent selection type istournament, theK_tournamentspecifies the number of parents participating in the tournament selection. It defaults to3.crossover_type="single_point": Type of the crossover operation. Supported types aresingle_point(for single point crossover),two_points(for two points crossover), anduniform(for uniform crossover). It defaults tosingle_point.mutation_type="random": Type of the mutation operation. Supported types arerandom(for random mutation),swap(for swap mutation),inversion(for inversion mutation), andscramble(for scramble mutation). It defaults torandom.mutation_percent_genes=10: Percentage of genes to mutate which defaults to10. Out of this percentage, the number of genes to mutate is deduced. This parameter has no action if the parametermutation_num_genesexists.mutation_num_genes=None: Number of genes to mutate which defaults toNonemeaning that no number is specified. If the parametermutation_num_genesexists, then no need for the parametermutation_percent_genes.random_mutation_min_val=-1.0: Forrandommutation, therandom_mutation_min_valparameter specifies the start value of the range from which a random value is selected to be added to the gene. It defaults to-1.random_mutation_max_val=1.0: Forrandommutation, therandom_mutation_max_valparameter specifies the end value of the range from which a random value is selected to be added to the gene. It defaults to+1.
The user doesn't have to specify all of such parameters while creating an instance of the GA class. A very important parameter you must care about is fitness_func which defines the fitness function.
Next, the steps of using the PyGAD library are discussed.
How to Use the PyGAD?
To use PyGAD, here is a summary of the required steps:
- Preparing the
fitness_funcparameter. - Preparing other parameters.
- Example of preparing the parameters.
- Import the
pygad.pymodule. - Create an instance of the
GAclass. - Run the genetic algorithm.
- Plotting Results.
- Saving & Loading the Results.
Let's discuss how to do each of these steps.
Preparing the fitness_func Parameter
Even there are a number of steps in the genetic algorithm pipeline that can work the same regardless of the problem being solved, one critical step is the calculation of the fitness value. There is no unique way of calculating the fitness value and it changes from one problem to another.
On 15 April 2020, a new argument named fitness_func is added that allows the user to specify a custom function to be used as a fitness function. This function must be a maximization function so that a solution with a high fitness value returned is selected compared to a solution with a low value. Doing that allows the user to freely use the library to solve any problem by passing the appropriate fitness function.
Let's discuss an example:
Given the following function: y = f(w1:w6) = w1x1 + w2x2 + w3x3 + w4x4 + w5x5 + 6wx6 where (x1,x2,x3,x4,x5,x6)=(4,-2,3.5,5,-11,-4.7) and y=44 What are the best values for the 6 weights (w1 to w6)? We are going to use the genetic algorithm to optimize this function.
So, the task is about using the genetic algorithm to find the best values for the 6 weight W1 to W6. Thinking of the problem, it is clear that the best solution is that returning an output that is close to the desired output y=44. So, the fitness function should return a value that gets higher when the solution's output is closer to y=44. Here is a function that does that. The function must accept a single parameter which is a 1D vector representing a single solution.
function_inputs = [4,-2,3.5,5,-11,-4.7] # Function inputs.
desired_output = 44 # Function output.

def fitness_func(solution):
    output = numpy.sum(solution*function_inputs)
    fitness = 1.0 / numpy.abs(output - desired_output)
    return fitness
By creating this function, you are ready to use the library.
Example of Preparing the Parameters
Here is an example for preparing the parameters:
num_generations = 50
sol_per_pop = 8
num_parents_mating = 4

mutation_percent_genes = 10

parent_selection_type = "sss"

crossover_type = "single_point"

mutation_type = "random"

keep_parents = 1

num_genes = len(function_inputs)
After the parameters are prepared, we can import the ga module and build an instance of the GA class.
Import the pygad.py Module
The next step is to import the ga module as follows:
import pygad
This module has a class named GA which holds the implementation of all methods for running the genetic algorithm.
Create an Instance of the GA Class.
The GA class is instantiated where the previously prepared parameters are fed to its constructor. The constructor is responsible for creating the initial population.
ga_instance = ga.GA(num_generations=num_generations,
          sol_per_pop=sol_per_pop,
          num_parents_mating=num_parents_mating,
          num_genes=num_genes,
          fitness_func=fitness_func,
          mutation_percent_genes=mutation_percent_genes,
          mutation_num_genes=mutation_num_genes,
          parent_selection_type=parent_selection_type,
          crossover_type=crossover_type,
          mutation_type=mutation_type,
          keep_parents=keep_parents,
          K_tournament=3)
Run the Genetic Algorithm
After an instance of the GA class is created, the next step is to call the run() method as follows:
ga_instance.run()
Inside this method, the genetic algorithm evolves over a number of generations by doing the following tasks:
- Calculating the fitness values of the solutions within the current population.
- Select the best solutions as parents in the mating pool.
- Apply the crossover & mutation operation
- Repeat the process for the specified number of generations.
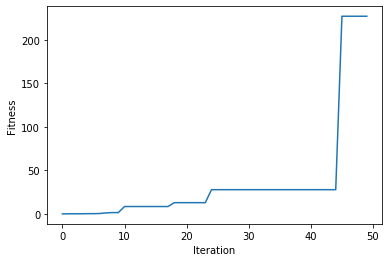
Plotting Results
There is a method named plot_result() which creates a figure summarizing how the fitness values of the solutions change with the generations .
ga_instance.plot_result()
Saving & Loading the Results
After the run() method completes, it is possible to save the current instance of the genetic algorithm to avoid losing the progress made. The save() method is available for that purpose. According to the next code, a file named genetic.pkl will be created and saved in the current directory.
# Saving the GA instance.
filename = 'genetic' # The filename to which the instance is saved. The name is without extension.
ga_instance.save(filename=filename)
You can also load the saved model using the load() function and continue using it. For example, you might run the genetic algorithm for a number of generations, save its current state using the save() method, load the model using the load() function, and then call the run() method again.
# Loading the saved GA instance.
loaded_ga_instance = ga.load(filename=filename)
After the instance is loaded, you can use it to run any method or access any property.
print(loaded_ga_instance.best_solution())
Crossover, Mutation, and Parent Selection
The library supports different types for selecting the parents and applying the crossover & mutation operators. More features will be added in the future. To ask for a feature, please open an issue in the GitHub project of the library: https://github.com/ahmedfgad/GeneticAlgorithmPython
The supported crossover operations at this time are:
- Single point.
- Two points.
- Uniform.
The supported mutation operations at this time are:
- Random
- Swap
- Inversion
- Scramble
The supported parent selection techniques at this time are:
- Steady state
- Roulette wheel
- Stochastic universal
- Rank
- Random
- Tournament
More types will be added in the future. You can also ask for supporting more types by opening an issue in the GitHub project associated with the library: https://github.com/ahmedfgad/GeneticAlgorithmPython
For More Information
To start with coding the genetic algorithm, you can check the tutorial titled Genetic Algorithm Implementation in Python available at these links:
-
https://www.linkedin.com/pulse/genetic-algorithm-implementation-python-ahmed-gad
-
https://towardsdatascience.com/genetic-algorithm-implementation-in-python-5ab67bb124a6
This tutorial is prepared based on a previous version of the project but it still a good resource to start with coding the genetic algorithm.

You can also check my book cited as Ahmed Fawzy Gad 'Practical Computer Vision Applications Using Deep Learning with CNNs'. Dec. 2018, Apress, 978-1-4842-4167-7.
Important Note
It is important to note that this library does not implement everything in GA and there are a wide number of variations to be applied. For example, this project just uses decimal representation for the chromosome and the binary representations might be preferred for other problems.
Get in Touch
Release history Release notifications | RSS feed


Download files
Download the file for your platform. If you're not sure which to choose, learn more about installing packages.
Source Distribution
Built Distribution
Filter files by name, interpreter, ABI, and platform.
If you're not sure about the file name format, learn more about wheel file names.
Copy a direct link to the current filters
File details
Details for the file pygad-1.0.16.tar.gz.
File metadata
- Download URL: pygad-1.0.16.tar.gz
- Upload date:
- Size: 15.5 kB
- Tags: Source
- Uploaded using Trusted Publishing? No
- Uploaded via: twine/3.1.1 pkginfo/1.5.0.1 requests/2.21.0 setuptools/41.6.0 requests-toolbelt/0.9.1 tqdm/4.45.0 CPython/3.7.5
File hashes
| Algorithm | Hash digest | |
|---|---|---|
| SHA256 |
49468d28a3dc355fbebff4ac55875aff4a0222d0c8ef3118a5ede0c5bce6bb5f
|
|
| MD5 |
50dd5e2d29a62e17bd3ab11607282eb5
|
|
| BLAKE2b-256 |
b8c45423e50b6a3f1fde68e37990adff5f737139864d2cbc9db24f8772c9cf61
|
File details
Details for the file pygad-1.0.16-py3-none-any.whl.
File metadata
- Download URL: pygad-1.0.16-py3-none-any.whl
- Upload date:
- Size: 11.7 kB
- Tags: Python 3
- Uploaded using Trusted Publishing? No
- Uploaded via: twine/3.1.1 pkginfo/1.5.0.1 requests/2.21.0 setuptools/41.6.0 requests-toolbelt/0.9.1 tqdm/4.45.0 CPython/3.7.5
File hashes
| Algorithm | Hash digest | |
|---|---|---|
| SHA256 |
da040efbc811fb394622cac0ca845847a3316db6f75036a981f761a191675174
|
|
| MD5 |
1afb29171eae8b3f1eb40be5b46e6fd1
|
|
| BLAKE2b-256 |
744f425e477ebbddbe8174c5b056dcb41726ba856264701d77cc275110ab5b72
|


