Pre-built OpenCV-Python/Mediapipe modules that easy to use and understand.

Project description
pygesture
Pre-built OpenCV-Python/Mediapipe modules that easy to use and understand.
For now it only had Hand Track. More features will be add in future.
Table of Contents
Installation
pip install pygesture
- First time use might won't work, so try it again.
- Because it need to generate it own
__pycache___.
Hand Track
- Hand tracking technology with the help of Mediapipe.
- This also detect if it
Left or RightHand. - I know there a lot of stuff down there but trust me.
- Just read it one by one it easy to understand.
from pygesture import handtrack
import cv2

# [int] maxHand: The maximum amount hand that allowed to be track.
# [bool] drawLandmark: Draw on landmark and connect them together.
# You can also put nothing in there it will also work.
# Ex: handtrack.handDetector()
# There are more options available, you can check the source code if want to learn more.
ht = handtrack.handDetector(maxHand=2, drawLandmark=True)
cap = cv2.VideoCapture(0)

# This is a config for camera resolution.
# But the quality still limit by your camera.
cap.set(cv2.CAP_PROP_FRAME_WIDTH, 1920)
cap.set(cv2.CAP_PROP_FRAME_HEIGHT, 1080)

while True:
    success, img = cap.read()

    # The value will return everything you need.
    # img: is the image result.
    # hand: is the value of left or right hand and value of each landmarks on each hand.
    img, hand = ht.findHands(img)

    # Print it out to see what going on.
    # This will return None if no hand detect. Make sure to add a check condition.
    print(hand)

    # "Hand Track" you can name it whatever you want. But other options may required.
    cv2.namedWindow("Hand Track", cv2.WND_PROP_FULLSCREEN)

    # [Optional] You can use this if you want full screen.
    cv2.setWindowProperty("Hand Track",cv2.WND_PROP_FULLSCREEN,cv2.WINDOW_FULLSCREEN)

    # Display output image.
    cv2.imshow("Hand Track", img)

    # Wait in milliseconds before capture next frame.
    cv2.waitKey(1)
- You can also try the pre-built test.
- Required assets.zip
- Just Extract it in the same directory as your script.
from pygesture import handtrack_test
Hand Vector
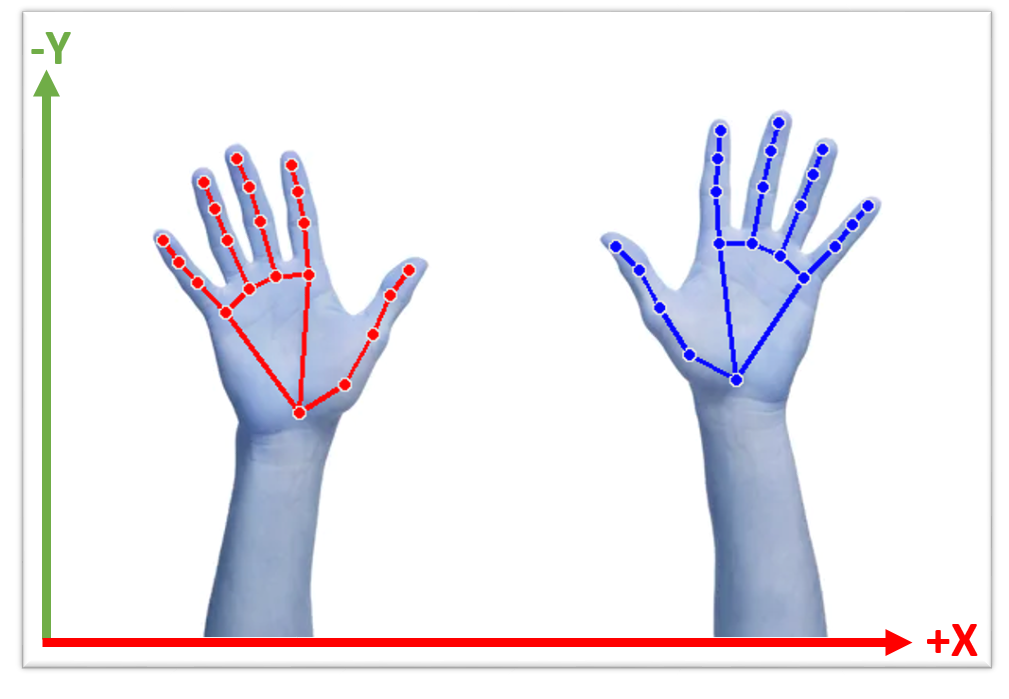
Landmarks Coordinate
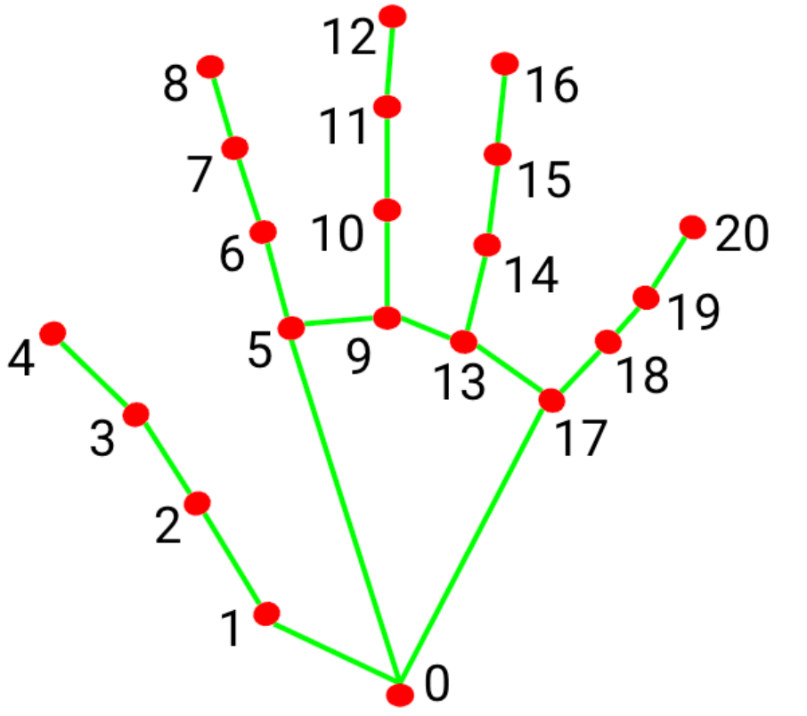
Even though there no landmarks number specify.
'lms': [
        x: 0.2995750904083252
        y: 0.7221927642822266
        z: -4.386473335671326e-07,

        x: 1.2995750904083252
        y: 4.7221927642822266
        z: -4.626473335671326e-07,

        .....
    ]
Each index inside a list is the landmark it self. Start from [0,1,2,...]


Download files
Download the file for your platform. If you're not sure which to choose, learn more about installing packages.
Source Distribution
pygesture-1.0.7.tar.gz
(9.7 kB
view details)
Built Distribution
Filter files by name, interpreter, ABI, and platform.
If you're not sure about the file name format, learn more about wheel file names.
Copy a direct link to the current filters
pygesture-1.0.7-py3-none-any.whl
(11.3 kB
view details)
File details
Details for the file pygesture-1.0.7.tar.gz.
File metadata
- Download URL: pygesture-1.0.7.tar.gz
- Upload date:
- Size: 9.7 kB
- Tags: Source
- Uploaded using Trusted Publishing? No
- Uploaded via: twine/4.0.1 CPython/3.9.12
File hashes
| Algorithm | Hash digest | |
|---|---|---|
| SHA256 |
1fe15fdfc7b85ae8e639fdca873c4c65c93ae461b88a62f4424460ad9d995964
|
|
| MD5 |
f4fda3ffd7bdd202e06ea034c6a6faf5
|
|
| BLAKE2b-256 |
7b66203ce0e5887ddeb9e7c0a27e816235f443ee1ef248d477014b484212ac49
|
File details
Details for the file pygesture-1.0.7-py3-none-any.whl.
File metadata
- Download URL: pygesture-1.0.7-py3-none-any.whl
- Upload date:
- Size: 11.3 kB
- Tags: Python 3
- Uploaded using Trusted Publishing? No
- Uploaded via: twine/4.0.1 CPython/3.9.12
File hashes
| Algorithm | Hash digest | |
|---|---|---|
| SHA256 |
2bc6c99f4904e15f476cc2957ddfb814a4ad8964441d25b345dd0b91ae4061c8
|
|
| MD5 |
fd1efe2374e1bbd0c015e49744faa904
|
|
| BLAKE2b-256 |
cb2eec7cea14ecfeb0742b1ef20da72cecc57276036e3c0034c47fc73d078560
|


