
pygidSIM
pygidSIM calculates GIWAXS patterns from CIF files or other crystal structure descriptions.
Installation
Install from PyPi
pip install pygidsim
Install from source
First, clone the repository:
git clone https://github.com/mlgid-project/pygidSIM.git
Then, to install all required modules, navigate to the cloned directory and execute:
cd pygidSIM
pip install -e .
Development Installation
For development and testing, install with development dependencies:
pip install -e .[dev]
Testing
The project uses pytest for testing. To run the test suite:
# Run all tests
pytest

# Run tests with coverage report
pytest --cov=pygidsim --cov-report=html

# Run tests in parallel
pytest -n auto
Usage
From CIF
To calculate the peak positions and their intensities in 2D GIWAXS pattern (qxy, qz) from a CIF file with the default orientation hkl = [001] (vector normal to the substrate, i.e. {001} contact plane) run the following:
from pygidsim import ExpParameters, GIWAXSFromCif

params = ExpParameters(
    q_xy_range=(0, 2.7),
    q_z_range=(0, 2.7),
    en=18000
)  # experimental parameters
el = GIWAXSFromCif(path_to_cif, params)
q_2d, intensity = el.giwaxs.giwaxs_sim()  # q_2d is array with shape (2, peaks number)
To add a crystal rotation use the argument orientation with the value "random" or a list containing the
corresponding Miller indices [hkl]:
q_2d, intensity = el.giwaxs.giwaxs_sim(orientation='random')

q_2d, intensity = el.giwaxs.giwaxs_sim(orientation=[2., 0., 1.])
To move the peaks from the missing wedge to the visible area use the argument move_fromMW:
q_2d, intensity = el.giwaxs.giwaxs_sim(orientation=[2., 0., 1.], move_fromMW=True)
For 3D powder diffraction simulation (non-oriented case) use orientation=None:
q_1d, intensity_1d = el.giwaxs.giwaxs_sim(orientation=None)
To return the Miller indices, you can use the argument return_mi = True:
q_2d, intensity, mi = el.giwaxs.giwaxs_sim(return_mi=True)
To restrict the maximum Miller index for simulation use the argument max_mi:
q_2d, intensity = el.giwaxs.giwaxs_sim(max_mi=3)
Crystal description
To calculate a GIWAXS pattern from your own description, use the following example:
from pygidsim import GIWAXS, Crystal

# space group number
spgr = 221  # alternatively, use e.g. '146:R'

# lattice parameters [a, b, c, α, β, γ]
lat_par = [6.3026, 6.3026, 6.3026, 90., 90., 90.]

# list of atoms
atoms = ['Pb', 'I', 'I', 'I', 'N']

# relative atom positions
atom_positions = [[0., 0., 0.],
                  [0.5, 0., 0.],
                  [0., 0.5, 0.],
                  [0., 0., 0.5],
                  [0.5, 0.5, 0.5]]

# occupancies of the corresponding sites
occupancy = [1., 1., 1., 1., 1.]

cr = Crystal(lat_par, spgr, atoms, atom_positions, occupancy)
el = GIWAXS(cr, params)
q_2d, intensity = el.giwaxs_sim(orientation='random')
The intensities are set to one in case the arguments atoms or/and atom_positions are not provided.
Visualization
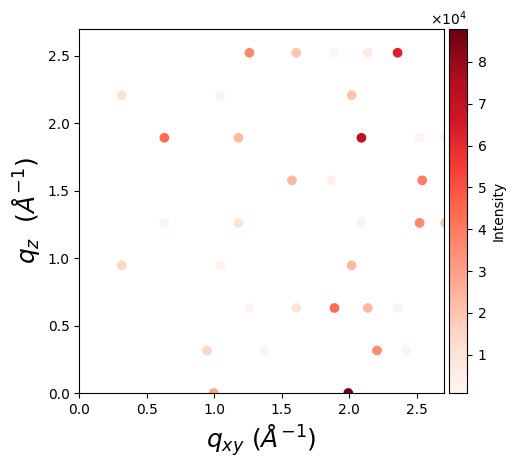
One can visualize a GIWAXS pattern using matplotlib:
import matplotlib.pyplot as plt
from mpl_toolkits.axes_grid1.axes_divider import make_axes_locatable

fig, ax = plt.subplots(figsize=(5, 5))
ax.set_aspect('equal')
scatter = ax.scatter(*q_2d, c=intensity, cmap='Reds')

ax.set_xlabel(r'$q_{xy}$ $(Å^{-1})$', fontsize=18)
ax.set_ylabel(r'$q_{z}$ $(Å^{-1})$', fontsize=18)

divider = make_axes_locatable(ax)

# Append a new axes for the color bar to the right of the current axes
cax = divider.append_axes("right", size="5%", pad=0.05)

# Create color bar in the new axes
colorbar = fig.colorbar(scatter, cax=cax)
colorbar.set_label('Intensity')

plt.show()
Citation
If you use this package in your research, please cite it as follows:
Romodin, M., Starostin, V., Lapkin, D., Hinderhofer, A., & Schreiber, F. (2025).
mlgid-project/pygidSIM: v0.1.1. Zenodo. https://doi.org/10.5281/zenodo.17609569
2 maintainers


Download files
Download the file for your platform. If you're not sure which to choose, learn more about installing packages.
Source Distribution
Built Distribution
Filter files by name, interpreter, ABI, and platform.
If you're not sure about the file name format, learn more about wheel file names.
Copy a direct link to the current filters
File details
Details for the file pygidsim-0.1.6.tar.gz.
File metadata
- Download URL: pygidsim-0.1.6.tar.gz
- Upload date:
- Size: 38.3 kB
- Tags: Source
- Uploaded using Trusted Publishing? No
- Uploaded via:
twine/6.1.0 CPython/3.10.9
File hashes
| Algorithm | Hash digest | |
|---|---|---|
| SHA256 |
6c708cf9e61bc6c73bd6c4bc82bf4216636652957d2c573fcef9e3d55a599f92
|
|
| MD5 |
6a3b3fdab583a6626ab249bbc59831bd
|
|
| BLAKE2b-256 |
ffa50f01188bd223e98ddc8f3d6dd8607a7105a91f9019805c0ce6e5d94e0d5b
|
File details
Details for the file pygidsim-0.1.6-py3-none-any.whl.
File metadata
- Download URL: pygidsim-0.1.6-py3-none-any.whl
- Upload date:
- Size: 32.5 kB
- Tags: Python 3
- Uploaded using Trusted Publishing? No
- Uploaded via:
twine/6.1.0 CPython/3.10.9
File hashes
| Algorithm | Hash digest | |
|---|---|---|
| SHA256 |
351899d167ebd33ff74c5a69721d8ffe2496940f9bdd236d884cb61ae06deffe
|
|
| MD5 |
2127b3b9641d5355e3fecbf4b492d8b3
|
|
| BLAKE2b-256 |
ea38f32450fe20220196bd55c0d087565c51fbd11c51edc1a7e88dc3c5506920
|







