A Python library for building user interfaces

Project description
PyHtmlGui


PyHtmlGui is a Python library for creating fast, easy to build, HTML/CSS/JS user interfaces with seamless interaction between Python and Javascript/HTML. It can be used to create web applications, but also fully functional desktop applications, similar to Electron.
PyHtmlGui creates reactive user interfaces by following the observer pattern to automatically update the HTML frontend if the underlying python model changes.
PyHtmlGui is designed to take the hassle out of writing GUI applications. It allows python developers to write HTML user interfaces without any boilerplate code. It enables function calls from Javascript to Python and the reverse, including asynchronous return values from one language to the other.
PyHtmlGui is inspired by Python eel and Javascript React.
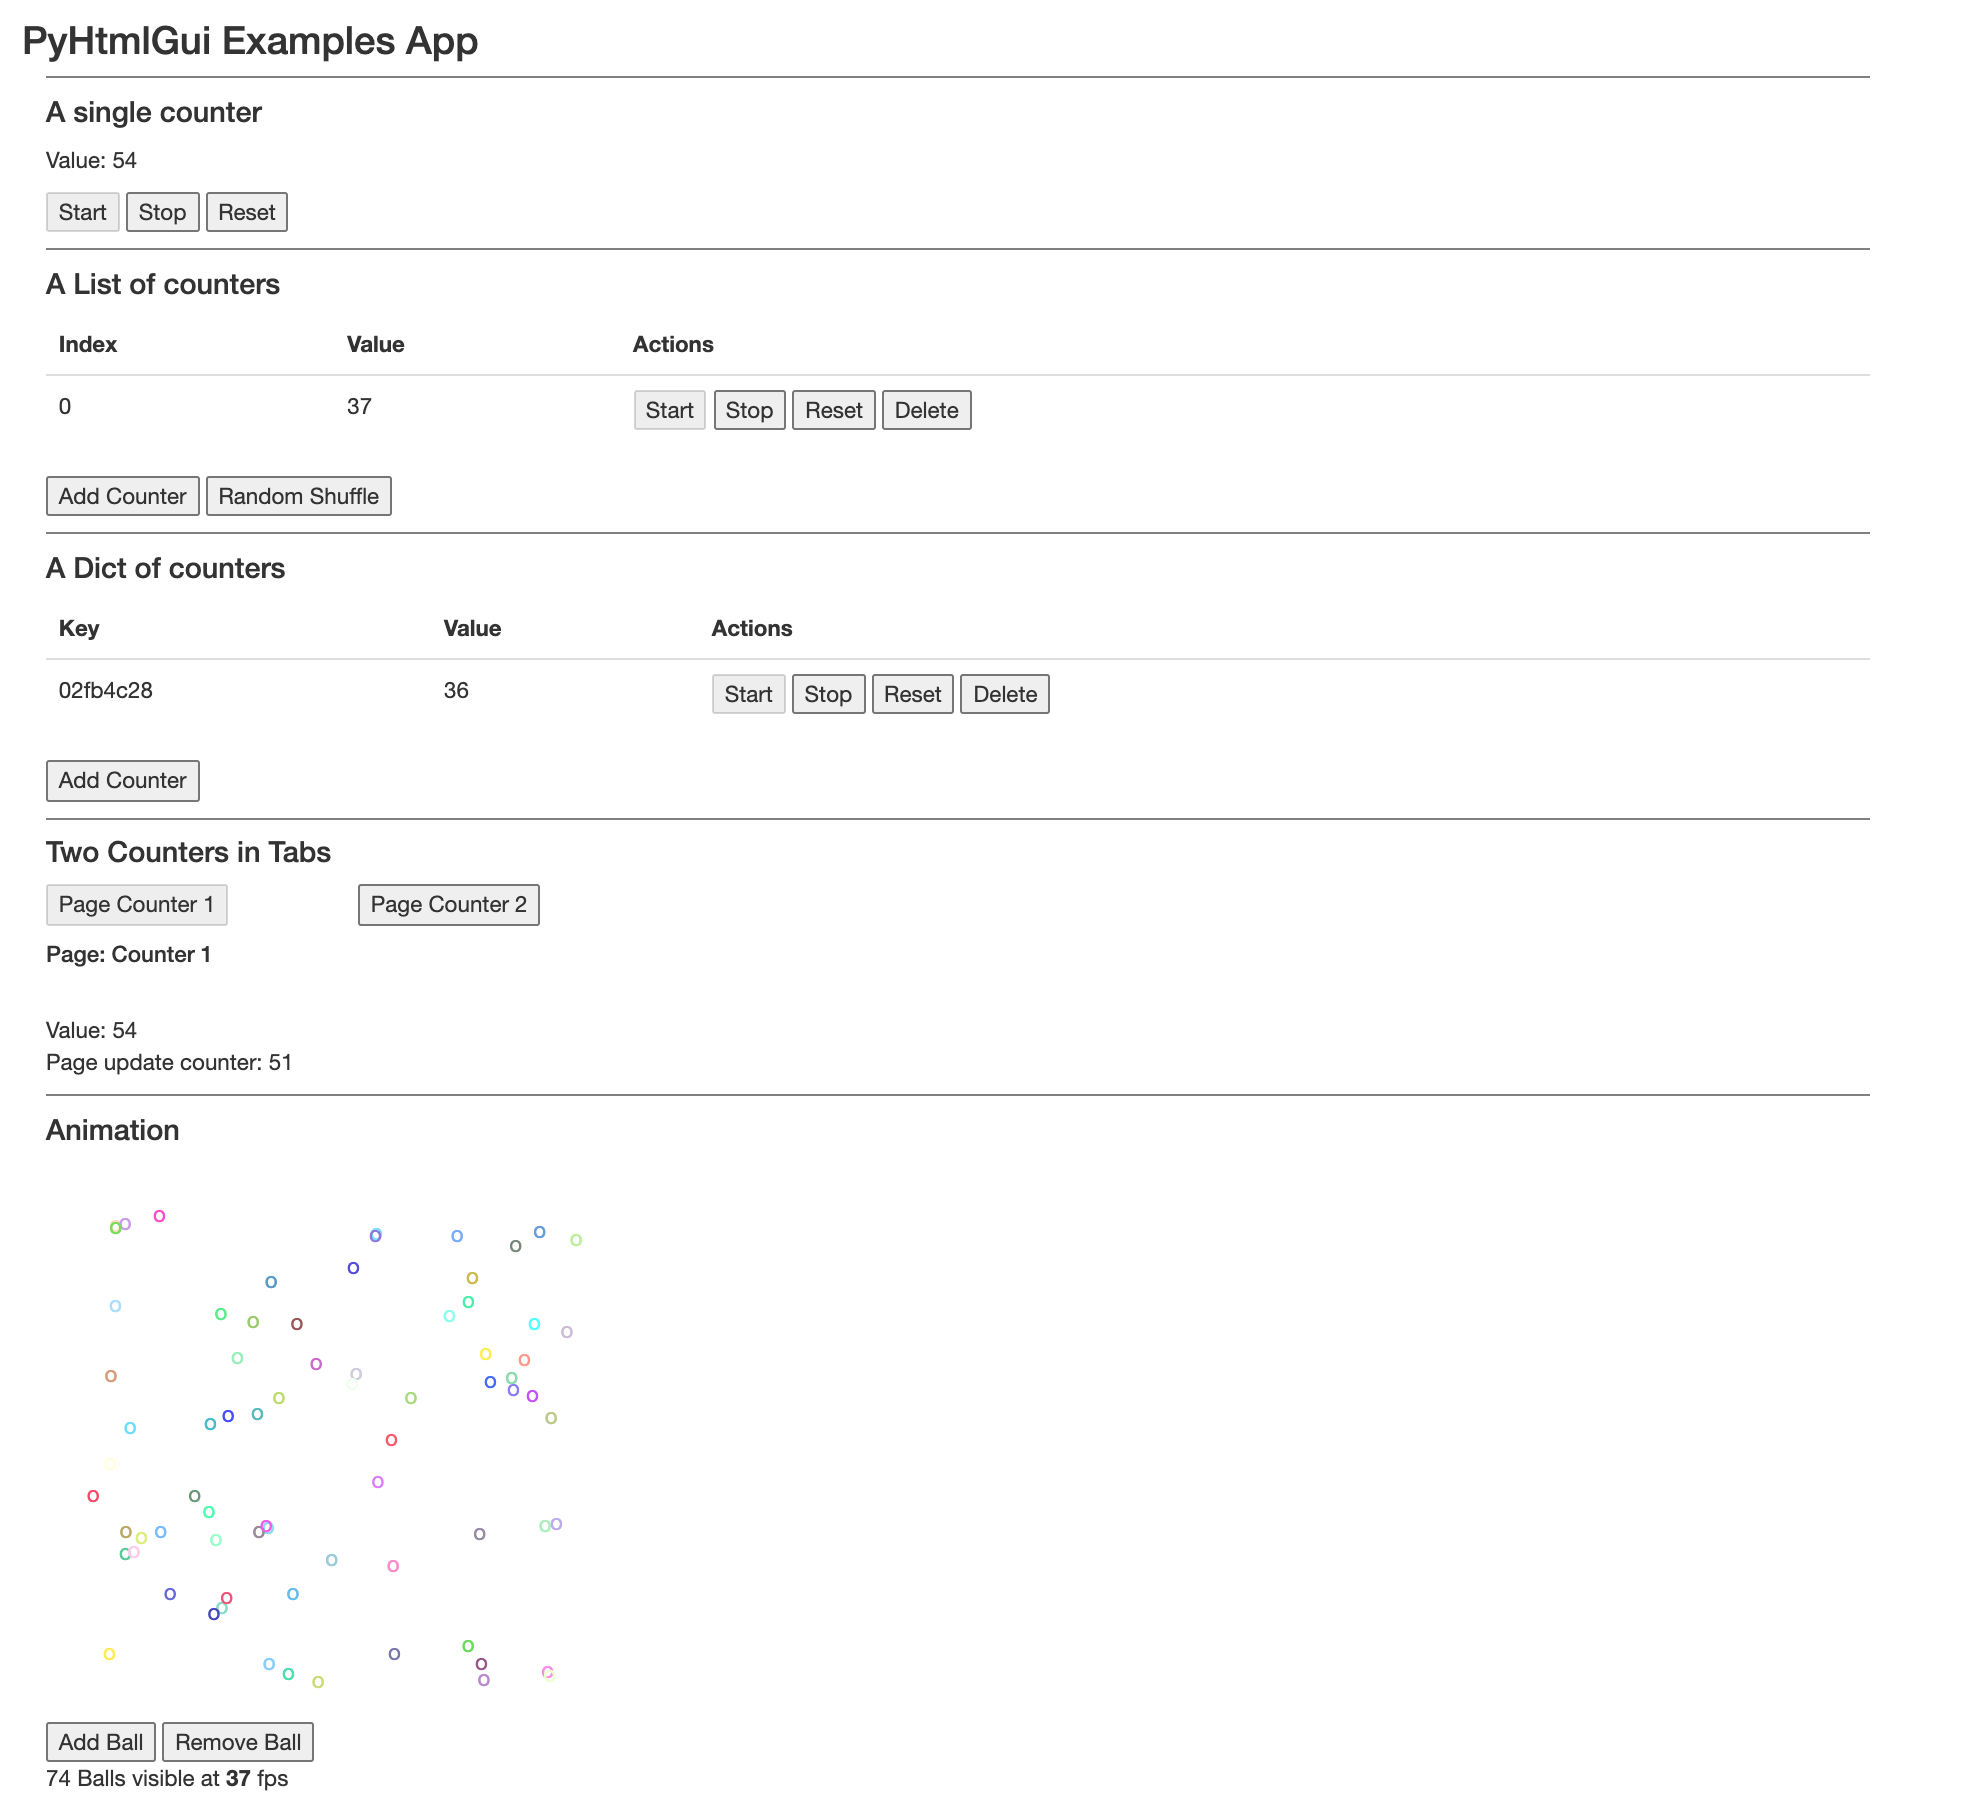
If you are familiar with Python and HTML, probably just jump to Minimal App below, or dive right into this example code that shows most functions of PyHtmlGui in one simple app.
Example app screenshot:
- PyHtmlGui
- Install
- Minimal App
- Directory Structure
- Creating a native App
- PyHtmlGui Options
- PyHtmlGui Methods
- Calling Python from Javascript
- Calling Javascript from Python
- View Nesting
- PyHtmlView methods
- PyHtmlView render customisation
- Renderer details
- Using from inside Electron
Install
Install from pypi with pip:
pip install pyhtmlgui
Minimal App
A PyHtmlGui app is split into your normal python application, and PyHtmlGui view classes.
App Logic
First create your app logic, make your classes inherit from pyhtmlgui.Observable
and call notify_observers() when your data changes.
import time, datetime, threading, random
from pyhtmlgui import Observable

class CounterApp(Observable):
    def __init__(self):
        super().__init__()
        self.value = 0
        self.worker_thread = threading.Thread(target=self._worker_thread, daemon=True)
        self.worker_thread.start()

    def _worker_thread(self):
        while True:
            self.set_value(self.value + 1)
            time.sleep(1)

    def set_value(self, value):
        self.value = value
        self.notify_observers()
View
Create a simple view with some inline html template.
Note the pyview reference used in the template. pyview represents
the PyHtmlView object instance that belongs to the tempate, pyview.subject is the app instance observed by that view.
import datetime
from pyhtmlgui import PyHtmlView

class CounterAppView(PyHtmlView):
    TEMPLATE_STR = '''
        Current value: {{ pyview.subject.value }} <br>
        <button onclick='pyview.subject.set_value(0);'> Reset Counter </button> <br><br>
        <button onclick="pyview.get_time().then(function(e){alert(e);})"> Get System Time </button>
    '''

    def get_time(self):
        return "It is now: %s" % datetime.datetime.now()
Starting the app
from pyhtmlgui import PyHtmlGui
gui = PyHtmlGui(
    app_instance = CounterApp(),
    view_class   = CounterAppView,
)
gui.start(show_frontend=True, block=True)
This will start a webserver on the default settings (http://localhost:8000) and open a browser to http://localhost:8000/.
Directory Structure
A larger PyHtmlGui application will be split into templates consisting of various web-technology files (.html, .js, .css), and various Python scripts split into actual app logic and views.
app/    <- App logic
  app.py
views/  <- Python views
  appView.py
templates/      <- Template files
  base.html     <- Extend pyHtmlGuiBase.html from pyhtmlgui/templates/
  appView.html  <- TEMPLATE_FILE for appView class
static/         <- Static content, add what you need
  css/app.css
  js/app.js
run.py
JS/CSS files are included by the apps base template. By default this is pyHtmlGuiBase.html from pyhtmlgui/templates. To extend this file and load your custom css/js, create a html file in your template dir and set matching options when initializing PyHtmlGui.
templates/base.html
{% extends 'pyHtmlGuiBase.html' %}

{% block head_scripts %}
    <script src="/static/js/app.js"></script>
{% endblock %}

{% block head_css %}
    <link rel="stylesheet" href="/static/css/app.css">
{% endblock %}

{% block head_meta %}
    <title>PyHtmlGui Example App</title>
{% endblock %}
templates/appView.html
<p>Hello World</p>
views/appView.py
class AppView(pyHtmlView):
    TEMPLATE_FILE = "appView.html"
run.py
gui = PyHtmlGui(
    ...
    base_template = "base.html",
    template_dir  = "templates",
    static_dir    = "static"
)
gui.start()
Creating a native App
PyHtmlGui creates a web(socket) server that will serve html created from your views.
In some cases, you might simply use a browser to access your gui.
However, at some point you might want to create a native app, maybe a tray icon and all the normal app stuff.
To save you from writing ~450 lines of annoying Qt code to set this all up, pyHmlGui provides some convience classes.
They should fit many needs, but if you need more, you can simply extend or copy/paste them as a great starting point.
PyHtmlGui native app capabilitys depend on PyQt and
PyQtWebEngine. On macOS optionally on PyObjC, if you need to hide the dock icon.
They are not installed by default with to keep your environment small in case you don't need the native app part.
Install these dependencys with
pip install PyQt5 PyQtWebEngine # optionally PyObjC
All examples below and some more can be found in examples/launchers/ .
Initializing
from pyhtmlgui.apps import PyHtmlChromeApp
from pyhtmlgui.apps.qt import PyHtmlQtApp, PyHtmlQtWindow, PyHtmlQtTray, PyHtmlQtSimpleTray
import webbrowser

applogic = MySuperApp()
guiservice = PyHtmlGui(
    app_instance = applogic,
    view_class   = MySuperAppView,
)
guiservice.start(block=False)
Simple tray with default browser
qt_app = PyHtmlQtApp()
tray   = PyHtmlQtSimpleTray(qt_app , icon_path="tray.ico")
tray.addAction("Show", lambda x:webbrowser.open(guiservice.get_url(), 1))
tray.addAction("Exit", qt_app.stop)
qt_app.run()
Native app
qt_app = PyHtmlQtApp(icon_path="app.ico")
window = PyHtmlQtWindow(qt_app, guiservice.get_url(), [600, 300], "My App Window Name")
window.on_closed_event.attach_observer(qt_app.exit)
window.show()
qt_app.run()
Native app with simple tray
qt_app = PyHtmlQtApp()
window = PyHtmlQtWindow(qt_app, url, [600, 300], "My App Window Name", icon_path="window.ico")
tray   = PyHtmlQtSimpleTray(qt_app, icon_path="tray.ico")
tray.addAction("Show", window.show)
tray.addAction("Hide", window.close)
tray.addAction("Exit", qt_app.stop)
window.on_minimized_event.attach_observer(window.hide) # we minimize to tray
qt_app.run()
Native app with html tray
class TrayView(PyHtmlView):
    TEMPLATE_STR = '''
        <button onclick="pyhtmlapp.show_app()" >Show App</button> <br>
        <button onclick="pyhtmlapp.hide_app()" >Hide App</button> <br>
        <button onclick="pyhtmlapp.exit()" >Exit App</button> <br>
    '''
guiservice.add_endpoint(app_instance=applogic, view_class=TrayView, name="tray")
qt_app = PyHtmlQtApp()
tray   = PyHtmlQtTray(  qt_app, guiservice.get_url("tray"), [ 300, 200], icon_path= "tray.ico")
window = PyHtmlQtWindow(qt_app, guiservice.get_url("")    , [ 600, 300], "My App Window Name", icon_path="window.ico")
tray.addJavascriptFunction("show_app", window.show)
tray.addJavascriptFunction("hide_app", window.close)
tray.addJavascriptFunction("exit_app", qt_app.stop)
window.show()
qt_app.run()
PyHtmlGui Options
Additional options can be passed to the PyHtmlGui constructor as keyword arguments.
- app_instance: Your main App logic object
- view_class: A class that Inherits from PyHtmlView
- static_dir:
Static files like js/css and fonts go here Default:
'' - template_dir:
Templates used in views go here Default:
'' - base_template:
A file in template_dir extending pyHtmlGui/templates/pyHtmlGuiBase.html, Default:
None - on_view_connected:
This Callback function is called when a frontend connects via websocket. Arguments passed: "nr of view instances", "nr of websocket connections" Default:
None - on_view_disconnected:
This Callback function is called when a frontend disconnects via websocket. Arguments passed: "nr of view instances", "nr of websocket connections" Default:
None - size:
A tuple of ints specifying the (width, height) of the main window in pixels Default:
None - position:
A tuple of ints specifying the (X, Y) position of the main windows in pixels. Default:
None - listen_host:
A string specifying what hostname to use for the server. Default:
'localhost') - listen_port:
An int specifying what port to use for the server. Default:
0, automatic. - shared_secret:
Add a security token to prevent unauthorized access to the webserver, use "" to automatically generate internally, None to disable token Default:
None. - auto_reload:
For development, monitor templates and reload while app is running. Default:
False. - single_instance:
Create only one view instance and share it between all connected websockets.
Try examples/full app and notice the animation and tab view in sync between multiple browser windows. Default:
True.
PyHtmlGui Methods
-
PyHtmlGui.__init__(**kwargs):
Create a new PyHtmlGui instance. See list above for detailed description ofkwargs -
PyHtmlGui.add_endpoint(app_instance, view_class, name, base_template, on_view_connected, on_view_disconnected, single_instance, size, position):
Create a new endpoint withname. This can be used if you need multiple view windows, like a main window and a tray view. -
PyHtmlGui.get_url(endpoint=""):
Receive frontend url. -
PyHtmlGui.start(show_frontend = False, block = True):
Launch PyHtmlGui websocket server. Ifshow_frontendis true, open gui in default browser. Ifblockis true this call will block until the server exits. -
PyHtmlGui.stop(): Stop PyHtmlGui server, this will release a blocking
startcall. -
PyHtmlGui.show(): Open gui in default browser.
-
PyHtmlGui.join(): Wait for service to stop.
Calling Python from Javascript
Html/JS rendered by a View can use the pyview reference to access the python side view object.
Note that the pyview object is not available from javascript at runtime,
pyview. is replaced by a dynamic function reference when the view is rendered. See Renderer details for more.
Note to beginners: If you find yourself manually updating frontend elements as a result of a python function call, aka in the .then part of the code below, your are most likely doing something wrong. If you want to update the frontend, either call self.notify_observers() in your backend app logic if something has changed there, or self.update() in the pyHtmlView view object, if your change only happens in the view part of your app.
class myView(pyHtmlView):
    TEMPLATE_STR = '''
        <button onclick='pyview.addSome(23).then(function(e){alert(e);});'></button>
    '''
    def addSome(self, value):
        return value + 42
Calling Javascript from Python
You can call javasript functions from inside the python view object and receive the return values.
If multiple frontends are connected to a shared view, you will get one result for each active frontend.
Use args to pass a list of arguments to the called JS function if needed.
Note to beginners: If you find yourself manually updating frontend elements this way, you are either optimizing something special,
or you are doing it wrong. If you want to update the frontend, either call self.notify_observers() in your backend app logic if something has changed there,
or self.update() in the pyHtmlView view object, if your change only happens in the view part of your app.
class myView(pyHtmlView):
    def call_js_async(self):
        resultsHandler = self.call_javascript(js_function_name="Math.round", args=[1.2345] )
        resultsHandler(callback=lambda results: print(results))

    def call_js_sync(self):
        resultsHandler = self.call_javascript(js_function_name="Math.round", args=[1.2345] )
        print(resultsHandler())
You can also eval javascript code dynamically.
Keyword arguments passed to eval_javascript are available as args array inside the evaled Javascript.
class myView(pyHtmlView):
    TEMPLATE_STR = '''
        Hello world
        <script>
            document.getElementById("{{pyview.uid}}").style.backgroundColor = '#'+Math.floor(Math.random()*16777215).toString(16);
        </script>
    '''
    def eval_js_async(self):
        resultsHandler = self.eval_javascript(
            script='return document.getElementById(args.uid).style.backgroundColor;',
            uid=self.uid)
        resultsHandler(callback=lambda results: print(results))
View Nesting
All your views must inherit from PyHtmlView. PyHtmlView takes a subject and parent as parameters. The parent parameter is needed to track view visibility. If a view has not been rendered after a parent of that view was rendered, it is considered invisible and all events for that view and all its children will be detached. If the view gets rendered again later, pyhtmlgui will automatically reattach all event so the view reacts to subject changes again.
class Status(Observable):
    def __init__(self):
        self.status = ""

    def set(self, new_status):
        self.status = new_status
        self.notify_observers()

class AppSub(Observable):
    def __init__(self):
        self.status = Status()
        self.value = 0
    def set_value(self, new_value):
        self.value = new_value
        self.notify_observers()

class App(Observable):
    def __init__(self):
        self.appSub = AppSub()

class StatusView(PyHtmlView):
    TEMPLATE_STR = 'Status: {{pyview.subject.status}}'

class AppSubView(PyHtmlView):
    TEMPLATE_STR = '''
        Value: {{pyview.subject.value}}<br>
        {{pyview.statusView.render()}}
    '''
    def __init__(self, subject, parent, **kwargs):
        super().__init__(subject, parent, **kwargs)
        self.statusView = StatusView(subject.status, self)

class AppView(PyHtmlView):
    TEMPLATE_STR = '''Some Subview: {{pyview.subview.render()}}'''
    def __init__(self, subject, parent, **kwargs):
        super().__init__(subject, parent, **kwargs)
        self.subview = AppSubView(subject.appSub, self)
PyHtmlView methods
-
PyHtmlView.__init__(subject, parent)
Create a new view instance, attaches default event that observes thesubjectand calls_on_subject_updated()when the subject notifies its observers. To prevent attaching of the default event, overwrite_on_subject_updatedto None. Useparentin nested views to access theparentview that contains this element.parentalso keeps track of visible/invisible elements and attaches/detached events appropriatley. -
PyHtmlView.render()
Returns the rendered template string as markup element. It can be use in other templates via{{pyview.subview.render()}}to create nested views. -
PyHtmlView.update()
Update the DOM element in place. View must have been rendered before and be visible in the DOM. By default, this function is called from_on_subject_updatedwhen the observedsubjectchanges and the view is visible. -
PyHtmlView.call_javascript(fname, args, skip_results)
Call frontend javascript functionfname. Supply a list of args if needed. Ifskip_resultsistrueno results will be received, andNonewill be returned. Otherwise aJavascriptCallResultobject will be returned. Results can be received either asynchronous via javascriptCallResult(callback=lambda results:print(results)) or synchronous via result = javascriptCallResult() -
PyHtmlView.eval_javascript(script, skip_results, **kwargs)
Dynamically eval javascript in frontend. Behaves largely like call_javascript, but kwargs are passed asargsvariable to the javascript call. eval_javascript(script='return 42 + args.value', value=23) -
PyHtmlView.set_visible(visible)
This method is called right before the view is rendered and added to the DOM, or after a parent element was rendered and this view is no longer visible. It attaches/detaches events based on visibility. Overwrite this function if you need your view to react to weather its visible or not. -
PyHtmlView.add_observable(subject, target_function)
Add a new event to this view that is active as long as the view is visible. By default,__init__will assign target_function_on_subject_updatedtosubject. If you not set target_function the default target function_on_subject_updatedwill be used. Use this function if you want your view to react to multiple model objects. -
PyHtmlView.remove_observable(subject, target_function)
Remove event from view. -
PyHtmlView._on_subject_updated(source, **kwargs)
This is the default event handler forself.subject, it will callupdateto redraw the DOM element -
PyHtmlView._on_subject_died(self, wr)
This is called when theself.subjectobject is derefered. The default handler removes the view from DOM, detaches all events and destroys the view object including all its children.
PyHtmlView render customization
Your view classes that inherit from PyHtmlView have several options to customize how their container is rendered.
class myView(PyHtmlView):
    TEMPLATE_STR = "test"
will render
<div class="myView" id="pvf6p3p7uiirkwac40">test</div>
You can change how the element is rendered by setting some attributes of your view class.
To remove the class attribute, set DOM_ELEMENT_CLASS to None.
class myView(PyHtmlView):
    DOM_ELEMENT = "p"
    DOM_ELEMENT_CLASS = "myFoo myBar"
    DOM_ELEMENT_EXTRAS = 'style="color:red;"'
    TEMPLATE_STR = "test"
rendered html:
<p class="myFoo myBar" style="color:red;" id="pvf6p3p7uiirkwac40">test</p>
You can make DOM_ELEMENT, DOM_ELEMENT_CLASS and DOM_ELEMENT_EXTRAS dynamic, so they are applied every time the dom element is updated. This does not work for TEMPLATE_STR because the template is prepared once and cached.
class myView(PyHtmlView):
    TEMPLATE_STR = "test"

    @property
    def DOM_ELEMENT_EXTRAS(self):
        color = "%s" % "".join(random.choices("456789abcdef", k=3))
        return 'style="color:#%s"' %  color
Renderer details
Templates are jinja2 templates. pyview is the python view object passed to the jinja renderer.
Default jinja rendering rules apply. "{{pyview.variable}}" will render a variable,
"{{pyview.myfunction()}}" will run myfunction at render time and show its results.
"{{pyview.subject}}" gives access to the app logic object attached to this view.
If you use pyview. outside of jinjas tags, some pyHtmlGui magic will be applied:
class myView():
    TEMPLATE_STR = '''
        <button onclick="pyview.addOne({{pyview.addOne(1)}}).then(function(e){alert(e);})">
        </button>
    '''
    def addOne(self, value):
        return value + 1
At the first rendering step, the convinience function notion will be replaced with something the jinja template renderer can use:
<button onclick="pyhtmlgui.call({{_create_py_function_reference(pyview.addOne)}}, {{pyview.addOne(1)}}).then(function(e){alert(e);})"></button>
After the final render this is the actual content that is send to the browser. The inner pyview.addOne function has been resolved at render
time, and some magic function reference has been created in the background to access the outer pyview.addOne function later.
<button onclick="pyhtmlgui.call(24325642347682, 2).then(function(e){alert(e);})"></button>
After this, clicking the button will show "3"
Release history Release notifications | RSS feed


Download files
Download the file for your platform. If you're not sure which to choose, learn more about installing packages.
Source Distribution
Built Distribution
Filter files by name, interpreter, ABI, and platform.
If you're not sure about the file name format, learn more about wheel file names.
Copy a direct link to the current filters
File details
Details for the file pyhtmlgui-3.22.tar.gz.
File metadata
- Download URL: pyhtmlgui-3.22.tar.gz
- Upload date:
- Size: 39.9 kB
- Tags: Source
- Uploaded using Trusted Publishing? No
- Uploaded via: twine/5.1.1 CPython/3.9.6
File hashes
| Algorithm | Hash digest | |
|---|---|---|
| SHA256 |
a14b08f55470990629241ae0759c51b5def3afd262f84ae4a3aa979d73d0968c
|
|
| MD5 |
299f40c487e5e454f067590de46996e9
|
|
| BLAKE2b-256 |
accdb8c5748f827b804489350a8e06d63520c0dd7e6879d8c228e63d3de8142f
|
File details
Details for the file pyhtmlgui-3.22-py3-none-any.whl.
File metadata
- Download URL: pyhtmlgui-3.22-py3-none-any.whl
- Upload date:
- Size: 38.5 kB
- Tags: Python 3
- Uploaded using Trusted Publishing? No
- Uploaded via: twine/5.1.1 CPython/3.9.6
File hashes
| Algorithm | Hash digest | |
|---|---|---|
| SHA256 |
708c04f8f6f9c7234aef92880f6d1bbe84efa6f580eb8a8af7ded0ff0f45a33e
|
|
| MD5 |
16b40620574cc8c27d002ea943d600dc
|
|
| BLAKE2b-256 |
d9eed21e171e888de1a5baf60048d2615c53172d24abe22c23f209e7de260dda
|


