
High-Performance Python/Rust Graph-Based SAST Framework










Need more from PySpector? Contact us!
PySpector is a State-of-the-Art Static Analysis Security Testing (SAST) framework, built in Rust for next-gen performances, made for modern Python projects and large codebases. Unlike traditional linters, PySpector utilizes a Flow-Sensitive, Inter-Procedural Taint Engine to track untrusted data across complex function boundaries and control flow structures.
By compiling the core analysis engine to a native binary, PySpector avoids the performance limitations of traditional Python-only tools. This makes it well-suited for CI/CD pipelines and local development environments where speed and scalability matter.
PySpector is designed to be both comprehensive and intuitive, offering a multi-layered analysis approach that goes beyond simple pattern matching to understand the structure and data flow of your Python application.
Table of Contents
- Quick Demo
- Getting Started
- Key Features
- Core Engine Architecture
- How It Works
- Performance Benchmarks
- Usage
- Triaging and Baselining
- Automation and Integration
- SARIF Output and Security Tool Integration
- Frequently Asked Questions
Quick Demo
https://github.com/user-attachments/assets/0fe03961-0b62-4964-83ba-849f2357efba
Getting Started
Prerequisites
- Python: Python 3.9 – 3.14 supported (Python 3.9 or newer, up to 3.14).
- Rust: The Rust compiler (
rustc) and Cargo package manager are required. You can easily install the Rust toolchain via rustup and verify your installation by runningcargo --version.
Installation
It is highly recommended to install PySpector in a dedicated Python 3.14 venv.
Create a Virtual Environment:
-
Linux (Bash):
# Download Python 3.14
python3.14 -m venv venv
source venv/bin/activate
-
Windows (PowerShell):
# Download Python 3.14 from the Microsoft Store and run:
python3.14 -m venv venv
.\venv\Scripts\Activate.ps1
# or, depending on the Python 3.14 installation source:
.\venv\bin\Activate.ps1
With PySpector now officially on PyPI🎉, installation is as simple as running:
pip install pyspector
Key Features
-
Flow-Sensitive Analysis: Utilizes a Control Flow Graph (CFG) to track variable states sequentially, accurately distinguishing between safe and vulnerable code paths.
-
Inter-Procedural Taint Tracking: Propagates untrusted data across function boundaries using global fixed-point iteration and function summaries.
-
Context-Aware Summaries: Sophisticated mapping of which function parameters flow to return values, allowing for high-precision tracking through complex utility functions.
-
Multi-Engine Hybrid Scanning:
-
Regex Engine: High-speed scanning for secrets, hardcoded credentials, and configuration errors.
-
AST Engine: Deep structural pattern matching to find Python-specific anti-patterns.
-
Graph Engine: Advanced CFG and Call-Graph-based data flow analysis for complex vulnerability chains.
-
-
Fastest Market Performances: Core analysis engine implemented in Rust with
Rayonfor multi-threaded parallelization (allowing PySpector to scan 71% faster than Bandit, and 16.6x faster than Semgrep). -
AI-Agent Security: Specialized rulesets designed to identify prompt injection, insecure tool use, and data leakage in LLM-integrated Python applications.
Core Engine Architecture
PySpector v0.1.5 represents a shift from partially-static pattern matching, to a full graph-based analysis engine:
- AST Parsing: Python source is converted into a structured JSON AST, for semantic analysis.
- Call Graph Construction: PySpector builds a project-wide map of function definitions, and call sites to enable cross-file analysis.
- CFG Generation: Each function is decomposed into a Control Flow Graph (CFG), allowing the engine to understand the order of operations and conditional Python logic.
- Fixed-Point Taint Propagation: Using a Worklist Algorithm, the engine propagates "taint" from defined Sources to Sinks, while respecting Sanitizers that clean the data along the way.
How It Works
PySpector's hybrid architecture is key to its performance and effectiveness.
-
Python CLI Orchestration: The process begins with the Python-based CLI. It handles command-line arguments, loads the configuration and rules, and prepares the target files for analysis. For each Python file, it uses the native ast module to generate an Abstract Syntax Tree, which is then serialized to JSON.
-
Invocation of the Rust Core: The serialized ASTs, along with the ruleset and configuration, are passed to the compiled Rust core. The handoff from Python to Rust is managed by the pyo3 library.
-
Parallel Analysis in Rust: The Rust engine takes over and performs the heavy lifting. It leverages the rayon crate to execute file scans and analysis in parallel, maximizing the use of available CPU cores. It builds a complete call graph of the application to understand inter-file function calls, which is essential for the taint analysis module.
-
Results and Reporting: Once the analysis is complete, the Rust core returns a structured list of findings to the Python CLI. The Python wrapper then handles the final steps of filtering the results based on the severity threshold and the baseline file, and generating the report in the user-specified format.
This architecture combines the best of both worlds: a flexible, user-friendly interface in Python and a high-performance, memory-safe analysis engine in Rust :)
Performance Benchmarks
Performance benchmarks demonstrate PySpector's competitive advantages in SAST scanning speed while maintaining comprehensive security analysis.
Performance benchmarks were executed in a deterministic and controlled environment using automated stress-testing scripts, ensuring repeatable and unbiased measurements
Benchmark Results
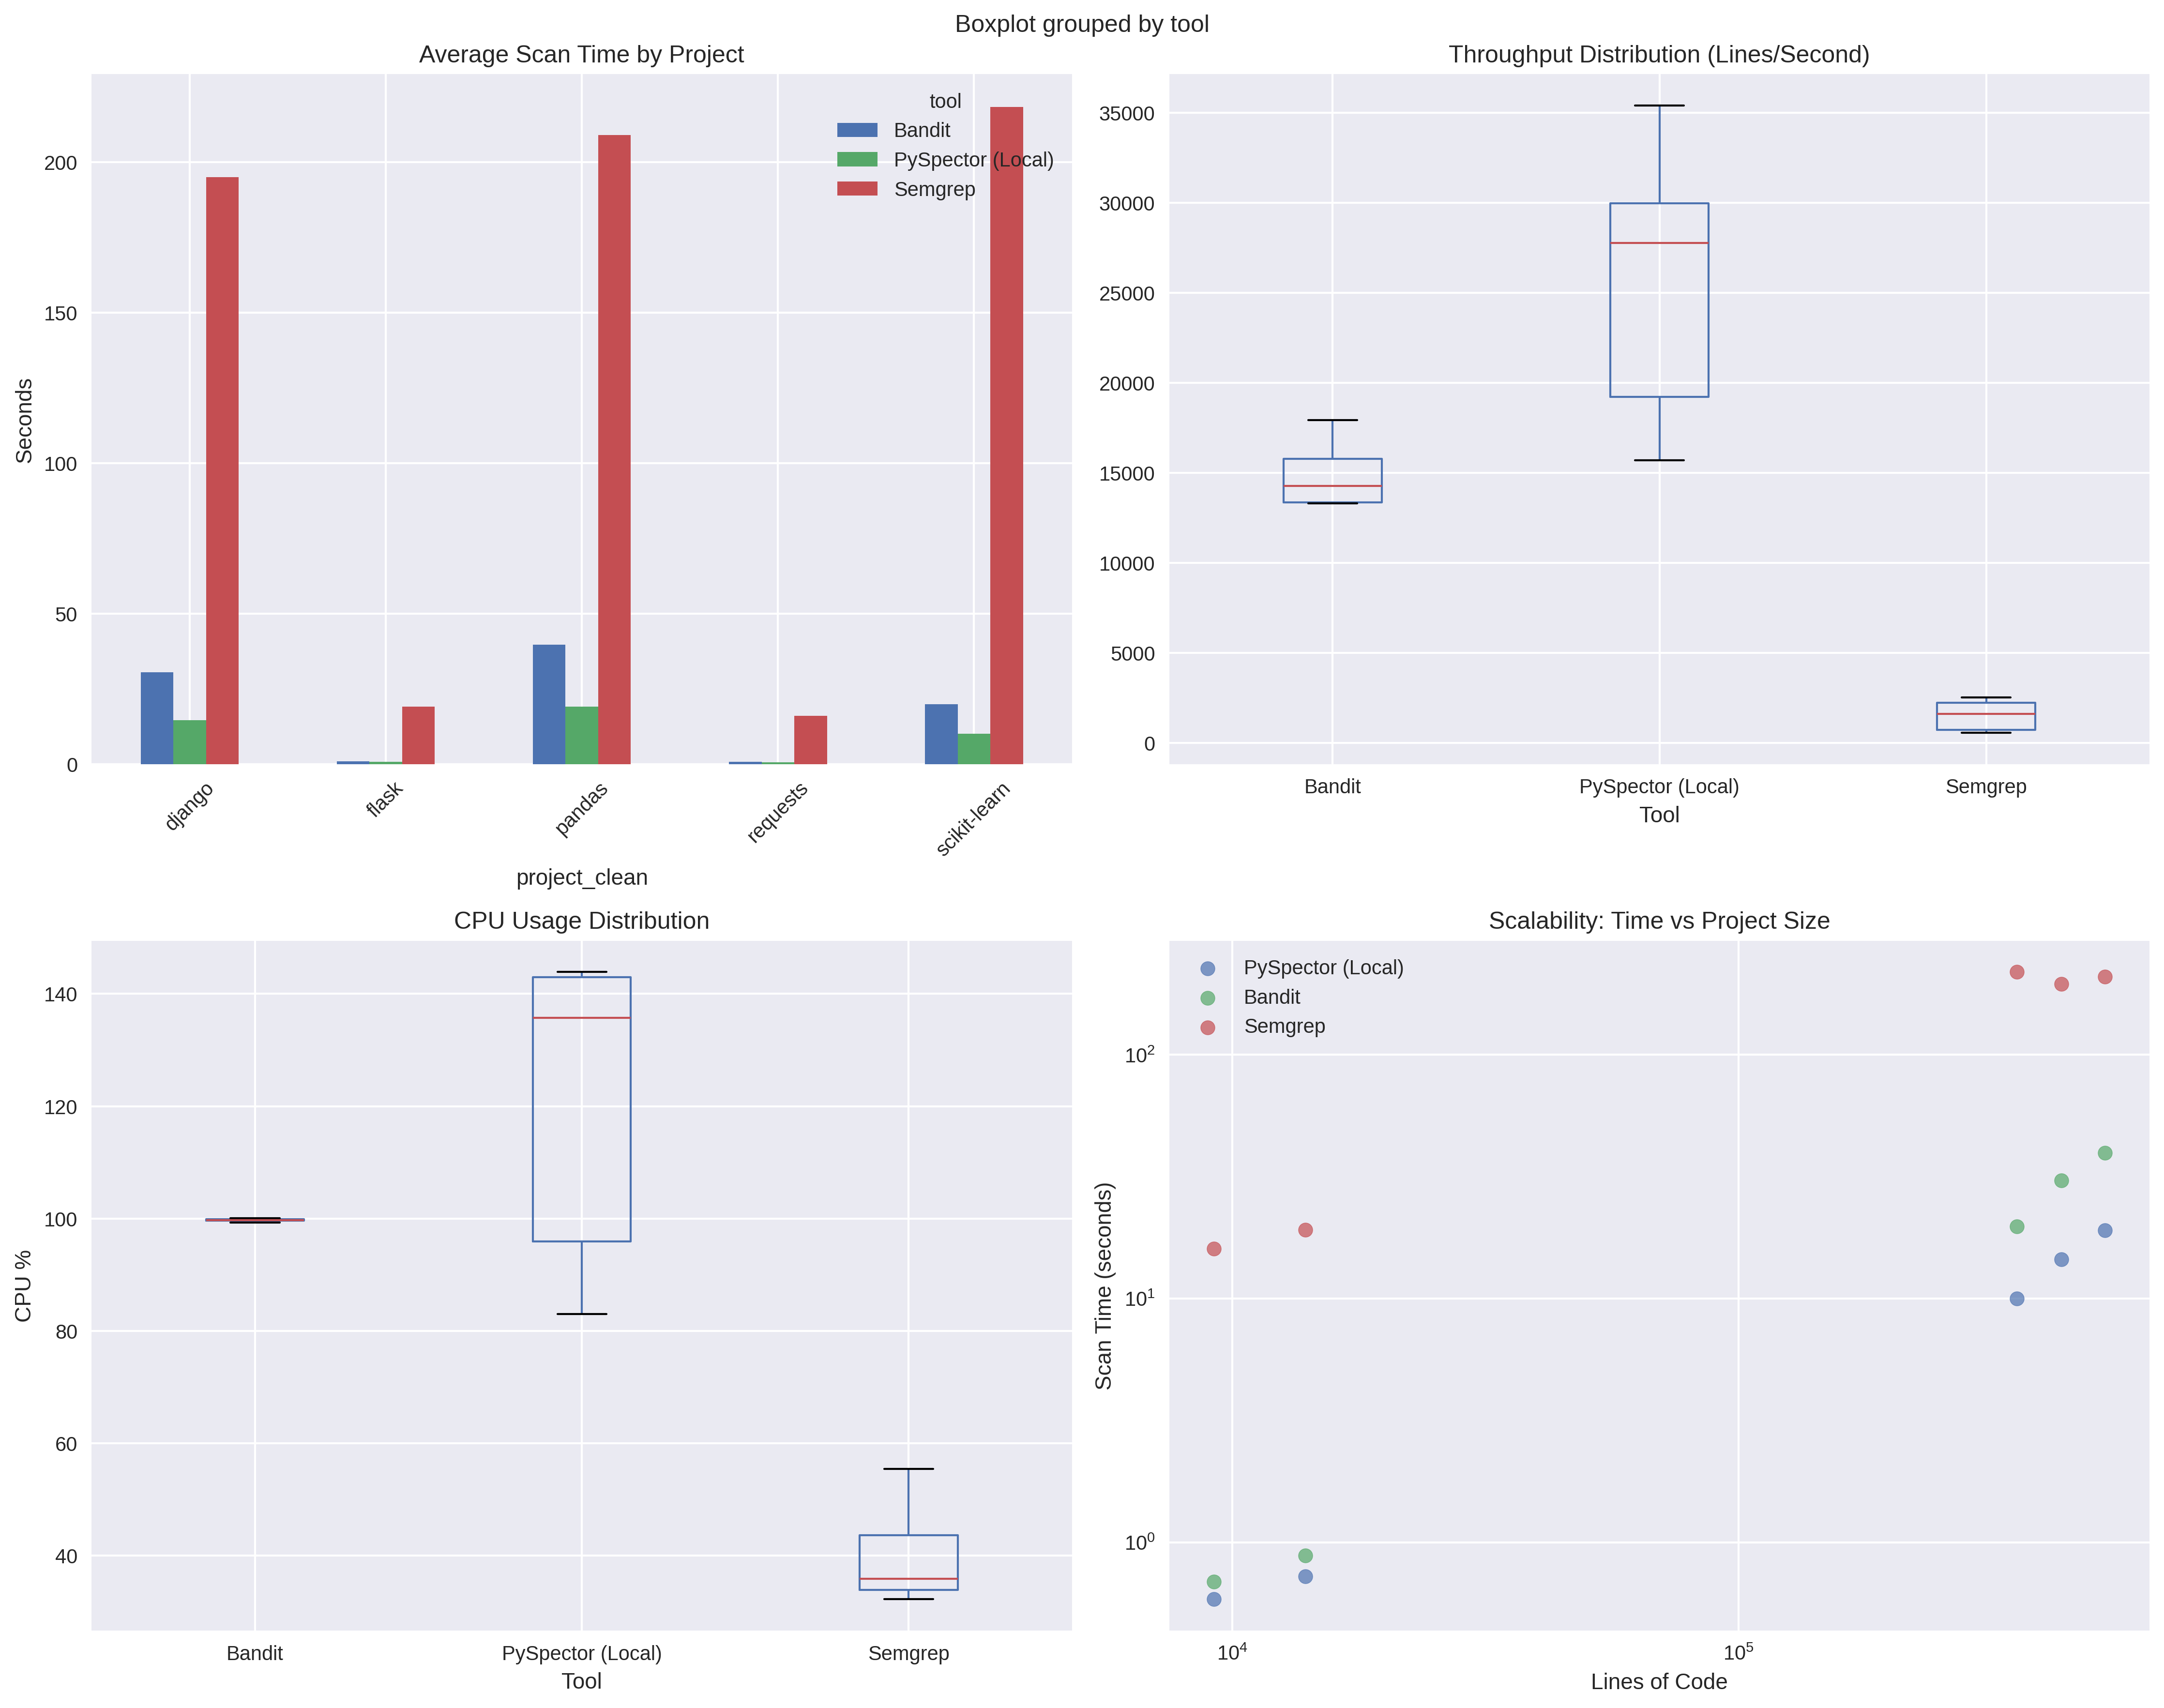
Comparative analysis across major Python codebases (Django, Flask, Pandas, Scikit-learn, Requests) shows:
| Metric | PySpector | Bandit | Semgrep |
|---|---|---|---|
| Throughput | 25,607 lines/sec | 14,927 lines/sec | 1,538 lines/sec |
| Performance Advantage | 71% faster than Bandit | Baseline | 16.6x slower |
| Memory Usage | 1.4 GB average | 111 MB average | 277 MB average |
| CPU Utilization | 120% (multi-core) | 100% (single-core) | 40% |
Key Performance Characteristics
- Speed: Delivers 71% faster scanning than traditional tools through Rust-powered parallel analysis
- Scalability: Maintains high throughput on large codebases (500k+ lines of code)
- Resource Profile: Optimized for modern multi-core environments with adequate memory allocation
- Consistency: Stable performance across different project types and sizes
System Requirements for Optimal Performance
- Minimum: 2 CPU cores, 2 GB RAM
- Recommended: 4+ CPU cores, 4+ GB RAM for large codebases
- Storage: SSD recommended for large repository scanning
Benchmark Methodology
Performance testing conducted on:
- Test Environment: Debian-based Linux VM (2 cores, 4GB RAM)
- Test Projects: 5 major Python repositories (13k-530k lines of code)
- Measurement: Average of multiple runs with CPU settling periods
- Comparison: Head-to-head against Bandit and Semgrep using identical configurations
Benchmark data available in the project repository for transparency and reproducibility.
Usage
PySpector is operated through a straightforward command-line interface.
Running a Scan
The primary command is scan, which can target a local file, a directory, or even a remote Git repository.
pyspector scan [PATH or --url REPO_URL] [OPTIONS]
Examples:
- Scan a single file
pyspector scan /path/to/your/project
- Scan a local directory and save the report as HTML:
pyspector scan /path/to/your/project -o report.html -f html
- Scan a public GitHub repository:
pyspector scan --url https://github.com/username/repo.git
Wizard Mode for Beginners
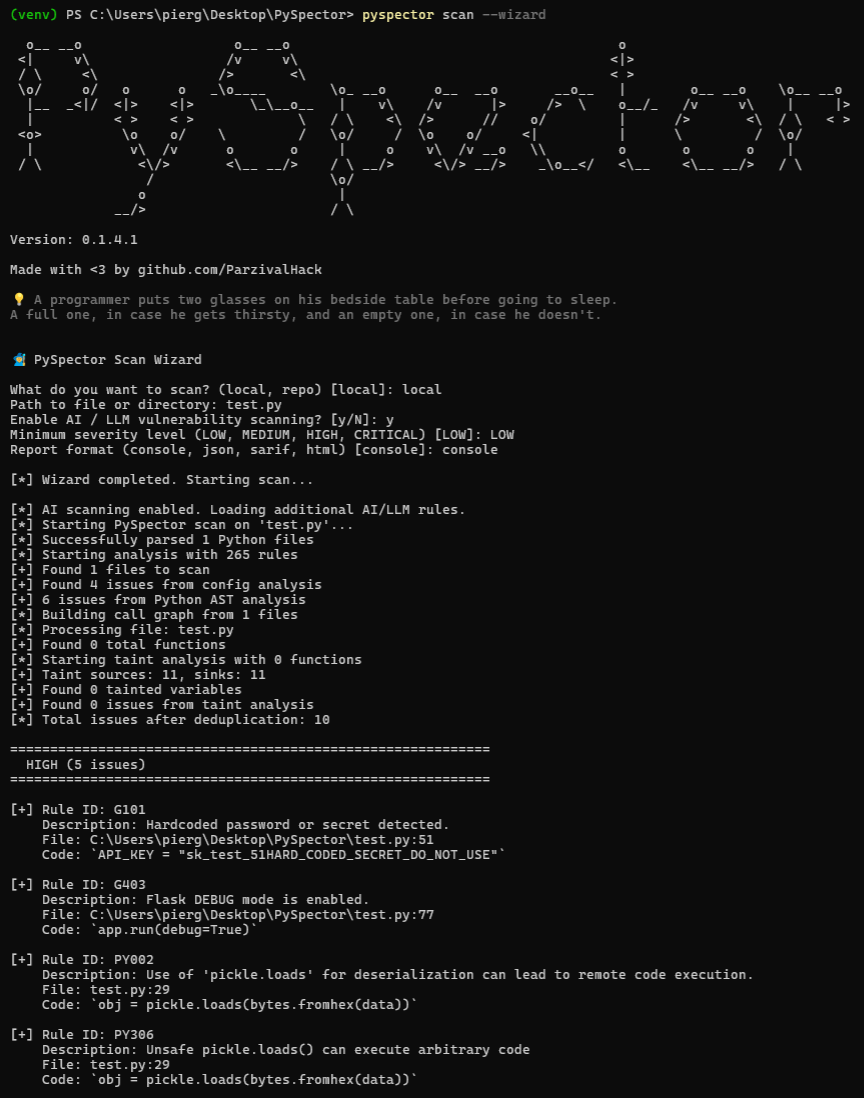
- Use the
--wizardflag to enter the guided scan mode, perfect for 1st time users and beginners or students:
pyspector scan --wizard
Watching for Changes
The watch command continuously monitors a directory or file and re-runs the scan whenever a .py file is created, modified, or deleted, ideal for real-time feedback during development.
pyspector watch [PATH] [OPTIONS]
Options
| Option | Description |
|---|---|
path |
Directory or file to watch (required) |
-s, --severity LEVEL |
Minimum severity to report: LOW, MEDIUM, HIGH, CRITICAL (default: LOW) |
--ai |
Enable AI/LLM vulnerability scanning rules |
-c, --config FILE |
Path to a pyspector.toml config file |
--debounce SECONDS |
Wait time after last change before re-scanning (default: 1.0s) |
--debug |
Show verbose progress output |
Examples
- Watch a project directory for changes:
pyspector watch ./my-project
- Watch with minimum HIGH severity:
pyspector watch ./my-project --severity HIGH
- Watch with debounce (wait 2s after last change):
pyspector watch ./my-project --debounce 2.0
On each re-scan, only new and resolved findings are printed, so you can track your security posture as you code. Exit with Ctrl+C.
Scan for AI and LLM Vulnerabilities
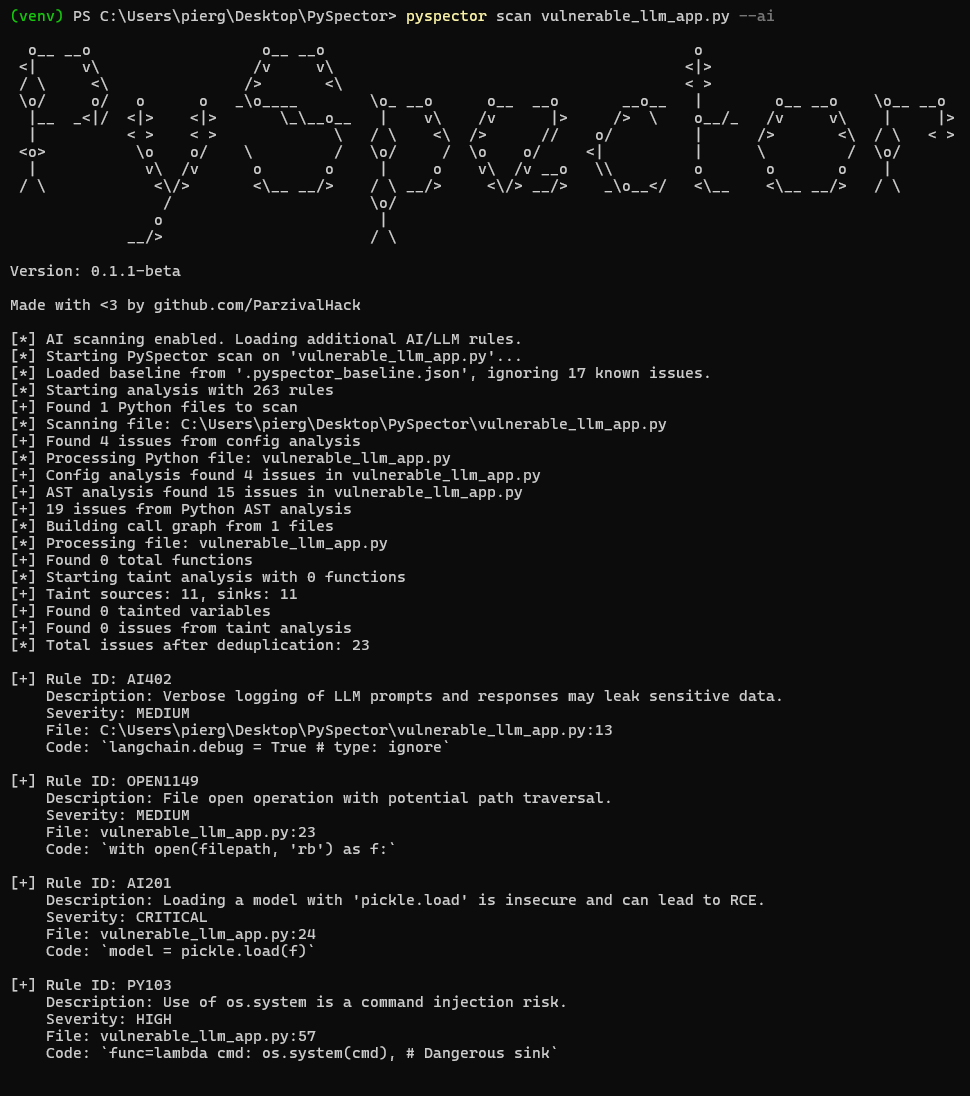
- Use the
--aiflag to enable a specialized ruleset, for projects using Large Language Models:
pyspector scan /path/to/your/project --ai
Scan for Supply-Chain CVEs in Dependencies
- Use the
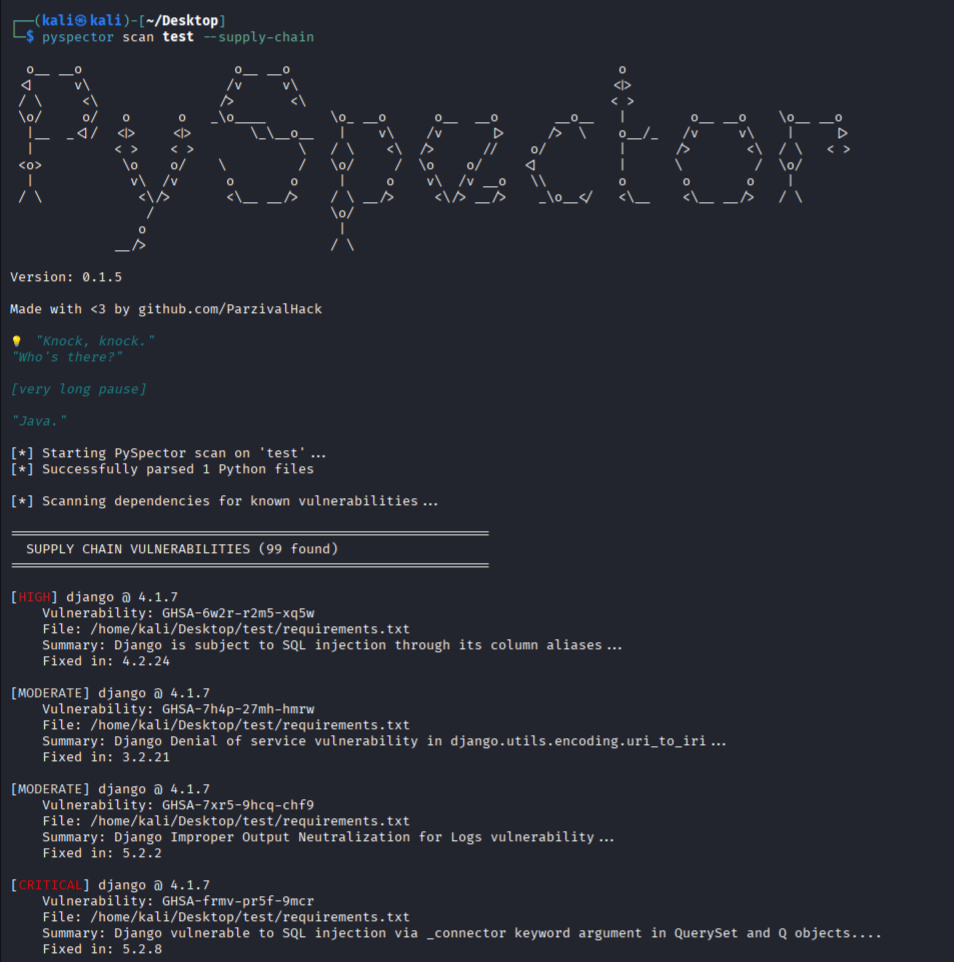
--supply-chainflag to check your project dependencies for known CVEs:
pyspector scan /path/to/your/project --supply-chain
Triaging and Baselining Findings
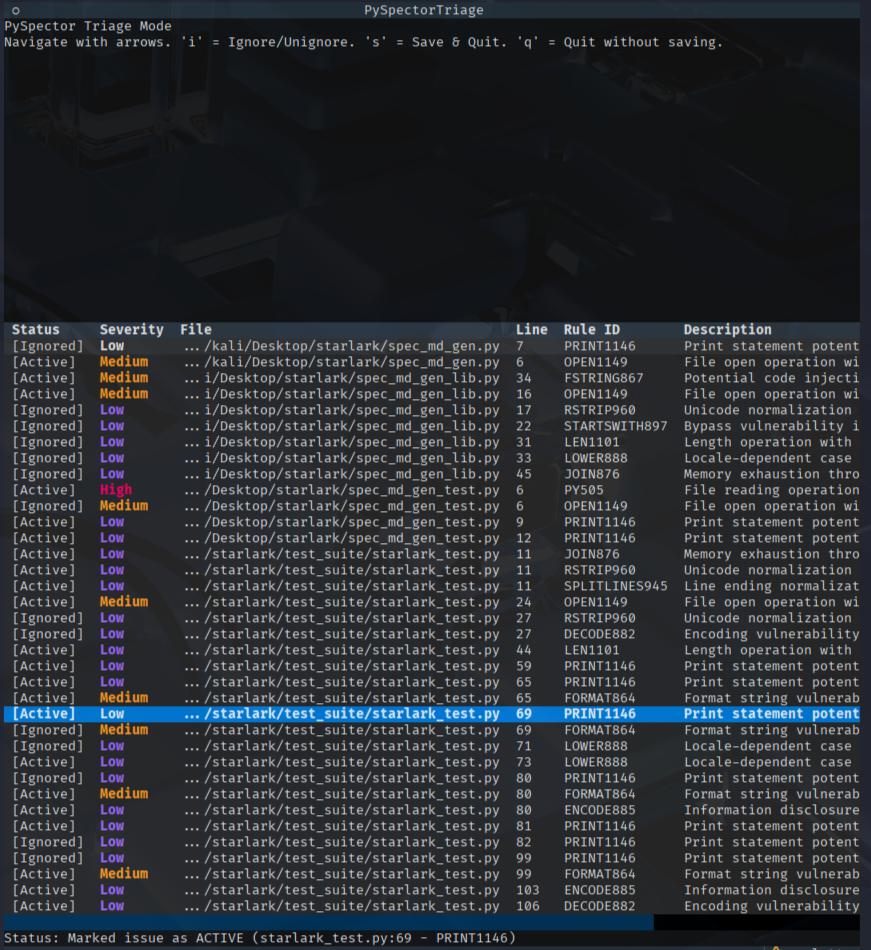
PySpector includes an interactive triage mode to help manage and baseline findings. This allows you to review issues and mark them as "ignored" so they don't appear in future scans.
- Generate a JSON report:
pyspector scan /path/to/your/project -o report.json -f json
- Start the triage TUI:
pyspector triage report.json
Inside the TUI, you can navigate with the arrow keys, press i to toggle the "ignored" status of an issue, and s to save your changes to a .pyspector_baseline.json file. This baseline file will be automatically loaded on subsequent scans.
Automation and Integration
PySpector includes Shell helper scripts to integrate security scanning directly into your development and operational workflows.
SARIF Output and Security Tool Integration
PySpector supports exporting scan results in SARIF (Static Analysis Results Interchange Format).
SARIF is a standardized format used by many security platforms and CI/CD systems to aggregate and visualize static analysis findings.
Why SARIF?
Using SARIF allows PySpector results to be easily integrated with:
- GitHub Code Scanning
- GitHub Advanced Security
- Security dashboards and DevSecOps pipelines
- Other SAST aggregation platforms
Example SARIF Output
Below is a simplified example of a SARIF result generated from a PySpector scan:
{
  "version": "2.1.0",
  "runs": [
    {
      "tool": {
        "driver": {
          "name": "PySpector",
          "informationUri": "https://github.com/ParzivalHack/PySpector"
        }
      },
      "results": [
        {
          "ruleId": "PYSEC001",
          "level": "warning",
          "message": {
            "text": "Potential command injection detected"
          }
        }
      ]
    }
  ]
}
CI/CD Integration
SARIF output can be uploaded to platforms like GitHub Code Scanning to visualize security findings directly in pull requests and repository security dashboards.
Example workflow:
pyspector scan ./project -f sarif -o report.sarif
The generated report.sarif file can then be uploaded to supported security platforms for analysis and visualization.
Git Pre-Commit Hook
To ensure that no new high-severity issues are introduced into the codebase, you can set up a Git pre-commit hook. This hook will automatically scan staged Python files before each commit and block the commit if any HIGH or CRITICAL issues are found.
To set up the hook, run the following script from the root of your Git repository:
./scripts/setup_hooks.sh
This script creates an executable .git/hooks/pre-commit file that performs the check. You can bypass the hook for a specific commit by using the --no-verify flag with your git commit command.
Scheduled Scans with Cron
For continuous monitoring, you can schedule regular scans of your projects using a cron job. PySpector provides an interactive script to help you generate the correct crontab entry.
To generate your cron job command, run:
./scripts/setup_cron.sh
🛡️ Security Hall of Fame
 satoridev01 🛡️ |
 Shinigami 🛡️ |
 fg0x0 🛡️ |
This project follows the all-contributors specification.
Frequently Asked Questions
Why is my scan slow?
If your scan is slow, it's probably because you aren't using PySpector, but rather something else (xD). Jokes apart, scan speed reduces as the codebase grows (so, for example, a 500k LoC codebase will take more time to get scanned, than a 10k LoC one), but recent benchmarks still demonstrate that PySpector is faster than other Python SASTs
Do I need Rust installed to use PySpector?
Yes. PySpector includes a Rust analysis core, so local installation from source requires the Rust toolchain. Install Rust with rustup, then verify the setup with cargo --version before installing or building PySpector.
What can I scan?
You can use pyspector scan with a local Python file, a local project directory, or a public Git repository URL:
pyspector scan ./my-python-project
pyspector scan --url https://github.com/username/repo.git
How can I choose the report format?
Use -f to select the output format and -o to write the report to a file. For example:
pyspector scan ./my-python-project -f json -o report.json
pyspector scan ./my-python-project -f html -o report.html
pyspector scan ./my-python-project -f sarif -o report.sarif
How should I handle false positives?
Generate a JSON report, then open the triage TUI:
pyspector scan ./my-python-project -f json -o report.json
pyspector triage report.json
Inside the TUI, mark findings as ignored (by pressing i inside the TUI) and save the baseline (with s). Future scans can use that baseline so already reviewed findings do not keep reappearing.
When should I use the AI and supply-chain modes?
Use --ai when scanning projects that integrate with LLMs or AI agents. Use --supply-chain when you want dependency checks for known CVEs:
pyspector scan ./my-python-project --ai
pyspector scan ./my-python-project --supply-chain
How do I enable debug output?
Use --debug to print verbose internal details during analysis, which is useful for troubleshooting false positives or unexpected results:
pyspector scan ./my-python-project --debug
How can I integrate PySpector into CI?
For CI pipelines, generate SARIF with -f sarif and upload it to a compatible security platform such as GitHub Code Scanning. For local guardrails, use ./scripts/setup_hooks.sh to install the provided pre-commit hook.
1 maintainer

Download files
Download the file for your platform. If you're not sure which to choose, learn more about installing packages.
Source Distribution
Built Distributions
Filter files by name, interpreter, ABI, and platform.
If you're not sure about the file name format, learn more about wheel file names.
Copy a direct link to the current filters
File details
Details for the file pyspector-0.2.1.tar.gz.
File metadata
- Download URL: pyspector-0.2.1.tar.gz
- Upload date:
- Size: 124.4 kB
- Tags: Source
- Uploaded using Trusted Publishing? No
- Uploaded via: twine/6.2.0 CPython/3.12.6
File hashes
| Algorithm | Hash digest | |
|---|---|---|
| SHA256 |
a20a101a5a9a7f7682d68e2c2e72803af4ccbfc31ada5bde84c42f843c4e62ab
|
|
| MD5 |
e91a25be7603f19568a2f60b7bc26387
|
|
| BLAKE2b-256 |
bc4fe55a53125f8e3d14837967ddc00d42fa2a67477dc03cefe2b3501befec9d
|
File details
Details for the file pyspector-0.2.1-cp314-cp314t-manylinux_2_28_x86_64.whl.
File metadata
- Download URL: pyspector-0.2.1-cp314-cp314t-manylinux_2_28_x86_64.whl
- Upload date:
- Size: 4.5 MB
- Tags: CPython 3.14t, manylinux: glibc 2.28+ x86-64
- Uploaded using Trusted Publishing? No
- Uploaded via: twine/6.2.0 CPython/3.12.6
File hashes
| Algorithm | Hash digest | |
|---|---|---|
| SHA256 |
790bfabd3790d5f42b5ca08f4030062c1ce426cbdf758591e096b1c255ad2889
|
|
| MD5 |
d3ed35157750bc0e9cc997cda672622d
|
|
| BLAKE2b-256 |
60e557f9f6dadba013e06d7f0089466802fc3144b5024d7218d100b9e323bc90
|
File details
Details for the file pyspector-0.2.1-cp314-cp314-manylinux_2_28_x86_64.whl.
File metadata
- Download URL: pyspector-0.2.1-cp314-cp314-manylinux_2_28_x86_64.whl
- Upload date:
- Size: 4.5 MB
- Tags: CPython 3.14, manylinux: glibc 2.28+ x86-64
- Uploaded using Trusted Publishing? No
- Uploaded via: twine/6.2.0 CPython/3.12.6
File hashes
| Algorithm | Hash digest | |
|---|---|---|
| SHA256 |
663a5bd0b233f54be1342bd985b25ee3e578474555d9a37941411541f4982e13
|
|
| MD5 |
b3bfb44106e7c50c1ccdb6293dce9e10
|
|
| BLAKE2b-256 |
408bc4e9952945b2c6695ae8108ab865e89acd223ae48c7eaee9079e43428706
|
File details
Details for the file pyspector-0.2.1-cp313-cp313t-manylinux_2_28_x86_64.whl.
File metadata
- Download URL: pyspector-0.2.1-cp313-cp313t-manylinux_2_28_x86_64.whl
- Upload date:
- Size: 4.5 MB
- Tags: CPython 3.13t, manylinux: glibc 2.28+ x86-64
- Uploaded using Trusted Publishing? No
- Uploaded via: twine/6.2.0 CPython/3.12.6
File hashes
| Algorithm | Hash digest | |
|---|---|---|
| SHA256 |
2f7347296945663b2d2fcd586ecec9b6719be0560f9f022bdb4bced7dc4507c2
|
|
| MD5 |
e34d996415b8f5febb4220da0cdaf1ff
|
|
| BLAKE2b-256 |
4e2843afd2cf5037b65d9f7d104d23061a6db6e95f28712faeb6ff214f10c377
|
File details
Details for the file pyspector-0.2.1-cp313-cp313-manylinux_2_28_x86_64.whl.
File metadata
- Download URL: pyspector-0.2.1-cp313-cp313-manylinux_2_28_x86_64.whl
- Upload date:
- Size: 4.5 MB
- Tags: CPython 3.13, manylinux: glibc 2.28+ x86-64
- Uploaded using Trusted Publishing? No
- Uploaded via: twine/6.2.0 CPython/3.12.6
File hashes
| Algorithm | Hash digest | |
|---|---|---|
| SHA256 |
3b43ba225f4ef363dfed5f29c64cbb03ac8bc8b0362c403da57ebfe495493c5f
|
|
| MD5 |
4908d4e62d2ad606d396497e5598c64b
|
|
| BLAKE2b-256 |
d490ed1abcec6e4192148cec00f6460c45a6dfa405bebf1761c26a1872053e73
|
File details
Details for the file pyspector-0.2.1-cp312-cp312-win_amd64.whl.
File metadata
- Download URL: pyspector-0.2.1-cp312-cp312-win_amd64.whl
- Upload date:
- Size: 2.5 MB
- Tags: CPython 3.12, Windows x86-64
- Uploaded using Trusted Publishing? No
- Uploaded via: twine/6.2.0 CPython/3.12.6
File hashes
| Algorithm | Hash digest | |
|---|---|---|
| SHA256 |
6a74fe46324555ab27e141abe61ec63aca39cd3bd3c51ec970c0effedb956efc
|
|
| MD5 |
8c0d4e64f2828d6063a05eba363ae408
|
|
| BLAKE2b-256 |
c9bd7e3bf5243549c515f8d78b73e79b57b6b0b4047046bd69d780d4ef21c03a
|
File details
Details for the file pyspector-0.2.1-cp312-cp312-manylinux_2_28_x86_64.whl.
File metadata
- Download URL: pyspector-0.2.1-cp312-cp312-manylinux_2_28_x86_64.whl
- Upload date:
- Size: 4.5 MB
- Tags: CPython 3.12, manylinux: glibc 2.28+ x86-64
- Uploaded using Trusted Publishing? No
- Uploaded via: twine/6.2.0 CPython/3.12.6
File hashes
| Algorithm | Hash digest | |
|---|---|---|
| SHA256 |
d05760e52c06eab8b073eb25bd4d3ec4bfe59e8726395700d0f14aabf41dced5
|
|
| MD5 |
4644889d389ebe4cb2b3fbcc860c5078
|
|
| BLAKE2b-256 |
022434192bf38b94d275aed90a1abc734e08be9dded6808a149305b32934c33e
|
File details
Details for the file pyspector-0.2.1-cp311-cp311-manylinux_2_28_x86_64.whl.
File metadata
- Download URL: pyspector-0.2.1-cp311-cp311-manylinux_2_28_x86_64.whl
- Upload date:
- Size: 4.5 MB
- Tags: CPython 3.11, manylinux: glibc 2.28+ x86-64
- Uploaded using Trusted Publishing? No
- Uploaded via: twine/6.2.0 CPython/3.12.6
File hashes
| Algorithm | Hash digest | |
|---|---|---|
| SHA256 |
8c86ed91fb73734f7cd0821eff6d9326790650b1200049aac01659cec54ffd34
|
|
| MD5 |
395608bbe6a1866b08c72bfadd15f04f
|
|
| BLAKE2b-256 |
ea8a162baadf4d4a8ed74a8e650a5f36cabcabb486765fbf7cc1a5c8234085f0
|
File details
Details for the file pyspector-0.2.1-cp310-cp310-manylinux_2_28_x86_64.whl.
File metadata
- Download URL: pyspector-0.2.1-cp310-cp310-manylinux_2_28_x86_64.whl
- Upload date:
- Size: 4.5 MB
- Tags: CPython 3.10, manylinux: glibc 2.28+ x86-64
- Uploaded using Trusted Publishing? No
- Uploaded via: twine/6.2.0 CPython/3.12.6
File hashes
| Algorithm | Hash digest | |
|---|---|---|
| SHA256 |
cfe84e5d93adbf19ab287b857ddae51b70a33cc3b0ae3933fea42668d88b6ee5
|
|
| MD5 |
1e04128ceeec96c0df4408f1b72dcb03
|
|
| BLAKE2b-256 |
add960c5e0a03b4edaaa6b3dcb67cec0bd5eb83a7faf040c5736b7ced9562c3e
|
File details
Details for the file pyspector-0.2.1-cp39-cp39-manylinux_2_28_x86_64.whl.
File metadata
- Download URL: pyspector-0.2.1-cp39-cp39-manylinux_2_28_x86_64.whl
- Upload date:
- Size: 4.5 MB
- Tags: CPython 3.9, manylinux: glibc 2.28+ x86-64
- Uploaded using Trusted Publishing? No
- Uploaded via: twine/6.2.0 CPython/3.12.6
File hashes
| Algorithm | Hash digest | |
|---|---|---|
| SHA256 |
9dc4ea7f7d5d90c706921d78c4c2582aac951218055cce536af8a48c8c809647
|
|
| MD5 |
3dbd94ff560ca74202c737112aaa880b
|
|
| BLAKE2b-256 |
b9996800633091e7080d49bb7cf9c6c029433d94b4c9481c7dc0bff1117919e6
|







