
A package to consume events from an AWS SQS queue, Azure Storage Account Topic and GCP PubSub Topic, process log files, and forward them to a HTTP endpoint or file.

Project description
SAP ECS LogForwarder Documentation
📑 Table of Contents
- 1 Introduction
- 2 Features
- 3 Architecture
- 4 Configuration Setup Flow (Quick Start)
- 5 Requirements and Prerequisites
- 6 Setup SAP ECS LogForwarder
- 7 Configuring SAP ECS LogForwarder
- 8 Running SAP ECS LogForwarder
- 9 Troubleshooting
- 10 Changelog
1 Introduction
SAP ECS LogForwarder is a reference implementation built using the native SDKs of major cloud providers, including Azure, AWS, and GCP. It provides a flexible and unified solution for customers to consume logs from the LogServ ObjectStore.
This service is a unified Python-based application that listens to object or blob creation events across multiple cloud platforms:
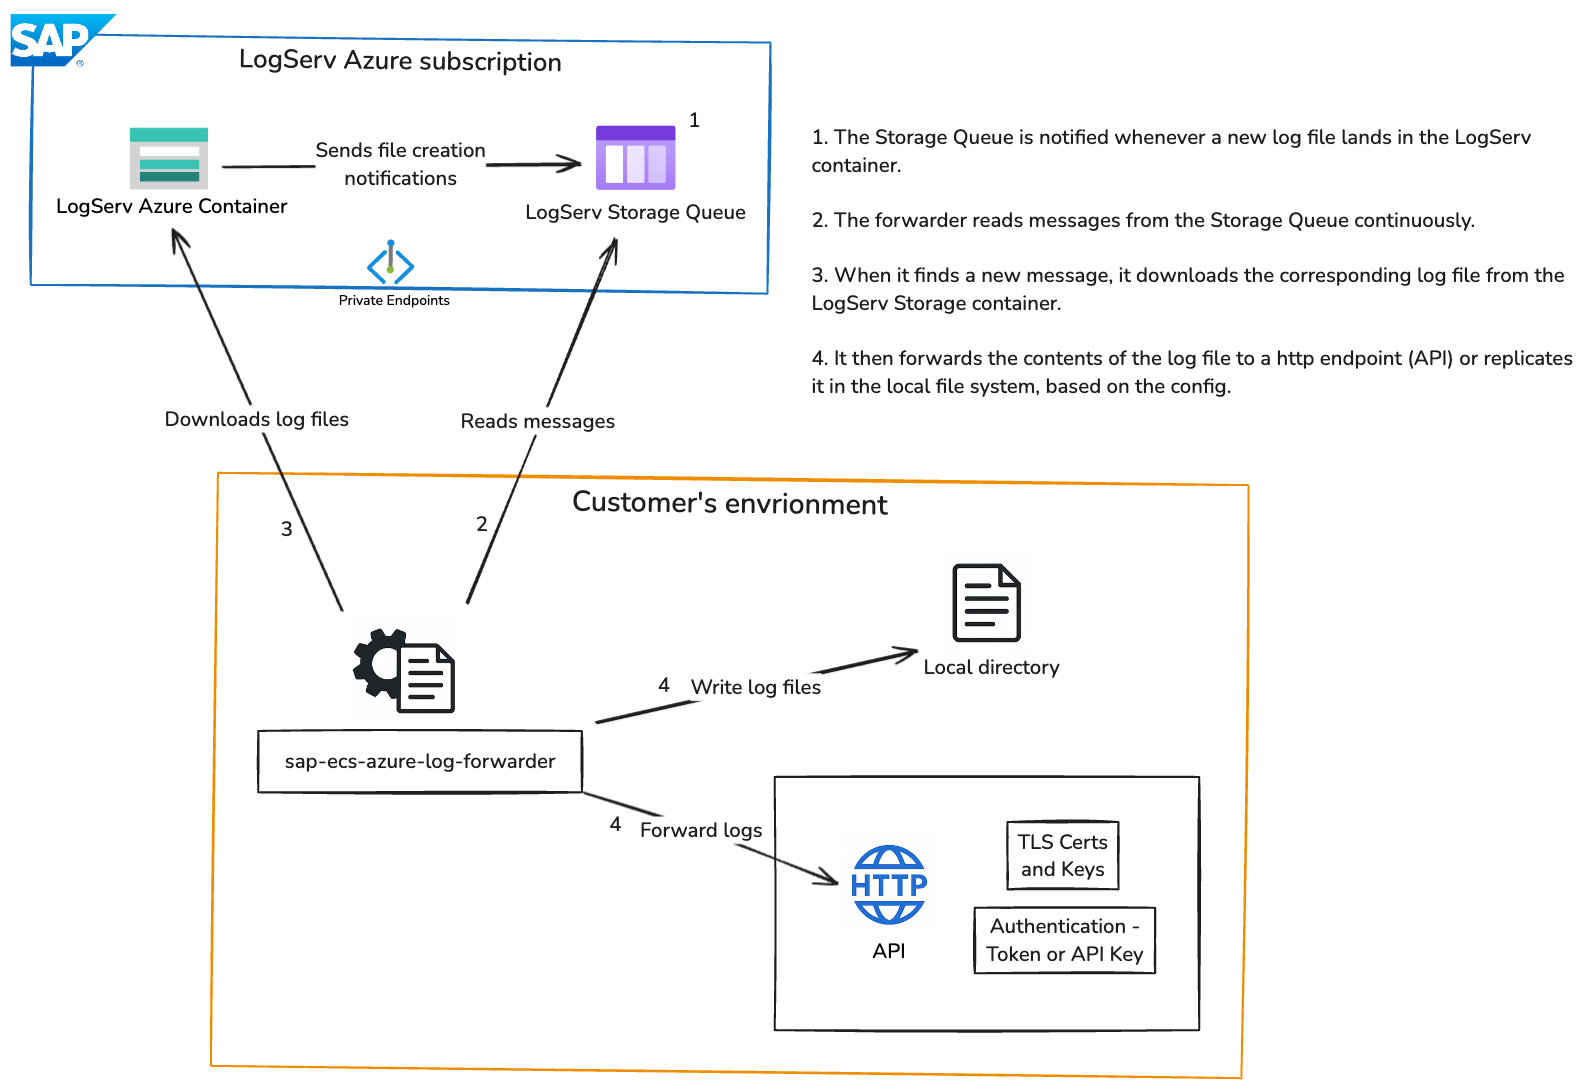
- Azure Event Grid notifications (triggered by Storage BlobCreated events)
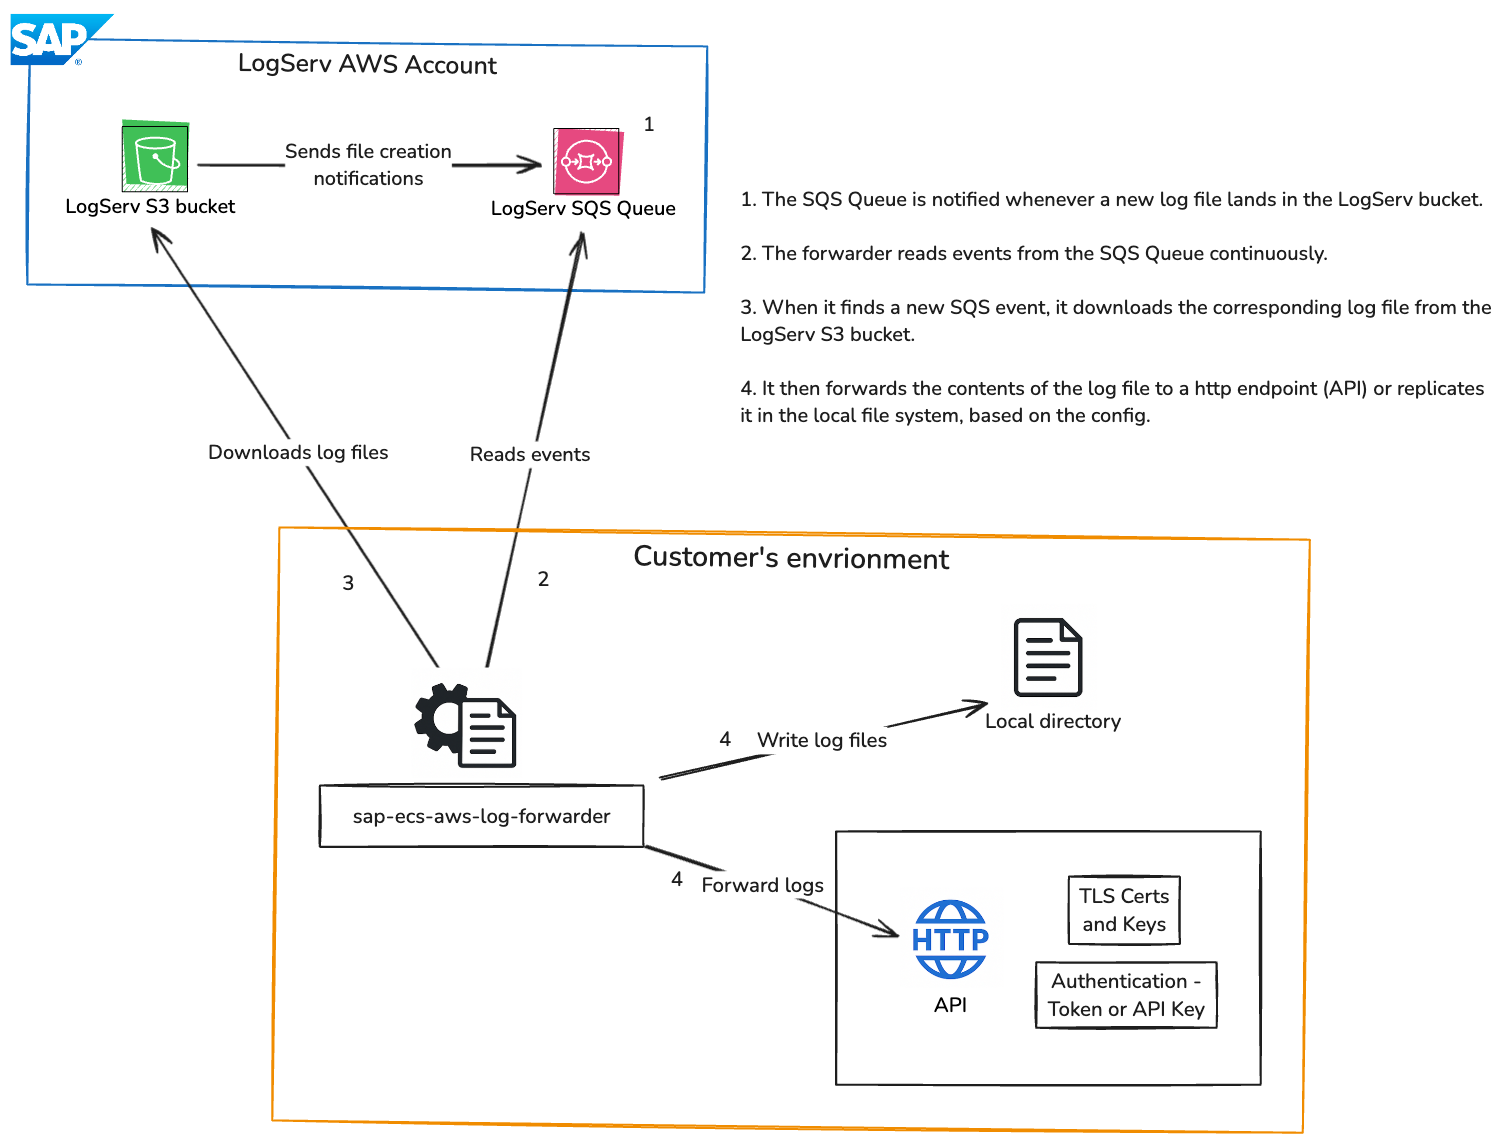
- AWS SQS messages (containing S3 ObjectCreated event notifications)
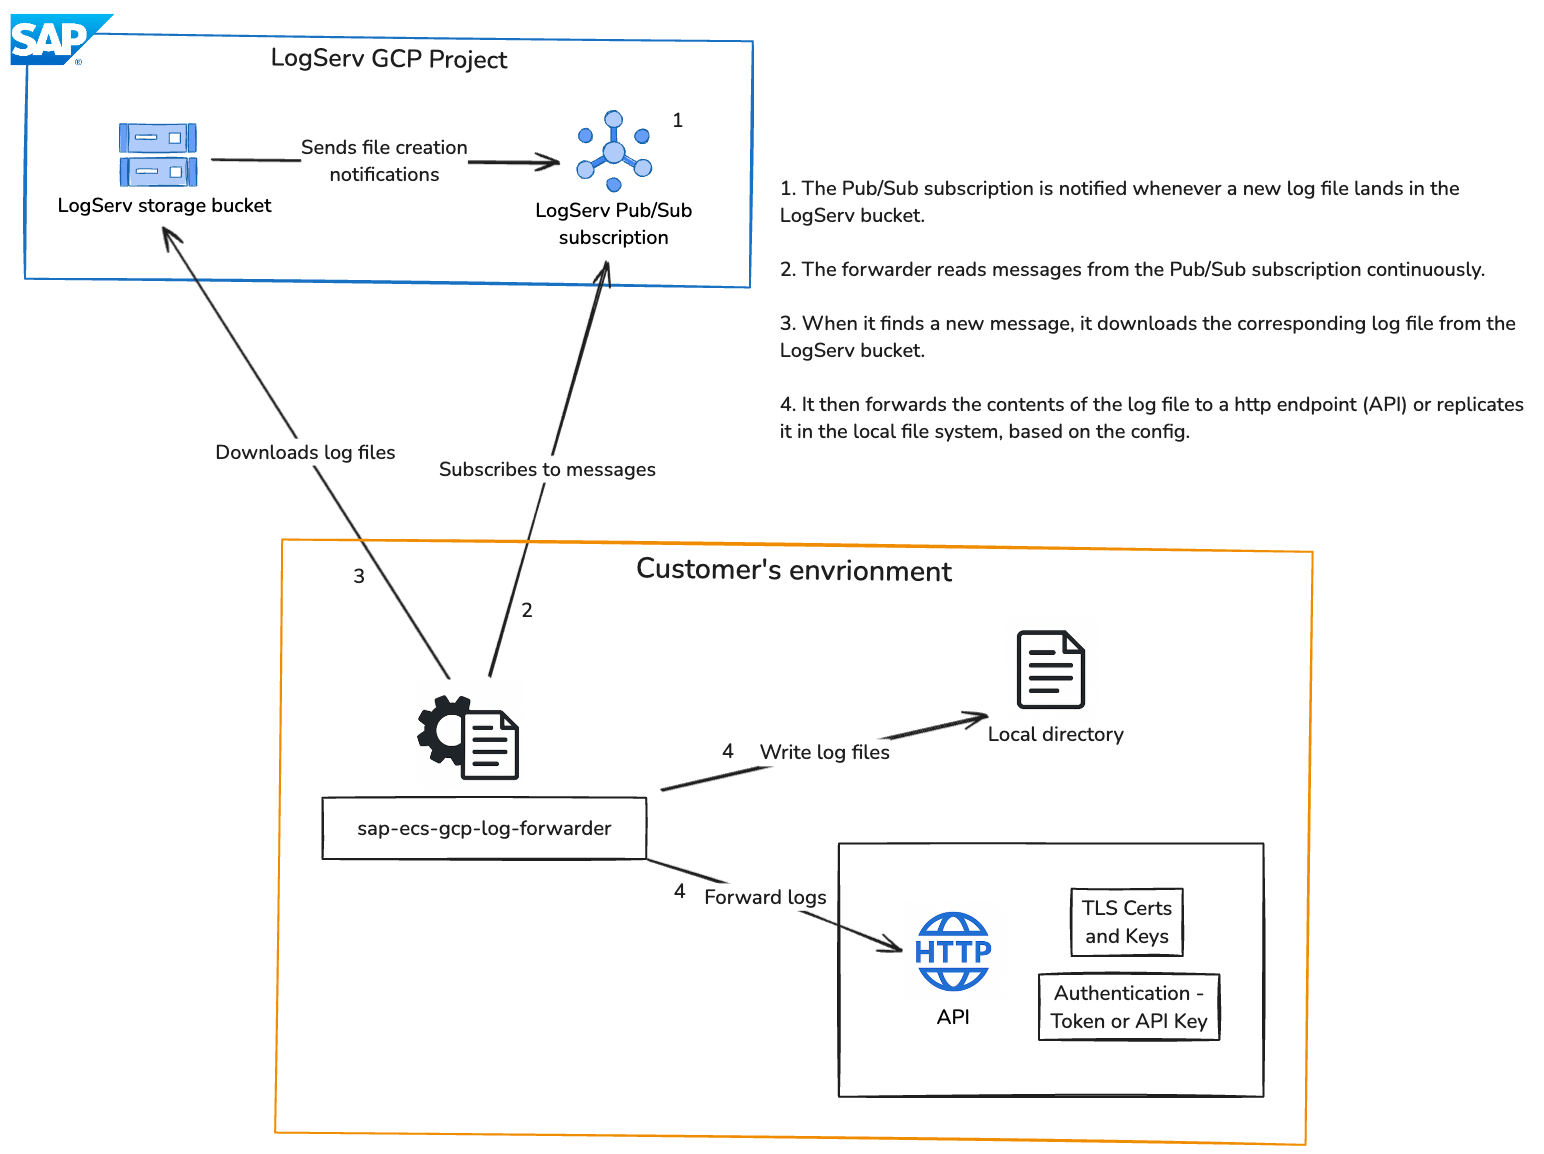
- GCP Pub/Sub messages (containing Cloud Storage OBJECT_FINALIZE event notifications)
Upon receiving these events, the SAP ECS LogForwarder downloads the associated log files, decompresses them if required (e.g., gzip), processes the content line by line, and forwards each entry to destinations such as HTTP endpoints, local files, console, or Microsoft Sentinel as per configuration.
The service includes advanced capabilities such as structured JSON logging, in-memory metrics, regex-based filtering, secure handling of encrypted credentials, retry mechanisms with jitter, and a configuration-driven CLI for easy setup and management.
📌 Navigation Tips
- Click any section in the Table of Contents to jump directly to that topic.
- Most Markdown renderers (GitHub, GitLab, Azure DevOps Wiki, MkDocs, Docusaurus) automatically generate the anchors.
- Keep section headings unchanged to ensure links remain valid.
2 Features
This package is designed to provide a simple, flexible, and secure way to collect and forward logs across cloud environments. It offers the following key benefits:
- Unified Configuration: Manage log collection from multiple cloud providers using a single configuration file, making setup and maintenance straightforward.
- Flexible Log Filtering: Easily control which logs are processed and forwarded by applying inclusion or exclusion rules based on your needs.
- Multiple Output Options: Send logs to various destinations such as APIs (http), local storage, console, monitoring platforms and Microsoft Sentinel, with the ability to use multiple outputs simultaneously.
- Secure Data Handling: Sensitive information such as credentials is securely stored in encrypted format to ensure data protection.
- Reliable Log Delivery: Built-in retry mechanisms ensure logs are delivered even in case of temporary failures or network issues.
- Customizable Log Routing: Apply different filtering rules for each destination, allowing precise control over what data goes where.
- Secure Communication Support: Supports secure connections when sending logs to external systems, ensuring data is transmitted safely.
- Structured Logging: Logs are processed in a consistent and structured format, making them easier to analyze and integrate with monitoring tools.
- Operational Visibility: Provides insights into processing activity through internal metrics and logging, helping track system performance.
- Easy Configuration Management: Comes with a command-line interface that simplifies setup, updates, and management of the log forwarding configuration.
- Cloud-Agnostic Design: Works seamlessly across AWS, Azure, and GCP, giving you flexibility to operate in multi-cloud environments.
3 Architecture
3.1 Azure
3.2 AWS
3.3 GCP
4 Configuration Setup Flow (🚀 Quick Start)
- Install Python
- Create a Virtual Environment
- Install
sap-ecs-log-forwarder - Set
SAP_LOG_FORWARDER_CONFIG - Generate Encryption Key
- Set
FORWARDER_ENCRYPTION_KEY - Add Input Configuration
- Configure Authentication
- Add Output Configuration
- Run the Forwarder
sap-ecs-log-forwarder
5 Requirements and Prerequisites
5.1 Infrastructure Requirements
5.1.1 Hardware Requirements
| Resource | Minimum | Recommended |
|---|---|---|
| CPU | 1 vCPU | 2 vCPU |
| Memory | 512 MB RAM | 1 GB RAM |
| Disk | HDD (any speed) | SSD (≥ 100 MB/s sequential write) |
| Network | Outbound HTTPS (443) | Stable low-latency connection to cloud provider and log destination |
Memory usage scales with the number of concurrent inputs and workers (
numberOfWorkers). Allow ~100 MB per additional worker.High-volume deployments (> 1,000 files/minute): Double the recommended values — 4 vCPU, 2 GB RAM, SSD ≥ 200 MB/s sequential write.
5.1.2 Software Requirements
Operating System
| OS | Supported Versions |
|---|---|
| Linux (Ubuntu/Debian) | 20.04 LTS, 22.04 LTS, 24.04 LTS |
| Linux (RHEL/CentOS) | 8, 9 |
| macOS | 12 (Monterey) and later |
| Windows | 10, 11, Server 2019+ |
Python
| Requirement | Version |
|---|---|
| Python | 3.10, 3.11, 3.12, 3.13, 3.14 |
| pip | Latest stable |
5.1.3 Cloud Provider Access
Azure
- Azure Storage Queue with read/delete access.
- Azure Blob Storage with read access.
- SAS token or dynamic credential endpoint.
AWS
- SQS queue with
ReceiveMessage,DeleteMessagepermissions. - S3 bucket with
s3:GetObjectpermission. - IAM credentials (static or dynamic via backend).
GCP
- Pub/Sub subscription with
roles/pubsub.subscriber. - Cloud Storage bucket with
roles/storage.objectViewer. - Service account JSON key file.
5.2 High Availability (HA) Setup
5.2.1 Overview
The forwarder is stateless by design: all pending work is held in the cloud queue (Azure Queue / AWS SQS / GCP Pub/Sub), not in the forwarder process itself. A message is deleted from the queue only after successful processing. This makes active-active multi-instance deployment safe and is the foundation of the HA strategy.
5.2.2 Failure Modes and Mitigations
| Failure | Impact without HA | Mitigation |
|---|---|---|
| Forwarder process crash | Messages pile up (not lost); processing resumes on restart | systemd Restart=always + multi-instance |
| Host/VM failure | Same as above; recovery depends on restart time | Run 2+ instances on separate hosts |
| Network blip to cloud queue | Retried automatically (15s backoff in runner loop) | Built-in |
| Network blip to log destination | Retried per maxRetries / retryDelay config |
Tune maxRetries |
| Processing takes > 180s (visibility timeout) | Message reappears → duplicate processing | Tune visibility timeout or reduce blob size |
5.2.3 Architecture
Active-Active Multi-Instance (Recommended)
Run 2 or more forwarder instances pointing to the same queue. The queue broker handles competing consumers: only one instance receives each message at a time (enforced by visibility timeout).
                        ┌─────────────────────┐
                        │   Azure Queue /      │
                        │   AWS SQS /          │
                        │   GCP Pub/Sub        │
                        └──────┬───────────────┘
                               │  competing consumers
               ┌───────────────┼───────────────┐
               ▼                               ▼
   ┌──────────────────────┐         ┌──────────────────────┐
   │  Forwarder Instance 1│         │  Forwarder Instance 2│
   │  (Host A / Node A)   │         │  (Host B / Node B)   │
   └──────────┬───────────┘         └──────────┬───────────┘
              │                               │
              └───────────────┬───────────────┘
                              ▼
                   ┌──────────────────────┐
                   │  Log Destination     │
                   │  (Splunk HEC /       │
                   │   Sentinel / HTTP /  │
                   │  Shared NFS)         │
                   └──────────────────────┘
Properties:
- If Instance 1 crashes mid-processing, the message visibility timeout expires (180s) and Instance 2 picks it up automatically — no data loss, no manual intervention
- Both instances process different messages in parallel — throughput doubles
- Instances are identical and interchangeable — no primary/secondary roles
5.3 Deployment Options
Option A — Two VMs with systemd (Bare Metal / IaaS)
Deploy the forwarder on two separate VMs in different availability zones. Both use the same config.json and point to the same queue.
VM-A (Zone 1)                   VM-B (Zone 2)
├── sap-ecs-log-forwarder        ├── sap-ecs-log-forwarder
├── /etc/sap-log-forwarder.env   ├── /etc/sap-log-forwarder.env
└── systemd: Restart=always      └── systemd: Restart=always
systemd unit on both VMs (see section 22):
Restart=always
RestartSec=5
Option B — Kubernetes Deployment (Container)
Deploy as a Kubernetes Deployment with replicas: 2. Kubernetes restarts crashed pods automatically and schedules them on separate nodes with pod anti-affinity.
apiVersion: apps/v1
kind: Deployment
metadata:
  name: sap-log-forwarder
spec:
  replicas: 2
  selector:
    matchLabels:
      app: sap-log-forwarder
  template:
    metadata:
      labels:
        app: sap-log-forwarder
    spec:
      affinity:
        podAntiAffinity:
          requiredDuringSchedulingIgnoredDuringExecution:
            - labelSelector:
                matchExpressions:
                  - key: app
                    operator: In
                    values: [sap-log-forwarder]
              topologyKey: kubernetes.io/hostname
      containers:
        - name: forwarder
          image: sap-ecs-log-forwarder:1.2.1
          env:
            - name: SAP_LOG_FORWARDER_CONFIG
              value: /etc/forwarder/config.json
            - name: FORWARDER_ENCRYPTION_KEY
              valueFrom:
                secretKeyRef:
                  name: forwarder-secrets
                  key: encryption-key
          volumeMounts:
            - name: config
              mountPath: /etc/forwarder
      volumes:
        - name: config
          configMap:
            name: forwarder-config
The podAntiAffinity rule ensures the two replicas are scheduled on different nodes, so a single node failure only takes down one instance.
5.4 Python Installation
5.4.1 Windows Installation
Step 1: Download Python
Visit the official Python website: https://www.python.org/downloads/
Download the latest available version of Python.
Step 2: Run Installer
- Double-click the downloaded
.exefile - Select the option "Add Python to PATH" * Click Install Now
Step 3: Verify Installation
Open Command Prompt and execute:
python --version
pip --version
Step 4: Set Python Path (if not set automatically)
If Python is not recognized, follow these steps:
- Open Environment Variables
- Click "Edit the system environment variables"
- Navigate to System Variables → Path → Edit
- Add the following paths:
C:\Users\<YourUser>\AppData\Local\Programs\Python\Python3x\
C:\Users\<YourUser>\AppData\Local\Programs\Python\Python3x\Scripts\
Restart the terminal and verify again.
Step 5: Ensure pip is Installed
pip --version
If pip is not installed:
python -m ensurepip --upgrade
5.4.2 Linux Installation (Ubuntu/Debian)
Step 1: Update Package List
sudo apt update
Step 2: Install Python
sudo apt install python3 -y
Step 3: Install pip
sudo apt install python3-pip -y
Step 4: Verify Installation
python3 --version
pip3 --version
Step 5: Optional – Configure python command
sudo update-alternatives --install /usr/bin/python python /usr/bin/python3 1
Verify:
python --version
5.4.3 macOS Installation
Step 1: Install Homebrew (if not installed)
/bin/bash -c "$(curl -fsSL https://raw.githubusercontent.com/Homebrew/install/HEAD/install.sh)"
Step 2: Install Python
brew install python
Step 3: Verify Installation
python3 --version
pip3 --version
Step 4: Set Python Path (if required)
nano ~/.zshrc
Add:
export PATH="/usr/local/bin:$PATH"
Apply changes:
source ~/.zshrc
Step 5: Optional Alias
echo "alias python=python3" >> ~/.zshrc
echo "alias pip=pip3" >> ~/.zshrc
source ~/.zshrc
5.5 Final Verification
python --version
pip --version
5.6 Activate Virtual Environment
5.6.1 Windows
cd your-project-folder
python -m venv venv
venv\Scripts\activate
Verify:
where python
Deactivate:
deactivate
5.6.2 Linux
sudo apt install python3-venv -y
python3 -m venv venv
source venv/bin/activate
Verify:
which python
Deactivate:
deactivate
5.6.3 macOS
python3 -m venv venv
source venv/bin/activate
Verify:
which python
Deactivate:
deactivate
5.6.4 Troubleshooting
If venv is not available:
python -m venv venv
On Linux:
sudo apt install python3-venv
For PowerShell execution issues:
Set-ExecutionPolicy RemoteSigned -Scope CurrentUser
6 Setup SAP ECS LogForwarder
6.1 Installation
pip install sap-ecs-log-forwarder
To install a specific version:
pip install sap-ecs-log-forwarder==<version>
Verify installation:
pip show sap-ecs-log-forwarder
List installed packages:
pip list
6.2 Create Service Users in ECS Security Portal - CyberArk
Prerequisites
You must have received the Access details for ECS Security Portal first with instructions.
Log in to ECS Security Portal - CyberArk as an Organization Power User. You must have permission to create users and assign roles.
Step 1 – Log in to CyberArk
- For the Access of CyberArk Please Contact with Revan LogServ Team .
- Log in using an account with Power User privileges for the organization.
Step 2 – Create a Service User (OAuth Confidential Client)
- Navigate to: Identity Administration → Core Services → Users
- Click Add User.
Account Configuration
- Login name: Use a descriptive service name (this value will be used as the client_id).
- Display name: Friendly name for the service.
- Password Type: Select Generated.
Status Settings
Configure the following options exactly as described:
- Is service user: Enabled
- Is OAuth confidential client: Enabled
- Password never expires: Enabled
- Require password change at next login: Disabled
- Email and SMS invites: Disabled
Important:
- The Login name will be used as the client_id.
- The generated Password will be used as the client_secret.
- Copy and store the password securely at creation time.
Reference Screenshot:

- Click Create User to finish the user creation.
Step 3 – Assign Required Roles
After the user is created, the required roles must be assigned.
- Navigate to: Identity Administration → Core Services → Roles
- Select the role LogservRead.
- Go to the Members tab.
- Click Add and select the newly created service user.
- Click Save.
- Repeat the same process for the role RavenRead.

Result
After completing these steps:
- The service user is configured as an OAuth Confidential Client.
- The user has the required roles:
- LogservRead
- RavenRead
- The credentials can be used as:
- client_id = Login name
- client_secret = Generated password
6.3 Security Notes
- Store the client_secret securely (e.g., secrets manager or vault).
- Never share service credentials via email or plain text documents.
- Rotate credentials according to internal security policies.
7 Configuring SAP ECS LogForwarder
7.1 Collecting Configuration Details
Note: If you have non-RISE Azure/AWS/GCP Account then you can use Static Authentication otherwise go for Dynamic Authentication.
7.1.1 Azure
Dynamic Authentication:
- clientId: This is from the Service User You can get this form the step 6.2
- client_secret: This is from the Service User You can get this form the step 6.2
- login_url: https://api.gco-security.rise.cloud.sap/api/v1/app/login
- creds_url: https://api.gco-security.rise.cloud.sap/api/v1/azure/credentials
- queue_name: Given as part of LogServ Integration details
- storage_account_name: Given as part of LogServ Integration details
Note: Once the details are collected, go to 7.2.1
Static Authentication:
- sas token: Given as part of LogServ Integration details
- queue_name: Given as part of LogServ Integration details
- storage_account_name: Given as part of LogServ Integration details
7.1.2 AWS
Dynamic Authentication:
- clientId: This is from the Service User You can get this form the step 6.2
- clientSecret: This is from the Service User You can get this form the step 6.2
- loginUrl: https://api.gco-security.rise.cloud.sap/api/v1/app/login
- awsCredsUrl: https://api.gco-security.rise.cloud.sap/api/v1/aws/credentials
- bucket: Given as part of LogServ Integration details
- region: Given as part of LogServ Integration details
Note: Once the details are collected, go to 7.2.2
Static Authentication: LogServ team has provided access to your non-RISE AWS Account. Customer can create a user or role there and use that details to provide the below parameters.
- AccessKeyId:
- SecretAccessKey:
- Region:
- Expiration: Optional. (Only if Customer has set an expiration date)
7.1.3 GCP
Static Authentication: LogServ team has provided access to your non-RISE GCP Principal. Customer can create the config.json (authentication) on their GCP Account.
Note: If the Customer does not have a GCP Account Principal, the authentication json file will be provided as part of LogServ integration Details
- subscription: Given as part of LogServ Integration details
- project_id: Given as part of LogServ Integration details
- config.json (authentication):
7.2 Dynamic Authentication
- Ensure
FORWARDER_ENCRYPTION_KEYis injected via a secrets manager. - Structured logs avoid sensitive fields.
7.2.1 Azure Dynamic Authentication (Temporary SAS)
Instead of a static sasToken, you can configure dynamic Azure auth. The forwarder will:
- POST to your backend login endpoint with
client_idandclient_secret, receive asession-id-ravencookie. - GET temporary credentials for the storage account, extract
SASToken, and refresh it every ~15 minutes (or before expiry).
CLI Execution:
sap-ecs-config-cli creds set-provider-auth --input-name azure1
# Choose auth mode: dynamic
# Provide client_id, client_secret, login URL (default http://logserv.forwarder.host/api/v1/app/login)
# Provide credentials URL (default http://logserv.forwarder.host/api/v1/azure/credentials)
Configuration Snippet:
{
  "provider": "azure",
  "name": "azure1",
  "queue": "my-queue",
  "storageAccount": "mystorageacct",
  "authentication": {
    "clientId": "enc:...",
    "clientSecret": "enc:...",
    "loginUrl": "http://logserv.forwarder.host/api/v1/app/login",
    "credsUrl": "http://logserv.forwarder.host/api/v1/azure/credentials",
    "encrypted": true
  }
}
Notes:
- The credentials endpoint must accept the
storage-account-namequery parameter. - The response must include
data.SASTokenanddata.Expiration(RFC3339 UTC). - If
sasTokenis set and dynamic fields are absent, the static SAS is used. - For connection strings, the runner uses them directly and skips SAS refresh.
# macOS: test endpoints locally
curl -X POST -H "content-type: application/x-www-form-urlencoded"   -d "client_id=xxx" -d "client_secret=xxx"   http://logserv.forwarder.host/api/v1/app/login

curl -H "Cookie: session-id-raven=xxxxx"   "http://logserv.forwarder.host/api/v1/azure/credentials?storage-account-name=mystorageacct"
7.2.2 AWS Dynamic Authentication (Temporary Credentials)
Instead of static IAM keys, you can configure dynamic AWS auth. The forwarder will:
- POST to your backend login endpoint with
client_idandclient_secret, receive asession-id-ravencookie. - GET temporary AWS credentials for the target bucket, and refresh them every ~15 minutes or before expiration.
CLI Execution:
sap-ecs-config-cli creds set-provider-auth --input-name aws1
# Choose auth mode: dynamic
# Provide client_id, client_secret, login URL (default http://logserv.forwarder.host/api/v1/app/login)
# Provide AWS credentials URL (default http://logserv.forwarder.host/api/v1/aws/credentials)
Configuration Snippet:
{
  "provider": "aws",
  "name": "aws1",
  "queue": "https://sqs.us-east-1.amazonaws.com/123/queue",
  "region": "us-east-1",
  "bucket": "my-s3-bucket",
  "authentication": {
    "clientId": "enc:...",
    "clientSecret": "enc:...",
    "loginUrl": "http://logserv.forwarder.host/api/v1/app/login",
    "awsCredsUrl": "http://logserv.forwarder.host/api/v1/aws/credentials",
    "encrypted": true
  }
}
Backend Contract:
# Login
curl -X POST -H 'content-type: application/x-www-form-urlencoded'   -d client_id=xxx -d client_secret=xxx   http://logserv.forwarder.host/api/v1/app/login

# Fetch temporary creds (cookie required)
curl -H 'Cookie: session-id-raven=xxxx'   'http://logserv.forwarder.host/api/v1/aws/credentials?bucket=my-s3-bucket'
Expected Response:
{
  "data": {
    "AccessKeyId": "xxxx",
    "SecretAccessKey": "xxxxx",
    "SessionToken": "xxxxxx",
    "Expiration": "2025-11-27T00:20:33Z",
    "Region": "ap-south-1"
  }
}
Notes:
- Region from the response overrides the input region if provided; otherwise, it uses the configured
region. - Static keys are used if dynamic fields are absent.
- Credentials refresh occurs on a schedule or 60s before expiration.
7.2.3 GCP Dynamic Authentication (Temporary Credentials)]
Dynamic Authentication through ECS Security Portal is not available.
7.3 Define Output Configuration
The SAP ECS LogForwarder supports multiple output handlers that determine where collected logs are sent. Customer can configure the desired output handlers taking the reference as below.
Supported Output Handlers
- files
- http(API)
- console
- sentinel
Example Configuration
OUTPUT = [
    {
        "type": "http",
        "destination": "https://example.com/ingest",
        "authorization": {
            "type": "bearer",
            "token": "enc:your_encrypted_token",
            "encrypted": True
        },
        "tls": {
            "pathToClientCert": "/path/client.crt",
            "pathToClientKey": "/path/client.key",
            "pathToCACert": "/path/ca.crt",
            "insecureSkipVerify": False
        },
        "includeFilter": ["prod"],
        "excludeFilter": ["test"]
    },
    {
        "type": "files",
        "destination": "logs/",
        "compress": True,
        "includeFilter": [],
        "excludeFilter": []
    },
    {
        "type": "console"
    },
    {
      "type": "sentinel",
      "includeFilter": [],
      "excludeFilter": [],
      "sentinel_dce_tenant_id": "<Destination tenant ID>",
      "sentinel_dce_application_id": "<Destination Application / client ID>",
      "sentinel_dce_application_secret": "<Destination client secret>",
      "sentinel_dce_log_ingestion_url": "<Log ingestion base URL>",
      "sentinel_dce_dcr_immutable_id": "<Data Collection Rule immutable ID>",
      "sentinel_dce_dcr_stream_id": "Custom-SAPLogServ_CL"
    }
]
7.4 Set Configuration File Path
7.4.1 Windows
Temporary
set SAP_LOG_FORWARDER_CONFIG=C:\path\to\config.json
setx SAP_LOG_FORWARDER_CONFIG "C:\path\to\config.json"
echo %SAP_LOG_FORWARDER_CONFIG%
Permanent
- Launch "Control Panel"
- "System"
- "Advanced system settings"
- Switch to "Advanced" tab.
- "Environment variables"
- Choose "System Variables" (for all users)
- To add a new environment variable: Choose "New" ...
- To change an existing environment variable: Choose "Edit"
- add name/key as SAP_LOG_FORWARDER_CONFIG
- Provide value as config file path
- restart terminal/cmd
7.4.2 Linux
Temporary
export SAP_LOG_FORWARDER_CONFIG=/path/to/config.json
echo $SAP_LOG_FORWARDER_CONFIG
Permanent
Edit ~/.bashrc:
echo 'export SAP_LOG_FORWARDER_CONFIG=/path/to/config.json' >> ~/.bashrc
source ~/.bashrc
7.4.3 macOS
Temporary
export SAP_LOG_FORWARDER_CONFIG=/path/to/config.json
echo $SAP_LOG_FORWARDER_CONFIG
Verify Config Path
sap-ecs-config-cli config-path
Permanent
# create file
touch ~/.zprofile

# open file
open ~/.zprofile

# add following line at the end of file with config file full path.
export SAP_LOG_FORWARDER_CONFIG=/path/to/config.json

# Compile file
source ~/.zprofile
Restart the terminal/console.
7.5 Configuration Methods
For setting configurations, there are two approaches:
7.5.1 APPROACH 1 – CLI (Recommended)
Apply Configuration with Encryption. This approach will generate the configuration file automatically.
Quick path — first-time setup wizard Run a single guided command that walks through every step below interactively:
sap-ecs-config-cli first-setupThe wizard generates an encryption key, prompts for input source, authentication, output destination, workers, log level, retries, and filters, then writes
config.jsonand prints the twoexportlines needed to start the forwarder. Skip to Step 12 if you usedfirst-setup.
Step 1 Generate Encryption Key
sap-ecs-config-cli gen-key
Example output:
Generated key: GF6sgLZ23fwKYgasdw_aKmsdssdlrne4-xyz=
Export it: export FORWARDER_ENCRYPTION_KEY='GF6sgLZ23fwKYgasdw_aKmsdssdlrne4-xyz='
Step 2 Set Environment Variables
Linux / macOS:
export FORWARDER_ENCRYPTION_KEY='GF6sgLZ23fwKYgasdw_aKmsdssdlrne4-xyz='
export SAP_LOG_FORWARDER_CONFIG='/path/to/config.json'
Windows (Command Prompt):
set FORWARDER_ENCRYPTION_KEY=GF6sgLZ23fwKYgasdw_aKmsdssdlrne4-xyz=
set SAP_LOG_FORWARDER_CONFIG=C:\path\to\config.json
Windows (PowerShell):
$env:FORWARDER_ENCRYPTION_KEY="GF6sgLZ23fwKYgasdw_aKmsdssdlrne4-xyz="
$env:SAP_LOG_FORWARDER_CONFIG="C:\path\to\config.json"
Step 3 Add AWS Input
sap-ecs-config-cli input add \
  --provider aws \
  --name aws1 \
  --queue https://sqs.us-east-1.amazonaws.com/123/queue \
  --region us-east-1 \
  --bucket my-bucket
Optional flags accepted by input add:
  --log-level INFO          # per-input log level (DEBUG/INFO/WARNING/ERROR/CRITICAL)
  --number-of-workers 2     # worker threads (1–256, default 1)
  --max-retries 5           # default 5
  --retry-delay 10          # seconds, default 10
  --include ".*\.log$"      # regex include filter (repeatable)
  --exclude ".*debug.*"     # regex exclude filter (repeatable)
Step 4 Add GCP Input
sap-ecs-config-cli input add \
  --provider gcp \
  --name gcp1 \
  --subscription projects/my-project/subscriptions/my-sub \
  --bucket my-bucket
Step 5 Add Azure Input
sap-ecs-config-cli input add
Provider (gcp, aws, azure): azure
Name: azure1
Azure queue name: <please pass queue name here>
Azure storage account / conn string: <please pass storage account name>
Step 6 Set Log File Path
If the directory does not exist:
mkdir -p /var/log/sap-log-forwarder
Linux and macOS:
sudo mkdir -p /var/log/sap-log-forwarder
sudo chmod 777 /var/log/sap-log-forwarder
sap-ecs-config-cli set-log-file --path /var/log/sap-log-forwarder/app.log
Step 6a Set Global Log Level
sap-ecs-config-cli set-log-level --level INFO
To override the log level for a specific input only:
sap-ecs-config-cli input set-log-level <input-name> --level DEBUG
Step 7 Set Azure Authentication
sap-ecs-config-cli creds set-provider-auth --input-name azure1
Step 8 Set AWS Authentication
sap-ecs-config-cli creds set-provider-auth --input-name aws2
Step 9 Add Output (HTTP)
sap-ecs-config-cli output add \
  --input-name aws1 \
  --type http \
  --destination https://example.com/ingest \
  --include ".*\.log$" \
  --exclude ".*debug.*"
To set HTTP authentication on the output after adding it:
sap-ecs-config-cli creds set-http-auth \
  --input-name aws1 \
  --output-index 0 \
  --auth-type bearer
To configure CA or mTLS certificates on an HTTP output:
sap-ecs-config-cli output set-tls \
  --input-name aws1 \
  --index 0 \
  --ca-cert /path/to/ca.pem \
  --client-cert /path/to/client.pem \
  --client-key /path/to/client.key
# add --insecure-skip-verify to disable certificate validation (not recommended)
Step 10 File Output
sap-ecs-config-cli output add \
  --input-name aws1 \
  --type files \
  --destination logs/ \
  --compress
Step 11 Sentinel Output
sap-ecs-config-cli output add \
    --input-name aws1 \
    --type sentinel \
    --sentinel-dce-tenant-id <TENANT_ID> \
    --sentinel-dce-app-id <APP_ID> \
    --sentinel-dce-app-secret <APP_SECRET> \
    --sentinel-dce-ingestion-url <INGESTION_URL> \
    --sentinel-dce-dcr-immutable-id <DCR_IMMUTABLE_ID> \
    --include ".*ERROR.*" \
    --exclude ".*DEBUG.*"
Step 12 Console Output
sap-ecs-config-cli output add \
  --input-name aws1 \
  --type console
Step 13 Manage Filters
Add or remove regex filters on an input or output at any time without re-creating it:
# Input-level filters
sap-ecs-config-cli input add-filter aws1 --type include --pattern ".*error.*"
sap-ecs-config-cli input add-filter aws1 --type exclude --pattern ".*debug.*"
sap-ecs-config-cli input remove-filter aws1 --type include --index 0

# Output-level filters (by output index)
sap-ecs-config-cli output add-filter --input-name aws1 --index 0 --type include --pattern ".*critical.*"
sap-ecs-config-cli output remove-filter --input-name aws1 --output-index 0 --type include --index 0
Step 14 Interactive UI
Open the terminal UI to browse the full config, inspect encrypted values, and check the service status live:
sap-ecs-config-cli ui
- Navigate the tree with arrow keys; press
dto reveal/hide encrypted values (requiresFORWARDER_ENCRYPTION_KEY) - Press
rto reload config from disk,qto quit
7.5.2 APPROACH 2 – Manual Configuration
Create a config.json file and define all required configurations. This file is common for all hyperscalers.
{
"logLevel": "INFO",
"logFile": "/var/log/sap-log-forwarder/app.jsonl",
"inputs": [
{
"provider": "aws",
"name": "aws1",
"numberOfWorkers": 1,
"queue": "",
"region": "",
"bucket": "",
"includeFilter": ["\\.log$", "sap", "dns"],
"excludeFilter": ["debug"],
"maxRetries": 5,
"retryDelay": 10,
"authentication": {
},
"outputs": [
    {
        "type": "http",
        "destination": "",
        "authorization": {
        "type": "bearer",
        "token": "enc:...",
        "encrypted": true
        },
        "tls": {
        "pathToClientCert": "/path/client.crt",
        "pathToClientKey": "/path/client.key",
        "pathToCACert": "/path/ca.crt",
        "insecureSkipVerify": false
        },
        "includeFilter": ["prod"],
        "excludeFilter": ["test"]
    },
    {
        "type": "files",
        "destination": "logs/",
        "compress": true,
        "includeFilter": [],
        "excludeFilter": []
    },
    {
        "type": "console"
    }
]
}
]
}
Note: If you need to modify anything in the configuration file, you can update it, save the changes, and then rerun the forwarder package.
8 Running LogForwarder
sap-ecs-log-forwarder
8.1 Verify Output
- Ensure logs are processed correctly
- Confirm data reaches the destination
- Verify there are no errors in logs or console
8.1.1 Example: How to create AWS config.json File using CLI
# Activate environment
source log-forwarder-env/bin/activate

# Set config path
export SAP_LOG_FORWARDER_CONFIG="/path/to/config.json"

# Create directory if required
mkdir -p /path/to

# --- Option A: guided wizard (covers all steps below interactively) ---
sap-ecs-config-cli first-setup

# --- Option B: step-by-step ---

# Generate and export encryption key
sap-ecs-config-cli gen-key
export FORWARDER_ENCRYPTION_KEY='<YOUR_KEY>'

# Set global log level and log file
sap-ecs-config-cli set-log-level --level INFO
mkdir -p logs
sap-ecs-config-cli set-log-file --path ./logs/app.log

# Add AWS input (with optional filters and tuning)
sap-ecs-config-cli input add \
  --provider aws \
  --name aws1 \
  --queue https://sqs.us-east-1.amazonaws.com/123/queue \
  --region us-east-1 \
  --bucket my-bucket \
  --log-level INFO \
  --number-of-workers 1 \
  --max-retries 5 \
  --retry-delay 10 \
  --include ".*\.log$" \
  --exclude ".*debug.*"

# Set AWS authentication
sap-ecs-config-cli creds set-provider-auth --input-name aws1

# Add HTTP output
sap-ecs-config-cli output add \
  --input-name aws1 \
  --type http \
  --destination https://example.com/ingest \
  --include ".*error.*"

# Optional HTTP authentication
sap-ecs-config-cli creds set-http-auth \
  --input-name aws1 \
  --output-index 0 \
  --auth-type bearer

# Optional CA / mTLS certificates on the HTTP output
sap-ecs-config-cli output set-tls \
  --input-name aws1 \
  --index 0 \
  --ca-cert /path/to/ca.pem

# Optional file output
sap-ecs-config-cli output add \
  --input-name aws1 \
  --type files \
  --destination logs/ \
  --compress

# Run forwarder
sap-ecs-log-forwarder
8.1.2 Example: How to create Azure config.json File using CLI
# Activate environment
source log-forwarder-env/bin/activate

# Set config path
export SAP_LOG_FORWARDER_CONFIG="/path/to/config.json"

# Create directory if required
mkdir -p /path/to

# --- Option A: guided wizard (covers all steps below interactively) ---
sap-ecs-config-cli first-setup

# --- Option B: step-by-step ---

# Generate and export encryption key
sap-ecs-config-cli gen-key
export FORWARDER_ENCRYPTION_KEY='<YOUR_KEY>'

# Set global log level and log file
sap-ecs-config-cli set-log-level --level INFO
mkdir -p logs
sap-ecs-config-cli set-log-file --path ./logs/app.log

# Add Azure input
sap-ecs-config-cli input add \
  --provider azure \
  --name azure1 \
  --queue <QUEUE_NAME> \
  --storage-account <STORAGE_ACCOUNT_NAME_OR_CONN_STRING>

# Set Azure authentication — Static (SAS token)
sap-ecs-config-cli creds set-provider-auth --input-name azure1
Azure auth mode (sas/dynamic) [sas]: sas
Azure SAS Token:
Provider credentials stored (encrypted).

# Set Azure authentication — Dynamic (temporary SAS via backend)
sap-ecs-config-cli creds set-provider-auth --input-name azure1
Azure auth mode (sas/dynamic) [sas]: dynamic
Backend client_id:
Backend client_secret:
Login URL [http://localhost:8000/api/v1/app/login]:
Credentials URL [http://localhost:8000/api/v1/azure/credentials]:
Dynamic Azure auth will request temporary SAS tokens every ~15 minutes.
Provider credentials stored (encrypted).

# Add HTTP output
sap-ecs-config-cli output add \
  --input-name azure1 \
  --type http \
  --destination https://example.com/ingest \
  --include ".*error.*"

# Optional HTTP authentication
sap-ecs-config-cli creds set-http-auth \
  --input-name azure1 \
  --output-index 0 \
  --auth-type bearer

# Optional CA / mTLS certificates on the HTTP output
sap-ecs-config-cli output set-tls \
  --input-name azure1 \
  --index 0 \
  --ca-cert /path/to/ca.pem

# Optional file output
sap-ecs-config-cli output add \
  --input-name azure1 \
  --type files \
  --destination logs/ \
  --compress

# Run forwarder
sap-ecs-log-forwarder
Sample Azure Config File for Static and Dynamic Configuration
{
  "logLevel": "info",
  "inputs": [
    {
      "provider": "azure",
      "name": "azure",
      "maxRetries": 5,
      "retryDelay": 10,
      "includeFilter": [],
      "excludeFilter": [],
      "outputs": [
        {
          "type": "files",
          "destination": "logs/",
          "compress": false
        }
      ],
      "logLevel": "INFO",
      "numberOfWorkers": 1,
      "queue": " ",
      "storageAccount": "",
      "authentication": {
        "sasToken": "enc:",
        "encrypted": true
      }
    },
    {
      "provider": "azure",
      "name": "azure1",
      "maxRetries": 5,
      "retryDelay": 10,
      "includeFilter": [],
      "excludeFilter": [],
      "outputs": [],
      "logLevel": "INFO",
      "numberOfWorkers": 1,
      "queue": "",
      "storageAccount": "",
      "authentication": {
        "clientId": "enc:",
        "clientSecret": "enc:",
        "loginUrl": "",
        "credsUrl": "",
        "encrypted": true
      }
    }
  ]
}
8.1.3 Example: How to create GCP config.json File using CLI
# Activate environment
source log-forwarder-env/bin/activate

# Set config path
export SAP_LOG_FORWARDER_CONFIG="/path/to/config.json"

# Create directory if required
mkdir -p /path/to

# --- Option A: guided wizard (covers all steps below interactively) ---
sap-ecs-config-cli first-setup

# --- Option B: step-by-step ---

# Generate and export encryption key
sap-ecs-config-cli gen-key
export/setx/set FORWARDER_ENCRYPTION_KEY='<YOUR_KEY>'

# Set global log level and log file
sap-ecs-config-cli set-log-level --level INFO


# Add GCP input
sap-ecs-config-cli input add
Provider (gcp, aws, azure): gcp
- Name: gcp1
- GCP subscription: xyz
- GCP bucket (optional) []:
- Added input 'gcp1' (gcp).

mkdir -p logs
sap-ecs-config-cli set-log-file --path ./logs/app.log


# Set GCP authentication —
sap-ecs-config-cli creds set-provider-auth --input-name gcp1


# Add HTTP output
sap-ecs-config-cli output add \
-- Input name: gcp1
-- Otype (files, http, console, sentinel): files
-- Destination: C:\path\to\output

# Optional HTTP authentication
sap-ecs-config-cli creds set-http-auth \
  --input-name gcp1 \
  --output-index 0 \
  --auth-type bearer

# Optional CA / mTLS certificates on the HTTP output
sap-ecs-config-cli output set-tls \
  --input-name gcp1 \
  --index 0 \
  --ca-cert /path/to/ca.pem

# Optional file output
sap-ecs-config-cli output add \
  --input-name gcp1 \
  --type files \
  --destination logs/ \
  --compress

# Run forwarder
sap-ecs-log-forwarder
8.2 Usage
To run the Log Forwarder, use the following command:
sap-ecs-log-forwarder
The service starts threads / async loops per input, and logs a metrics snapshot every 30s.
8.3 Structured Logging
Emits JSON lines to the console (and to logFile if configured):
{"ts":"2025-11-25T12:00:00","level":"INFO","message":"Wrote logs to logs/app.log.gz","thread":"aws-aws1"}
8.4 Metrics (logged)
Counters (examples):
- files_forward_success / files_forward_error
- http_forward_success / http_forward_error
- output_invocations
- aws_messages_processed / aws_retry
- gcp_messages_processed / gcp_retry
- azure_messages_processed / azure_retry
A snapshot is logged periodically; this can be extended to expose an HTTP endpoint.
8.5 Filtering
- Include / exclude lists are regex patterns applied (case-insensitive) to object/blob/file names.
- Exclude overrides include.
- Output-level include/exclude filters are also supported per output.
8.5 Retries
Exponential backoff with added random jitter up to base retryDelay for download / processing failures.
8.7 HTTP Output
- Per-line POST with
Content-Type: application/json. - Auth types: bearer, api-key, basic.
- TLS options:
pathToClientCert+pathToClientKeyfor mTLSpathToCACertfor custom CAinsecureSkipVerifyto skip verification (not recommended)
8.8 Extending
- Add new output: Implement handler and register in
processor.py(OUTPUT_HANDLERS). - Add metrics:
metrics.inc("<name>"). - Add provider: Create runner class following the existing pattern and register in
consumer.PROVIDERS.
8.9 Systemd Deployment Guide
(For Linux servers only.)
Overview
Run the forwarder as a managed service with automatic restarts and persistent log files.
Step 1 Create a Service Account (Optional)
sudo useradd -r -s /bin/false saplogfwd || true
Step 2 Create Directories
sudo mkdir -p /opt/sap-log-forwarder
sudo mkdir -p /var/log/sap-log-forwarder
sudo chown -R saplogfwd:saplogfwd /opt/sap-log-forwarder /var/log/sap-log-forwarder
Place your project (editable install or wheel) under /opt/sap-log-forwarder or install via pip:
cd /opt/sap-log-forwarder
sudo pip install sap-ecs-log-forwarder
Step 3 Environment File
Create /etc/sap-log-forwarder.env:
SAP_LOG_FORWARDER_CONFIG=/etc/sap-log-forwarder/config.json
FORWARDER_ENCRYPTION_KEY=YOUR_FERNET_KEY
PYTHONUNBUFFERED=1
LOG_LEVEL=INFO
(Generate the key earlier and replace it here.)
Step 4 Systemd Unit
Create /etc/systemd/system/sap-log-forwarder.service:
[Unit]
Description=SAP ECS LogForwarder
After=network.target
Wants=network-online.target

[Service]
Type=simple
User=saplogfwd
Group=saplogfwd
WorkingDirectory=/opt/sap-log-forwarder
EnvironmentFile=/etc/sap-log-forwarder.env
ExecStart=/usr/bin/python -m sap_ecs_log_forwarder.consumer
Restart=always
RestartSec=5
# File logging (append). Systemd 240+ supports append:
StandardOutput=append:/var/log/sap-log-forwarder/forwarder.out.log
StandardError=append:/var/log/sap-log-forwarder/forwarder.err.log
# Alternatively (recommended) use journald and remove StandardOutput/StandardError lines.

# Resource limits (optional)
NoNewPrivileges=yes
ProtectSystem=full
ProtectHome=yes

[Install]
WantedBy=multi-user.target
Reload and start:
sudo systemctl daemon-reload
sudo systemctl enable --now sap-log-forwarder
Status:
systemctl status sap-log-forwarder
CLI shortcut — Steps 3 and 4 can be automated with the built-in
servicecommands, which write the env file and unit file, reload systemd, and optionally enable the service on boot:sudo sap-ecs-config-cli service install \ --user saplogfwd \ --env FORWARDER_ENCRYPTION_KEY=YOUR_FERNET_KEY sudo sap-ecs-config-cli service start sudo sap-ecs-config-cli service stop sudo sap-ecs-config-cli service restart sudo sap-ecs-config-cli service status sudo sap-ecs-config-cli service uninstall
Step 5 Log Rotation (If Using File Output)
Create /etc/logrotate.d/sap-log-forwarder:
/var/log/sap-log-forwarder/forwarder.*.log {
  daily
  rotate 14
  compress
  missingok
  notifempty
  create 0640 saplogfwd saplogfwd
  sharedscripts
  postrotate
    systemctl kill -s SIGUSR1 sap-log-forwarder || true
  endscript
}
(The forwarder ignores SIGUSR1 now; postrotate is just optional. Compression is handled by logrotate.)
Step 6 Using Journald Instead
Remove StandardOutput/StandardError lines to keep logs in the journal:
journalctl -u sap-log-forwarder -f
To export periodically, use:
journalctl -u sap-log-forwarder --since "1 hour ago" > /var/log/sap-log-forwarder/hour.log
Step 7 Config File Location
Place config.json in the WorkingDirectory (/opt/sap-log-forwarder/config.json). Edit via CLI:
sudo -u saplogfwd sap-ecs-config-cli input list
Additional CLI operations available for day-to-day management:
# Set global or per-input log level
sap-ecs-config-cli set-log-level --level DEBUG
sap-ecs-config-cli input set-log-level <name> --level WARNING

# Add/remove regex filters on inputs or outputs
sap-ecs-config-cli input add-filter <name> --type include --pattern ".*error.*"
sap-ecs-config-cli input remove-filter <name> --type include --index 0
sap-ecs-config-cli output add-filter --input-name <name> --index 0 --type exclude --pattern ".*debug.*"

# Configure CA / client certificates for HTTP outputs
sap-ecs-config-cli output set-tls --input-name <name> --index 0 --ca-cert /path/to/ca.pem

# Open the interactive terminal UI (browse config + live service status + reveal secrets)
sap-ecs-config-cli ui
Step 8 Permissions
Ensure /var/log/sap-log-forwarder is writable by the service user. If using file outputs (destination logs/):
sudo mkdir -p /opt/sap-log-forwarder/logs
sudo chown saplogfwd:saplogfwd /opt/sap-log-forwarder/logs
Step 9 Updating
sudo systemctl stop sap-log-forwarder
sudo pip install --upgrade sap-ecs-log-forwarder
sudo systemctl start sap-log-forwarder
Step 10 Common Checks
systemctl status sap-log-forwarder
journalctl -u sap-log-forwarder -n 50
ls -lh /var/log/sap-log-forwarder
Step 11 Troubleshooting Restart Loops
- Inspect recent logs (
journalctl -u sap-log-forwarder -f). - Validate
config.jsonstructure. - Verify
FORWARDER_ENCRYPTION_KEYis present (systemctl show -p Environment sap-log-forwarder).
Step 12 Security Hardening (Optional)
Add these directives:
PrivateTmp=yes
ProtectKernelTunables=yes
ProtectKernelModules=yes
RestrictAddressFamilies=AF_INET AF_INET6 AF_UNIX
Keep the encryption key in a root-readable-only environment file (chmod 640).
Step 13 Switching To Virtualenv
If installed in a virtualenv, adjust the path:
ExecStart=/opt/sap-log-forwarder/venv/bin/python -m sap_ecs_log_forwarder.consumer
Ensure the venv ownership matches the service user.
Step 14 Testing Manual Run
sudo -u saplogfwd FORWARDER_ENCRYPTION_KEY=YOUR_FERNET_KEY python -m sap_ecs_log_forwarder.consumer
Stop the service with:
sudo systemctl stop sap-log-forwarder
The service now runs with an automatic restart (Restart=always) and logs are persisted under /var/log/sap-log-forwarder.
9 Troubleshooting
9.1 Quick Checklist
config.jsonis present and valid (jq '.' config.json).FORWARDER_ENCRYPTION_KEYis exported.- Inputs are listed (
sap-ecs-config-cli input list). - Outputs are configured (
sap-ecs-config-cli output list <input>). - Per-input
logLevelis set (useDEBUGfor diagnosis). - If using HTTP/TLS, verify cert/key/CA paths.
9.2 General Issues
| Symptom | Cause | Fix |
|---|---|---|
| Encrypted values not decrypted | Missing FORWARDER_ENCRYPTION_KEY |
Export key before running consumer |
| No files processed | Check exclude/include filters | Adjust filters |
| Output skipped | Output-level include/exclude filters | Remove or correct filters |
| HTTP send fails | Bad URL, TLS paths, undecrypted auth | Verify destination, cert/key/CA paths, export key |
| File output missing | No destination or permission denied | Provide writable directory in output config |
9.3 Azure (Queue + Blob)
- Decode errors: Ensure Event Grid -> Queue message schema.
- Missing blob URL: Recreate Event Grid subscription;
data.urlmust exist. - Unauthorized blob download: Provide SAS token or full connection string.
- Filters miss: Subject pattern
/blobServices/default/containers/<c>/blobs/<name>; adjust regex.
9.4 AWS (SQS + S3)
- No messages: Ensure S3 event notification is configured (ObjectCreated -> SQS).
- Objects ignored: Bucket mismatch, eventName not
ObjectCreated:Put, regex filters. - Repeated retries (
aws_retry): Missings3:GetObjector corrupt gzip. - Credential failure: Re-run
creds set-provider-authand export the key.
9.5 GCP (Pub/Sub + Storage)
- Subscription path invalid: Must be
projects/<project>/subscriptions/<name>. - PermissionDenied: Grant
roles/pubsub.subscriberandroles/storage.objectViewer. - Service account JSON parse failure: Re-enter credentials (file/paste mode).
- Events ignored: Not
OBJECT_FINALIZEor filters reject.
9.6 Performance
- Slow: Large object fully loaded; consider future streaming enhancement.
- Many retries: Increase
retryDelay, verify network and permissions. - Parallelism: Each input runs its own thread/loop; split workloads across inputs.
9.7 Debug Commands (macOS)
env | grep FORWARDER_ENCRYPTION_KEY
sap-ecs-config-cli input list
sap-ecs-config-cli output list <input-name>
python -m sap_ecs_log_forwarder.consumer
9.8 Metrics Reference
- aws_messages_processed / aws_retry
- gcp_messages_processed / gcp_retry
- azure_messages_processed / azure_retry
- output_invocations
- files_forward_success / files_forward_error
- http_forward_success / http_forward_error
9.9 When Nothing Processes
- Set input
logLeveltoDEBUG. - Temporarily clear include/exclude filters.
- Upload a small test file that matches the expected pattern.
- Confirm metrics counters increment.
- Reapply filters gradually.
9.10 License
This application and its source code are licensed under the terms of the SAP Developer License Agreement. See the LICENSE file for more information.
10 Changelog
Version 1.2.1
- Introduced structured, step-by-step documentation for improved clarity and usability.
- Enhanced readability of the documentation with better formatting and sequencing.
- Simplified instructions to help users quickly onboard and configure the forwarder package.
Version 1.2.0
- Add possibility to run multiple workers to consume queues
- Add at config file the key
$.inputs[].numberOfWorkersthe number of workers ( default 1, limited to 256 ) to enable concurrency.
Version 1.1.0
- Added output type
sentinelto ingest data into a Microsoft Sentinel deployment through the solution "SAP LogServ (RISE), S/4 HANA Cloud Private Edition" from the Microsoft Sentinel Content Hub as described here.
Version 1.0.2
- Solving minor issue to avoid data loss when HTTP destination is unavailable
Version 1.0.1
- Security Patches
Version 1.0.0
- First proper release
Release history Release notifications | RSS feed


Download files
Download the file for your platform. If you're not sure which to choose, learn more about installing packages.
Source Distributions
Built Distribution
Filter files by name, interpreter, ABI, and platform.
If you're not sure about the file name format, learn more about wheel file names.
Copy a direct link to the current filters
File details
Details for the file sap_ecs_log_forwarder-1.3.3-py3-none-any.whl.
File metadata
- Download URL: sap_ecs_log_forwarder-1.3.3-py3-none-any.whl
- Upload date:
- Size: 55.3 kB
- Tags: Python 3
- Uploaded using Trusted Publishing? No
- Uploaded via: twine/7.0.0 CPython/3.12.1
File hashes
| Algorithm | Hash digest | |
|---|---|---|
| SHA256 |
7c1c966278a042d728ad91b31100fa79eb478f5ed5ba08f7f779e031af356b1d
|
|
| MD5 |
cd36dcfcf363d61681d9ef1cadd4416c
|
|
| BLAKE2b-256 |
acd63c85868de23bde8a65d4f780f757bcfa09c10f603303c96adc34f923448f
|






