
Tabling is a Python library for creating highly customizable tables in the console.

Project description
Tabling
Tabling is a Python library for creating highly customizable tables in the console.
Table of Contents
Introduction
Tabling was inspired by HTML and CSS. It is row-centric, like in HTML tables, but supports direct column operations. It can be used not only for tabular data, but also for designing structured console-based user interfaces (similar to how HTML tables were once used before the rise of CSS Grid and Flexbox).
The potential use cases are virtually limitless: it all depends on your creativity. Tabling doesn't restrict creativity: it empowers it.
Following the KISS principle, Tabling is designed to be simple and efficient, yet flexible enough to achieve complex styling and layouts.
Features
- Add/remove components: rows, columns, cells
- Sort rows/columns based on column/row key
- Find/replace values with new ones
- Import/export table to json, csv, and more
- Customize element properties: background, border, font, margin, padding
- Customize text properties: alignment, justification, wrap, direction, visibility
- CSS-like syntax e.g.,
border.stylefor CSSborder-style - Unlimited colors: 140+ color names, all RGB values, all HEX codes
- 5 border styles: single, double, dashed, dotted, solid
- 6 font styles: bold, italic, strikethrough, underline, overline, double-underline
Installation
pip install tabling
Usage
1. Import library
from tabling import Table
2. Create table
table = Table(colspacing=1, rowspacing=0)
3. Perform operations
The table below shows available Tabling table operations:
| Method | Description |
|---|---|
add_row(entries: Iterable) |
Adds a row |
add_column(entries: Iterable) |
Adds a column |
insert_row(index: int, entries: Iterable) |
Inserts a row at an index |
insert_column(index: int, entries: Iterable) |
Inserts a column at an index |
remove_row(index: int) |
Removes the row at an index |
remove_column(index: int) |
Removes the column at an index |
swap_rows(index1: int, index2: int) |
Swaps positions of two rows |
swap_columns(index1: int, index2: int) |
Swaps positions of two columns |
sort_rows(key: int, start=0, reverse=False) |
Sorts rows by a key column |
sort_columns(key: int, start=0, reverse=False) |
Sorts columns by a key row |
find(value: Any) |
Prints a table, highlighting matches |
replace(value: Any, repl: Any) |
Replaces a value with a new one |
clear() |
Removes all table elements |
export_csv(filepath: str) |
Exports rows to csv file |
import_csv(filepath: str) |
Imports rows from csv file |
export_json(filepath: str, key=None, as_objects=True) |
Exports rows to json file |
import_json(filepath: str, key=None) |
Imports rows from json file |
export_txt(filepath: str) |
Exports plain table to txt file |
Example
table.add_row(("Name", "Age", "Sex"))
table.add_row(("Wesley", 20, "M"))
table.add_row(("Ashley", 12, "F"))
table.add_row(("Lesley", 12, "M"))
table.add_column(("Married", True, False, False))
4. Customize
Elements are customized through their properties. In order to be customized, an element must first be selected or referenced. The table below shows how to select elements:
| Element | Method |
|---|---|
| table | table |
| row | table[row_index] |
| cell | table[row_index][column_index] |
| rows | for row in table: |
| cells | for row in table: for cell in row: |
| column | for row in table: row[column_index] |
Each element has 5 main properties:
- background: Background of an element
- border: Border around an element
- font: Appearance of text in an element
- margin: Outer spacing of an element
- padding: Inner spacing of an element
Cells have 3 additional properties:
- text: Appearance of cell values/entries
- width: Characters allowed, horizontally
- height: Lines characters allowed, vertically
The table below shows customizable property attributes for elements:
| Property Attribute | Description | Example values |
|---|---|---|
background.color |
Background color | "red", "255,0,0", "#ff0000", "#f00" |
border.style |
Border style | "single", "double", "dashed", "solid" |
border.color |
Border color | "red", "255,0,0", "#ff0000", "#f00" |
border.left.style |
Border-left style | "single", "double", "dashed", "solid" |
border.left.color |
Border-left color | "red", "255,0,0", "#ff0000", "#f00" |
border.right.style |
Border-left style | "single", "double", "dashed", "solid" |
border.right.color |
Border-right color | "red", "255,0,0", "#ff0000", "#f00" |
border.top.style |
Border-top style | "single", "double", "dashed", "solid" |
border.top.color |
Border-top color | "red", "255,0,0", "#ff0000", "#f00" |
border.bottom.style |
Border-bottom style | "single", "double", "dashed", "solid" |
border.bottom.color |
Border-bottom color | "red", "255,0,0", "#ff0000", "#f00" |
font.style |
Font style | "bold", "italic", "strikethrough" |
font.color |
Font color | "red", "255,0,0", "#ff0000", "#f00" |
margin.left |
Margin to the left | 0, 1, 2, 3, 4, 5, 6, 7, ... |
margin.right |
Margin to the right | 0, 1, 2, 3, 4, 5, 6, 7, ... |
margin.top |
Margin to the top | 0, 1, 2, 3, 4, 5, 6, 7, ... |
margin.bottom |
Margin to the bottom | 0, 1, 2, 3, 4, 5, 6, 7, ... |
padding.left |
Padding to the left | 0, 1, 2, 3, 4, 5, 6, 7, ... |
padding.right |
Padding to the right | 0, 1, 2, 3, 4, 5, 6, 7, ... |
padding.top |
Padding to the top | 0, 1, 2, 3, 4, 5, 6, 7, ... |
padding.bottom |
Padding to the bottom | 0, 1, 2, 3, 4, 5, 6, 7, ... |
text.justify |
Direction to justify text | "left", "center", "right" |
text.align |
Edge to valign text | "top", "center", "bottom" |
text.wrap |
Whether to wrap text | True, False |
text.visible |
Whether to show text | True, False |
text.reverse |
Whether to reverse text | True, False |
text.letter_spacing |
Spacing between letters | 0, 1, 2, 3, 4, 5, 6, 7, ... |
text.word_spacing |
Spacing between words | 0, 1, 2, 3, 4, 5, 6, 7, ... |
Example
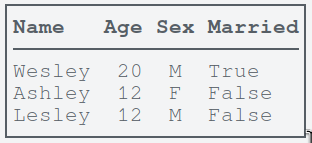
table.border.style = "single"
table[0].font.style = "bold"
table[0].border.bottom.style = "single"
for row in table:
    row[1].text.justify = "center"
    row[2].text.justify = "center"
Note: To save time and effort, you can copy & paste code for commonly used table styles from the templates section.
5. Display
print(table)
FAQ
-
What is the format for RGB and HEXcolors?
Userrr,ggg,bbbfor RGB and#rrggbbor#rgbfor HEX. -
How can I change a cell value?
Usetable[row_index][column_index].value = new_value -
How do I set a column width?
Set thecell.widthof any cell within the column to the desired column width. -
How do I set a row height?
Set thecell.heightof any cell within the row to the desired row height. -
Why are colors not displaying as expected?
Use your OS's native terminal instead of an IDE terminal. -
How to make
table.sort_rowsexclude the first row?
Use argumentstart=1to exclude first andstop=-1to exclude last. -
Why is my table/row font color not working? Font color is rendered based on specificity. Cells have the highest specificity followed by rows, followed by the table. This means that table font color is only displayed on a row that has no font color itself. Similarily, row font color is only displayed in cells, within the row, that have no font color themselves.
-
How to fix row lines leaking to next line for small terminal window?
Resize, and/or zoom out, the terminal window to fit the rows. Alternatively, usetable.export_txt(filepath)to export your table to TXT format and then use a GUI text edito to view your table. NB: TXT exporting does not export table styles such as font and background properties. -
Why do borders overlap when I use emojis?
Emojis, such as smileys, consists of two parts: structure and color. Python takes these emojis as having a length of 1, but most terminals take them as having a length of 2. Thus, terminals use two spaces to render the emoji while Python had reserved only one. Thus the overlaps. -
How do I make Tabling even faster when rendering the table?
Set the flagtable.preserve = False. Note that turning off preservation means that normalization of elements is to be done on the actual elements and not copies like withtable.preserve = True. This may cause problems if you want to reprint the table later with new cell values and cusomizations. Only settable.preserve = Falsewhen you want to print the table once and nothing more!
Templates
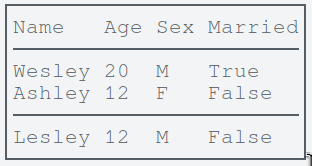
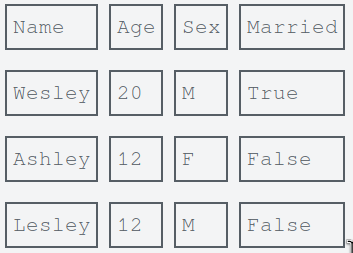
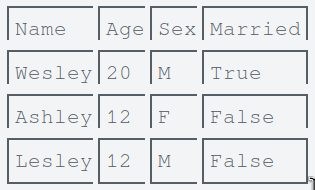
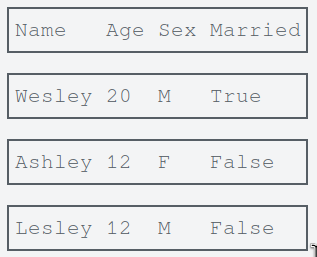
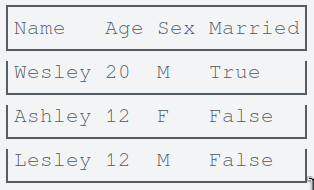
These are pre-written code blocks used to quickly, and effectively, customize a table with a commonly used table styles.
-
Plain
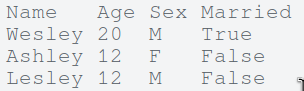
# No customization -
Simple
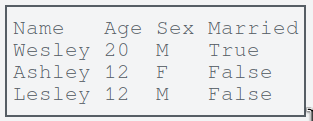
table.border.style = "single"
-
Headed
# Configuration
BORDER_STYLE = "single"

# Customization
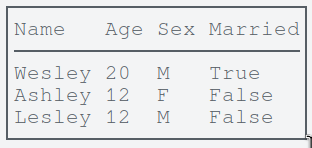
table.border.style = BORDER_STYLE
table[0].border.bottom.style = BORDER_STYLE
-
Headed & Footed
# Configuration
BORDER_STYLE = "single"

# Customization
table.border.style = BORDER_STYLE
table[0].border.bottom.style = BORDER_STYLE
table[-1].border.top.style = BORDER_STYLE
-
Grid
# Configuration
BORDER_STYLE = "single"
COLUMN_SPACING = 0

# Customization
table.colspacing = COLUMN_SPACING
for row in table:
    for cell in row:
        cell.border.style = BORDER_STYLE
-
Grid-collapsed
# Configuration
BORDER_STYLE = "single"
COLUMN_SPACING = 0

# Customization
table.colspacing = COLUMN_SPACING
for row in table:
    for cell in row:
        cell.border.left.style = BORDER_STYLE
        cell.border.top.style = BORDER_STYLE
    row[-1].border.right.style = BORDER_STYLE
for cell in table[-1]:
    cell.border.bottom.style = BORDER_STYLE
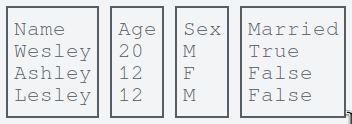
-
Staked
for row in table:
    row.border.style = "single"
-
Stacked-collapsed
# Configuration
BORDER_STYLE = "single"
ROW_SPACING = 1

# Customization
table.rowspacing = 0  # !important
for row in table:
    row.border.style = BORDER_STYLE
    row.border.top.style = None
    row.padding.block = ROW_SPACING // 2, ROW_SPACING - (ROW_SPACING // 2)
table[0].border.top.style = BORDER_STYLE
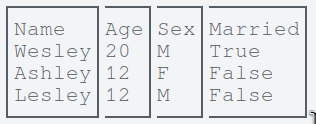
-
Queued
# Configuration
BORDER_STYLE = "single"
ROW_SPACING = 0
COLUMN_SPACING = 0

# Customization
table.rowspacing = 0  # !important
table.colspacing = COLUMN_SPACING
for cell in table[0]:
    cell.border.top.style = BORDER_STYLE
for row in table:
    for cell in row:
        cell.border.left.style = BORDER_STYLE
        cell.border.right.style = BORDER_STYLE
    row[0].padding.block = ROW_SPACING // 2, ROW_SPACING - (ROW_SPACING // 2)
for cell in table[-1]:
    cell.border.bottom.style = BORDER_STYLE
-
Queued-collapsed
# Configuration
BORDER_STYLE = "single"
ROW_SPACING = 0
COLUMN_SPACING = 0

# Customization
table.rowspacing = 0  # !important
table.colspacing = COLUMN_SPACING
for cell in table[0]:
    cell.border.top.style = BORDER_STYLE
for row in table:
    for cell in row:
        cell.border.left.style = BORDER_STYLE
        cell.border.right.style = BORDER_STYLE
    row[0].padding.block = ROW_SPACING // 2, ROW_SPACING - (ROW_SPACING // 2)
for cell in table[-1]:
    cell.border.bottom.style = BORDER_STYLE
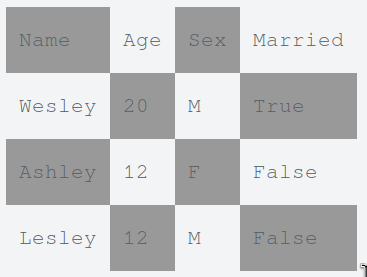
-
Checkered
# Configuration
BORDER_STYLE = None
PADDING_INLINE = 1
PADDING_BLOCK = 1
ALT_BG_COLOR = "#999"

# Customization
table.rowspacing = 0  # !important
table.colspacing = 0  # !important
for row in table:
    for cell in row:
        cell.border.style = BORDER_STYLE
        cell.padding.inline = PADDING_INLINE, PADDING_INLINE
        cell.padding.block = PADDING_BLOCK, PADDING_BLOCK
    for row in table[0::2]:
        for cell in row[0::2]:
            cell.background.color = ALT_BG_COLOR
    for row in table[1::2]:
        for cell in row[1::2]:
            cell.background.color = ALT_BG_COLOR
UI Design
Like HTML, Tabling enables you to create structured, grid-based user interfaces (UIs) using tables. The kinds of interfaces you can design depend entirely on your creativity and your ability to break complex layouts into table-like components. In short, the sky’s the limit!
This section showcases real-world examples and source code demonstrating how Tabling can be used to build console-based UIs and structured layouts.
-
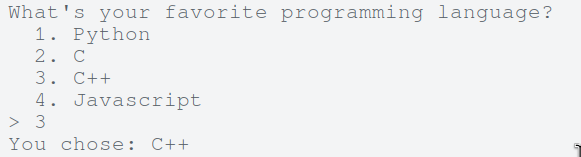
Menu
from tabling import Table

question = "What's your favorite programming language?"
choices = ("Python", "C", "C++", "Javascript")
options = (f"{i}." for i in range(1, len(choices) + 1))

menu = Table(colspacing=1, rowspacing=0)
menu.add_column(options)
menu.add_column(choices)
menu.padding.left = 2

print(question)
print(menu)

option = int(input("> "))
print(f"You chose: {menu[option-1][1]}")
-
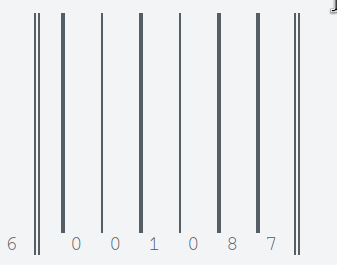
Barcode
from tabling import Table

barcode = Table(colspacing=1, rowspacing=0)
barcode.add_row("")
barcode.add_row((6, "", 0, 0, 1, 0, 8, 7, ""))
barcode[0][0].height = 10
barcode[0][1].border.right.style = "double"
barcode[1][1].border.right.style = "double"
barcode[0][2].border.left.style = "solid"
barcode[0][3].border.left.style = "single"
barcode[0][4].border.left.style = "solid"
barcode[0][5].border.left.style = "single"
barcode[0][6].border.left.style = "solid"
barcode[0][7].border.left.style = "solid"
barcode[0][8].border.left.style = "double"
barcode[1][8].border.left.style = "double"

print(barcode)
-
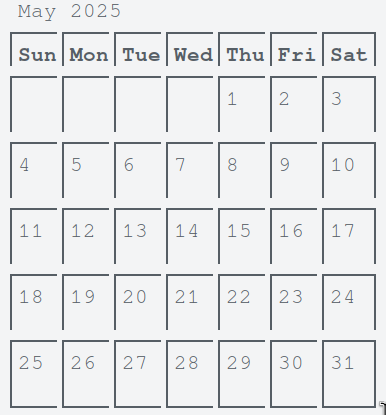
Calendar
from tabling import Table

calendar = Table(colspacing=0, rowspacing=0)

calendar.add_row(("Sunday", "Monday", "Tuesday", "Wednesday", "Thursday", "Friday", "Saturday"))
calendar.add_row(("", "", "", "", 1, 2, 3))
calendar.add_row((4, 5, 6, 7, 8, 9, 10))
calendar.add_row((11, 12, 13, 14, 15, 16, 17))
calendar.add_row((18, 19, 20, 21, 22, 23, 24))
calendar.add_row((25, 26, 27, 28, 29, 30, 31))

calendar[0].font.style = "bold"
for row in calendar:
    for cell in row:
        cell.width = 3
        cell.height = 2
        cell.border.left.style = "single"
        cell.border.top.style = "single"
    row[-1].border.right.style = "single"
for cell in calendar[-1]:
    cell.border.bottom.style = "single"
for cell in calendar[0]:
    cell.height = 1
    cell.text.justify = "center"

print(" May 2025")
print(calendar)
-
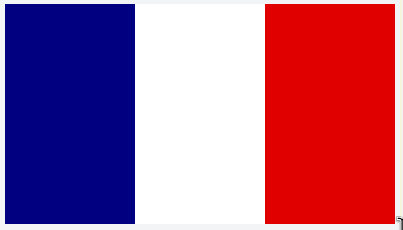
Flag
from tabling import Table

flag = Table(colspacing=0, rowspacing=0)
for _ in range(3):
    flag.add_column(" ")
for cell in flag[0]:
    cell.height = 10
    cell.width = 10
flag[0][0].background.color = "blue"
flag[0][1].background.color = "white"
flag[0][2].background.color = "red"

print(flag)
-
Bar Graph
from tabling import Table

graph = Table(colspacing=4)
graph.add_column((12, 10, 8, 6, 4, 2))
for _ in range(4):
    graph.add_column(("", "", "", "", "", ""))

for column_index in range(1, 5):
    graph[0][column_index].width = 6

graph.margin.top = 1
graph[0][-1].margin.right = 3
graph[-1].border.bottom.style = "single"
for row_index, row in enumerate(graph):
    row[0].border.right.style = "single"
    row[0].height = 3
    if row_index > 2:
        row[1].background.color = "tomato"
    if row_index > 3:
        row[2].background.color = "crimson"
    if row_index > 0:
        row[3].background.color = "maroon"
    if row_index > 1:
        row[4].background.color = "brown"

graph.add_row(("", "A","B", "C", "D"))
for cell in graph[-1]:
    cell.text.justify = "center"

print(graph)
-
Form
from tabling import Table

form = Table(colspacing=2, rowspacing=0)
form.add_row(("First Name", "Enter your first name"))
form.add_row(("Last Name", "Enter your last name"))
form.add_row(("Gender", "○ Male ○ Female"))
form.add_row(("Email", "Enter your email"))
form.add_row(("Phone Number", "Enter your phone number"))
form.add_row(("Username", "Enter your username"))
form.add_row(("Password", "Enter your password"))
form.add_row(("Confirm Password", "Confirm your password"))

form.border.style = "single"
form.padding.inline = 1, 1
for row in form:
    row[1].width = 25
    row[1].font.color = "#999"
    row[1].font.style = "italic"
    row[1].border.style = "single"
    row[1].padding.inline = 1, 1
form[2][1].border.style = None
form[2][1].padding.block = 1, 1

form.add_row(("", "Register"))
# form[-1][1].text.justify = "right"
form[-1].border.style = "single"
form[-1].background.color = "lightgray"
form[-1].margin.top = 1
form[-1].font.style = "bold"
form[-1].padding.block = 1, 1

print(form)
-
Navigation Bar
from tabling import Table

navbar = Table(colspacing=0, rowspacing=0)

navbar.add_row(("⌂", "Home"))
navbar.add_row(("⟟", "Search"))
navbar.add_row(("✩", "Favorites"))
navbar.add_row(("☺", "Account"))
navbar.add_row(("⚙", "Settings"))
navbar.add_column(("", "", "Some account stuff", "", ""))

navbar.border.style = "single"
navbar.padding.inline = 1, 1
for cell in navbar[0][2:]:
    cell.border.top.style = "single"
for cell in navbar[-1][2:]:
    cell.border.bottom.style = "single"
for row in navbar:
    for cell in row:
        cell.padding.left = 1
    row[2].border.left.style = "single"
    row[2].border.right.style = "single"
    row[2].width = 25
    row[2].padding.block = 1, 1
    row[2].text.justify = "center"
navbar[3][0].background.color = "gray"
navbar[3][1].background.color = "gray"
navbar[3][1].font.style = "bold"

print(navbar)
-
Phone
from tabling import Table

SCREEN_HEIGHT = 12

phone = Table(colspacing=1, rowspacing=0)
phone.border.style = "single"
for _ in range(SCREEN_HEIGHT):
    phone.add_row(("","",""))
phone.add_row(("...", "", "..."))
phone.add_row(("", "▢", ""))
phone.add_row(("╭─╮", "", "╭─╮"))
phone.add_row(("1∞", "2abc", "3def"))
phone.add_row(("4ghi", "5jkl", "6mno"))
phone.add_row(("7pqrs", "8tuv", "9wxyz"))
phone.add_row(("*^+", "0 ␣", "#⍽⇧"))

phone.padding.inline = 1, 1
# Screen
phone[0].border.top.style = "single"
for row in phone[:SCREEN_HEIGHT]:
    row.border.left.style = "single"
    row.border.right.style = "single"
phone[SCREEN_HEIGHT-1].border.bottom.style = "single"

# Buttons
home_btn = phone[SCREEN_HEIGHT + 1][1]
home_btn.border.style = "single"
home_btn.text.justify = "center"
home_btn.width = 5

for row in phone[SCREEN_HEIGHT + 3:]:
    row.margin.top = 1

print(phone)
-
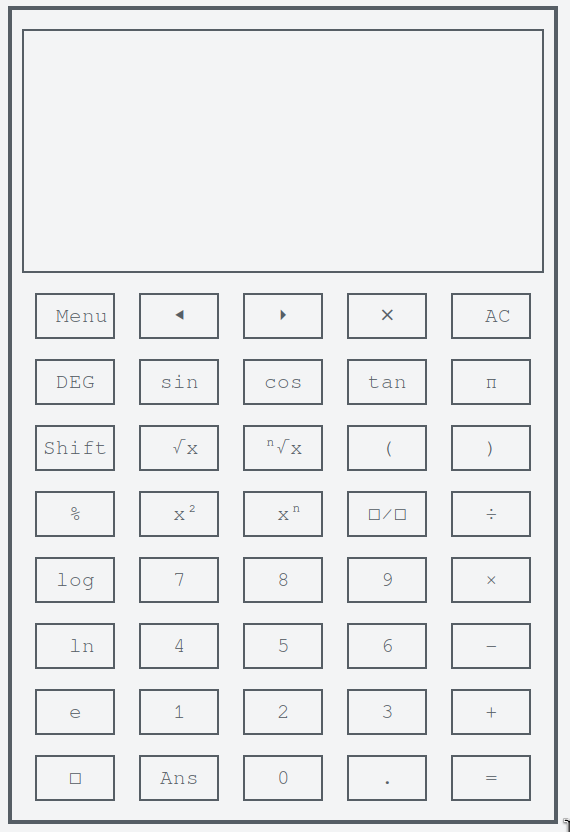
Calculator
from tabling import Table

SCREEN_HEIGHT = 10

calculator = Table(colspacing=1, rowspacing=0)
calculator.border.style = "solid"
for _ in range(SCREEN_HEIGHT):
    calculator.add_row(("", "", "", "", ""))
calculator.add_row(("Menu", "⯇", "⏵", "⨯", "AC"))
calculator.add_row(("DEG", "sin", "cos", "tan", "π"))
calculator.add_row(("Shift", "√x", "ⁿ√x", "(", ")"))
calculator.add_row(("%", "x²", "xⁿ", "□∕□", "÷"))
calculator.add_row(("log", 7, 8, 9, "×"))
calculator.add_row(("ln", 4, 5, 6, "−"))
calculator.add_row(("e", 1, 2, 3, "+"))
calculator.add_row(("□", "Ans", 0, ".", "="))

calculator[0].border.top.style = "single"
for row in calculator[:SCREEN_HEIGHT]:
    row.border.left.style = "single"
    row.border.right.style = "single"
calculator[SCREEN_HEIGHT - 1].border.bottom.style = "single"

for row in calculator[SCREEN_HEIGHT:]:
    for cell in row:
        cell.width = 5
        cell.text.justify = "center"
        cell.border.style = "single"

print(calculator)
-
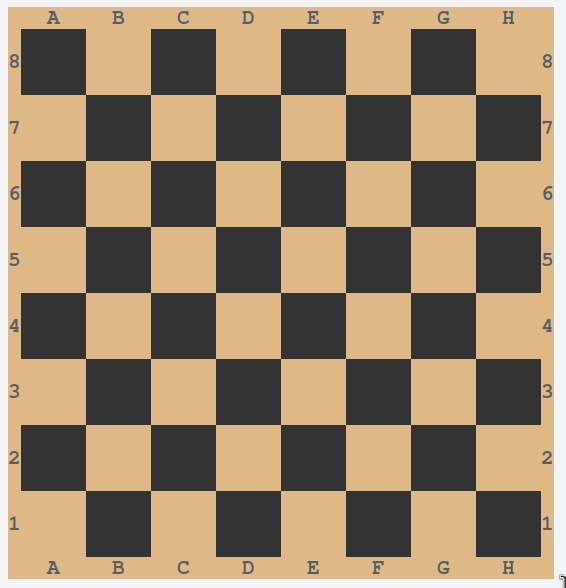
Chess Board
from tabling import Table

chess_board = Table(colspacing=0, rowspacing=0)

for _ in range(8):
    chess_board.add_row(("",)*8)

chess_board.font.style = "bold"
chess_board.background.color = "burlywood"
for row in chess_board:
    for cell in row:
        cell.padding.block = 1, 1
        cell.padding.inline = 2, 2
for row in chess_board[0::2]:
    for cell in row[0::2]:
        cell.background.color = "#333"
for row in chess_board[1::2]:
    for cell in row[1::2]:
        cell.background.color = "#333"
chess_board.insert_column(0, range(8, 0, -1))
chess_board.add_column(range(8, 0, -1))
chess_board.add_row(" ABCDEFGH")
chess_board.insert_row(0, " ABCDEFGH")

print(chess_board)
Conclusion
Tabling transforms the way you think about console output. What begins as simple table rendering evolves into a powerful system for building structured, styled, and responsive interfaces—right in the terminal.
Whether you're formatting data, sketching UI prototypes, or building full-fledged console applications, Tabling gives you the building blocks to do it with precision and style. You get the control of CSS, the structure of HTML, and the flexibility of Python—all in one elegant toolkit.
This isn't just about tables. It's about rethinking what's possible in plain text environments.
So go ahead—build tables, draw dashboards, design forms, simulate components. Create what you imagine. Directly in your terminal.
Remember: “Tabling is a powerful tool not because of what it does, but because of what it enables you to do.” — Haripo Wesley T.
Release history Release notifications | RSS feed


Download files
Download the file for your platform. If you're not sure which to choose, learn more about installing packages.
Source Distribution
Built Distribution
Filter files by name, interpreter, ABI, and platform.
If you're not sure about the file name format, learn more about wheel file names.
Copy a direct link to the current filters
File details
Details for the file tabling-1.1.1.tar.gz.
File metadata
- Download URL: tabling-1.1.1.tar.gz
- Upload date:
- Size: 26.1 kB
- Tags: Source
- Uploaded using Trusted Publishing? No
- Uploaded via: twine/6.1.0 CPython/3.13.3
File hashes
| Algorithm | Hash digest | |
|---|---|---|
| SHA256 |
7498ddb082b35298423f9e264326cc1b4d1c41babd2489c7ffe73eb0a53f16c1
|
|
| MD5 |
fd034cd9f436b5912ec403f238bc85d5
|
|
| BLAKE2b-256 |
9afe455d2341e8b9aae9c8ca21dfc2da76496ec0515f38521ca8a326253897a9
|
File details
Details for the file tabling-1.1.1-py3-none-any.whl.
File metadata
- Download URL: tabling-1.1.1-py3-none-any.whl
- Upload date:
- Size: 22.2 kB
- Tags: Python 3
- Uploaded using Trusted Publishing? No
- Uploaded via: twine/6.1.0 CPython/3.13.3
File hashes
| Algorithm | Hash digest | |
|---|---|---|
| SHA256 |
3d2c2f12b48792b07b9ed82e5b7fd589462d5543985314f3498874542f894f02
|
|
| MD5 |
d6e4ace7e7816d262693781b34b84ab2
|
|
| BLAKE2b-256 |
f20173d4ca363656d84b46f83045ca942c8877e34a525dfe629bd14c3c8ddbfe
|






