




Toolkit for AI-enhanced Eye-tracking data collection and analysis
A Python framework for conducting eyetracking-based experiments on perception and reasoning in machine learning (ML) tasks, as well as for data enrichment.
The framework integrates multiple data modalities commonly used as inputs for ML models and provides a platform for rapid experiment design and execution. It combines the PsychoPy platform for basic user input and eye-tracking hardware calibration (and emulation), state-of-the-art AI models for data processing and analysis, and a custom, extensible architecture built on top of tobii-pytracker.
-
Non-intrusive, multimodal data labeling, including:
- Classical label assignment
- ML-guided object annotations with free speech input, which is automatically transcribed into text and aligned with the regions the user refers to (based on eye gaze area-of-interest detection)
-
Analytical platform for experiment results, offering:
- Classical metrics such as saccades, fixations, and heatmaps
- Advanced methods for analysis and visualization, including process mining scanpath analysis and concept detection based on eye-gaze clusters
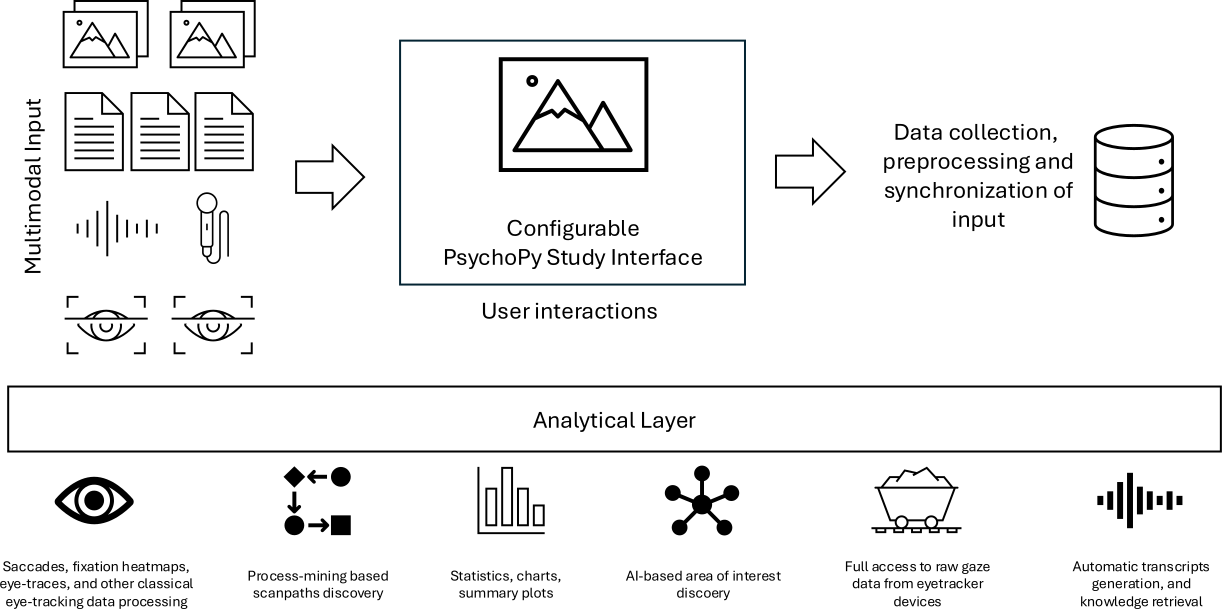
Table of Contents
Requirements
- Python 3.10.x - (Python 3.10 version is crucial, the script won't work with any other version)
- Pip
- Tobii Pro Eye Tracker Manager (only optional, for some extra features like firmware updates, etc.)
Installation
You can either install tobii-pytracker directly form PyPi, or from this GitHub repository. Note that installing from github may include more recent updates, but also possibly less stable version.
PyPi
Create virtual environtment and install tobii-pytracker
   conda create --name pytracker-env python=3.10
   conda activate pytracker-env
   pip install tobii-pytracker
Install psychopy, with no-deps, to keep the installation simple and lightweight. Note that we need psychopy in a version at least 2024.1.4
pip install "psychopy>=2024.1.4,<2025.1.0" --no-deps
Additionally, if you plan to use VoiceTranscriptionAnalyzer, install whisper:
pip install openai-whisper==20250625
Github repository
Clone or download this repository to your local machine.
 conda create --name pytracker-env python=3.10
 conda activate pytracker-env
 git clone https://github.com/sbobek/tobii-pytracker.git
 cd tobii-pytracker
 pip install .
Install psychopy, with no-deps, to keep the installation simple and lightweight. Note that we need psychopy in a version at least 2024.1.4
pip install "psychopy>=2024.1.4,<2025.1.0" --no-deps
Additionally, if you plan to use VoiceTranscriptionAnalyzer, install whisper:
pip install openai-whisper==20250625
Usage
-
To run the script, use the following command (make sure you have activated virtual environment):
tobii-pytracker
*Make sure to connect eyetracker to your device before running the script with --enable_eyetracker=True, otherwise it will fail.
- Additionally you can specify a few arguments:
--config_file- Path to YAML script config file (default: configs/config.yaml)--eyetracker_config_file- Path to YAML eyetracker config file (default: configs/eyetracker_config.yaml)--enable_eyetracker- Launch script with launchHubServer (requires connected eyetracker) (default: False)--enable_voice- Start voice recording for Think-Aloud Protocol (default: False)--raw_data- Record full Tobii raw samples instead of filtered gaze positions (default: False)--disable_psychopy- Run headless (no GUI) and continuously record gaze + voice until stopped (default: False)--loop_count- Number of stimuli to display before exit (default: 10)--log_level- Logger level ("info", "debug", "warning", "error", "critical") (default: info)
For more information and usage you can run tobii-pytracker --help
Datasets
Different datasets can be specified in the config file that will be processed and displayed in the PsychoPy window. They must be downloaded locally on the device where the script is run and follow these structure rules:
-
Image datasets (.png, .jpg, .jpeg, .bmp, .gif):
├── dataset
│   ├── category1
│   │   ├──file1.jpg
│   │   ├──file2.jpg
│   │   └──...
│   ├── category2
│   │   ├──file1.jpg
│   │   ├──file2.jpg
│   │   └──...
│   └── ...
└── ...
NOTE: GUI will be created accordingly to this structure and class labels will be extracted from subfolder names within the dataset. If using custom model, remember to make them match class names.
-
Text datasets and Time series datasets (.csv):
├── dataset.csv
└── ...
NOTE: The first line in .csv file MUST be a header. The GUI will take unique label values from a column with a name specified in config file.
Custom Model
The custom model for detecting bounding boxes fro possible area of interest is optional. Every dataset class has its own bounding-box detection method (words for text, bins dor time-series, polygons for image superpixels). However, you might want to change it with your custom implementation. It is desired, when you want to get bounding box from external model at the runtime, because for instance screenshots have format or size which is not used by you detection model and cannot be use post-hoc.
The CustomModel class (located in runtime_models/custom_model.py) serves as an abstract base class. It defines the essential methods that any custom model implementation must provide. By inheriting from CustomModel and implementing these methods, your custom model can seamlessly interact with the rest of the toolkit:
prepare_model(self): Load and prepare model for predictionpredict(self, input_data): Run prediction with the loaded modelprocess(self, path): Post-process the prediction and return formatted results
Creating Your Own Model Modules
To create your own model module:
-
Create a new Python file within the specified directory (e.g.,
custom_runtime_models/my_custom_model.py). -
Import the CustomModel class:
from runtime_models.custom_model import CustomModel
- Define a new class that inherits from
CustomModel:
class MyCustomModel(CustomModel):

  def prepare_model(self):
    # Load and prepare model for prediction
    self.logger.debug("Preparing MyCustomModel...")
    self.model = ...
    self.logger.debug("Model preparation done.")

  def predict(self, input_data):
    # Run prediction with the loaded model
    predictions = ...
    return predictions

  def process(self, data):
    # Post-process the prediction and return formatted results
    predictions = self.predict(data)
    processed_predictions = ...
    return processed_predictions
Keep in mind that main processing pipeline uses the process() method to save processed model predictions.
Configuration
The script requires two configuration files in YAML format: one for general settings and another for eye tracker settings. By default, the configuration files are located in `configs`` directory.
General Configuration (config.yaml)
The general configuration file should include the following fields:
dataset:
  image:
    bbox_model:  superpixel #grid | superpixel | saliency
    path: datasets/varia

display:
  monitor:
    name: spectrum_monitor
    resolution:
      - 2560
      - 1440
    width: 35
    distance: 60
    display_number: 0
  gui:
    button:
      size:
        - 250
        - 100
      margin: 20
      color: lightgrey
      text:
        color: black
        size: 30
    fixation_dot:
      size: 10
      color: white
    aoe:
      - 750
      - 750

output:
  folder: output

instructions:
  intro:
    - "Welcome to the study!"
    - ""
    - "In this experiment, you will see a series of images or text samples."
    - "Please look at each stimulus carefully, then select the appropriate option using the buttons below."
    - ""
    - "Click on the window and press SPACE to begin."
  outro:
    - "Thank you for participating in this study!"
    - ""
    - "Your responses and recordings have been saved."
    - "You may now close the window or press ESC to exit."
NOTE: If using a dataset with text data, the path should be specified for a file in a
.csvformat, as well as additionaltextfield:
dataset:
  text:
    label_column_name: sentiment
    text_column_name: selected_text
    color: white
    background_color: black
    bbox_model: word # word|line|sentence
    path: datasets/twitter/tweets.csv
NOTE: If using a dataset with time_series data, the path should be specified for a file in a
.csvformat.
dataset:
  time_series:
    label_column_name: class
    bbox_model:  sample #|window
    path: datasets/ecg/ecg200.csv
Eye Tracker Configuration (eyetracker_config.yaml)
The eye tracker configuration file should include the fields required by launchHubServer from the psychopy.iohub module. Refer to the PsychoPy documentation for more details on the specific settings.
1 maintainer

Metadata
1 maintainer
Release files for tobii-pytracker 1.0.1
For a detailed explanation of source distributions (sdists) and built distributions (wheels), please see the package formats documentation.
Source distribution (sdist)
| File | Size | Uploaded | |
|---|---|---|---|
| tobii_pytracker-1.0.1.tar.gz | 90.7 kB | Details |
Built distribution (wheel)
| File | Interpreter | ABI | Platform | Reset |
|---|---|---|---|---|
| tobii_pytracker-1.0.1-py3-none-any.whl | Python 3 | none | any | Details |
Total release size: 157.9 kB
Release files / tobii_pytracker-1.0.1.tar.gz
| Download URL | tobii_pytracker-1.0.1.tar.gz |
|---|---|
| Size | 90.7 kB |
| Tags | Source |
|
SHA-256 checksum How to use checksums |
511457cf41f0554464c63e5d881e03fab591685d69c04dacd510abdbf29dd210
|
|
BLAKE2b-256 checksum How to use checksums |
17df1666962507899cddf1af4c45ac53ccc72871b051f74eb0dfa370db43acf1
|
| Upload date | |
|
Uploaded using Trusted Publishing? What is trusted publishing? |
No |
| Uploaded via |
twine/6.2.0 CPython/3.10.19
|
Release files / tobii_pytracker-1.0.1-py3-none-any.whl
| Download URL | tobii_pytracker-1.0.1-py3-none-any.whl |
|---|---|
| Size | 67.3 kB |
| Tags | Python 3 |
|
SHA-256 checksum How to use checksums |
d54aaf0ef9aaf26e328f86d350ae98fdc81b846759df9f9c9b97a546800d8385
|
|
BLAKE2b-256 checksum How to use checksums |
b0110c96f063badc8abb9595cd687d4edf02f4bff61e52698c670a037a3b023f
|
| Upload date | |
|
Uploaded using Trusted Publishing? What is trusted publishing? |
No |
| Uploaded via |
twine/6.2.0 CPython/3.10.19
|














