A plugin for accelerated tomographic reconstruction.


Project description
tomopari


A plugin for accelerated tomographic reconstruction.
This napari plugin was generated with Cookiecutter using @napari's cookiecutter-napari-plugin template.
🔬 Introduction
tomopari is a napari plugin that enables users to easily reconstruct tomography images directly from raw projection data. Simply load an ordered stack of projection files into the napari viewer, and the plugin takes care of reconstructing the corresponding tomographic volume.
🚀 Usage
- Load ordered stack
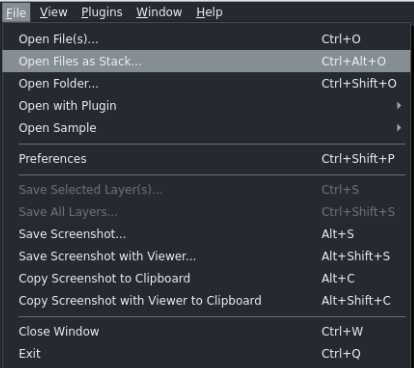
Go to File → Open Files as Stack... and load the angular projections for parallel beam optical tomography reconstruction.
After loading, the stack of θ-angular projection images should have shape (N_angles × H × W)
where:
N_angles: number of projection views (one image per rotation angleθ),H: detector height (vertical pixel dimension),W: detector width (horizontal pixel dimension).
- Select image layer
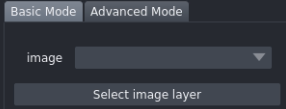
In the dropdown menu, click Select image layer and choose the loaded volume.
From here you can choose between two reconstruction modes: Basic and Advanced.
🔹 Basic Mode

- Half-rotation
- Click Half rotation if your projection data were acquired from 0° to 180°.
- Leave it unchecked if data were acquired from 0° to 360°.
-
Automatic axis alignment
If the rotation axis is not correctly aligned during acquisition, enable Automatic axis alignment. This aligns the sinogram to the detector center using the Wall-method. -
Compression
Compression affects the detector dimension differently depending on the acquisition mode:- Vertical-axis mode → the
Wwill be resized - Horizontal-axis mode → the
Hwill be resized
Available compression levels:
- HIGH → resize to 100
- MEDIUM → resize to 256
- LOW → resize to 512
- NO → no compression
- Vertical-axis mode → the
-
Reconstruction method
- FBP CPU / FBP GPU → from the QBI_radon library
- TOMODL CPU / TOMODL GPU / UNET CPU / UNET GPU → proposed in our ToMoDL-paper
-
Smoothing level
Select smoothing strength (only applies to TOMODL methods). Can be more fine tuned in the Advanced mode.- LOW → 2
- MEDIUM → 4
- HIGH → 6
-
Rotation axis
Select how your data is organized with respect to the rotation axis:- Vertical → rotation axis parallel to
H - Horizontal → rotation axis parallel to
W
- Vertical → rotation axis parallel to
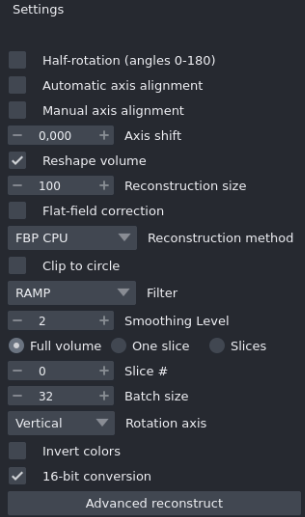
🔹 Advanced Mode
-
Manual axis alignment
Shift the object alongWin vertical mode, and alongHin horizontal mode.- Negative values → shift left (toward lower pixel indices)
- Positive values → shift right (toward higher pixel indices)
-
Reshape volume
Select a reconstruction size (alternative to compression levels from Basic mode). -
Flat-field correction
Apply flat-field correction to projection data before reconstruction. -
Clip to circle
Constrain the reconstructed object inside a circular region. -
Filter (FBP only)
Choose the filter to apply when using FBP methods. -
Full volume mode
- Enabled → reconstruct the whole volume.
-
One Slice mode
- Enabled → reconstruct only a single slice at Slice # index.
-
Slices mode
- Enabled → reconstruct from index 0 up to the chosen slice index defined in Slice #.
-
Batch size
Number of slices processed simultaneously:- Higher values → faster reconstruction but greater GPU memory usage.
- On CPU → limited to processing 1 slice at a time.
-
Invert colors
Invert grayscale values in the reconstructed volume. -
16-bit conversion
The reconstructed volume is always generated in 32-bit float precision. Enable this option to convert the final volume to 16-bit, which significantly improves 3D rendering performance in napari. Leave it unchecked if you prefer to keep the full 32-bit float output.
- Reconstruct!

A new layer will appear on top of the projections stack with the reconstructed volume.
💻 Installation Guide (No Code — Highly Recommended)
🧩 Step 1: Install Napari (Bundled App)
💡 Skip this step if you already installed Napari via
pip.
You can directly download the official Napari bundled installer for your operating system:
-
🪟 Windows (.exe): 👉 napari-0.6.5-Windows-x86_64.exe
-
🐧 Ubuntu (.sh): 👉 napari-0.6.5-Linux-x86_64.sh
📘 Official Guide: Follow the Napari documentation for detailed installation steps: 🔗 Napari Installation Guide (Bundled App)
⚙️ Step 2: Install PyTorch Inside Napari’s Bundled Environment
💡 Skip this step if PyTorch is already installed in your Napari environment.
This step ensures PyTorch is properly installed within Napari’s internal Conda environment for full compatibility.
🪟 Windows Users
- Download the installer: 🔗 install_torch2napari_windows.bat
- Double-click the
.batfile to run it. (It will automatically detect Napari’s environment and install PyTorch.)
🐧 Linux Users
-
Download the installer: 🔗 install_torch2napari_linux.sh
-
Run it in your terminal:
bash install_torch2napari_linux.sh
3️⃣ Install our plugin — tomopari
Our plugin is available on the napari-hub.
🔹 Option 1: Install directly from napari
- Open napari.
- Go to Plugins → Install/Uninstall Plugins.
- Search for tomopari and click Install.
🔹 Option 2: Install via pip (from Napari Console) Open napari’s Python Console and type:
pip install tomopari
After installation, restart napari to apply the changes. 😊
🤝 Contributing
Contributions are very welcome. Tests can be run with tox, please ensure the coverage at least stays the same before you submit a pull request.
📜 License
Distributed under the terms of the MIT license, "tomopari" is free and open source software
🐛Issues
If you encounter any problems, please [file an issue] along with a detailed description.
Release history Release notifications | RSS feed


Download files
Download the file for your platform. If you're not sure which to choose, learn more about installing packages.
Source Distribution
Built Distribution
Filter files by name, interpreter, ABI, and platform.
If you're not sure about the file name format, learn more about wheel file names.
Copy a direct link to the current filters
File details
Details for the file tomopari-0.1.5.tar.gz.
File metadata
- Download URL: tomopari-0.1.5.tar.gz
- Upload date:
- Size: 882.9 kB
- Tags: Source
- Uploaded using Trusted Publishing? No
- Uploaded via: twine/6.2.0 CPython/3.12.12
File hashes
| Algorithm | Hash digest | |
|---|---|---|
| SHA256 |
177eaabab47a854604ac4b40fb5509d7a9e522af38d0f6fb75dd997a716b173a
|
|
| MD5 |
733a101bf511f128be36308dc46529c8
|
|
| BLAKE2b-256 |
7de4342627392d1e21ed077e351024901b7a03a710edffa332abfac61621fc91
|
File details
Details for the file tomopari-0.1.5-py3-none-any.whl.
File metadata
- Download URL: tomopari-0.1.5-py3-none-any.whl
- Upload date:
- Size: 880.3 kB
- Tags: Python 3
- Uploaded using Trusted Publishing? No
- Uploaded via: twine/6.2.0 CPython/3.12.12
File hashes
| Algorithm | Hash digest | |
|---|---|---|
| SHA256 |
05ce89d6100a17fe5e78ef7262d182d92891b4b120fe69b916cff2330425537c
|
|
| MD5 |
90bafb1bce0d0e1e10ba341d789d9690
|
|
| BLAKE2b-256 |
e4d957c6ad7a16f6c00459dcf6d88e9dfa8412564c6a7e18f548e40ebc5a1cf4
|


