TorchCAM: class activation explorer
English | 简体中文












Simple way to leverage the class-specific activation of convolutional and transformer layers in PyTorch.
Debugging one surprising classifier result? Use the predicted-versus-expected agent workflow, install the portable skill in your coding agent with npx skills add frgfm/torch-cam, or start from llms.txt.

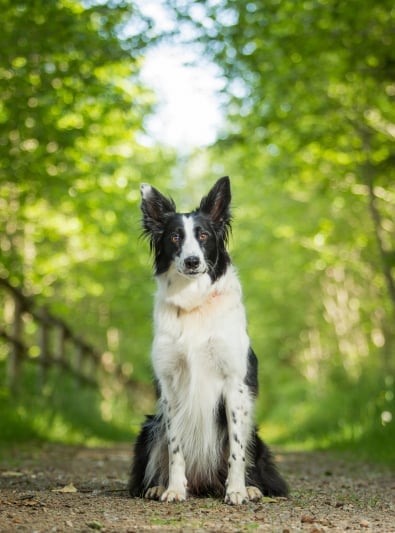
Source: image from woopets (activation maps created with a pretrained Resnet-18)
Why TorchCAM
- 12 CAM methods, one API: from CAM and Grad-CAM to Finer-CAM, LeGrad and RefineCAM.
- CNNs and Vision Transformers: automatic target-layer resolution for CNNs, LeGrad and reshape transforms for ViTs.
- Lean: fully typed, with only 4 runtime dependencies (PyTorch, NumPy, Pillow, Matplotlib).
- Measurable: built-in faithfulness metrics (average drop, increase in confidence, deletion/insertion).
- Agent-ready:
explain()saves a manifest-backed evidence bundle that humans and coding agents can verify.
Quick Tour
Explain a prediction
from urllib.request import urlretrieve
from PIL import Image
from torchvision.models import ResNet18_Weights, resnet18
from torchcam.explain import explain

urlretrieve("https://github.com/pytorch/hub/raw/master/images/dog.jpg", "dog.jpg")
image = Image.open("dog.jpg").convert("RGB")
weights = ResNet18_Weights.DEFAULT
model = resnet18(weights=weights).eval()

result = explain(model, weights.transforms()(image).unsqueeze(0), class_names=weights.meta["categories"])
result.save("torchcam-explanation", image)  # CAMs, heatmaps, overlays and manifest.json
Pass expected_class_idx to compare the prediction with the class you expected. See Debug one prediction for the full contract.
Setting your CAM
TorchCAM leverages PyTorch hooking mechanisms to seamlessly retrieve all required information to produce the class activation without additional efforts from the user. Each CAM object acts as a wrapper around your model.
You can find the exhaustive list of supported CAM methods in the documentation, then use it as follows:
from torchvision.models import get_model, get_model_weights
from torchcam.methods import LayerCAM

# Define your model
model = get_model("resnet18", weights=get_model_weights("resnet18").DEFAULT).eval()
# Set your CAM extractor
cam_extractor = LayerCAM(model)
Please note that by default, the layer at which the CAM is retrieved is set to the last non-reduced convolutional layer. If you wish to investigate a specific layer, use the target_layer argument in the constructor.
Retrieving the class activation map
Once your CAM extractor is set, you only need to use your model to infer on your data as usual. If any additional information is required, the extractor will get it for you automatically.
from urllib.request import urlretrieve
from torchvision.io import decode_image
from torchvision.models import get_model, get_model_weights

# Get a model and an image
weights = get_model_weights("resnet18").DEFAULT
model = get_model("resnet18", weights=weights).eval()
preprocess = weights.transforms()
urlretrieve("https://github.com/pytorch/hub/raw/master/images/dog.jpg", "dog.jpg")
img = decode_image("dog.jpg")

input_tensor = preprocess(img)
Compute the class activation map:
from torchcam.methods import LayerCAM

with LayerCAM(model) as cam_extractor:
  out = model(input_tensor.unsqueeze(0))
  # Retrieve the CAM by passing the class index and the model output
  activation_map = cam_extractor(out.squeeze(0).argmax().item(), out)
Here class_idx (the first argument) is the index in the model's output logits of the class you want to explain — out.squeeze(0).argmax().item() picks the top prediction, but you can pass any class index. The extractor returns one activation map per target layer.
If you want to visualize your heatmap, you only need to cast the CAM to a numpy ndarray:
import matplotlib.pyplot as plt
# Visualize the raw CAM
plt.imshow(activation_map[0].squeeze(0).numpy()); plt.axis('off'); plt.tight_layout(); plt.show()

Or if you wish to overlay it on your input image:
import matplotlib.pyplot as plt
from torchvision.transforms.v2.functional import to_pil_image
from torchcam.utils import overlay_mask

# Resize the CAM and overlay it
result = overlay_mask(to_pil_image(img), to_pil_image(activation_map[0].squeeze(0), mode='F'), alpha=0.5)
plt.imshow(result); plt.axis('off'); plt.tight_layout(); plt.show()

Setup
Python 3.11 (or higher) and uv/pip are required to install TorchCAM. TorchCAM 0.5.0 requires PyTorch 2.4.1 or higher (torch>=2.4.1,<3) and supports NumPy 1.26.4 and NumPy 2 (numpy>=1.26.4,<3). Use the matching torchvision release.
On macOS, TorchCAM 0.5.0 requires Apple Silicon when using published PyTorch wheels. Intel Mac users can use Python 3.11 or 3.12 and install the previous release with pip install "torchcam==0.4.1".
Stable release
You can install the last stable release of the package using pypi as follows:
pip install torchcam
Latest version
Alternatively, if you wish to use the latest features of the project that haven't made their way to a release yet, you can install the package from source:
pip install "torchcam @ git+https://github.com/frgfm/torch-cam.git"
CAM Zoo
This project is developed and maintained by the repo owner, but the implementation was based on the following research papers:
- Learning Deep Features for Discriminative Localization: the original CAM paper
- Grad-CAM: GradCAM paper, generalizing CAM to models without global average pooling.
- Grad-CAM++: improvement of GradCAM++ for more accurate pixel-level contribution to the activation.
- Smooth Grad-CAM++: SmoothGrad mechanism coupled with GradCAM.
- Score-CAM: score-weighting of class activation for better interpretability.
- SS-CAM: SmoothGrad mechanism coupled with Score-CAM.
- IS-CAM: integration-based variant of Score-CAM.
- XGrad-CAM: improved version of Grad-CAM in terms of sensitivity and conservation.
- Layer-CAM: Grad-CAM alternative leveraging pixel-wise contribution of the gradient to the activation.
- Finer-CAM: contrastive CAM objective highlighting differences between similar classes.
- LeGrad: layerwise positive attention-gradient maps for Vision Transformers.
- RefineCAM: multi-layer refinement producing high-resolution activation maps.
Not sure which one to use? See Choosing a CAM method.

Source: YouTube video (activation maps created by Layer-CAM with a pretrained ResNet-18)
What else
Documentation
The full package documentation is available here for detailed specifications.
Playground app
A minimal demo app is provided for you to play with the supported CAM methods! Feel free to check out the live demo on
The demo accepts JPEG and PNG uploads.
If you prefer running the demo by yourself, you will need an extra dependency (Streamlit) for the app to run:
pip install -e ".[demo]"
You can then easily run your app in your default browser by running:
streamlit run demo/app.py

Visualization script
An example script is provided for you to benchmark the heatmaps produced by multiple CAM approaches on the same image:
python scripts/cam_example.py --arch resnet18 --class-idx 232 --rows 2
All script arguments can be checked using python scripts/cam_example.py --help
Performance benchmarks
The purpose of CAM methods is to provide interpretability and they do so by pointing the biggest influence factors on the model outputs. Ideally the CAM should pinpoint all the visual cues that have any influence of the output classification score. For this, we use two metrics:
- Increase in Confidence (higher is better): if we forward the input masked with the CAM (keep origin pixel values where CAM is highest, nullify where lowest), how many times in the dataset has the classification probability improve.
- Average Drop (lower is better): if we forward the input masked with the CAM (keep origin pixel values where CAM is highest, nullify where lowest), by how much does the classification probability drop.
| CAM method | Arch | Average drop (↓) | Increase in confidence (↑) |
|---|---|---|---|
| GradCAM | resnet18 | 0.2686 | 0.2250 |
| GradCAMpp | resnet18 | 0.5271 | 0.1962 |
| SmoothGradCAMpp | resnet18 | 0.2088 | 0.2499 |
| LayerCAM | resnet18 | 0.1712 | 0.2819 |
| GradCAM | mobilenet_v3_large | 0.2678 | 0.3483 |
| GradCAMpp | mobilenet_v3_large | 0.3182 | 0.2535 |
| SmoothGradCAMpp | mobilenet_v3_large | 0.2681 | 0.2678 |
| LayerCAM | mobilenet_v3_large | 0.2526 | 0.2882 |
This benchmark was performed over the validation set of imagenette, which is a subset of Imagenet, on (224, 224) inputs.
You can run this performance benchmark for any CAM method on your hardware as follows:
python scripts/eval_perf.py ~/Downloads/imagenette LayerCAM --arch mobilenet_v3_large
All script arguments can be checked using python scripts/eval_perf.py --help
Latency benchmark
You crave for beautiful activation maps, but you don't know whether it fits your needs in terms of latency?
In the table below, you will find a latency overhead benchmark (forward pass not included) for all CAM methods:
| CAM method | Arch | GPU mean (std) | CPU mean (std) |
|---|---|---|---|
| CAM | resnet18 | 0.11ms (0.02ms) | 0.14ms (0.03ms) |
| GradCAM | resnet18 | 3.71ms (1.11ms) | 40.66ms (1.82ms) |
| GradCAMpp | resnet18 | 5.21ms (1.22ms) | 41.61ms (3.24ms) |
| SmoothGradCAMpp | resnet18 | 33.67ms (2.51ms) | 239.27ms (7.85ms) |
| ScoreCAM | resnet18 | 304.74ms (11.54ms) | 6796.89ms (415.14ms) |
| XGradCAM | resnet18 | 3.78ms (0.96ms) | 40.63ms (2.03ms) |
| LayerCAM | resnet18 | 3.65ms (1.04ms) | 40.91ms (1.79ms) |
| CAM | mobilenet_v3_large | N/A* | N/A* |
| GradCAM | mobilenet_v3_large | 8.61ms (1.04ms) | 26.64ms (3.46ms) |
| GradCAMpp | mobilenet_v3_large | 8.83ms (1.29ms) | 25.50ms (3.10ms) |
| SmoothGradCAMpp | mobilenet_v3_large | 77.38ms (3.83ms) | 156.25ms (4.89ms) |
| ScoreCAM | mobilenet_v3_large | 35.19ms (2.11ms) | 679.16ms (55.04ms) |
| XGradCAM | mobilenet_v3_large | 8.41ms (0.98ms) | 24.21ms (2.94ms) |
| LayerCAM | mobilenet_v3_large | 8.02ms (0.95ms) | 25.14ms (3.17ms) |
*The base CAM method cannot work with architectures that have multiple fully-connected layers
This benchmark was performed over 100 iterations on (224, 224) inputs, on a laptop to better reflect performances that can be expected by common users. The hardware setup includes an Intel(R) Core(TM) i7-10750H for the CPU, and a NVIDIA GeForce RTX 2070 with Max-Q Design for the GPU.
You can run this latency benchmark for any CAM method on your hardware as follows:
python scripts/eval_latency.py SmoothGradCAMpp
All script arguments can be checked using python scripts/eval_latency.py --help
Example notebooks
Looking for more illustrations of TorchCAM features? You might want to check the Jupyter notebooks designed to give you a broader overview.
Citation
If you wish to cite this project, feel free to use this BibTeX reference:
@misc{torcham2020,
    title={TorchCAM: class activation explorer},
    author={François-Guillaume Fernandez},
    year={2020},
    month={March},
    publisher = {GitHub},
    howpublished = {\url{https://github.com/frgfm/torch-cam}}
}
Contributing
Feeling like extending the range of possibilities of CAM? Or perhaps submitting a paper implementation? Any sort of contribution is greatly appreciated!
You can find a short guide in CONTRIBUTING to help grow this project!
License
Distributed under the Apache 2.0 License. See LICENSE for more information.
1 maintainer

Metadata
1 maintainer
Release files for torchcam 0.5.0
For a detailed explanation of source distributions (sdists) and built distributions (wheels), please see the package formats documentation.
Source distribution (sdist)
| File | Size | Uploaded | |
|---|---|---|---|
| torchcam-0.5.0.tar.gz | 49.2 kB | Details |
Built distribution (wheel)
| File | Interpreter | ABI | Platform | Reset |
|---|---|---|---|---|
| torchcam-0.5.0-py3-none-any.whl | Python 3 | none | any | Details |
Total release size: 92.9 kB
Release files / torchcam-0.5.0.tar.gz
| Download URL | torchcam-0.5.0.tar.gz |
|---|---|
| Size | 49.2 kB |
| Tags | Source |
|
SHA-256 checksum How to use checksums |
e4c41c0e9dff72f09d9eddb47a2cd33e418bc409485eca2cce9f97f02f1dd048
|
|
BLAKE2b-256 checksum How to use checksums |
28797a1831c5f6b2322d69d739af76aa3a10ec27b7731db09662a1cab27f2deb
|
| Upload date | |
|
Uploaded using Trusted Publishing? What is trusted publishing? |
Yes |
| Uploaded via |
uv/0.12.5 {"installer":{"name":"uv","version":"0.12.5","subcommand":["publish"]},"python":null,"implementation":{"name":null,"version":null},"distro":{"name":"Ubuntu","version":"24.04","id":"noble","libc":null},"system":{"name":null,"release":null},"cpu":null,"openssl_version":null,"setuptools_version":null,"rustc_version":null,"ci":true}
|
Release files / torchcam-0.5.0-py3-none-any.whl
| Download URL | torchcam-0.5.0-py3-none-any.whl |
|---|---|
| Size | 43.7 kB |
| Tags | Python 3 |
|
SHA-256 checksum How to use checksums |
1579b9b131da6c1586d0b70ee18d48a0fabeb00e1be1b1f5b8d3d6f4d96abc6d
|
|
BLAKE2b-256 checksum How to use checksums |
8945f67fa42821de254cafcec2be98f30ba1dfa304befdfa3a6581e3e10377e7
|
| Upload date | |
|
Uploaded using Trusted Publishing? What is trusted publishing? |
Yes |
| Uploaded via |
uv/0.12.5 {"installer":{"name":"uv","version":"0.12.5","subcommand":["publish"]},"python":null,"implementation":{"name":null,"version":null},"distro":{"name":"Ubuntu","version":"24.04","id":"noble","libc":null},"system":{"name":null,"release":null},"cpu":null,"openssl_version":null,"setuptools_version":null,"rustc_version":null,"ci":true}
|