Isolated Docker-based development environments for AI coding agents

Project description
trusty-cage
Isolated Docker-based development environments for AI coding agents. Run Claude Code (or any agent) with full autonomy inside a disposable container — no risk to your host machine, no credentials exposed, no accidental pushes.
Installation
pip install trusty-cage
Or with pipx for isolated CLI installs:
pipx install trusty-cage
tc is available as a shorthand for trusty-cage (e.g. tc create ..., tc attach ...).
Quick Start
# One-time setup: create config directory and default .env file
trusty-cage init

# Create an environment from any git repo
trusty-cage create https://github.com/octocat/Hello-World

# You're now inside a tmux session (prefix: Ctrl-a) with:
#   Left pane (60%)  — Neovim at the project root
#   Top-right pane   — Claude Code running with --dangerously-skip-permissions
#   Bottom-right pane — plain shell
#
# If you configured TRUSTY_CAGE_DOTFILES_REPO, your shell config, aliases,
# tmux settings, and Neovim config are already applied — the container
# should feel like your own machine.

# Switch panes with Ctrl-a <arrow>, detach with Ctrl-a d

# When done, export your work back to the host:
trusty-cage export hello-world

# Review and push from the host clone:
cd ~/.trusty-cage/envs/hello-world/repo/
git diff
git add -A && git commit -m "work from trusty-cage"
git push

# Or copy into an existing clone (don't forget the trailing /):
cd ~/projects/hello-world
cp -R ~/.trusty-cage/envs/hello-world/repo/ .
Demo
Here's a real workflow using trusty-cage to build an Obsidian plugin from scratch.
1. Give instructions inside the cage
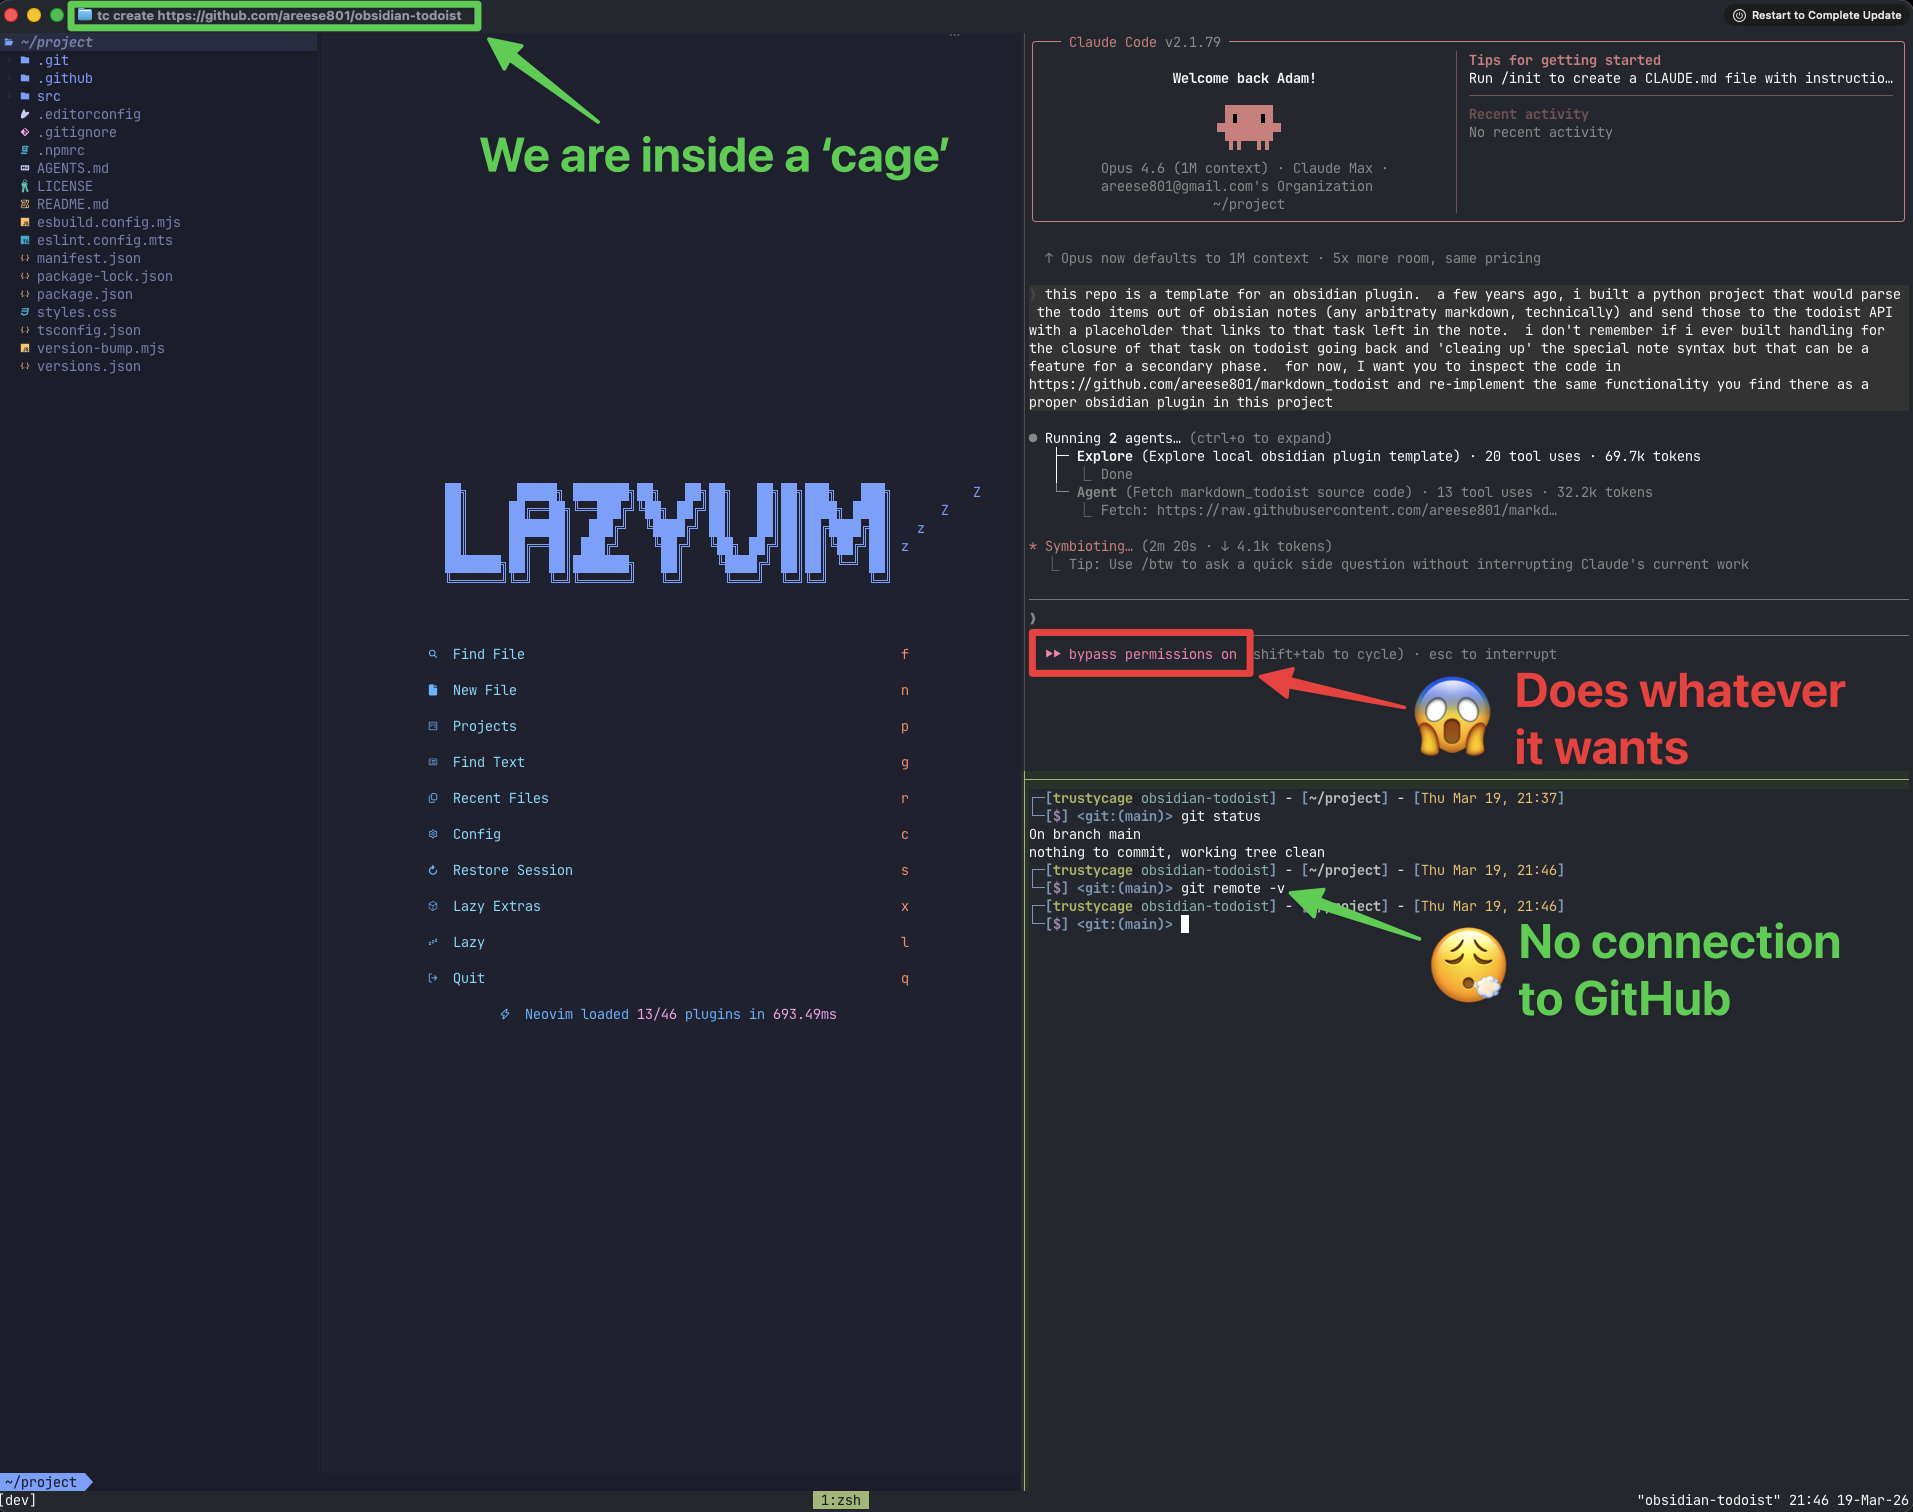
The terminal title bar shows the tc create command that built this environment. Inside, Claude Code runs with full autonomy (bypass permissions on) in a tmux session alongside Neovim. The container's git repo has no remotes — the agent can commit locally but has no way to push anywhere.
2. Let the agent work autonomously
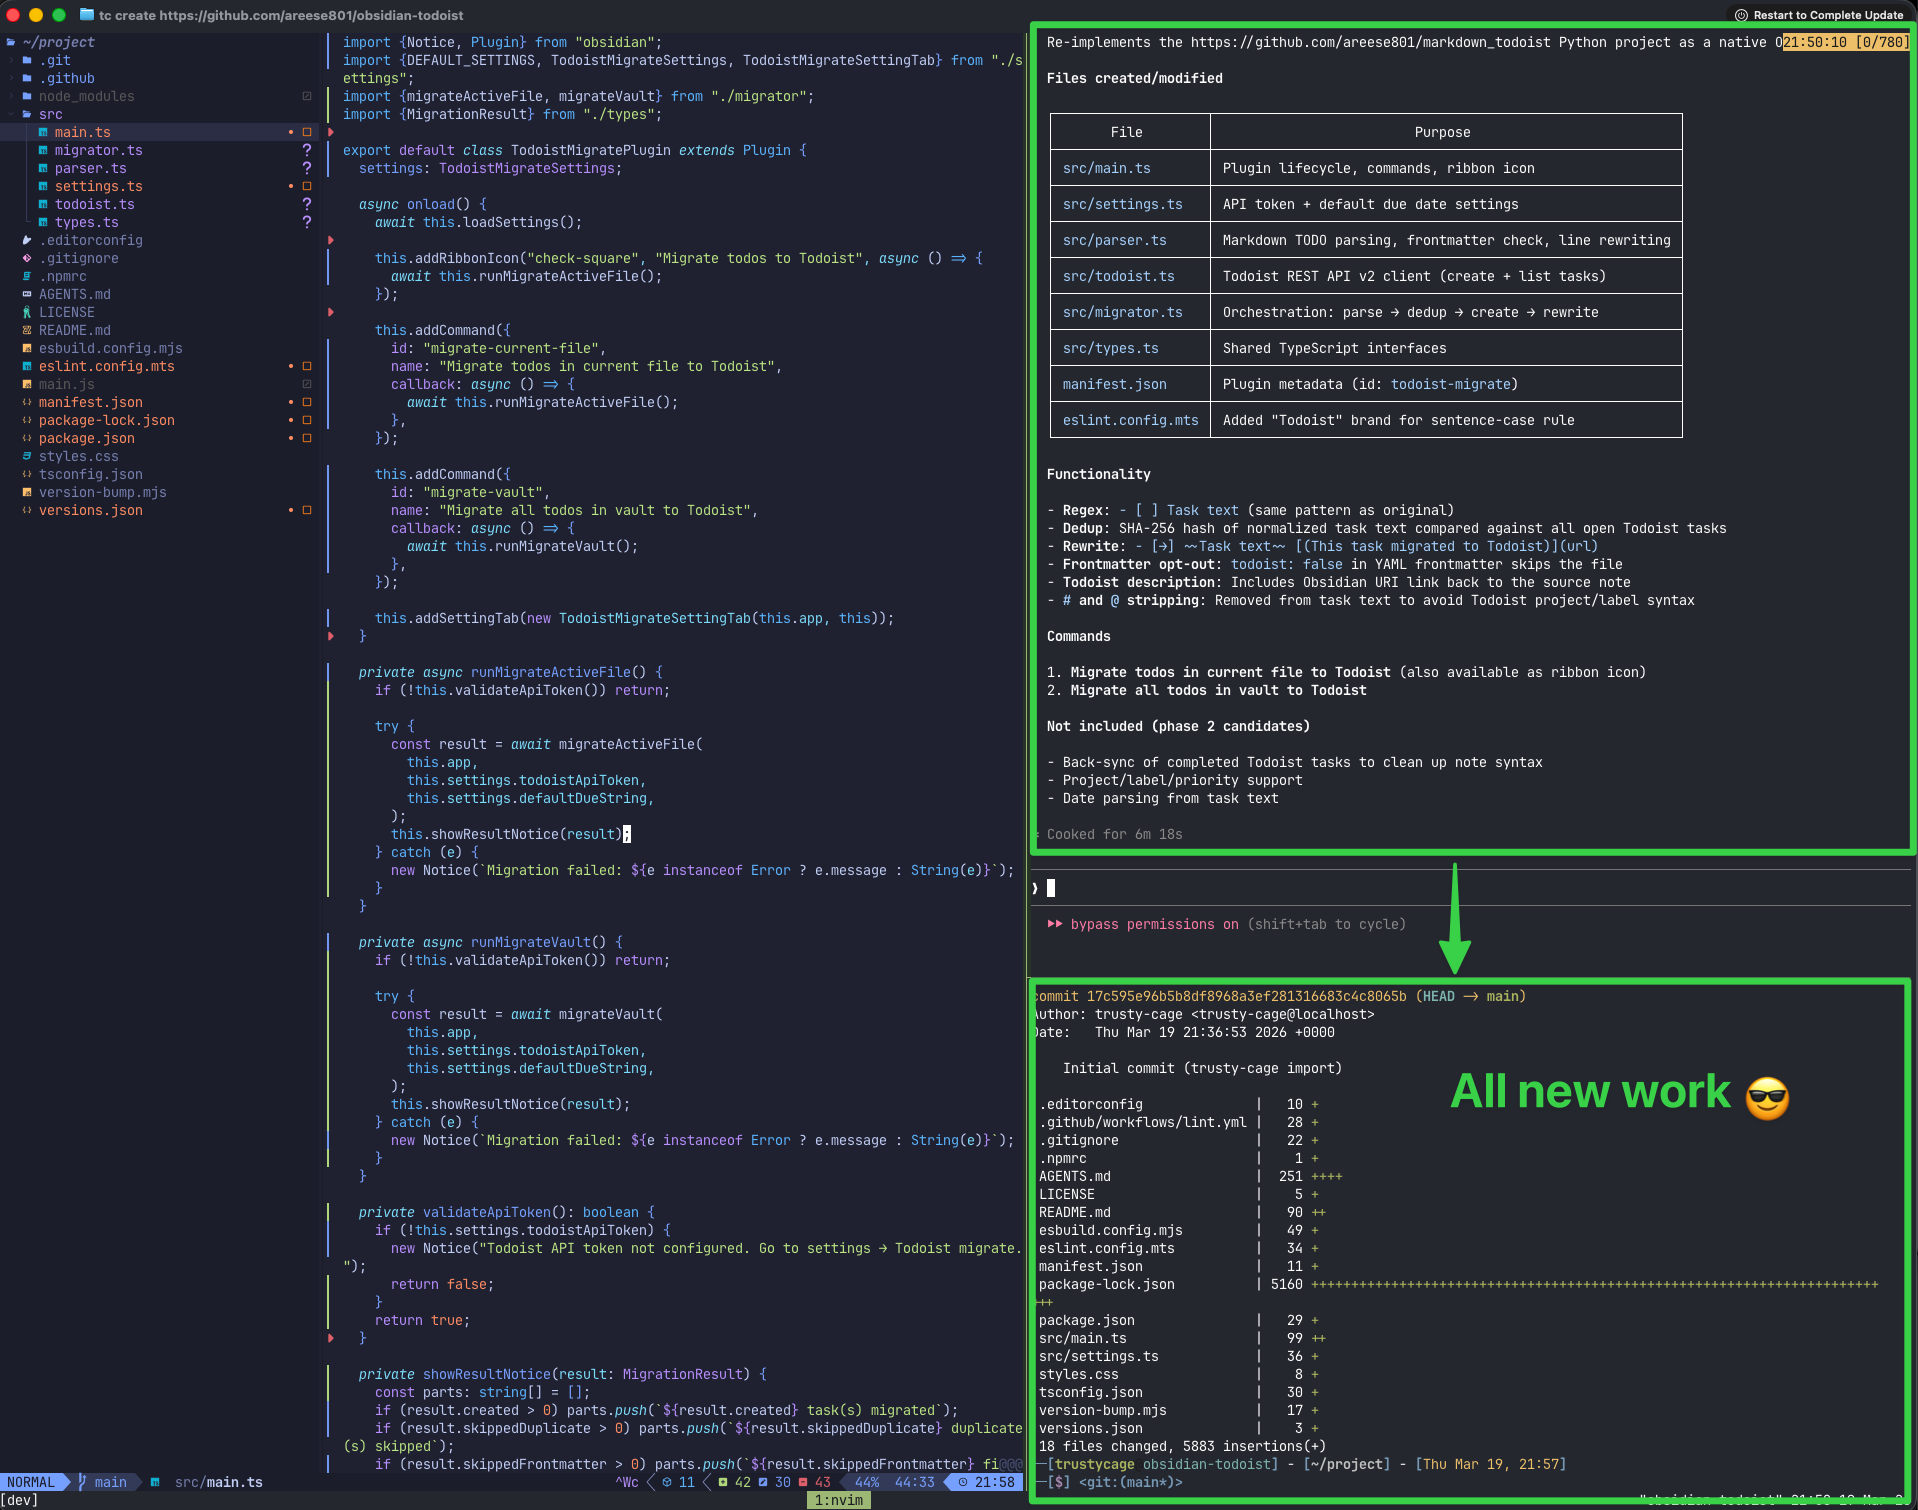
Claude Code explored a reference project, designed an architecture, wrote the full plugin (TypeScript, settings UI, API client, parser), and committed everything — all without any human intervention. The agent had full control inside the container: installing packages, creating files, running builds. If anything went wrong, the host machine would be completely unaffected.
3. Export and review on the host
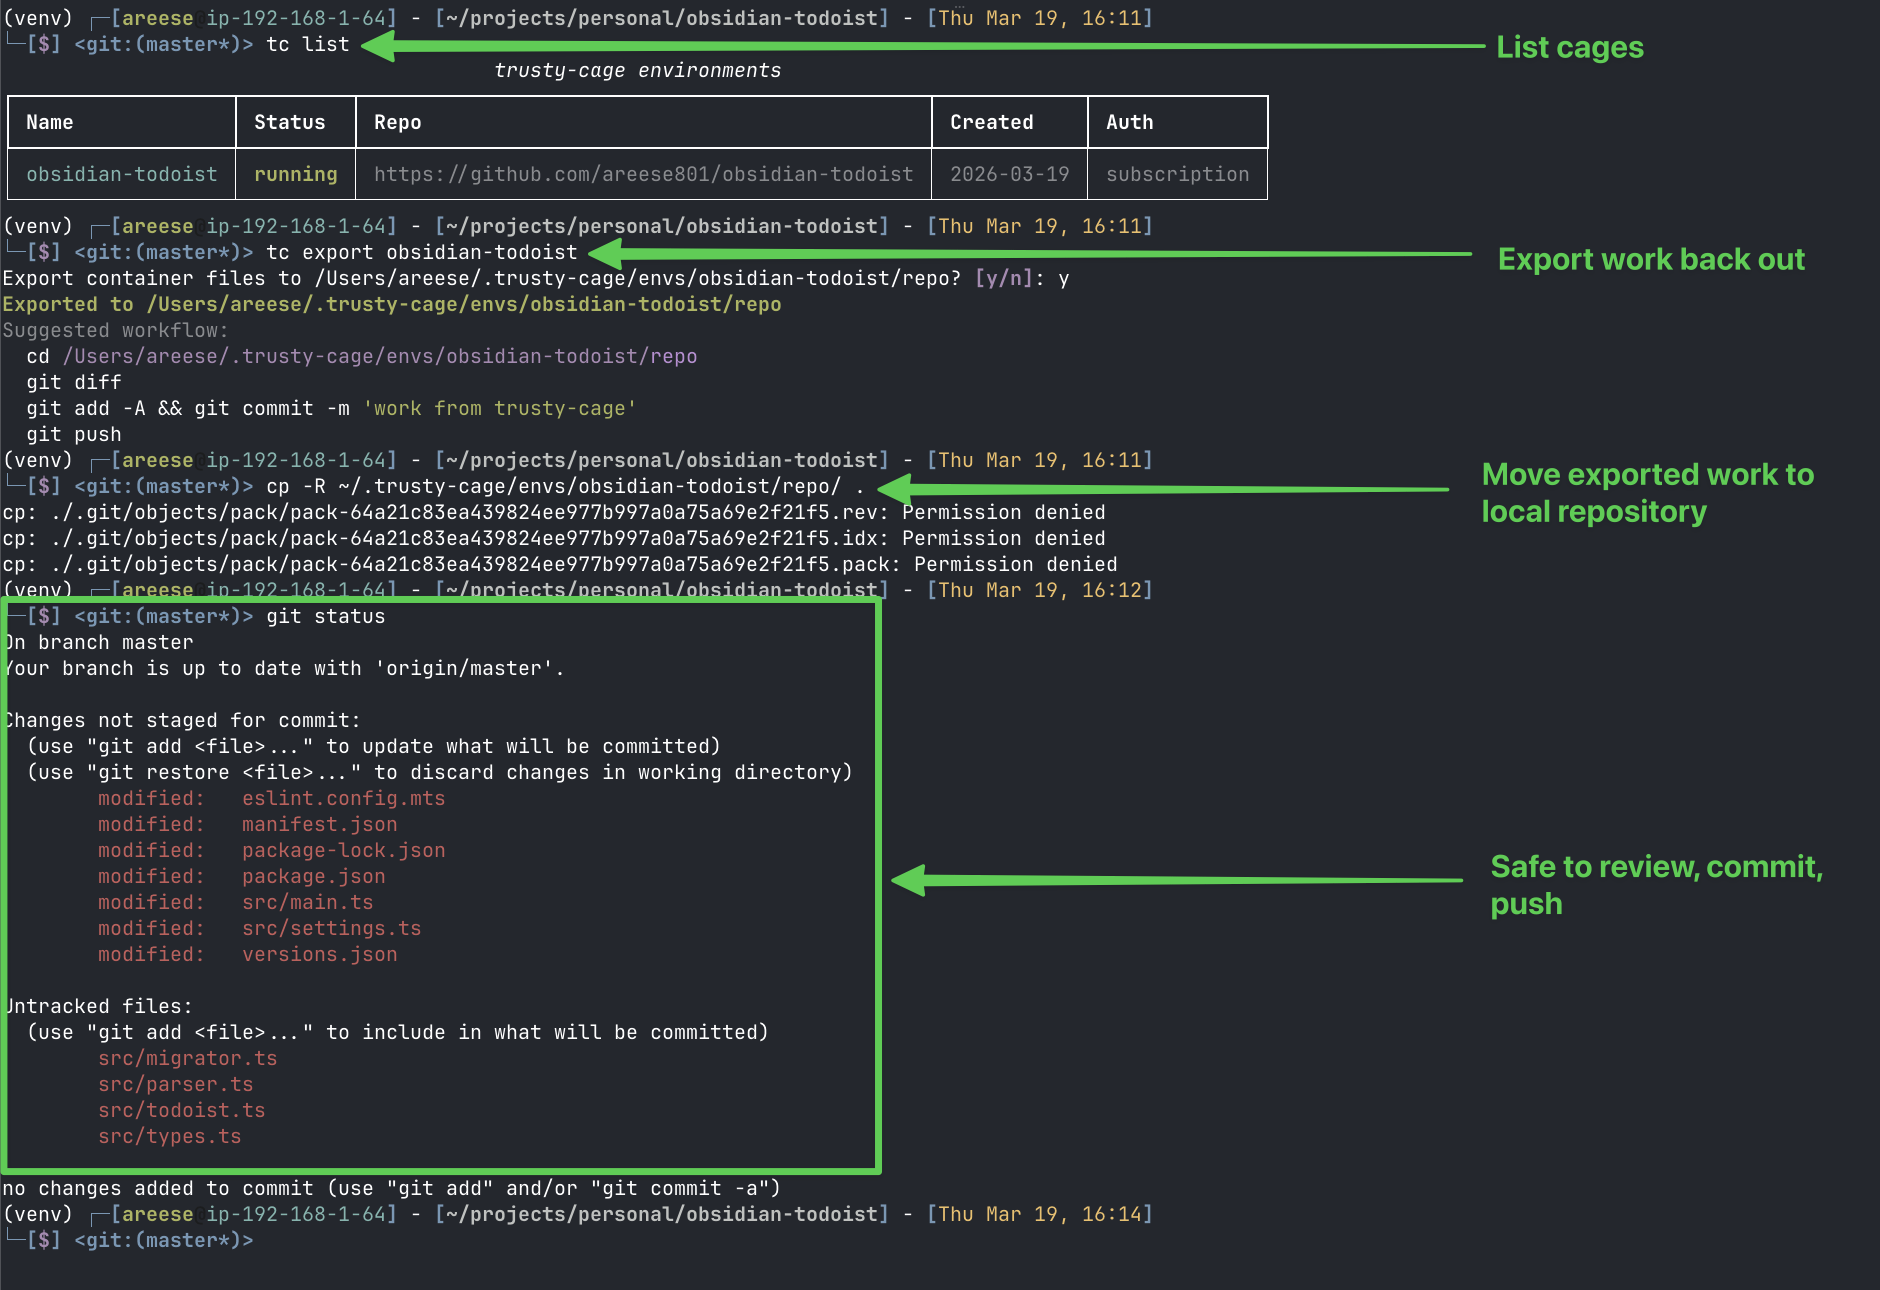
Back on the host, tc export copies the container's work into the host clone at ~/.trusty-cage/envs/<name>/repo/. From there, you review the diff, commit, and push — the human stays in the loop for all git operations that touch a remote.
To work from the exported repository:
cd ~/.trusty-cage/envs/obsidian-todoist/repo/
git diff
git add -A && git commit -m "work from trusty-cage"
git push
To copy exported code into your own cloned repository:
If you already have the repo cloned elsewhere (e.g. ~/projects/personal/obsidian-todoist), you can copy the exported files into it instead. Make sure you're cd'd into your clone first, and don't forget the trailing / on the source path — on macOS (BSD cp), the trailing / copies the contents of the directory rather than the directory itself:
cd ~/projects/personal/obsidian-todoist
cp -R ~/.trusty-cage/envs/obsidian-todoist/repo/ .
git status   # review what changed
git diff
git add -A && git commit -m "work from trusty-cage"
git push
Linux note: GNU cp ignores the trailing / and always copies the directory itself. On Linux, use cp -RT or rsync -a instead:
cp -RT ~/.trusty-cage/envs/obsidian-todoist/repo .
rsync -a ~/.trusty-cage/envs/obsidian-todoist/repo/ .
The
Permission deniederrors on.git/objects/packfiles are expected and harmless — your host.git/is preserved and those locked pack files don't need to be overwritten.
Example: Hello World
# Create (environment name is derived as lowercase: "hello-world")
trusty-cage create https://github.com/octocat/Hello-World --no-attach

# Verify
trusty-cage list
docker ps -a | grep isolated-dev

# Attach — drops you into tmux inside the container
trusty-cage attach hello-world

# Inside the container:
#   Ctrl-a <arrow>    — switch tmux panes
#   git remote -v     — empty (no remotes, by design)
#   curl example.com  — works (outbound web allowed)
#   Ctrl-a d          — detach

# Export work back to host
trusty-cage export hello-world

# Clean up
trusty-cage destroy hello-world
Example: Local Directory
No remote repo? Use --dir to create a cage from any local directory:
# Create from current directory
trusty-cage create --dir . --name my-project --no-attach

# Or from an explicit path
trusty-cage create --dir ~/projects/my-project --no-attach

# Everything else works the same
trusty-cage attach my-project
trusty-cage export my-project
trusty-cage destroy my-project
Additional Directories
Ship extra local directories into a cage alongside the main project. Each additional directory gets its own Docker volume and host clone, with full export/sync/diff support.
# Include at create time
tc create --dir ~/projects/main-app --add-dir ~/projects/shared-lib --name my-cage --no-attach

# Or add to an existing cage (recreates the container with a new volume mount)
tc add-dir my-cage ~/projects/shared-lib

# Additional dirs appear in the container's home directory
# /home/trustycage/project       ← main project (always)
# /home/trustycage/shared-lib    ← additional dir

# Export, diff, and sync work with --dir and --all
tc diff my-cage --dir shared-lib           # diff one additional dir
tc diff my-cage --all                      # diff main project + all additional dirs
tc export my-cage --dir shared-lib -y      # export one additional dir
tc export my-cage --all -y                 # export everything
tc sync my-cage --dir shared-lib -y        # push host changes into one dir

# Remove a directory (removes volume and host clone)
tc remove-dir my-cage shared-lib -y

# Destroy cleans up all volumes (main + additional dirs)
tc destroy my-cage -y
Directory names are derived from the path basename (lowercased, sanitized). Override with --name:
tc add-dir my-cage ~/projects/My.Library --name mylib
The name project is reserved for the main project directory.
Commands
| Command | Description |
|---|---|
trusty-cage --version |
Show version and exit |
trusty-cage init [--force] |
Create config directory and default .env file |
trusty-cage create <url> [--name] [--no-attach] [--auth-mode] [--dockerfile] [--add-dir] |
Create a new environment from a git repo |
trusty-cage create --dir <path> [--name] [--no-attach] [--auth-mode] [--dockerfile] [--add-dir] |
Create from a local directory (no remote required) |
trusty-cage attach <name> |
Attach to an existing environment |
trusty-cage stop <name> |
Stop a container (preserves work) |
trusty-cage list [--json] |
List all environments with status and additional dirs |
trusty-cage exists <name> |
Check if an environment exists (exit code 0/1) |
trusty-cage add-dir <name> <path> [--name] |
Add a local directory to an existing cage |
trusty-cage remove-dir <name> <dir-name> [-y/--yes] |
Remove an additional directory from a cage |
trusty-cage export <name> [-y/--yes] [--output-dir] [--delete] [--protect] [--dir] [--all] |
Copy work back to host clone (safe default: no --delete) |
trusty-cage diff <name> [--full] [--output-dir] [--dir] [--all] |
Preview what export would change (dry run) |
trusty-cage sync <name> [--files] [-y/--yes] [--dir] [--all] |
Push host files into a cage (inverse of export) |
trusty-cage destroy <name> [-y/--yes] |
Remove container, all volumes, and additional dirs (keeps host clone) |
trusty-cage rebuild-image [--dockerfile] |
Force rebuild the Docker image |
trusty-cage auth <name> [--login] |
Refresh or verify credentials for an environment |
trusty-cage launch <name> -p/--prompt|--prompt-file|--test [--background] [--no-inject-messaging] |
Launch Claude Code inside a cage (messaging instructions injected by default) |
trusty-cage logs [name] [-f] [-r/--raw] [-n/--lines N] |
Stream inner Claude's reasoning (pretty-printed by default) |
trusty-cage outbox <name> [-a/--all] [--json] [--poll] [--timeout] [--interval] |
Read messages from a cage's outbox |
trusty-cage inbox <name> <type> <payload_json> |
Send a message to a cage's inbox |
Export, Diff, and Sync
Safe Export (default)
By default, tc export copies cage files onto the host without deleting host-only files. This prevents accidental removal of .gitignore, venv/, .env, and other files that exist only on the host.
tc export myenv -y                     # safe: adds/updates files, never deletes
tc export myenv -y --delete            # opt-in: mirror cage exactly (deletes host-only files)
tc export myenv -y --protect "*.md"    # exclude additional patterns from sync
tc export myenv -y --dir shared-lib    # export a specific additional dir
tc export myenv -y --all               # export main project + all additional dirs
Files matching .gitignore and .cageprotect patterns are always excluded from both overwrite and deletion, even with --delete.
.cageprotect file
Create a .cageprotect file in your project root to protect host-only files during export. Same format as .gitignore — one pattern per line, # for comments:
# Host-only config
CLAUDE.md
.env.production
secrets/
Preview with tc diff
See what tc export would change before running it:
tc diff myenv                          # summary table (added/modified/deleted)
tc diff myenv --full                   # full unified diffs
tc diff myenv --output-dir .           # compare against a specific directory
tc diff myenv --dir shared-lib         # diff a specific additional dir
tc diff myenv --all                    # diff main project + all additional dirs
Push fixes with tc sync
After exporting and fixing something on the host, push changes back into a running cage:
tc sync myenv -y                       # sync all host files into cage
tc sync myenv -y --files "main.py"     # sync specific files only
tc sync myenv -y --dir shared-lib      # sync a specific additional dir
tc sync myenv -y --all                 # sync main project + all additional dirs
Typical workflow
tc diff myenv                          # preview changes
tc export myenv -y                     # export (safe default)
# ... fix something on the host ...
tc sync myenv -y --files "fixed.py"    # push fix back into cage
tc launch myenv --prompt "Continue"    # resume work in cage
Configuration
Configuration is resolved in order: CLI flags > environment variables > ~/.trusty-cage/.env > defaults.
| Variable | Default | Description |
|---|---|---|
TRUSTY_CAGE_DOTFILES_REPO |
(empty) | HTTPS URL of dotfiles repo to clone into containers |
TRUSTY_CAGE_PYTHON_VERSION |
3.12 |
Python version installed via pyenv |
TRUSTY_CAGE_DEFAULT_SHELL |
zsh |
Default shell inside the container |
TRUSTY_CAGE_DEFAULT_AUTH_MODE |
api_key |
Auth mode: api_key or subscription |
TRUSTY_CAGE_TMUX_PREFIX |
C-a |
tmux prefix key inside containers (default Ctrl-a to avoid conflict with host Ctrl-b) |
ANTHROPIC_API_KEY |
(none) | API key for Claude Code (required for api_key auth mode) |
Run trusty-cage init to create ~/.trusty-cage/.env with a commented template you can customize.
Dotfiles
If you set TRUSTY_CAGE_DOTFILES_REPO, your dotfiles are automatically applied to every new container at create time. The repo is cloned on the host, .git/ is stripped, and the files are copied into the container's home directory. If an install script is found (install.sh, setup.sh, bootstrap.sh, etc.), it runs automatically. GNU Stow layouts are detected and handled (files are copied from common/ if present).
This means your shell config, tmux settings, Neovim config, aliases, and other personalizations carry over — the container feels like your own machine.
Without dotfiles, the container ships with sensible defaults: oh-my-zsh (robbyrussell theme), LazyVim starter config, pyenv on PATH, and vim/vi aliased to nvim. Everything works out of the box, just without your personal customizations.
Authentication
Chosen at create time via --auth-mode:
- api_key — Reads
ANTHROPIC_API_KEYfrom your host shell at attach/launch time. Injected viadocker exec -e, never written to disk. Best for API billing users. - subscription — Copies
~/.claude/,~/.claude.json, and OAuth tokens from macOS Keychain into the container at create time. Persists in the volume. Best for Claude Pro/Max subscribers — no API key needed.
# Create with API key auth (default)
tc create https://github.com/user/repo
# Requires ANTHROPIC_API_KEY to be set in your shell

# Create with subscription auth (Claude Pro/Max)
tc create https://github.com/user/repo --auth-mode subscription
# Automatically extracts OAuth tokens from macOS Keychain

# Refresh credentials at any time
tc auth myenv

# If subscription tokens have expired, re-login interactively
tc auth myenv --login
On macOS, subscription mode extracts OAuth tokens from the system Keychain (Claude Code-credentials) and writes them as ~/.claude/.credentials.json inside the container. This bridges macOS Keychain storage with Linux's file-based fallback — no manual /login step needed.
Custom Dockerfile
By default, trusty-cage uses a built-in Dockerfile (Ubuntu 24.04 with Python, Node.js, Neovim, tmux, Claude Code). You can replace it entirely with your own:
# Via CLI flag (highest priority)
tc create https://github.com/user/repo --dockerfile /path/to/Dockerfile

# Via convention path (used if no flag is passed)
# Place your Dockerfile at ~/.trusty-cage/Dockerfile

# Rebuild the image with a custom Dockerfile
tc rebuild-image --dockerfile /path/to/Dockerfile
Custom Dockerfiles fully replace the default — you are responsible for including the trustycage user (UID 1000), required tools, and any security constraints your workflow requires.
Extending the Base Image
If you only need to add packages or tools on top of the default image, use Docker's FROM inheritance instead of replacing the entire Dockerfile:
FROM trusty-cage:latest

# Add system packages
RUN apt-get update && apt-get install -y postgresql-client redis-tools

# Add Python packages
RUN pip install pandas requests

# Add project-specific tooling
COPY my-linter.conf /home/trustycage/.config/
Build the base image first (happens automatically on tc create), then pass your extending Dockerfile:
tc create https://github.com/user/repo --dockerfile ./Dockerfile.custom
This preserves the base setup (non-root user, tmux, Neovim, Claude Code, network policy) while letting you layer on project-specific dependencies.
Orchestration
trusty-cage supports two modes of use:
- Interactive —
tc attachdrops you into a tmux session with Claude Code, Neovim, and a shell. You prompt Claude directly and watch it work. - Headless —
tc launchruns Claude non-interactively with a prompt. An outer Claude (or script) orchestrates the inner Claude, monitors progress, and exports results.
Headless Workflow
# Create a cage (no interactive attach)
tc create https://github.com/user/repo --name myproject --auth-mode subscription --no-attach

# Verify Claude can start (pre-flight check)
tc launch myproject --test

# Send a task
tc launch myproject --prompt "Implement feature X" --background

# Watch the inner Claude's reasoning in real-time (from the host)
tc logs myproject -f

# Or get raw stream-json for programmatic consumption
tc logs myproject -f --raw

# For long prompts, use a file
tc launch myproject --prompt-file /path/to/prompt.txt --background

# Poll for completion (blocks until task_complete arrives)
tc outbox myproject --poll --timeout 1800

# Or read outbox messages manually
tc outbox myproject --all --json

# Send a response to the inner Claude's inbox
tc inbox myproject info_response '{"request_id":"req-001","content":"file contents"}'

# When done, export and overlay onto your working directory
tc export myproject -y --output-dir .

# Clean up
tc destroy myproject -y
Monitoring with tc logs
tc logs streams the inner Claude's reasoning from outside the cage — no attach needed. Output is pretty-printed by default:
INIT session=a48c7ada... model=claude-opus-4-6[1m]
THINKING Simple task - create a weather.py script with temperature conversion.
TOOL Write: /home/trustycage/project/weather.py
RESULT File created successfully at: /home/trustycage/project/weather.py
TOOL Bash: python weather.py
RESULT 0°C = 32.00°F ...
CLAUDE Script created and working.
DONE Script created and working.
     cost=$0.1563 duration=10.5s
Use --raw for the full stream-json output. Use -f / --follow to tail in real-time.
cage-send (Inside the Container)
The container image includes cage-send at /usr/local/bin/cage-send — a helper script that handles message envelope construction (id, timestamp, version) so the inner Claude doesn't have to build JSON by hand:
# Report progress
cage-send progress_update '{"status":"implementing auth module","detail":"3 of 5 files done"}'

# Request a file from the host
cage-send info_request '{"request_id":"req-001","description":"Need package.json","paths":["package.json"]}'

# Report an error
cage-send error '{"error_type":"missing_dep","message":"need ffmpeg","recoverable":true}'

# Signal completion (REQUIRED as final action)
cage-send task_complete '{"summary":"Implemented feature X","exit_code":0}'
Valid types: task_complete, progress_update, error, info_request, going_idle. The script validates the type and JSON payload before writing.
Messaging System
The container includes a file-based message bus for structured communication between the inner and outer Claude. Messages are timestamped JSON files in well-known directories:
/home/trustycage/.cage/
  outbox/                  # Inner Claude writes here (via cage-send), outer reads (via tc outbox)
  inbox/                   # Outer Claude writes here (via tc inbox), inner reads
  cursor/                  # Tracks read position (Kafka-like offset)
  claude-stream.log        # Stream-json output from tc launch (readable via tc logs)
Message types:
| Type | Direction | Purpose |
|---|---|---|
task_complete |
inner -> outer | Signal task is done (includes summary) |
progress_update |
inner -> outer | Report what's being worked on |
info_request |
inner -> outer | Ask for files/data from the host |
error |
inner -> outer | Report a blocker |
info_response |
outer -> inner | Respond to an info_request |
ack |
outer -> inner | Acknowledge receipt of a message |
task_revision |
outer -> inner | Send revised instructions after review |
going_idle |
inner -> outer | Inner Claude's polling timed out, session ending |
Message format:
{
  "id": "msg-20260326T143000-a1b2",
  "type": "task_complete",
  "timestamp": "2026-03-26T14:30:00.000Z",
  "payload": { "summary": "Implemented feature X", "exit_code": 0 },
  "version": 1
}
The messaging system is initialized automatically during tc create. The new task_revision and going_idle message types support an iteration loop — inner Claude polls for revised instructions after completing a task, allowing multiple rounds of feedback without destroying the cage.
Using the Cage Orchestrator Skill
The easiest way to use trusty-cage in headless mode is through the cage-orchestrator skill. Instead of running CLI commands manually, you tell your outer Claude to delegate work to an isolated cage:
"Spin up a cage and implement feature X in this repo"
The cage-orchestrator skill handles the full lifecycle automatically:
- Creates a cage from the current repo's git remote
- Launches inner Claude with your task description
- Monitors progress via
tc logsandtc outbox --poll - Relays progress updates and handles information requests from inner Claude
- Exports completed work back to your working directory
- Reviews changes with you (
git diff) - Iterates — if you have feedback, it sends revised instructions back to inner Claude (who stays alive and keeps context), and the cycle repeats
- Cleans up when you're done
The inner Claude works with full autonomy inside the container — installing packages, editing files, running tests — while the outer Claude keeps you informed and handles anything that requires host access (git push, file retrieval, approvals).
Install the skills
Install the companion plugin by running these commands inside a Claude Code session:
/plugin marketplace add areese801/trusty-cage-plugin
/plugin install trusty-cage@trusty-cage-plugin
The skills activate automatically when you ask Claude to run something in a cage. See trusty-cage-plugin for details.
Security Model
The container is the blast radius. If an agent does something destructive, your host is unaffected.
What agents can do inside:
- Clone/fetch public repos over HTTPS
- Browse the web, read docs, hit public APIs
- Install packages (pip, apt, npm)
- Full read/write access to the project directory
What agents cannot do:
- Push to any git remote (no credentials present)
- Use SSH (port 22 blocked)
- Pull Docker images from Docker Hub (blocked)
- Access any host files (no bind mounts)
Protection is enforced by credential absence, not network blocking. The container has no SSH keys, no .netrc, no GH_TOKEN, no git credential helper.
Requirements
- Docker (Docker Desktop, OrbStack, or Docker Engine)
- Python 3.11+
- Git
- rsync (pre-installed on macOS and most Linux distros; used by
export)
Development
git clone https://github.com/areese801/trusty-cage.git
cd trusty-cage
python -m venv venv
source venv/bin/activate
pip install -e ".[dev]"

# Available make targets
make help
License
MIT
Release history Release notifications | RSS feed


Download files
Download the file for your platform. If you're not sure which to choose, learn more about installing packages.
Source Distribution
Built Distribution
Filter files by name, interpreter, ABI, and platform.
If you're not sure about the file name format, learn more about wheel file names.
Copy a direct link to the current filters
File details
Details for the file trusty_cage-0.8.4.tar.gz.
File metadata
- Download URL: trusty_cage-0.8.4.tar.gz
- Upload date:
- Size: 1.3 MB
- Tags: Source
- Uploaded using Trusted Publishing? No
- Uploaded via: twine/6.2.0 CPython/3.14.3
File hashes
| Algorithm | Hash digest | |
|---|---|---|
| SHA256 |
6d8a1f2c4b13941263d2f5acec8959e217408d6c15f30bc4c1e25e8c0edc8367
|
|
| MD5 |
afcee78dbcc2acb897542b0a846a45ff
|
|
| BLAKE2b-256 |
b8c0ea2c06a392b5600b6d057c6a7140b75ab6334f4845ae59c625657eb675c3
|
File details
Details for the file trusty_cage-0.8.4-py3-none-any.whl.
File metadata
- Download URL: trusty_cage-0.8.4-py3-none-any.whl
- Upload date:
- Size: 48.2 kB
- Tags: Python 3
- Uploaded using Trusted Publishing? No
- Uploaded via: twine/6.2.0 CPython/3.14.3
File hashes
| Algorithm | Hash digest | |
|---|---|---|
| SHA256 |
7d2dd3fe1f7f1b2629abf2672b128137c0558d1c3e51efa76fc462f4ac567e1e
|
|
| MD5 |
23dda16fa2f15f464aa9aaa3622f51ca
|
|
| BLAKE2b-256 |
b72defa81b487d8bf262fc862f335e75c1d72407f9e069e178fe6df94572033d
|


