
uiautomation_new - Refactored Python UIAutomation for Windows
uiautomation_new is a refactored Windows UI Automation package based on the classic uiautomation API. It keeps the familiar import style and most legacy function names while adding a cleaner internal architecture, modern input helpers, safer clicking, tab-window utilities, visual matching helpers, and PyPI-ready packaging metadata.
This package is designed for automating Windows desktop applications that expose Microsoft UIAutomation providers, including Win32, WinForms, WPF, Modern UI, Qt-based apps, browser windows, and Electron-based apps when accessibility support is enabled.
Installation
pip install uiautomation-new
The default installation includes comtypes, pywin32, Pillow, numpy,
opencv-python, and pynput. Image matching and hotkey helpers work without
installing feature extras. This project does not depend on pyautogui.
Development tools remain optional:
pip install "uiautomation-new[dev]"
Compatibility
The public compatibility layer is intentionally preserved:
import uiautomation as auto

window = auto.GetForegroundControl()
button = window.ButtonControl(Name="OK")
button.Click()
Most old names such as Click, SendKeys, ControlType, PatternId, PropertyId, WindowControl, ButtonControl, and EditControl remain available from the top-level package. New code can also use the added helper APIs described below.
What Changed in This Refactor
Modular Architecture
The old project was centered around one very large uiautomation.py file. This refactor starts splitting responsibilities into focused modules:
uiautomation/enums.py: UIAutomation and Win32 integer enums such asControlType,PatternId,PropertyId,Keys,MouseEventFlag, andKeyboardEventFlag.uiautomation/structures.py:Rectand ctypes input structures such asINPUT,MOUSEINPUT,KEYBDINPUT, andHARDWAREINPUT.uiautomation/inputs/core.py: low-levelSendInput,MouseInput,KeyboardInput, and virtual-key scan-code helpers.uiautomation/inputs/keyboard.py:pynputhotkey helpers.uiautomation/win32_api.py: pywin32-first, ctypes-fallback wrappers for selected Win32 APIs.uiautomation/client.py: thread-safe singleton helpers and package DLL path handling.
The original uiautomation.py remains as a compatibility aggregation layer while larger areas such as controls, patterns, bitmap handling, and logging are migrated progressively.
Modernized Constants and Rect
- Classic constant classes have been moved to
enum.IntEnumwhile keeping int-compatible behavior. Rectis now a dataclass-compatible helper instructures.py.- Empty rectangle detection now treats zero or negative width/height as empty.
Modern Input Simulation
- Mouse clicks, mouse button down/up, mouse wheel, single-key input, and
SendKeysnow useSendInputinternally. - Deprecated
mouse_eventandkeybd_eventnames are still available as compatibility wrappers. SendInputbatches input events instead of sending them one by one.
DPI and Multi-Monitor Improvements
New helpers improve high-DPI and multi-monitor coordinate behavior:
import uiautomation as auto
auto.SetDpiAwareness()
rect = auto.GetVirtualScreenRect()
inside = auto.IsPointInVirtualScreen(x, y)
SetDpiAwareness() prefers PerMonitorV2 awareness and automatically falls back to older Windows DPI APIs.
Safer Clicks
Controls now support visibility and clickability checks:
control.IsVisibleOnScreen()
control.IsClickable()
control.SafeClick()
auto.SafeClick(x, y)
control.SafeClick() now prefers UIA InvokePattern for center-click style calls. This is more reliable for buttons whose visual center is covered by another layer or whose physical clickable point is inaccurate. If InvokePattern is unavailable or fails, it falls back to the previous mouse-click path with ScrollIntoView and clickability/occlusion checks.
auto.SafeClick(x, y) is a coordinate-based safe click: it gets the control at (x, y), tries silent UIA actions on the hit control and its ancestors, then tries a Win32 PostMessage click, and falls back to auto.Click(x, y) only when those silent attempts fail. PostMessage can only confirm that mouse messages were posted; some modern or hardware-accelerated apps may ignore them.
To force the physical mouse-click path:
control.SafeClick(preferInvoke=False)
auto.SafeClick(x, y, useInvoke=False, useLegacy=False, usePostMessage=False)
Fluent Relative Search
Controls can be filtered by relative position:
import uiautomation as auto
window = auto.ControlFromHandle(handle) # handle为窗口句柄
save = window.ButtonControl(Name="Save").RightOf(cancel_button)
save = window.ButtonControl(Name="Save").right_of(cancel_button)
Available helpers:
LeftOf()/left_of()RightOf()/right_of()Above()/above()Below()/below()AddCompare()
def relative_position():
    # 先定位一个已知的参考控件(作为“锚点”)
    reference = auto.ButtonControl(Name="智能分流")
    # 然后使用相对位置查找目标 A.RightOf(B) 表示“A 在 B 的右边”
    target = auto.ButtonControl(Name="全局代理").RightOf(reference)
    print(target)
    # 或者写成链式:
    target1 = reference.LeftOf(auto.TextControl(Name="全局代理"))  # 反过来也行?
    # # 注意:通常的写法是:目标控件的条件 .RightOf(参考控件)
    # 目标(智能分流) 在 参照物(全局代理)的左侧
    print(target1)
    #目标(快速连接) 在 参照物(智能分流)的上方
    # target2 = auto.TextControl(RegexName="快速连接").Above(reference)
    # print(target2)
Smart Waiting
Modern wait aliases are available:
control.WaitUntilExists(timeout=10)
control.WaitUntilDisappear(timeout=5)

auto.WaitUntilExists(control, timeout=10)
auto.WaitUntilDisappear(control, timeout=5)
Recursive FindAll and Tab Utilities
Windows with tab controls can be automated with FindAll() and tab helpers:
tabs = window.FindAll(auto.ControlType.TabItemControl, maxDepth=10)
for tab in tabs:
    url = auto.GetTabUrl(tab, window=window)
    print(tab.Name, url)

current_tab = window.GetCurrentTab()
window.SwitchToTabByName("Settings")
window.SwitchToTabByUrl("example.com")
url = window.GetCurrentUrl()
tab_urls = window.GetAllTabUrls()
Module-level helpers are also available:
tabs = auto.FindAll(window, auto.ControlType.TabItemControl)
tabs = auto.find_control_num(window, auto.ControlType.TabItemControl)
tab = auto.get_current_tab(window)
auto.switch_to_tab_by_name(window, "Settings")
auto.SwitchToTabByUrl(window, "example.com")
url = auto.get_current_url(window)
url = auto.GetTabUrl(tab, window=window)
tab_urls = auto.GetAllTabUrls(window)
FindAll() supports maxDepth to avoid walking extremely large UI trees indefinitely. Current-tab detection first uses SelectionItemPattern.IsSelected, then falls back to keyboard-focus properties. Tab switching prefers SelectionItemPattern.Select() and falls back to Click(). SwitchToTabByUrl() supports substring URL matching by default. GetTabUrl() and GetAllTabUrls() switch tabs to read the active address bar and then restore the originally selected tab when possible.
pynput Hotkey Helper
auto.Press_Hotkey("ctrl", "a")
auto.Press_Hotkey("backspace")
auto.Press_Hotkey("ctrl", "shift", "a")

edit.Press_Hotkey("ctrl", "a")
pynput is installed automatically with uiautomation-new.
Screenshot, Highlight, and UI Tree Export
New debugging and reporting helpers:
control.Screenshot("control.png")
control.Screenshot("control_offscreen.png", offscreen=True)
control.Highlight()

data = control.ToDict()
control.ExportTreeToJson("tree.json", maxDepth=5)
control.ExportTreeToMarkdown("tree.md", maxDepth=5)
offscreen=True uses Windows PrintWindow to capture native windows even when they are covered by other top-level windows. Some hardware-accelerated surfaces such as video, games, WebView, and parts of modern browsers may still return blank or stale content because the target application must support offscreen painting.
Module-level tree export helpers:
ControlToDict()ControlTreeToDict()ExportControlTreeToJson()ControlTreeToMarkdown()ExportControlTreeToMarkdown()
Practical Browser Automation Example
The following example shows how the newer helpers can be used together in a browser-like window:
import uiautomation as auto

def get_browser_object(shop_name, class_name=None):
    # 获取对象
    doc_windows = find_windows_by_class_and_title(class_name, shop_name)
    if len(doc_windows) == 0:
        return False
    window = auto.ControlFromHandle(doc_windows[0])
    if window.Exists():
        print(f"成功获取窗口控制对象2: {window2}")
    return window

def get_all_window_controls():
    # 1. 获取桌面根控件(即所有顶级窗口的父控件)
    root = auto.GetRootControl()
    # 2. 获取所有顶级窗口(直接子控件)
    top_windows = root.GetChildren()
    print(f"共找到 {len(top_windows)} 个顶级窗口:\n")
    # 3. 遍历并打印每个窗口的信息
    for i, window in enumerate(top_windows):
        try:
            print(f"【窗口 {i + 1}】")
            print(f"  窗口标题: {window.Name}")
            print(f"  类名: {window.ClassName}")
            print(f"  句柄: {window.NativeWindowHandle}")
            print(f"  控件类型: {window.ControlType}")
            print(f"  是否可见: {window.Exists()}")
            print("-" * 50)
            print(window.GetChildren())
        except Exception as e:
            print(f"读取窗口失败: {e}")

auto.SetDpiAwareness()

window = auto.WindowControl(ClassName="Chrome_WidgetWin_1", RegexName=".*Google Chrome")

# Enumerate tabs and read their URLs.
tabs = window.FindAll(auto.ControlType.TabItemControl, maxDepth=10)
for tab in tabs:
    url = tab.GetTabUrl(window=window)
    print(tab.Name, url)

# Read all tab URLs in one call. This switches tabs and restores the original tab.
tab_urls = window.GetAllTabUrls()
for item in tab_urls:
    print(item["index"], item["name"], item["url"])

# Switch tabs by title or by URL substring.
window.SwitchToTabByName("PyPI")
window.SwitchToTabByUrl("pypi.org")

# Read the active tab URL from the browser address bar.
url = window.GetCurrentUrl()
print(url)

# Use pynput-backed hotkeys on a focused control.
window = auto.WindowControl(ClassName='Chrome_WidgetWin_1', RegexName='.*Google Chrome')
control = window.EditControl(RegexName='地址和搜索栏')
control.Press_Hotkey("ctrl", "a")
control.Press_Hotkey("backspace")
control.SendKeys('https://pypi.org/project/uiautomation-new/')
# control.Press_Hotkey("ctrl", "v")
control.Press_Hotkey("enter")

# Safely invoke a covered button; SafeClick prefers InvokePattern and falls back to mouse click.
window2 = get_browser_object('万达云')
# 控件隐藏也能点击到
control = window2.ButtonControl(RegexName='智能分流') #
print(control.IsVisibleOnScreen())
control.SafeClick()

# Capture a control even when another top-level window covers it.
address_bar.Screenshot("address_bar.png", offscreen=True)
address_bar.Highlight()

# Export UI tree data for debugging or reports.
window.ExportTreeToJson("tree.json", maxDepth=5)
window.ExportTreeToMarkdown("tree.md", maxDepth=5)
You can also start from a native window handle, which is useful when a window is easier to locate with Win32 APIs:
import win32gui
import uiautomation as auto

def find_windows_by_class_and_title(class_name=None, title_keyword=""):
    handles = []

    def callback(hwnd, _):
        current_class = win32gui.GetClassName(hwnd)
        title = win32gui.GetWindowText(hwnd)
        if class_name:
            matched = current_class == class_name and title_keyword in title
        else:
            matched = title_keyword in title
        if matched:
            handles.append(hwnd)
        return True

    win32gui.EnumWindows(callback, 0)
    return handles

handles = find_windows_by_class_and_title("Chrome_WidgetWin_1", "Google Chrome")
if handles:
    window = auto.ControlFromHandle(handles[0])
    print(window.Name, window.ClassName, window.NativeWindowHandle)
Image Template Matching
match = auto.FindImageOnScreen("button.png", confidence=0.9)
match = auto.WaitImageAppear("button.png", timeout=10)
auto.ClickImage("button.png", timeout=10)

# DPI/resolution-tolerant multi-scale matching.
match = auto.FindImageOnScreen(
    "button.png",
    confidence=0.8,
    multiScale=True,
    maxScaleDiff=0.3,
    scaleStep=0.05,
)
auto.ClickImage("button.png", timeout=10, multiScale=True)

# Reuse robust matching settings across multiple operations.
matcher = auto.RobustTemplateMatch(threshold=0.7, maxScaleDiff=0.3)
matcher.click_by_template("button.png", timeout=10)


def image_click():
    path = r'C:\Users\YHCX\Desktop\旧\ScreenShot_2026-07-27_165832_374.png'
    match_result = auto.FindImageOnScreen(path, confidence=0.85)
    print(match_result)

    # 1. 解包数据
    x, y, w, h, confidence = match_result

    # 2. 计算中心点
    center_x = x + w // 2  # 780
    center_y = y + h // 2  # 161

    # 3. 移动鼠标
    # 方法 A: 如果你的 auto 库有 MoveTo 方法 (根据你之前的代码风格推测)
    auto.MoveTo(center_x, center_y)

    # 4. 移动鼠标到坐标点进行点击
    auto.Click(center_x, center_y)

    # 5. 静默点击这个坐标
    auto.SafeClick(center_x, center_y)

    # 6. 传入图片路径 -> 找到图片所在坐标 -> 进行点击
    auto.ClickImage(path)
Multi-scale matching searches around the current Windows DPI scale and also tests the original template size. It returns screen coordinates correctly for restricted regions and virtual desktops. This is useful for custom-rendered UI that does not expose reliable UIAutomation controls. OpenCV and NumPy are installed automatically with the package.
PaddleOCR Text Position Clicks
OCR helpers are useful for UIA-invisible text, self-drawn controls, web pages, Canvas, and image-like buttons. Install the OCR extra when needed:
pip install "uiautomation-new[ocr]"
Default PaddleOCR settings:
ocr = auto.CreatePaddleOCR(
    text_detection_model_name="PP-OCRv6_medium_det",
    text_recognition_model_name="PP-OCRv6_medium_rec",
    use_textline_orientation=False,
    use_doc_orientation_classify=False,
    use_doc_unwarping=False,
)
Recognize text positions from an image file:
positions = auto.OCRImageTextPositions(
    "control.png",
    text="登录",
    minScore=0.8,
    ocr=ocr,
    predictArgs={"text_det_limit_side_len": 256},
)

for item in positions:
    print(item["text"], item["score"], item["box"], item["screen_center"])
One-step OCR text click on a control:
window = auto.WindowControl(ClassName="Chrome_WidgetWin_1", RegexName=".*Google Chrome")

match = auto.OCRClickText("登录", window, minScore=0.8, offscreen=True)
print(match["text"], match["screen_center"]) if match else print("not found")

# Equivalent control method.
match = window.OCRClickText("登录", minScore=0.8, offscreen=True)
For tuning or reuse:
def show_window(handle):
    """ cmdShow 值及效果
    SW_HIDE     0   隐藏窗口(最常用,让程序在后台运行不显示界面)
    SW_SHOW     5   显示窗口(如果之前被隐藏了,就恢复显示)
    SW_MINIMIZE 6   最小化窗口到任务栏
    SW_MAXIMIZE 3   最大化窗口(全屏)
    SW_RESTORE  9   还原窗口(从最小化或最大化恢复到之前的大小)
    :return:
    """
    # 展示最初的桌面
    # auto.ShowDesktop()
    # 显示窗口的状态
    # auto.ShowWindow(handle, cmdShow)

def text_click():
    # 使用文本进行点击
    window = auto.WindowControl(ClassName='Chrome_WidgetWin_1', RegexName='.*Google Chrome')
    control = window.DocumentControl(Name='搜索 - Microsoft 必应')
    match = auto.OCRClickText(
        "国际版",
        control,
        minScore=0.8,
        # 如果控件/窗口被其他顶层窗口遮挡
        offscreen=True,
        ocrArgs={
            "text_detection_model_name": "PP-OCRv6_medium_det",
            "text_recognition_model_name": "PP-OCRv6_medium_rec",
        },
        # 调整图片缩放限制
        predictArgs={
            "text_det_limit_side_len": 256,
        },
        # SafeClick 开启由Click进行兜底点击
        safeClickArgs={
            "fallbackToClick": True,
        },
    )
    print(match)
OCRClickText() screenshots the control through Screenshot() / ToBitmap(), runs PaddleOCR, matches text, converts OCR image coordinates to screen coordinates, and clicks with SafeClick(). center is the OCR center inside the screenshot image; screen_center is center plus the screenshot's actual desktop offset, so it can be used for Windows screen clicks. PaddleOCR(...) arguments are passed with ocrArgs={...} or by creating an OCR instance with CreatePaddleOCR(...). ocr.predict(...) arguments are passed with predictArgs={...}. OCR results are normalized to dictionaries with text, score, box, center, screen_box, and screen_center.
Publishing Notes
This distribution is Windows-focused and includes native DLL assets. Build and check before uploading:
python -m pip install -U build twine
python -m build
python -m twine check dist/*
python -m twine upload dist/*
Do not upload old *-any.whl files if the package contains Windows DLLs. Use Windows platform wheels and the source distribution.
Original uiautomation module documentation
:cn:中文版介绍
Do not use 3.7.6 and 3.8.1; comtypes doesn't work in these two versions. Install an earlier or the latest version. https://github.com/enthought/comtypes/issues/202
This module is for UIAutomation on Windows (Windows XP with SP3, Windows Vista, Windows 7, and Windows 8/8.1/10/11). It supports UIAutomation for applications that implemented UIAutomation Provider, such as MFC, Windows Form, WPF, Modern UI (Metro UI), Qt (partly), Firefox (version<=56 or >=60), Chrome, and Electron-based apps (require --force-renderer-accessibility command line parameter).
I developed it in my spare time and for my personal use.
uiautomation is shared under the Apache License 2.0.
This means that the code can be freely copied and distributed, and costs nothing to use.
uiautomation1.x supports py2, py3 and doesn't depend on any third-party packages.
uiautomation2.0+ only supports py3 and depends on comtypes and typing (Python3.5+ built-in).
uiautomation2.0+ is not backward compatible with earlier versions. See API changes.
You can install uiautomation with pip install uiautomation. After installation, an automation.py script that calls uiautomation will be in 'C:\PythonXX\Scripts'.
You can use this script to traverse UI controls.
Run 'C:\PythonXX\Scripts\automation.py -h' for help.
Run demos\automation_calculator.py to see a simple demo.
On Windows 8/8.1, to automate a Metro App, the app must be in the foreground. If a Metro App was switched to the background, uiautomation can't fetch its controls' information.
By the way, you should run Python as administrator. Otherwise uiautomation may fail to enumerate controls or get controls' information on Windows 7 or higher.
Microsoft UIAutomation Minimum supported client: Windows 7, Windows Vista with SP2 and Platform Update for Windows Vista, Windows XP with SP3 and Platform Update for Windows Vista [desktop apps only]
Microsoft UIAutomation Minimum supported server: Windows Server 2008 R2, Windows Server 2008 with SP2 and Platform Update for Windows Server 2008, Windows Server 2003 with SP2 and Platform Update for Windows Server 2008 [desktop apps only]
C++ dll source code: UIAutomationClient
How to use uiautomation?
Run 'automation.py -h'

Understand the arguments of automation.py, and try the following examples:
automation.py -t 0 -n, print current active window's controls, show full name
automation.py -r -d 1 -t 0, print desktop (the root of control tree) and its children (top level windows)

automation.py prints the properties of controls and the patterns they support. You use controls and patterns to retrieve information about controls and interact with them.
A control may support some patterns or conditionally support some patterns according to its control type.

Refer to Control Pattern Mapping for UI Automation Clients for the complete control pattern table.
uiautomation searches controls from the control tree based on the controls' properties you supply.
Suppose the control tree is
root(Name='Desktop', Depth=0)
window1(Depth=1)
control1-001(Depth=2)
control1-...(Depth=2)
...
control1-100(Depth=2)
window2(Name='window2', Depth=1)
control2-1(Depth=2)
control2-1-001(Depth=3)
control2-1-...(Depth=3)
...
control2-1-100(Depth=3)
control2-2(Depth=2)
control2-3(Depth=2)
control2-4(Name='2-4', Depth=2)
editcontrol(Name='myedit1', Depth=3)
editcontrol(Name='myedit2', Depth=3)
If you want to find the EditControl whose name is 'myedit2' and type 'hi',
you can write the following code:
uiautomation.EditControl(searchDepth=3, Name='myedit2').SendKeys('hi')
But this code runs slowly because there are more than 200 controls before myedit2 in the control tree.
uiautomation has to traverse more than 200 controls before finding myedit2 if searching from the root with a search depth of 3.
A better approach is:
window2 = uiautomation.WindowControl(searchDepth=1, Name='window2') # search 2 times
sub = window2.Control(searchDepth=1, Name='2-4')    # search 4 times
edit = sub.EditControl(searchDepth=1, Name='myedit2')   # search 2 times
edit.SendKeys('hi')
This code runs faster than the former approach.
You can also combine the four lines of code into one line.
uiautomation.WindowControl(searchDepth=1, Name='window2').Control(searchDepth=1, Name='2-4').EditControl(searchDepth=1, Name='myedit2').SendKeys('hi')
Now let's take notepad.exe as an example.
Launch notepad.exe and run automation.py -t 3, then switch to Notepad and wait for 5 seconds
automation.py will print the controls of Notepad and save them to @AutomationLog.txt:
ControlType: PaneControl ClassName: #32769 Name: 桌面 Depth: 0 (Desktop window, the root control)
ControlType: WindowControl ClassName: Notepad Depth: 1 (Top level window)
ControlType: EditControl ClassName: Edit Depth: 2
ControlType: ScrollBarControl ClassName: Depth: 3
ControlType: ButtonControl ClassName: Depth: 4
ControlType: ButtonControl ClassName: Depth: 4
ControlType: ThumbControl ClassName: Depth: 3
ControlType: TitleBarControl ClassName: Depth: 2
ControlType: MenuBarControl ClassName: Depth: 3
ControlType: MenuItemControl ClassName: Depth: 4
ControlType: ButtonControl ClassName: Name: 最小化 Depth: 3 (Minimize Button)
ControlType: ButtonControl ClassName: Name: 最大化 Depth: 3 (Maximize Button)
ControlType: ButtonControl ClassName: Name: 关闭 Depth: 3 (Close Button)
...
Run the following code
# -*- coding: utf-8 -*-
# this script only works with Win32 notepad.exe
# if your notepad.exe is the Windows Store version in Windows 11, you need to uninstall it.
import subprocess
import uiautomation as auto

def test():
    print(auto.GetRootControl())
    subprocess.Popen('notepad.exe', shell=True)
    # you should find the top level window first, then find children from the top level window
    notepadWindow = auto.WindowControl(searchDepth=1, ClassName='Notepad')
    if not notepadWindow.Exists(3, 1):
        print('Can not find Notepad window')
        exit(0)
    print(notepadWindow)
    notepadWindow.SetTopmost(True)
    # find the first EditControl in notepadWindow
    edit = notepadWindow.EditControl()
    # usually you don't need to catch exceptions
    # but if you encounter a COMError exception, put it in a try block
    try:
        # use value pattern to get or set value
        edit.GetValuePattern().SetValue('Hello')  # or edit.GetPattern(auto.PatternId.ValuePattern)
    except auto.comtypes.COMError as ex:
        # maybe you aren't running Python as administrator
        # or the control doesn't have an implementation for the pattern method (there is no workaround for this)
        pass
    edit.Click() # this step is optional, but some edits need it
    edit.SendKeys('{Ctrl}{End}{Enter}World')
    print('current text:', edit.GetValuePattern().Value)
    notepadWindow.CaptureToImage('notepad.png')
    notepadWindow.MenuBarControl(searchDepth=1).CaptureToImage('notepad_menubar.png')

    # generate an animated gif
    bitmap = notepadWindow.ToBitmap(x=0, y=0, width=160, height=160)
    side = int(bitmap.Width * 1.42)
    gifBmp = auto.Bitmap(side, side)
    gifBmp.Clear(0xFFFF_FFFF) # set bitmap background color to white
    gifBmp.Paste(x=(side-bitmap.Width)//2, y=(side-bitmap.Height)//2, bitmap=bitmap)
    gifFrameCount = 20
    bmps = [gifBmp.RotateWithSameSize(gifBmp.Width//2, gifBmp.Height//2, i*360/gifFrameCount) for i in range(0, gifFrameCount)]
    auto.GIF.ToGifFile('notepad_part.gif', bitmaps=bmps, delays=[100]*gifFrameCount)

    # find the first TitleBarControl in notepadWindow,
    # then find the second ButtonControl in TitleBarControl, which is the Maximize button
    maximizeButton = notepadWindow.TitleBarControl().ButtonControl(foundIndex=2)
    maximizeButton.Click(waitTime=2)
    maximizeButton.Click()
    # find the first button in notepadWindow whose Name is '关闭' or 'Close', the close button
    # the relative depth from Close button to Notepad window is 2
    notepadWindow.ButtonControl(searchDepth=2, Compare=lambda c, d: c.Name in ['Close', '关闭']).Click()
    # then notepad will pop up a window asking whether to save, press Alt+N to discard
    notepadWindow.WindowControl(searchDepth=1).CaptureToImage('notepad_save.png')
    auto.SendKeys('{Alt}n')

if __name__ == '__main__':
    test()
The above code automates notepad.exe and generates a GIF file.

auto.GetRootControl() returns the root control (the Desktop window)
auto.WindowControl(searchDepth=1, ClassName='Notepad') creates a WindowControl, the parameters specify how to search the control
The following parameters can be used:
searchFromControl = None,
searchDepth = 0xFFFFFFFF,
searchInterval = SEARCH_INTERVAL,
foundIndex = 1
Name
SubName
RegexName
ClassName
AutomationId
ControlType
Depth
Compare
See Control.__init__ for the comments on the parameters.
See scripts in folder demos for more examples.
Control.Element returns the low level COM object IUIAutomationElement, Almost all methods and properties of Control are implemented via IUIAutomationElement COM API and Win32 API. when calling a control's method or property that indirectly calls Control.Element and Control.Element is None, uiautomation starts searching the control by the properties you supply. uiautomation will raise a LookupError exception if it can't find the control within uiautomation.TIME_OUT_SECOND (default 10 seconds). Control.Element will have a valid value if uiautomation finds the control successfully. You can use Control.Exists(maxSearchSeconds, searchIntervalSeconds) to check whether a control exists, this function doesn't raise any exceptions. Call Control.Refind or Control.Exists to make Control.Element invalid again and uiautomation will start a new search.
For example:
#!python3
# -*- coding:utf-8 -*-
# this script only works with Win32 notepad.exe
# if your notepad.exe is the Windows Store version in Windows 11, you need to uninstall it.
import subprocess
import uiautomation as auto
auto.uiautomation.SetGlobalSearchTimeout(15)  # set new timeout 15


def main():
    subprocess.Popen('notepad.exe', shell=True)
    window = auto.WindowControl(searchDepth=1, ClassName='Notepad')
    # or use Compare for custom search
    # window = auto.WindowControl(searchDepth=1, ClassName='Notepad', Compare=lambda control, depth: control.ProcessId==100)
    edit = window.EditControl()
    # when calling SendKeys, uiautomation starts searching the window and edit controls in 15 seconds
    # because SendKeys indirectly calls Control.Element and Control.Element is None
    # if the window and edit controls don't exist within 15 seconds, a LookupError exception will be raised
    try:
        edit.SendKeys('first notepad')
    except LookupError as ex:
        print("The first notepad doesn't exist in 15 seconds")
        return
    # the second call to SendKeys doesn't trigger a search; the previous call makes sure that Control.Element is valid
    edit.SendKeys('{Ctrl}a{Del}')
    window.GetWindowPattern().Close()  # close the first Notepad, the window and edit controls become invalid even though their Elements have values

    subprocess.Popen('notepad.exe')  # run second Notepad
    window.Refind()  # need to re-find the window, trigger a new search
    edit.Refind()  # need to re-find the edit, trigger a new search
    edit.SendKeys('second notepad')
    edit.SendKeys('{Ctrl}a{Del}')
    window.GetWindowPattern().Close()  # close the second Notepad, window and edit become invalid again

    subprocess.Popen('notepad.exe')  # run third Notepad
    if window.Exists(3, 1): # trigger a new search
        if edit.Exists(3):  # trigger a new search
            edit.SendKeys('third notepad')  # edit.Exists makes sure that edit.Element has a valid value now
            edit.SendKeys('{Ctrl}a{Del}')
        window.GetWindowPattern().Close()
    else:
        print("The third notepad doesn't exist in 3 seconds")


if __name__ == '__main__':
    main()
If automation.py can't print the controls you see. Maybe the controls were built by DirectUI (or CustomControl), not Microsoft UI Frameworks. In order to support UIAutomation, a UI Framework must implement UI Automation Provider.
A Microsoft UI Automation provider is a software object that exposes an element of an application's UI so that accessibility client applications can retrieve information about the element and invoke its functionality. In general, each control or other distinct element in a UI has a provider.
Microsoft includes a provider for each of the standard controls that are supplied with Microsoft Win32, Windows Forms, and Windows Presentation Foundation (WPF). This means that the standard controls are automatically exposed to UI Automation clients; you do not need to implement any accessibility interfaces for the standard controls.
If your application includes any custom controls, you need to implement UI Automation providers for those controls to make them accessible to accessibility client applications. You also need to implement providers for any third-party controls that do not include a provider. You implement a provider by implementing UI Automation provider interfaces and control pattern interfaces.
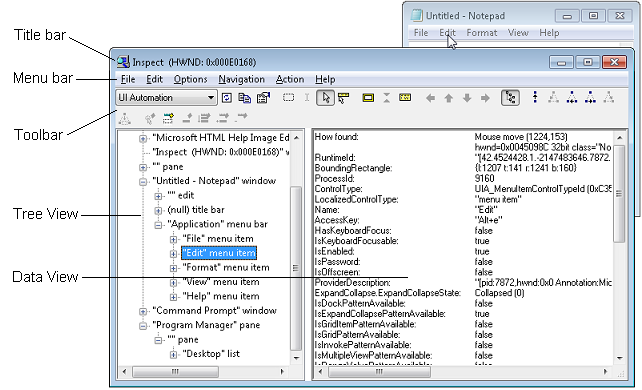
Another UI tool, Inspect.exe, supplied by Microsoft can also be used to traverse the UI elements. It has a UI interface whereas my script shows UI elements in the terminal. However, I find that my script is more convenient in some cases.
Some screenshots:
Batch rename PDF bookmarks

Microsoft Word

Wireshark 3.0 (Qt 5.12)

GitHub Desktop (Electron App)

Pretty-print directory

Donate:


1 maintainer

Metadata
1 maintainer
Release files for uiautomation-new 0.0.4
For a detailed explanation of source distributions (sdists) and built distributions (wheels), please see the package formats documentation.
Source distribution (sdist)
| File | Size | Uploaded | |
|---|---|---|---|
| uiautomation_new-0.0.4.tar.gz | 253.7 kB | Details |
Built distribution (wheel)
| File | Interpreter | ABI | Platform | Reset |
|---|---|---|---|---|
| uiautomation_new-0.0.4-cp313-cp313-win_amd64.whl | CPython 3.13 | CPython 3.13 | Windows x86-64 | Details |
Total release size: 486.9 kB
Release files / uiautomation_new-0.0.4.tar.gz
| Download URL | uiautomation_new-0.0.4.tar.gz |
|---|---|
| Size | 253.7 kB |
| Tags | Source |
|
SHA-256 checksum How to use checksums |
2bcda438cacf54bc8077ee2613786b85e86da6a40bcb8759a4e8be8e6365794d
|
|
BLAKE2b-256 checksum How to use checksums |
e2cb03e111de3b12e3ad5aed9c4a60f479159b5b1a8fed96aa5bad9f621e4d93
|
| Upload date | |
|
Uploaded using Trusted Publishing? What is trusted publishing? |
No |
| Uploaded via |
twine/6.2.0 CPython/3.13.1
|
Release files / uiautomation_new-0.0.4-cp313-cp313-win_amd64.whl
| Download URL | uiautomation_new-0.0.4-cp313-cp313-win_amd64.whl |
|---|---|
| Size | 233.1 kB |
| Tags | CPython 3.13 Windows x86-64 |
|
SHA-256 checksum How to use checksums |
8d4366476dee0a8fc2cd44a29de6f673fa0ecb586bd606c7c8f5051184f0ac80
|
|
BLAKE2b-256 checksum How to use checksums |
ce90876f4789f29b8bc7dc0c702616af37ff57bff5701d6e483570e2dbc8dc8a
|
| Upload date | |
|
Uploaded using Trusted Publishing? What is trusted publishing? |
No |
| Uploaded via |
twine/6.2.0 CPython/3.13.1
|














