
VISA Vulture
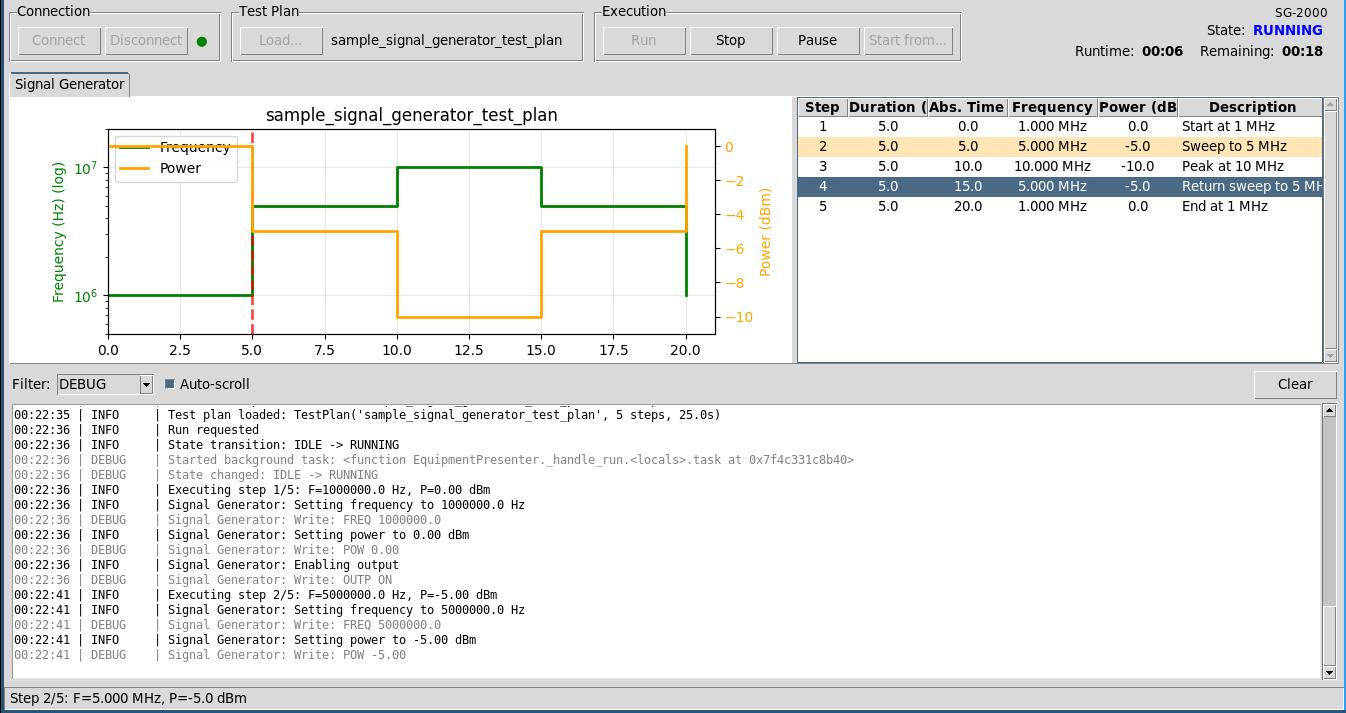
A Python GUI application for controlling test equipment over VISA. Load test plans from CSV files, execute them against connected instruments, and monitor results through real-time logging and plotting.
Features
- VISA Instrument Control: Connect to power supplies, signal generators, and other test equipment
- Test Plan Execution: Load CSV-based test plans for different instrument types
- Real-time Plotting: Monitor voltage/current or frequency/power during test execution
- Test Points Table: View all test plan steps in a tabular format
- Comprehensive Logging: Filterable log panel with file output
- Simulation Mode: Develop and test without hardware using PyVISA-sim
Requirements
- Python 3.10+
- Tkinter (usually included with Python)
Installation
From PyPI
pip install visa-vulture
From Source
-
Clone the repository:
git clone https://github.com/dekmeister/visa-vulture.git
cd visa-vulture
-
Install the package:
pip install .
Or for development (includes pytest, black, mypy):
pip install -e ".[dev]"
Usage
Running the Application
After installation via pip:
# Run with default configuration (simulation mode)
visa-vulture

# Run with simulation mode explicitly enabled
visa-vulture --simulation

# Run with custom configuration file
visa-vulture --config path/to/config.json
If running from source:
python run.py
# or
python -m visa_vulture
Test Plan Format
Test plans are CSV files. The format depends on the instrument type. Step numbers are assigned automatically based on row order.
Metadata
Metadata rows are indicated by lines starting with # and placed at the start of the testplan file. Metadata applies to the entire file. Metadata includes:
| Metadata | Required | Description |
|---|---|---|
| instrument_type | Yes | Type of instrument (power_supply or signal_generator) |
| modulation_type | No | Type of modulation (am or fm) |
| modulation_frequency | Yes (modulation only) | Frequency of modulation in Hz |
| am_depth | Yes (AM modulation only) | Depth of modulation (0-100) |
| fm_deviation | Yes (FM modulation only) | Deviation of modulation in Hz |
Power Supply Test Plans
| Column | Required | Description |
|---|---|---|
| duration | Yes | Duration of this step in seconds |
| voltage | Yes | Voltage setpoint in volts |
| current | Yes | Current limit in amps |
| description | No | Optional step description |
Example (./plans/sample_power_supply_test_plan.csv):
# instrument_type: power_supply
duration,voltage,current,description
5.0,5.0,1.0,Initial voltage
5.0,10.0,1.5,Ramp to 10V
10.0,12.0,2.0,Final voltage
5.0,0.0,0.0,Power down
Signal Generator Test Plans
| Column | Required | Description |
|---|---|---|
| duration | Yes | Duration of this step in seconds |
| frequency | Yes | Frequency in Hz |
| power | Yes | Power level in dBm |
| modulation | No | Modulation enabled or disabled for step (defaults to disabled) |
| description | No | Optional step description |
Example (./plans/sample_signal_generator_test_plan.csv):
# instrument_type: signal_generator
duration,frequency,power,description
5.0,1000000,0,Start at 1 MHz
5.0,5000000,-5,Sweep to 5 MHz
5.0,10000000,-10,Peak at 10 MHz
Example (./plans/sample_signal_generator_am_test_plan.csv):
# instrument_type: signal_generator
# modulation_type: am
# modulation_frequency: 1000
# am_depth: 50
duration,frequency,power,modulation_enabled,description
5.0,1000000,0,true,Start at 1 MHz with 50% AM
5.0,5000000,-5,true,Sweep to 5 MHz with AM
5.0,10000000,-10,false,Peak at 10 MHz without modulation
5.0,5000000,-5,true,Return to 5 MHz with AM
5.0,1000000,0,true,End at 1 MHz with AM
Configuration
Configuration is stored in JSON format. Key settings:
{
    "simulation_mode": true,
    "log_level": "INFO"
}
See visa_vulture/config/default_config.json for full configuration options.
Architecture
The application follows the Model-View-Presenter (MVP) pattern:
┌─────────────────────────────────────────────────────────┐
│                        Model                            │
│  • Equipment state machine (5 states inc. PAUSED)       │
│  • Test plan representation                             │
│  • Instrument abstraction                               │
└─────────────────────────────────────────────────────────┘
                          ▲
                          │
                          ▼
┌─────────────────────────────────────────────────────────┐
│                      Presenter                          │
│  • Coordinates model and view                           │
│  • Manages background threads for VISA communication    │
└─────────────────────────────────────────────────────────┘
                          ▲
                          │
                          ▼
┌─────────────────────────────────────────────────────────┐
│                         View                            │
│  • Tkinter GUI components                               │
│  • Log panel, plot panel, controls                      │
└─────────────────────────────────────────────────────────┘
Project Structure
instruments/                    # Custom instrument extensions (project root)
visa_vulture/
├── main.py                 # Entry point
├── config/                 # Configuration loading
├── model/                  # Business logic, state machine
├── view/                   # Tkinter GUI components
├── presenter/              # MVP coordination
├── file_io/                # CSV parsing, results writing
├── instruments/            # VISA instrument classes and loader
├── logging_config/         # Logging setup
├── simulation/             # PyVISA-sim configuration
└── utils/                  # Threading helpers
Custom Instruments
You can extend existing instrument types with instrument-specific functionality by placing custom instrument modules in the instruments/ directory at the project root.
Custom instruments must extend PowerSupply or SignalGenerator (not BaseInstrument directly) and define a display_name class attribute. They are auto-discovered at startup and appear in the Resource Manager dialog.
See instruments/README.md for full documentation and the PSG E8257D example.
Adding New Built-in Instruments
- Create a new class in
visa_vulture/instruments/inheriting fromBaseInstrument - Implement required methods:
connect,disconnect,get_status - Add instrument-specific commands
- Register in
visa_vulture/instruments/instrument_loader.pyregistry - Add simulation responses to
visa_vulture/simulation/instruments.yaml
Development
Running with Hardware
- Set
simulation_mode: falsein configuration - Update instrument
resource_addressto match your equipment - Ensure VISA drivers are installed (NI-VISA, Keysight IO Libraries, etc.)
Extending Simulation
Edit visa_vulture/simulation/instruments.yaml to add:
- New instrument responses
- Additional SCPI commands
- Stateful properties
License
MIT License
1 maintainer

Metadata
1 maintainer
Release files for visa-vulture 0.2.0
For a detailed explanation of source distributions (sdists) and built distributions (wheels), please see the package formats documentation.
Source distribution (sdist)
| File | Size | Uploaded | |
|---|---|---|---|
| visa_vulture-0.2.0.tar.gz | 51.7 kB | Details |
Built distribution (wheel)
| File | Interpreter | ABI | Platform | Reset |
|---|---|---|---|---|
| visa_vulture-0.2.0-py3-none-any.whl | Python 3 | none | any | Details |
Total release size: 116.9 kB
Release files / visa_vulture-0.2.0.tar.gz
| Download URL | visa_vulture-0.2.0.tar.gz |
|---|---|
| Size | 51.7 kB |
| Tags | Source |
|
SHA-256 checksum How to use checksums |
7b825d1d8a01c2e61f05c3134391922ed46c906681b2de7def4906b7d9b978f9
|
|
BLAKE2b-256 checksum How to use checksums |
1a24efd4ca43589122fac46d9e6acf6739bbfcf3abcfa18a1e88562d979b8579
|
| Upload date | |
|
Uploaded using Trusted Publishing? What is trusted publishing? |
No |
| Uploaded via |
twine/6.2.0 CPython/3.13.5
|
Release files / visa_vulture-0.2.0-py3-none-any.whl
| Download URL | visa_vulture-0.2.0-py3-none-any.whl |
|---|---|
| Size | 65.2 kB |
| Tags | Python 3 |
|
SHA-256 checksum How to use checksums |
b1ce9f9beb2f831ea56f40455e5906a28cf66188a397757ba5d595f6f2c7be84
|
|
BLAKE2b-256 checksum How to use checksums |
e544c94e6fbaf6fe1a856cd3687f6c844c42c0c0e62a98ab5fd99388f3cf420a
|
| Upload date | |
|
Uploaded using Trusted Publishing? What is trusted publishing? |
No |
| Uploaded via |
twine/6.2.0 CPython/3.13.5
|














