This package is written for the restoration of degraded speech

Project description


VoiceFixer
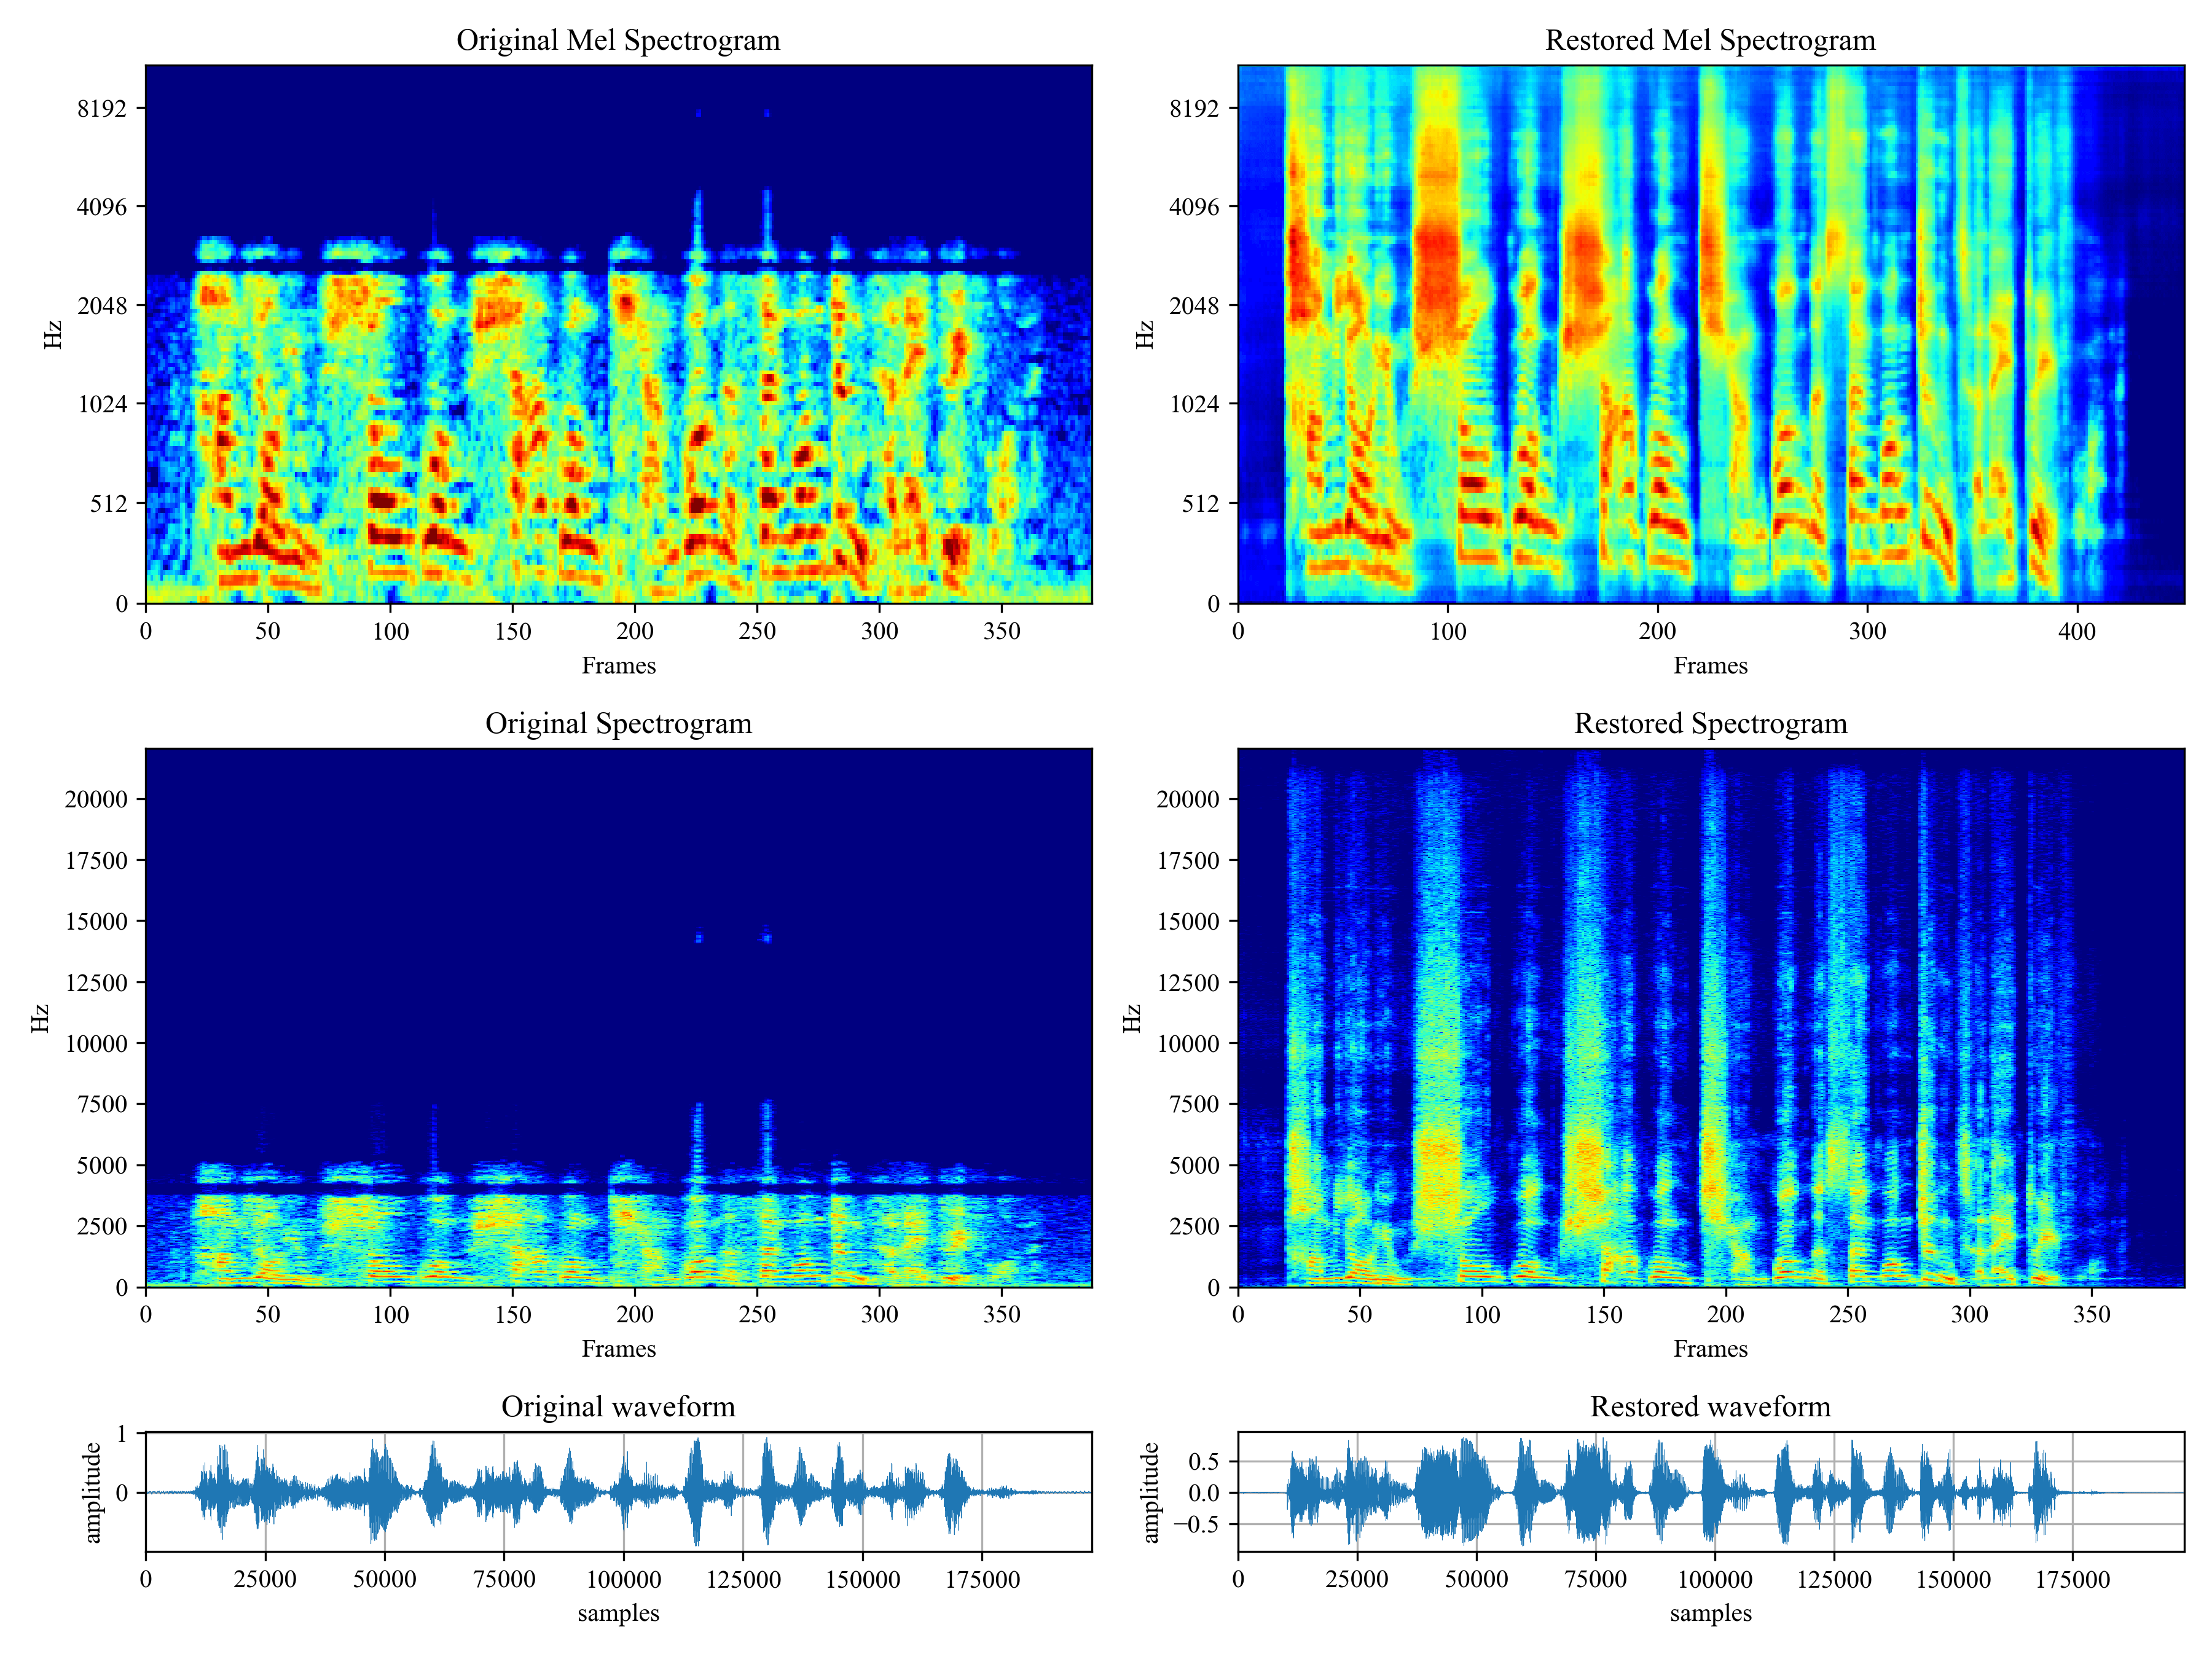
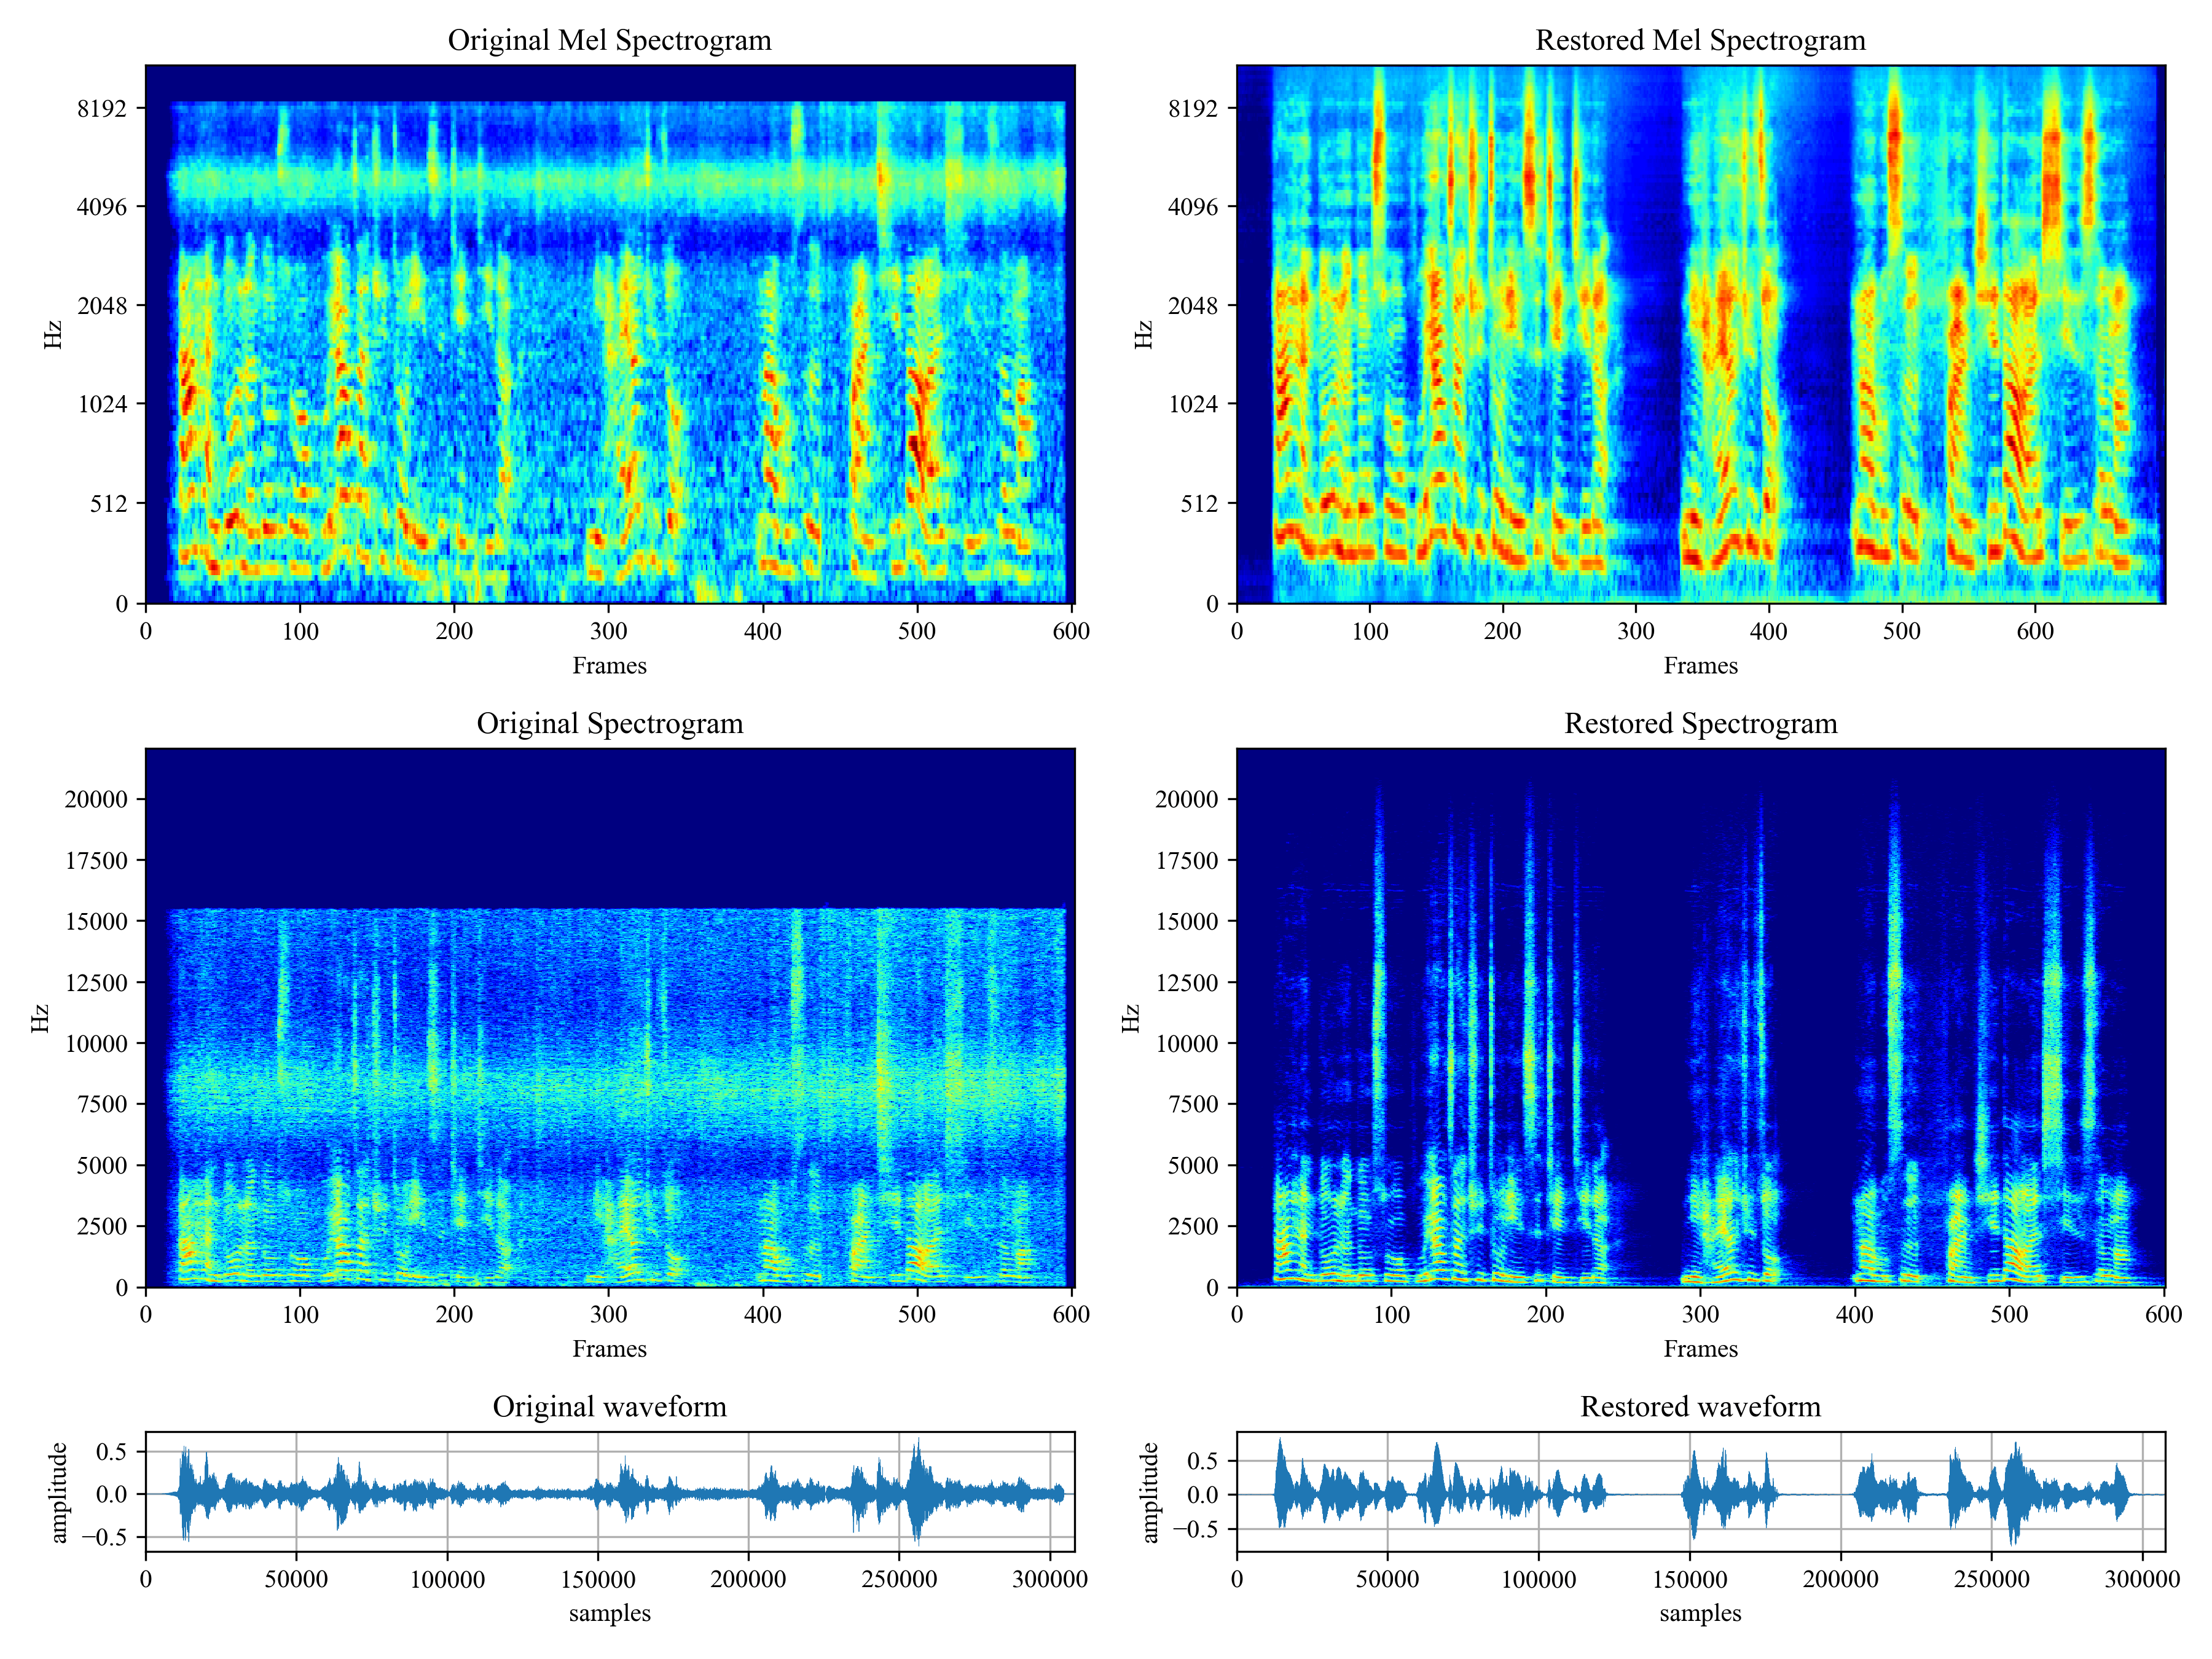
Voicefixer aims at the restoration of human speech regardless how serious its degraded. It can handle noise, reveberation, low resolution (2kHz~44.1kHz) and clipping (0.1-1.0 threshold) effect within one model.
This package provides:
- A pretrained Voicefixer, which is build based on neural vocoder.
- A pretrained 44.1k universal speaker-independent neural vocoder.

- If you found this repo helpful, please consider citing
 @misc{liu2021voicefixer,
     title={VoiceFixer: Toward General Speech Restoration With Neural Vocoder},
     author={Haohe Liu and Qiuqiang Kong and Qiao Tian and Yan Zhao and DeLiang Wang and Chuanzeng Huang and Yuxuan Wang},
     year={2021},
     eprint={2109.13731},
     archivePrefix={arXiv},
     primaryClass={cs.SD}
 }
Demo
Please visit demo page to view what voicefixer can do.
Usage
Desktop App
First, install voicefixer via pip:
pip install voicefixer==0.0.17
You can test audio samples on your desktop by running website (powered by streamlit)
- Clone the repo first.
git clone https://github.com/haoheliu/voicefixer.git
cd voicefixer
For windows users, please make sure you have installed WGET and added the wget command to the system path (thanks @justinjohn0306).
- Initialize and start web page.
# Install additional web package
pip install streamlit
# Run streamlit
streamlit run test/streamlit.py
-
If you run for the first time: the web page may leave blank for several minutes for downloading models. You can checkout the terminal for downloading progresses.
-
You can use this low quality speech file we provided for a test run. The page after processing will look like the following.

Python Examples
First, install voicefixer via pip:
pip install voicefixer==0.0.17
Then run the following scripts for a test run:
git clone https://github.com/haoheliu/voicefixer.git; cd voicefixer
python3 test/test.py # test script
We expect it will give you the following output:
Initializing VoiceFixer...
Test voicefixer mode 0, Pass
Test voicefixer mode 1, Pass
Test voicefixer mode 2, Pass
Initializing 44.1kHz speech vocoder...
Test vocoder using groundtruth mel spectrogram...
Pass
test/test.py mainly contains the test of the following two APIs:
- voicefixer.restore
- vocoder.oracle
...

# TEST VOICEFIXER
## Initialize a voicefixer
print("Initializing VoiceFixer...")
voicefixer = VoiceFixer()
# Mode 0: Original Model (suggested by default)
# Mode 1: Add preprocessing module (remove higher frequency)
# Mode 2: Train mode (might work sometimes on seriously degraded real speech)
for mode in [0,1,2]:
    print("Testing mode",mode)
    voicefixer.restore(input=os.path.join(git_root,"test/utterance/original/original.flac"), # low quality .wav/.flac file
                       output=os.path.join(git_root,"test/utterance/output/output_mode_"+str(mode)+".flac"), # save file path
                       cuda=False, # GPU acceleration
                       mode=mode)
    if(mode != 2):
        check("output_mode_"+str(mode)+".flac")
    print("Pass")

# TEST VOCODER
## Initialize a vocoder
print("Initializing 44.1kHz speech vocoder...")
vocoder = Vocoder(sample_rate=44100)

### read wave (fpath) -> mel spectrogram -> vocoder -> wave -> save wave (out_path)
print("Test vocoder using groundtruth mel spectrogram...")
vocoder.oracle(fpath=os.path.join(git_root,"test/utterance/original/p360_001_mic1.flac"),
               out_path=os.path.join(git_root,"test/utterance/output/oracle.flac"),
               cuda=False) # GPU acceleration

...
You can clone this repo and try to run test.py inside the test folder.
Others Features
- How to use your own vocoder, like pre-trained HiFi-Gan?
First you need to write a following helper function with your model. Similar to the helper function in this repo: https://github.com/haoheliu/voicefixer/blob/main/voicefixer/vocoder/base.py#L35
    def convert_mel_to_wav(mel):
        """
        :param non normalized mel spectrogram: [batchsize, 1, t-steps, n_mel]
        :return: [batchsize, 1, samples]
        """
        return wav
Then pass this function to voicefixer.restore, for example:
voicefixer.restore(input="", # input wav file path
                   output="", # output wav file path
                   cuda=False, # whether to use gpu acceleration
                   mode = 0,
                   your_vocoder_func = convert_mel_to_wav)
Note:
- For compatibility, your vocoder should working on 44.1kHz wave with mel frequency bins 128.
- The input mel spectrogram to the helper function should not be normalized by the width of each mel filter.
Materials
- Voicefixer training: https://github.com/haoheliu/voicefixer_main.git
- Demo page: https://haoheliu.github.io/demopage-voicefixer/
Release history Release notifications | RSS feed


Download files
Download the file for your platform. If you're not sure which to choose, learn more about installing packages.
Source Distributions
Built Distribution
Filter files by name, interpreter, ABI, and platform.
If you're not sure about the file name format, learn more about wheel file names.
Copy a direct link to the current filters
File details
Details for the file voicefixer-0.0.18-py3-none-any.whl.
File metadata
- Download URL: voicefixer-0.0.18-py3-none-any.whl
- Upload date:
- Size: 47.1 kB
- Tags: Python 3
- Uploaded using Trusted Publishing? No
- Uploaded via: twine/4.0.1 CPython/3.8.13
File hashes
| Algorithm | Hash digest | |
|---|---|---|
| SHA256 |
b0e5954242bf151731a5f90886f7362a8737df6d89b4d6ba1c17fa317d9c551e
|
|
| MD5 |
e0b6c04703071289edfb4295a62a54ab
|
|
| BLAKE2b-256 |
0af2f9551b6e3f72cb58ac9aeb9c2244b508f2aea39db2d77be9527d0a24a8e5
|


