
[CVPR2026] VoxTell: Free-Text Promptable Universal 3D Medical Image Segmentation








This repository contains the official implementation of our paper:
VoxTell: Free-Text Promptable Universal 3D Medical Image Segmentation
VoxTell is a 3D vision–language segmentation model that directly maps free-form text prompts, from single words to full clinical sentences, to volumetric masks. By leveraging multi-stage vision–language fusion, VoxTell achieves state-of-the-art performance on anatomical and pathological structures across CT, PET, and MRI modalities, excelling on familiar concepts while generalizing to related unseen classes.
Authors: Maximilian Rokuss*, Moritz Langenberg*, Yannick Kirchhoff, Fabian Isensee, Benjamin Hamm, Constantin Ulrich, Sebastian Regnery, Lukas Bauer, Efthimios Katsigiannopulos, Tobias Norajitra, Klaus Maier-Hein
Paper:
📰 News
- 09/2026: 📦 v0.1.2 on PyPI:
pip install voxtellnow brings batch/folder inference, precomputed prompt embeddings, the remote inference server and fine-tuning, with lower memory use and many fixes - 07/2026: 🚀 New batch and folder inference for the CLI and Python API — text-prompt embeddings can be cached and reused across multiple images, with faster, more memory-efficient text encoding. 👉 Getting Started
- 03/2026: 🥇 First place on the official ReXGroundingCT benchmark
- 02/2026: 📄 VoxTell was accepted at CVPR 2026!
- 02/2026: 🎉 The community built a VoxTell web interface - thank you! 👉 voxtell-web-plugin
- 01/2026: 🧩 Model checkpoint v1.1 released and now available with official napari plugin 👉 napari-voxtell
- 12/2025: 🚀
VoxTelllaunched with a Python backend and PyPI package (pip install voxtell)
Overview
VoxTell is trained on a large-scale, multi-modality 3D medical imaging dataset, aggregating 158 public sources with over 62,000 volumetric images. The data covers:
- Brain, head & neck, thorax, abdomen, pelvis
- Musculoskeletal system and extremities
- Vascular structures, major organs, substructures, and lesions
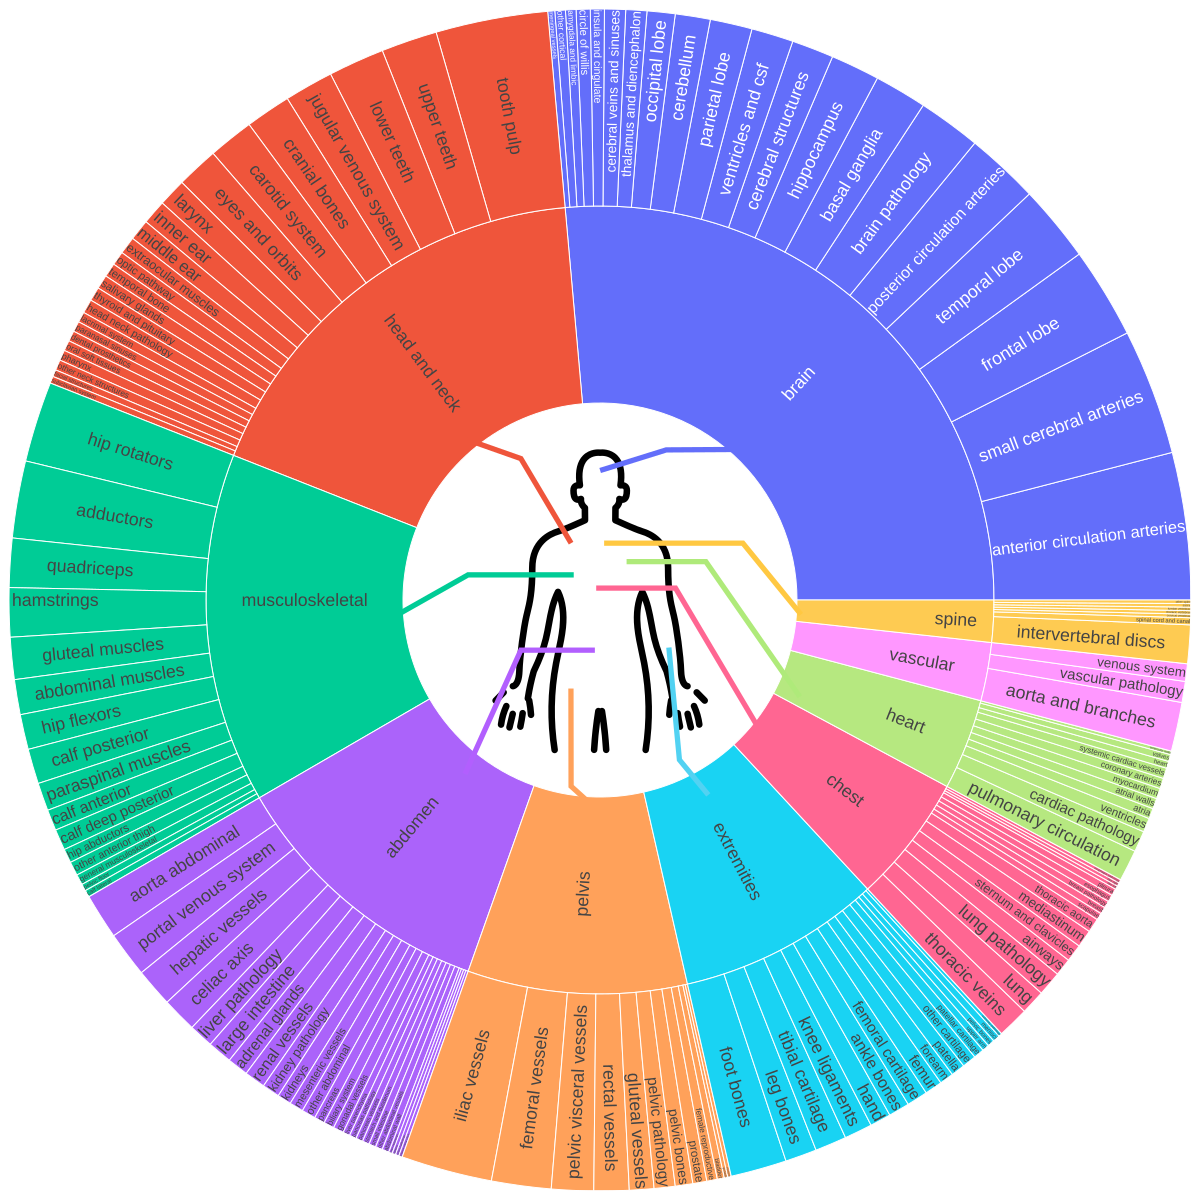
This rich semantic diversity enables language-conditioned 3D reasoning, allowing VoxTell to generate volumetric masks from flexible textual descriptions, from coarse anatomical labels to fine-grained pathological findings.
Architecture
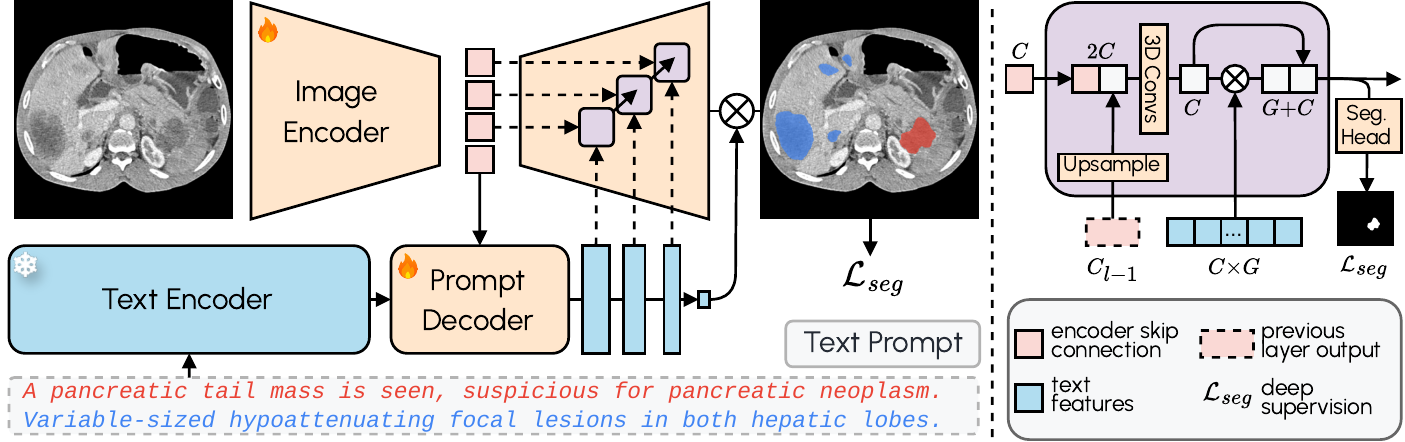
VoxTell combines 3D image encoding with text-prompt embeddings and multi-stage vision–language fusion:
- Image Encoder: Processes 3D volumetric input into latent feature representations
- Prompt Encoder: We use the fozen Qwen3-Embedding-4B model to embed text prompts
- Prompt Decoder: Transforms text queries and image latents into multi-scale text features
- Image Decoder: Fuses visual and textual information at multiple resolutions using MaskFormer-style query-image fusion with deep supervision
🛠 Installation
1. Create a Virtual Environment
VoxTell supports Python 3.10+ and works with Conda, pip, or any other virtual environment manager. Here's an example using Conda:
conda create -n voxtell python=3.12
conda activate voxtell
2. Install PyTorch
Install PyTorch compatible with your CUDA version. For example, for Ubuntu with a modern NVIDIA GPU:
pip install torch torchvision --index-url https://download.pytorch.org/whl/cu126
Any PyTorch >= 2.1.2 works except the 2.9.x series, which has a 3D-convolution memory regression (also excluded by nnU-Net).
For other configurations (macOS, CPU, different CUDA versions), please refer to the PyTorch Get Started page.
3. Install VoxTell
Install the latest release from PyPI (you can also use uv):
pip install voxtell
For the development version (the main branch, which may contain unreleased changes), install
directly from GitHub:
pip install git+https://github.com/MIC-DKFZ/VoxTell.git
For development, clone and install in editable mode:
git clone https://github.com/MIC-DKFZ/VoxTell
cd VoxTell
pip install -e .
🚀 Getting Started
👉 NEW: Try VoxTell interactively in the napari viewer
VoxTell downloads its default model (voxtell_v1.1) automatically on first use and caches it (in
the standard Hugging Face cache, ~/.cache/huggingface), so the examples below work without any
setup.
To download a copy into a directory you control (e.g. to use a different or custom model), fetch
it with the Hugging Face huggingface_hub library:
import os
from huggingface_hub import snapshot_download

MODEL_NAME = "voxtell_v1.1"        # the default model
DOWNLOAD_DIR = "/home/user/temp"   # where to put the model

local = snapshot_download("mrokuss/VoxTell", allow_patterns=f"{MODEL_NAME}/*", local_dir=DOWNLOAD_DIR)
model_path = os.path.join(local, MODEL_NAME)  # e.g. "/home/user/temp/voxtell_v1.1"
Then point VoxTell at that directory with the VOXTELL_MODEL environment variable (or pass
-m/model_dir to override per run):
export VOXTELL_MODEL=/path/to/voxtell_v1.1 # a local model directory (e.g. add to ~/.bashrc)
Once a model has been downloaded it is cached, so subsequent runs work offline.
Command-Line Interface (CLI)
VoxTell provides a convenient command-line interface for running predictions:
voxtell-predict -i input.nii.gz -o output_folder -p "liver" "spleen" "kidney"
Single prompt:
voxtell-predict -i case001.nii.gz -o output_folder -p "liver"
# Output: output_folder/case001_liver.nii.gz
Multiple prompts (saves individual files by default):
voxtell-predict -i case001.nii.gz -o output_folder -p "liver" "spleen" "right kidney"
# Outputs:
#   output_folder/case001_liver.nii.gz
#   output_folder/case001_spleen.nii.gz
#   output_folder/case001_right_kidney.nii.gz
Save combined multi-label file:
voxtell-predict -i case001.nii.gz -o output_folder -p "liver" "spleen" --save-combined
# Output: output_folder/case001.nii.gz (multi-label: 1=liver, 2=spleen)
# ⚠️ WARNING: Overlapping structures will be overwritten by later prompts
CLI Options
| Argument | Short | Required | Description |
|---|---|---|---|
--input |
-i |
Yes (unless --jobs) |
Input NIfTI file(s), or a single folder of NIfTI files |
--output |
-o |
Yes | Path to output folder |
--model |
-m |
No | Path to a local model directory. If omitted, uses VOXTELL_MODEL or downloads the default model (voxtell_v1.1) from Hugging Face |
--prompts |
-p |
Yes (unless --jobs) |
Text prompt(s) for segmentation, applied to every input image |
--jobs |
No | Per-image prompts instead of -i/-p: a .json file or inline JSON list of {"image": ..., "prompts": [...]} |
|
--device |
No | Device to use: cuda (default) or cpu |
|
--gpu |
No | GPU device ID (default: 0) | |
--save-combined |
No | Save multi-label file instead of individual files | |
--embeddings |
No | Use a local precomputed-embeddings file (.npz) instead of auto-download |
|
--no-precomputed |
No | Skip the automatic precomputed-embeddings download; embed every prompt with the backbone | |
--list-embeddings |
No | List the available precomputed prompts and exit | |
--no-overwrite |
No | Skip images whose outputs already exist | |
--verbose |
No | Enable verbose output |
--inputis either a single folder (all NIfTI files in it) or one or more NIfTI files (absolute or relative to the current directory) — not a mix. The text prompts are embedded once and reused across all images.
Batch / folder / list inference (same prompts)
# Every NIfTI in a folder
voxtell-predict -i images_folder -o output_folder -p "liver" "spleen"

# An explicit list of files
voxtell-predict -i a.nii.gz b.nii.gz c.nii.gz -o out -p "liver"
Different prompts per image
Use --jobs to bind each image to its own prompts (images come from the file, so -i is not used).
The union of all prompts across the jobs is embedded only once.
voxtell-predict --jobs jobs.json -o out
// jobs.json
[
  {"image": "a.nii.gz", "prompts": ["liver", "spleen"]},
  {"image": "b.nii.gz", "prompts": ["tumor"]}
]
(For the same prompts on every image, use -p with -i instead.)
Python API
For more control or integration into Python workflows, use the Python API:
import torch
from voxtell.inference.predictor import VoxTellPredictor
from nnunetv2.imageio.nibabel_reader_writer import NibabelIOWithReorient

# Select device
device = torch.device("cuda:0" if torch.cuda.is_available() else "cpu")

# Load image
# Keep `props`: it stores the original affine/orientation and is required to save the masks correctly.
image_path = "/path/to/your/image.nii.gz"
img, props = NibabelIOWithReorient().read_images([image_path])

# Define text prompts
text_prompts = ["liver", "right kidney", "left kidney", "spleen"]

# Initialize predictor
predictor = VoxTellPredictor(
      model_dir="/path/to/voxtell_model_directory",  # optional; omit to use $VOXTELL_MODEL or auto-download
      device=device,
)

# Run prediction
# Output shape: (num_prompts, x, y, z)
voxtell_seg = predictor.predict_single_image(img, text_prompts)
Optional: Save Results
Save the masks through the same reader:
import os
import numpy as np

output_folder = "/path/to/output"
os.makedirs(output_folder, exist_ok=True)
writer = NibabelIOWithReorient()

# Option A - one 3D mask per prompt
for prompt, seg in zip(text_prompts, voxtell_seg):
      out_path = os.path.join(output_folder, f"{prompt.replace(' ', '_')}.nii.gz")
      writer.write_seg(seg, out_path, props)

# Option B - a single multi-label 3D file, where each prompt gets its own label
# value (1, 2, 3, ...). Overlapping structures are overwritten by later prompts.
combined = np.zeros_like(voxtell_seg[0], dtype=np.uint8)
for i, seg in enumerate(voxtell_seg):
      combined[seg > 0] = i + 1  # label 1=first prompt, 2=second, ...
writer.write_seg(combined, os.path.join(output_folder, "combined.nii.gz"), props)
# Label legend: {i + 1: prompt for i, prompt in enumerate(text_prompts)}
For many images, the voxtell-predict CLI and predictor.predict_from_files /
predict_from_jobs (below) handle this saving for you.
Efficient batch / folder inference
To segment many images with the same prompts, use predict_from_files. The text prompts are
embedded once and reused across every image (a folder, a single file, or a list of files):
predictor = VoxTellPredictor(device=device)   # model auto-downloads (or set $VOXTELL_MODEL)

written = predictor.predict_from_files(
    inputs="/path/to/images_folder",          # folder, file, or list of files
    output_folder="/path/to/output",
    text_prompts=["liver", "spleen"],
    save_combined=False,                       # one file per prompt (default)
)
For different prompts per image, use predict_from_jobs (the union of all prompts is embedded
once):
predictor.predict_from_jobs(
    jobs=[
        {"image": "a.nii.gz", "prompts": ["liver", "spleen"]},
        {"image": "b.nii.gz", "prompts": ["tumor"]},
    ],
    output_folder="/path/to/output",
)
You can also embed prompts yourself and feed the embeddings into predict_single_image to reuse
them across custom loops:
embeddings = predictor.embed_text_prompts(["liver", "spleen"])
seg = predictor.predict_single_image(img, text_embeddings=embeddings)
Precomputed text embeddings
Common prompts are precomputed and downloaded automatically from Hugging Face, skipping the Qwen3 backbone; anything uncovered is embedded on the fly. To override:
VoxTellPredictor(embedding_bank="/path/to/embeddings.npz")  # explicit local file
VoxTellPredictor(use_precomputed_embeddings=False)          # always use the backbone
Optional: Visualize Results
You can visualize the segmentation results using napari:
pip install napari[all]
💡 Tip
If you work in napari already, the napari-voxtell plugin offers the fastest way to explore VoxTell results interactively.
import napari
import numpy as np

# Create a napari viewer and add the original image
viewer = napari.Viewer()
viewer.add_image(img, name='Image')

# Add segmentation results as label layers for each prompt
for i, prompt in enumerate(text_prompts):
      viewer.add_labels(voxtell_seg[i].astype(np.uint8), name=prompt)

# Run napari
napari.run()
🌐 Remote Inference Server
Run VoxTell as an HTTP server so a lightweight client (e.g. the napari-voxtell plugin on a laptop) can drive inference on a remote GPU machine. The client uploads a NIfTI once; the server reorients it, runs sliding-window inference, streams per-patch progress, and returns the masks.
pip install "voxtell[server]"

# Bind to localhost (reach it over an SSH tunnel) - safe default for a single user
voxtell-server --host 127.0.0.1 --port 1527

# ...or expose it on a trusted LAN behind a static bearer token
voxtell-server --host 0.0.0.0 --port 1527 --api-key "$VOXTELL_API_KEY"
Model resolution matches voxtell-predict (-m/--model → $VOXTELL_MODEL → Hugging Face
download). From a laptop, forward the port with ssh -N -L 1527:127.0.0.1:1527 workstation
and point the client at http://127.0.0.1:1527. The client/server design is inspired by
MIC-DKFZ's nnInteractive (Apache-2.0).
🎯 Fine-Tuning
Transfer VoxTell's pretrained image encoder into nnU-Net and fine-tune it for multi-class segmentation. The image encoder is transferred and the image decoder is trained from scratch.
1. Preprocess your dataset with standard nnU-Net:
export nnUNet_raw=/path/to/nnUNet_raw
export nnUNet_preprocessed=/path/to/nnUNet_preprocessed
export nnUNet_results=/path/to/nnUNet_results
nnUNetv2_plan_and_preprocess -d DATASET_ID --verify_dataset_integrity
2. Fine-tune (positional dataset configuration fold):
voxtell-finetune DATASET_ID 3d_fullres 0 \
    -pretrained_weights /path/to/voxtell_model/fold_0/checkpoint_final.pth
Use -tr VoxTellTrainer_noMirroring for datasets whose labels distinguish left/right. The
CLI mirrors nnUNetv2_train (--c to resume, --val to validate, etc.), see the
nnU-Net repository for the full argument reference.
Important: Image Orientation and Spacing
-
⚠️ Image Orientation (Critical): For correct anatomical localization (e.g., distinguishing left from right), images must be in RAS orientation. VoxTell was trained on data reoriented using this specific reader. Orientation mismatches can be a source of error. An easy way to test for this is if a simple prompt like "liver" fails and segments parts of the spleen instead. Make sure your image metadata is correct.
-
Image Spacing: The model does not resample images to a standardized spacing for faster inference. Performance may degrade on images with very uncommon voxel spacings (e.g., super high-resolution brain MRI). In such cases, consider resampling the image to a more typical clinical spacing (e.g., 1.5×1.5×1.5 mm³) before segmentation.
🗺️ Roadmap
- Paper Published: arXiv:2511.11450
- Code Release: Official implementation published
- PyPI Package: Package downloadable via pip
- Model Release: Public availability of pretrained weights
- Napari Plugin: Integration into the napari viewer as a plugin
- Fine-Tuning: Support and scripts for custom fine-tuning
Citation
@inproceedings{rokuss2026voxtell,
      title={Voxtell: Free-text promptable universal 3d medical image segmentation},
      author={Rokuss, Maximilian and Langenberg, Moritz and Kirchhoff, Yannick and Isensee, Fabian and Hamm, Benjamin and Ulrich, Constantin and Regnery, Sebastian and Bauer, Lukas and Katsigiannopulos, Efthimios and Norajitra, Tobias and Maier-Hein, Klaus},
      booktitle={Proceedings of the IEEE/CVF Conference on Computer Vision and Pattern Recognition},
      pages={37538--37557},
      year={2026}
}
📬 Contact
For questions, issues, or collaborations, please contact:
📧 maximilian.rokuss@dkfz-heidelberg.de / moritz.langenberg@dkfz-heidelberg.de
3 maintainers


Metadata
3 maintainers
Release files for voxtell 0.1.2
For a detailed explanation of source distributions (sdists) and built distributions (wheels), please see the package formats documentation.
Source distribution (sdist)
| File | Size | Uploaded | |
|---|---|---|---|
| voxtell-0.1.2.tar.gz | 62.7 kB | Details |
Built distribution (wheel)
| File | Interpreter | ABI | Platform | Reset |
|---|---|---|---|---|
| voxtell-0.1.2-py3-none-any.whl | Python 3 | none | any | Details |
Total release size: 121.9 kB
Release files / voxtell-0.1.2.tar.gz
| Download URL | voxtell-0.1.2.tar.gz |
|---|---|
| Size | 62.7 kB |
| Tags | Source |
|
SHA-256 checksum How to use checksums |
0a35a37b1256a4819d8245ee42468f7848bdf5fc9c94065cdee8248ded60ecc3
|
|
BLAKE2b-256 checksum How to use checksums |
176661bfb9846518d878684be59a3b6a6cb2f1b1a357215c28e88e38886c7c5c
|
| Upload date | |
|
Uploaded using Trusted Publishing? What is trusted publishing? |
No |
| Uploaded via |
uv/0.9.17 {"installer":{"name":"uv","version":"0.9.17","subcommand":["publish"]},"python":null,"implementation":{"name":null,"version":null},"distro":{"name":"Ubuntu","version":"22.04","id":"jammy","libc":null},"system":{"name":null,"release":null},"cpu":null,"openssl_version":null,"setuptools_version":null,"rustc_version":null,"ci":null}
|
Release files / voxtell-0.1.2-py3-none-any.whl
| Download URL | voxtell-0.1.2-py3-none-any.whl |
|---|---|
| Size | 59.2 kB |
| Tags | Python 3 |
|
SHA-256 checksum How to use checksums |
90ba64cfcb4cfc156047578bad502738c504d7286141807f22a006ae110c9d27
|
|
BLAKE2b-256 checksum How to use checksums |
1b562b2f2d484fb57a05896728d76e6c1da3de1d3e4a1637d853cf07c6f46b59
|
| Upload date | |
|
Uploaded using Trusted Publishing? What is trusted publishing? |
No |
| Uploaded via |
uv/0.9.17 {"installer":{"name":"uv","version":"0.9.17","subcommand":["publish"]},"python":null,"implementation":{"name":null,"version":null},"distro":{"name":"Ubuntu","version":"22.04","id":"jammy","libc":null},"system":{"name":null,"release":null},"cpu":null,"openssl_version":null,"setuptools_version":null,"rustc_version":null,"ci":null}
|














