xlwings_utils

Project description

Introduction
This module provides some useful functions to be used in xlwings (lite).
Installation
Just add xlwings-utils to the requirements.txt tab.
In the script, add
ìmport xlwings_utils as xwu
For regular installations, use
pip install xlwings_utils
[!NOTE]
The GitHub repository can be found on https://github.com/salabim/xlwings_utils .
General
It is recommended to put
import xlwings_utils as xwu
at the top of an xlwings lite script.
If an application runs under xlwings, xwu.xlwings will be True. False, if not.
Cloud support
The xlwings lite system does not provide access to the local file system. With xlwings_lites, files can be copied between a cloud storage provider and the local pyodide file system, making it possible to indirectly use the local file system.
Currently, xlwings_utils supports:
- full-access Dropbox
- read access of GitHub repo
- full access Nextcloud (not under xlwings Lite, though).
Dropbox
The easiest way to use the Dropbox functionality is to add the credentials to the environment variables. Add DROPBOX.REFRESH_TOKEN, DROPBOX.APP_KEY and DROPBOX.APP_SECRET with their corresponding values to the environment variables. Instructions on how to get these variables can be found here.
In order to make a Dropbox app, and get the required environment variables, just execute this line from the command line (shell).
python -c "exec(__import__('requests').get('https://salabim.org/dropbox setup.py').text)"The file
dropbox setup.pycan also be found in the repo of xlwings_lite .
It is possible to list all files in a specified folder using the dropbox.dir() function.
It is also possible to get at all folders and to access all underlying folders.
The function dropbox.read() can be used to read a Dropbox file (as bytes). By default, the result is cached.
The function dropbox.write() can be used to write contents (bytes) to Dropbox
The function dropbox.delete() can be used to delete a Dropbox file.
GitHub
The cloud service github does not support writing and deleting files.
Although GitHub does not require a token, it is highly recommended to obtain and set the environment variable GITHUB.TOKEN to that value. If not, only 60 requests per hour are allowed, whereas, with a token, 5000 requests per hour are allowed.
To obtain a GitHub personal access token, sign in to GitHub, go to Settings > Developer settings > Personal access tokens, choose Fine-grained tokens or Tokens (classic), click Generate new token, give it a name, set an expiration and permissions, then generate and copy the token immediately (it will not be shown again).
Unlike other cloud services,xwu.github.dir(), xwu.github.read() and xwu.github.import_from_folder require a so called orp, being a tuple of the owner, repo and path to be given.
Specific to this cloud module, the method get_repos is implemented to get the names of all repos of a given owner.
It is possible to list all files in a specified folder using the github.dir() function.
It is also possible to get at all folders and to access all underlying folders.
The function github.read() can be used to read a Github file (as bytes). The location is specified as an orp, which is a tuple of owner, repo and path.
By default, the result is cached.
The function github.get_repos() cab be used to get the names of all repos for a given owner.
Nextcloud
The easiest way to use the Nextcloud functionality is to add the credentials to the environment variables. Add NEXTCLOUD.URL, NEXTCLOUD.USERNAME and NEXTCLOUD.PASSWORD with their corresponding values to the environment variables. Instructions on how to get these variables can be found here.
Login to the file section of the browser version of your Nextcloud provider, like https://use11.thegood.cloud/apps/files/files
Then click on Files settings (bottom left) and you will see a header WebDAV. NEXTCLOUD.URL is the given URL. Next, click If you have enabled 2FA, you must create and use a new app password by clicking here. " Then, create an app and copy the password to NEXTCLOUD.PASSWORD. Finally NEXTCLOUD.USERNAME is the user name.
It is possible to list all files in a specified folder using the nextcloud.dir() function.
It is also possible to get at all folders and to access all underlying folders.
The function nextcloud.read() can be used to read a Nextcloud file (as bytes). By default, the result is cached.
The function nextcloud.write() can be used to write contents (bytes) to Nextcloud
The function nextcloud.delete() can be used to delete a Nextcloud file.
[!IMPORTANT]
As of now, nextcloud does not work under xlwings Lite, because of limitations in a sandboxed environment (it runs under native Python, though)
for all cloud services
Access is the same for Dropbox and Nextcloud.
So, a way to access a file on the system's drive (mapped to Dropbox) as a local file is:
cloud = xwu.dropbox
contents = cloud.read('/downloads/file1.xlsx')
local.write('file1.xlsx')
df = pandas.read_excel"file1.xlsx")
...
And the other direction (not available for github):
contents = local.read('file1.gif')
cloud.write('/downloads/file1.gif')
Importing a module from a cloud service.
With import_from_folder, it is possible to import a module from a folder in a cloud service, rather than from PyPI via requirements.txt
This can be very useful in case:
-
the module is not (yet) available under PyPI
-
the module is being developed and the developer wants to debug the module prior to uploading to PyPI
-
the module is just uploaded to PyPI, but it is not yet visible in pyodide.
Example for dropbox:
import xlwings_utils as xwu
vardict = xwu.dropbox.import_from_folder("/Python/vardict/vardict")
# vardict will now be imported from dropbox
Example for github (everybody can run this):
import xlwings_utils as xwu
vardict = xwu.github.import_from_folder(("salabim", "vardict", "vardict")
# vardict will now be imported from github
Note that if a module with the same name is already imported, calling ``import_from_folder` has no effect.
The method import_from_folder has one required parameter:
- folder_name: path to the module in the cloud service. Under github this has to be a tuple of (owner, repo, path)
The method returns the loaded module.
Block support
The module contains a useful 2-dimensional data structure: block.
This can be useful for manipulating a range without accessing it directly, which is expensive in terms of memory and execution time.
The advantage over an ordinary list of lists is that a block is index one-based, in line with range and addressing is done with a row, column tuple.
So, my_block[row, col] is roughly equivalent to lol[row-1][col-1]
A block stores the values internally as a dictionary and will only convert these to a list of lists when using block.value.
Converting of a range to a block can be done like
rng = book.sheets.active.range((5,7),(8,100))
my_block = xwu.block.from_range(rng
A value of a range (list of lists, list of scalars or scalar can be converted to a block with
my_block = xwu.block.from_value(rng.value)
The dimensions (number of rows and number of columns) are automatically set.
Setting of an individual item (one-based, like range) can be done like
my_block[row, column] = x
And, likewise, reading an individual item can be done like
x = my_block[row, column]
It is not allowed to read or write outside the block dimensions.
It is also possible to define an empty block, like
block = xwu.block(number_of_rows, number_columns)
The dimensions can be queried or redefined with block.number_of_rows and
block.number_of_columns.
It is also possible to get a copy of a block with different dimensions:
bl = my.block.reshape(number_of_rows=2, number_of_columns=10)
The property block.highest_used_row_number returns the row number of the highest non-None cell.
The property block.highest_used_column_number returns the column_number of the highest non-None cell.
The method block.minimized() returns a block that has the dimensions of (highest_used_row_number, highest_used_column_number).
Particularly if we process an unknown number of lines, we can do something like:
this_block = xwu.block(number_of_rows=10000, number_of_columns=2)
for row in range(1, 10001):
	this_block[row,1]= ...
	this_block[row,2]= ...
	if ...: # end condition
	    break
sheet.range((10,1)).value = this_block.minimized().value
In this case, only the really processed rows are copied to the sheet.
Looking up in a block
With blocks, it is easy to use a sheet as an input for a project / scenario.
Something like
Of course, we could access the various input fields with absolute ranges, but if something changes later (such as adding a row), all references would need to be updated.
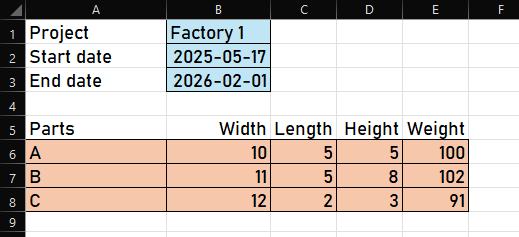
If we read the project sheet (partly) into a block, lookup methods are available to access fields easily and future-proof:
bl = xwu.block.from_range(sheet.range(1,1),(100,10)))
Let's see how this works with the above sheet. The corresponding block (bl) looks like
  |   1                2                3                4                5
--+-------------------------------------------------------------------------------
1 |   Project          Factory1
2 |   Start date       2025-05-17
3 |   End date         2026-02-01
4 |
5 |   Parts            Width            Length           Height           Weight
6 |   A                10               5                5                100
7 |   B                11               5                8                102
8 |   C                12               2                3                91
9 |
Now we can do
project  = bl.lookup("Project")
project = bl.lookup("Project")
start_date = bl.lookup("Start date")
end_date = bl.lookup("End date")
row1 = bl.lookup_row("Parts")
parts=[]
for row2 in range(row1 + 1, bl.highest_used_row_number + 1):
    if not (part_name := bl.hlookup("Part",row1=row1, row2=row2)):
        # stop when a 'blank' part_name is found
        break
    width = bl.hlookup("Width",row1=row1, row2=row2)
    length = bl.hlookup("Length",row1=row1, row2=row2)
    height = bl.hlookup("HeightL",row1=row1, row2=row2)
    weight = bl.hlookup("Weight",row1=row1, row2=row2)
    parts.append(Part(part_name, width, length, height, weight))
First, we perform a couple of vertical lookups to scan column 1 for the given labels and return the corresponding values from column 2.
Then, there's lookup_row, which also scans column1 for the given label (Parts), but returns the corresponding row (5). It is then stored in row1.
We then read the following rows (using hlookups) and access the required values.
Filling a block from other sources
The advantage of using a block instead of accessing these sources directly is that they are one-based, just like in Excel.
It is possible to make a block from an xlrd worksheet with block.from_xlrd_sheet.
It is possible to create a block from a panda dataFrame using block.from_dataframe. Ensure that, if the dataframe is created by reading from an Excel sheet, headers=None is specified, e.g., df = pd.read_excel(filename, header=None).
It is possible to make a block from an openpyxl worksheet with block.from_openpyxl_sheet.
It is possible to make a block from a text file with block.from_file.
Writing a block to an openpyxl sheet
In order to write (append) to an openpyxl sheet, use: block.to_openpyxl_sheet.
Capture stdout support
The module has support for capturing stdout and -later- using showing the captured output on a sheet.
This is rather important as printing in xlwings lite to the UI pane is rather slow.
In order to capture stdout output, it is required to first issue
capture = xwu.Capture()
By this, capture is automatically enabled and print is disabled. Alternatively, it is possible to use
capture = xwu.Capture(enabled=False)
to disable the capture. And with
capture = xwu.Capture(include_print=True)
the stdout output is captured and printed.
Capturing can be enabled and disabled at any time with capture.enabled = True and capture.enabled = False.
And include print, likewise, with capture.include_print.
Alternatively, a context manager is provided:
with capture:
    """
    code with print statements
    """
Note that stopping the capture, leaves the captured output in place, so it can be extended later.
In either case, the captured output can then be copied to a sheet, like
sheet.range(4,5).value = capture.value
Upon reading the value, the capture buffer will be emptied.
If you don't want the buffer to be emptied after accessing the value, use capture.value_keep.
The capture buffer can also be retrieved as a string with capture.str and capture.str_keep.
Clearing the captured stdout buffer can be done at any time with capture.clear().
Functionality for accessing local files via VBA
Currently, xlwings Lite does not provide access to the local file system. Therefore, xlwings_utils offers some functionality to trigger a VBA script as well as functionality to encode a file in the pyodide file system to a VBA sheet and to trigger writing the encoded file(s) to the local file system.
Files can be encoded into a block, like:
    bl = xwu.block.encode_file("film1.mp4")
    book.sheets["VBA"].range((10,1)).value=bl.value
With this code, column A will be filled with an encoded copy of the files film1.mp4 . This can then be used with a suitable VBA macro to decode to the real file system. A VBA macro can be triggered with xwu.trigger_macro(). This requires an Excel worksheet where cell A1 is reserved for communication with xlwings lite. This worksheet needs to contain a macro, like
Private Sub Worksheet_Calculate()
    If Me.Range("A1").Formula = "=NOW()" Then
        Me.Range("A1").Value = Null
        Call MacroToExecute
    End If
End Sub
, where MacroToExecute should contain the user code, most likely code to decode file(s) encoded.
The repo contains a VBA module called xlwings_utils.bas with code to decode encoded files. Just add the .bas file to a worksheet and call like
Sub MacroToExecute()
    DecodeFile(Me, 10, 1)
In this example, the file film1.mp4 will be downloaded into the current directory.
The module xlwings_utils also contains code to encode a local file to a sheet:
Sub MacroToExecute()
    EncodeFile(Me, "data.json", 10, 1)
This will place an encoded version of data.json on the sheet.
Then, the file can be copied to the pyodide file system with
bl = block(xw.range((10,1),(50000,1)).decode_to_files())
Miscellaneous, timer decorator
xlwings_utils provides a useful timer decorator that may be used to show the name, the entry time, the exit time and the duration of a xlwings script.
To use this, put the decorator immediately after the xw.script decorator, like:
@xw.script
@xwu.timer
def MyScript(book: xw.Book):
    ...
This will print something like:
Done MyScript 11:51:13.24 - 11:51:20.28 (7.04s)
Miscellaneous, calling function decorated with xw.script
xlwings_utils contains the undecorated function to remove the decorators from function; this is particularly useful if you would like to call a function that is decorated with @xw.script. Example:
    @xw.script
    def Task_1(book: xw.Book):
        ...

    @xw.script
    def Task_2(book: xw.Book):
        ...

    @xw.script
    def Task_1_2(book: xw.Book):
        xwu.undecorated(Task_1)(book)
        xwu.undecorated(Task_2)(book)
The function works only for decorators that use the wrapped attribute, most likely via @functools.wraps, which is indeed the case for xw.script, and xwu.timer.
By default, undecorated removes all decorators. With the parameter max_number, that number can be limited:
    @xw.script
    @xwu.timer
    def Task_1(book: xw.Book):
        ...

    @xw.script
    @xwu.timer
    def Task_2(book: xw.Book):
        ...

    @xw.script
    def Task_1_2(book: xw.Book):
        xwu.undecorated(Task_1, max_number=1)(book)
        xwu.undecorated(Task_2, max_number=1)(book)
Now, the timer decorator will be still in effect for Task_1 and Task_2.
## Contact info
You can contact Ruud van der Ham, the core developer, at ruud@salabim.org.
## Badges


Release history Release notifications | RSS feed


Download files
Download the file for your platform. If you're not sure which to choose, learn more about installing packages.
Source Distribution
Built Distribution
Filter files by name, interpreter, ABI, and platform.
If you're not sure about the file name format, learn more about wheel file names.
Copy a direct link to the current filters
File details
Details for the file xlwings_utils-26.0.5.tar.gz.
File metadata
- Download URL: xlwings_utils-26.0.5.tar.gz
- Upload date:
- Size: 25.2 kB
- Tags: Source
- Uploaded using Trusted Publishing? No
- Uploaded via: twine/6.2.0 CPython/3.14.0
File hashes
| Algorithm | Hash digest | |
|---|---|---|
| SHA256 |
7796e76f1f893f73b1994ee83bebf758f72e12061c9fc6f384eb1f5e50ed8b89
|
|
| MD5 |
2cec2dcc5ca3fcdb6fa015a909ba4238
|
|
| BLAKE2b-256 |
bf06027ec0f713416c8e7c55d56fb5d26343b5db69adf37ce7c47fa5fbfaf509
|
File details
Details for the file xlwings_utils-26.0.5-py3-none-any.whl.
File metadata
- Download URL: xlwings_utils-26.0.5-py3-none-any.whl
- Upload date:
- Size: 19.9 kB
- Tags: Python 3
- Uploaded using Trusted Publishing? No
- Uploaded via: twine/6.2.0 CPython/3.14.0
File hashes
| Algorithm | Hash digest | |
|---|---|---|
| SHA256 |
0c5abb6b0101fcc6f247c2cf26d1b5fc1d00cf2a300f8a62f26c727632bc6826
|
|
| MD5 |
e29d325201cb05526297827ae2a1414c
|
|
| BLAKE2b-256 |
568c622fde6841333d92495efce41bf851158809df13b83316122f6fde9d8665
|


