
Zabbix-Cachet
This is python script which provides synchronisation between Zabbix IT Services and Cachet
Description
The idea of Zabbix-Cachet is providing the easiest way to export Zabbix terms to Cachet. With this script you can maintain Cachet though Zabbix.
Zabbix-Cachet reads pre-configured Zabbix IT Services and automatically creates Cachet components. After that Zabbix-Cachet periodically checks Zabbix triggers (that linked to you IT Services) and manipulate with Cachet incidents and Component statuses based on triggers.
Zabbix-Cachet communicate with Zabbix and Cachet via API interface. To make it works you need a zabbix user with sufficient permissions to read triggers, items of services that is exported to Cachet and Cachet`s API key.
Features
- Automatically creates Cachet Components and Components group
- Automatically creates Cachet Incidents and update them with acknowledgement messages
- Allow to specify root IT service where Zabbix-Cachet will work
Example
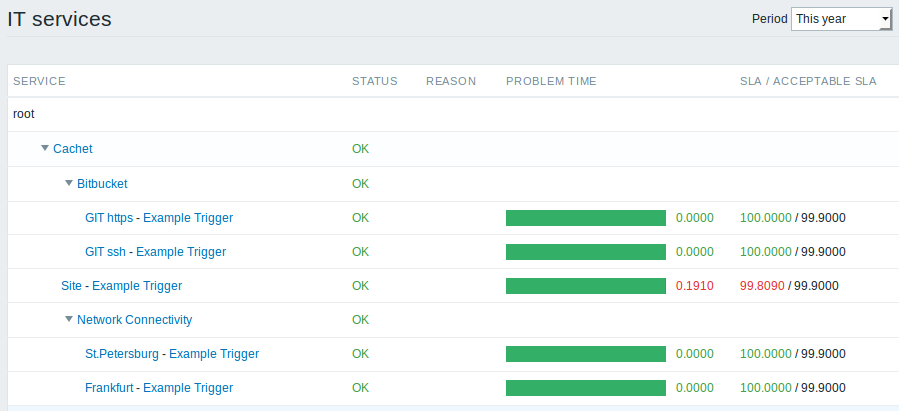
Zabbix IT Services.
- Cachet -
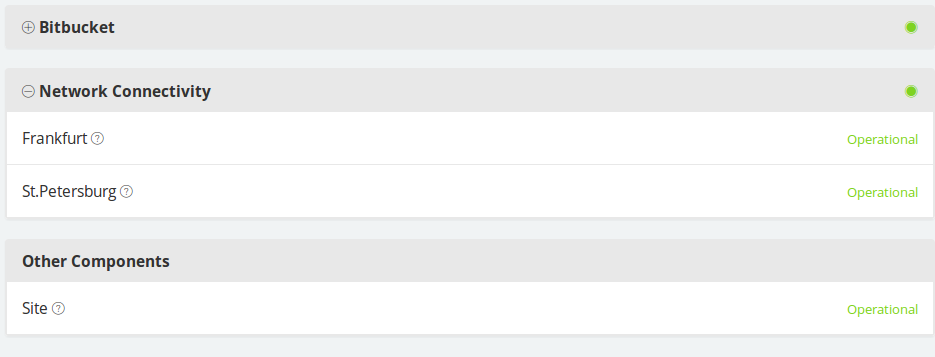
root_servicefor zabbix-cachet script. - Bitbucket, Network Connectivity - parent services. They will be Components Groups in Cachet.
- GIT https, GIT ssh - Components in Cachet. Do not forget to set Zabbix trigger to this group.
Cachet
Requirements
- Cachet 2.2, 2.3
- Zabbix 2.X, 3.X, 4.0, 5.0, 6.0, 6.4, 7.0
- python 3.6+
Installation
Docker Installation
- Create
/etc/zabbix-cachet.ymlfile basedconfig-example.yml. - Run Docker container
docker run --name zabbix-cachet -v /etc/zabbix-cachet.yml:/config.yml qk4l/zabbix-cachet - Drink a cup of tea (optional)
Python package
- Install python package via pip
pip install zabbix-cachet
- Rename
config-example.ymltoconfig.ymland fill a file with your settings. - Define
CONFIG_FILEenvironment variable which point to yourconfig.ymlor change current work directory to folder with config - Launch
zabbix-cachet
Apt (outdated release)
- Add official Zabbix-Cachet PPA:
add-apt-repository ppa:reg-tem4uk/zabbix-cachet
apt-get update
- Install the package:
apt-get install zabbix-cachet - Configure it:
nano /etc/zabbix-cachet.yml - Restart it:
systemctl enable zabbix-cachet && systemctl restart zabbix-cachet
Configuration
Settings are storing in config.yml file which should be placed in script's working directory.
If you want to use another path for config.yml use CONFIG_FILE environment variable.
1 maintainer

Metadata
1 maintainer
Release files for zabbix-cachet 2.1.3
For a detailed explanation of source distributions (sdists) and built distributions (wheels), please see the package formats documentation.
Built distribution (wheel)
| File | Interpreter | ABI | Platform | Reset |
|---|---|---|---|---|
| zabbix_cachet-2.1.3-py3-none-any.whl | Python 3 | none | any | Details |
Release files / zabbix_cachet-2.1.3-py3-none-any.whl
| Download URL | zabbix_cachet-2.1.3-py3-none-any.whl |
|---|---|
| Size | 14.4 kB |
| Tags | Python 3 |
|
SHA-256 checksum How to use checksums |
2c2213da08c53dff8e72343bd43b53f5f25b6c335b262c6d196de85258a0dd50
|
|
BLAKE2b-256 checksum How to use checksums |
55da5e85863d970429df538ee2da365cb09e35fc3dfd199bc79929edec7d72dd
|
| Upload date | |
|
Uploaded using Trusted Publishing? What is trusted publishing? |
No |
| Uploaded via |
poetry/1.8.3 CPython/3.10.12 Linux/6.8.0-40-generic
|














