Python daemon which provides synchronisation between Zabbix IT Services and Cachet

Project description
Zabbix-Cachet
This is python script which provides synchronisation between Zabbix IT Services and Cachet
Description
The idea of Zabbix-Cachet is providing the easiest way to export Zabbix terms to Cachet. With this script you can maintain Cachet though Zabbix.
Zabbix-Cachet reads pre-configured Zabbix IT Services and automatically creates Cachet components. After that Zabbix-Cachet periodically checks Zabbix triggers (that linked to you IT Services) and manipulate with Cachet incidents and Component statuses based on triggers.
Zabbix-Cachet communicate with Zabbix and Cachet via API interface. To make it works you need a zabbix user with sufficient permissions to read triggers, items of services that is exported to Cachet and Cachet`s API key.
Features
- Automatically creates Cachet Components and Components group
- Automatically creates Cachet Incidents and update them with acknowledgement messages
- Allow to specify root IT service where Zabbix-Cachet will work
Example
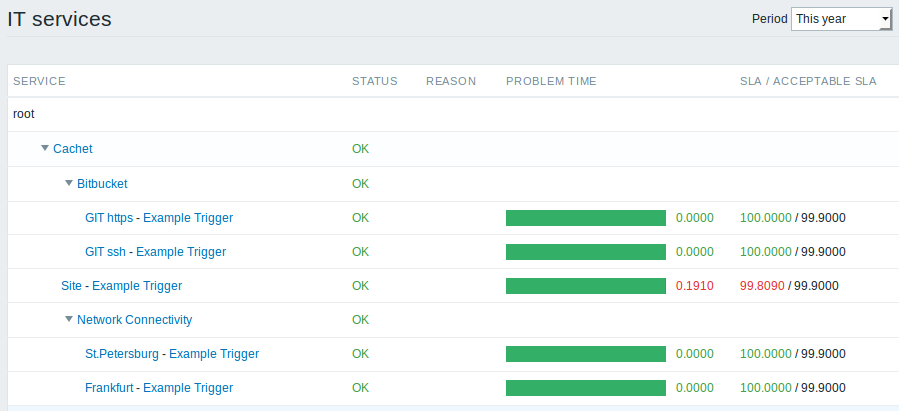
Zabbix IT Services.
- Cachet -
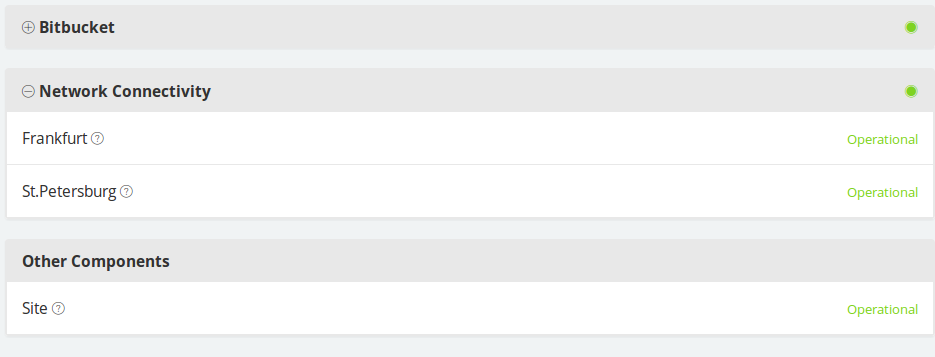
root_servicefor zabbix-cachet script. - Bitbucket, Network Connectivity - parent services. They will be Components Groups in Cachet.
- GIT https, GIT ssh - Components in Cachet. Do not forget to set Zabbix trigger to this group.
Cachet
Requirements
- Cachet 2.2, 2.3
- Zabbix 2.X, 3.X, 4.0, 5.0, 6.0, 6.4, 7.0
- python 3.6+
Installation
Docker Installation
- Create
/etc/zabbix-cachet.ymlfile basedconfig-example.yml. - Run Docker container
docker run --name zabbix-cachet -v /etc/zabbix-cachet.yml:/config.yml qk4l/zabbix-cachet - Drink a cup of tea (optional)
Python package
- Install python package via pip
pip install zabbix-cachet
- Rename
config-example.ymltoconfig.ymland fill a file with your settings. - Define
CONFIG_FILEenvironment variable which point to yourconfig.ymlor change current work directory to folder with config - Launch
zabbix-cachet
Apt (outdated release)
- Add official Zabbix-Cachet PPA:
add-apt-repository ppa:reg-tem4uk/zabbix-cachet
apt-get update
- Install the package:
apt-get install zabbix-cachet - Configure it:
nano /etc/zabbix-cachet.yml - Restart it:
systemctl enable zabbix-cachet && systemctl restart zabbix-cachet
Configuration
Settings are storing in config.yml file which should be placed in script's working directory.
If you want to use another path for config.yml use CONFIG_FILE environment variable.
Release history Release notifications | RSS feed


Download files
Download the file for your platform. If you're not sure which to choose, learn more about installing packages.
Source Distributions
Built Distribution
Filter files by name, interpreter, ABI, and platform.
If you're not sure about the file name format, learn more about wheel file names.
Copy a direct link to the current filters
File details
Details for the file zabbix_cachet-2.1.3-py3-none-any.whl.
File metadata
- Download URL: zabbix_cachet-2.1.3-py3-none-any.whl
- Upload date:
- Size: 14.4 kB
- Tags: Python 3
- Uploaded using Trusted Publishing? No
- Uploaded via: poetry/1.8.3 CPython/3.10.12 Linux/6.8.0-40-generic
File hashes
| Algorithm | Hash digest | |
|---|---|---|
| SHA256 |
2c2213da08c53dff8e72343bd43b53f5f25b6c335b262c6d196de85258a0dd50
|
|
| MD5 |
cf9669211b871d843576e47884ad2ac4
|
|
| BLAKE2b-256 |
55da5e85863d970429df538ee2da365cb09e35fc3dfd199bc79929edec7d72dd
|


