

pytest-elasticsearch




What is this?
This is a pytest plugin that enables you to test your code that relies on a running Elasticsearch search engine. It allows you to specify fixtures for Elasticsearch process and client fixtures.
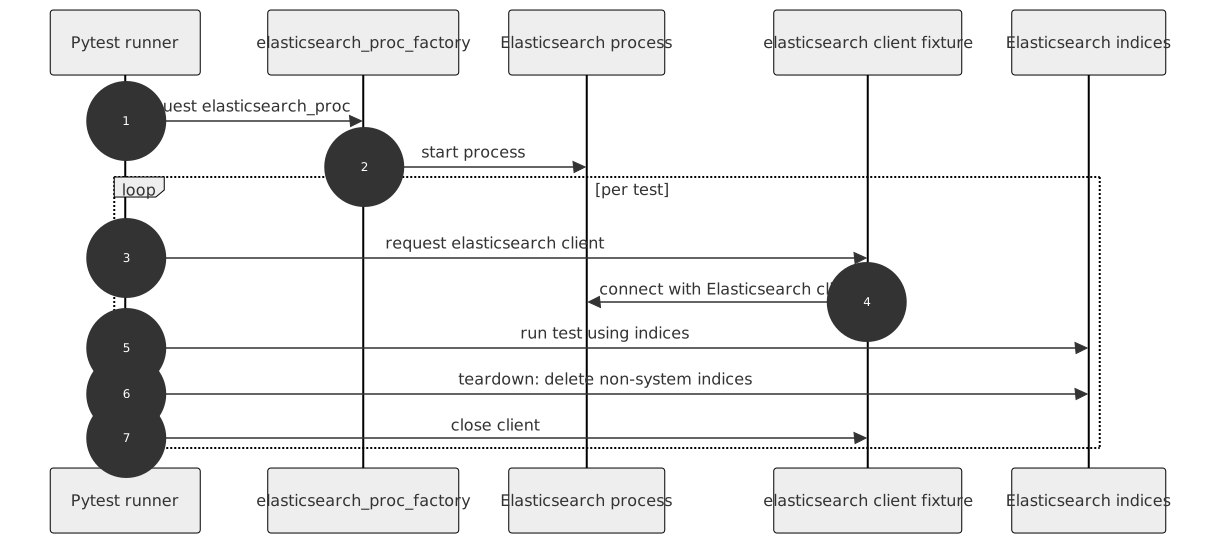
How to use
Prerequisites
Install Elasticsearch 8.x or newer following the official documentation: https://www.elastic.co/guide/en/elasticsearch/reference/current/install-elasticsearch.html
Quickstart: first test
Install the plugin and your test dependencies (as you normally do for your project).
Ensure Elasticsearch is available (local install or container).
Create a test that uses the built-in fixture:
def test_can_connect(elasticsearch):
    assert elasticsearch.info()
Run your tests:
pytestThe plugin contains three fixtures:
elasticsearch - a client fixture that has function-scope, and which cleans Elasticsearch at the end of each test.
elasticsearch_proc - a session-scoped fixture that starts an Elasticsearch instance at its first use and stops at the end of the tests.
elasticsearch_nooproc - a no-process fixture that holds connection data to an already running Elasticsearch instance
Simply include one of these fixtures in your test fixture list.
You can also create additional Elasticsearch client and process fixtures if you need to:
from pytest_elasticsearch import factories

elasticsearch_my_proc = factories.elasticsearch_proc(port=None)
elasticsearch_my = factories.elasticsearch('elasticsearch_my_proc')Connecting to already existing Elasticsearch service
Some projects use already running Elasticsearch servers (e.g., in Docker). To connect to them, use the elasticsearch_nooproc fixture.
es_external = factories.elasticsearch('elasticsearch_nooproc')Configure the host/port to match your running Elasticsearch instance using the options below. If not provided, the noprocess fixture defaults to port 9200.
Configuration
You can define your settings in three ways: fixture factory arguments, command line options, and pytest.ini configuration options. You can pick which you prefer, but remember that these settings are handled in the following order:
Fixture factory argument
Command line option
Configuration option in your pytest.ini file
Elasticsearch option |
Fixture factory argument |
Command line option |
pytest.ini option |
Noop process fixture |
Default |
|---|---|---|---|---|---|
Elasticsearch executable |
executable |
–elasticsearch-executable |
elasticsearch_executable |
/usr/share/elasticsearch/bin/elasticsearch |
|
host |
host |
–elasticsearch-host |
elasticsearch_host |
host |
127.0.0.1 |
port |
port |
–elasticsearch-port |
elasticsearch_port |
port (default 9200) |
random (free port) |
Free port search count |
port_search_count |
–elasticsearch-port-search-count |
elasticsearch_port_search_count |
5 |
|
Elasticsearch cluster name |
cluster_name |
–elasticsearch-cluster-name |
elasticsearch_cluster_name |
elasticsearch_cluster_<port> |
|
index storage type |
index_store_type |
–elasticsearch-index-store-type |
elasticsearch_index_store_type |
mmapfs |
|
network publish host |
network_publish_host |
–elasticsearch-network-publish-host |
elasticsearch_network_publish_host |
127.0.0.1 |
|
Transport TCP port |
transport_tcp_port |
–elasticsearch-transport-tcp-port |
elasticsearch_transport_tcp_port |
random |
Example usage:
pass it as an argument to your own fixture
elasticsearch_proc = factories.elasticsearch_proc(
    cluster_name='awsome_cluster')
specify your cluster name as elasticsearch_cluster_name in your pytest.ini file.
To do so, put a line like the following under the [pytest] section of your pytest.ini:
[pytest]
elasticsearch_cluster_name = awsome_cluster
Known issues
It might happen that the process can’t be started due to lack of permissions. The files that the user running tests must have access to are:
/etc/default/elasticsearch
Make sure you either run tests as a user who has access to these files, or grant the user proper permissions or add them to the proper groups.
In CI, we install Elasticsearch from tar/zip archives, which do not set up additional permission restrictions, so it’s not a problem on the CI/CD.
Package resources
1 maintainer

Metadata
1 maintainer
Release files for pytest-elasticsearch 6.0.0
For a detailed explanation of source distributions (sdists) and built distributions (wheels), please see the package formats documentation.
Source distribution (sdist)
| File | Size | Uploaded | |
|---|---|---|---|
| pytest_elasticsearch-6.0.0.tar.gz | 18.1 kB | Details |
Built distribution (wheel)
| File | Interpreter | ABI | Platform | Reset |
|---|---|---|---|---|
| pytest_elasticsearch-6.0.0-py3-none-any.whl | Python 3 | none | any | Details |
Total release size: 34.0 kB
Release files / pytest_elasticsearch-6.0.0.tar.gz
| Download URL | pytest_elasticsearch-6.0.0.tar.gz |
|---|---|
| Size | 18.1 kB |
| Tags | Source |
|
SHA-256 checksum How to use checksums |
275ee07a40392523f7e9ad04b74d3487a4259420c67c948e359ff7f3b90fa24a
|
|
BLAKE2b-256 checksum How to use checksums |
1a510a16726defe38a24a1d3f270a708778f61d04a21e6ec54854fddf62b311e
|
| Upload date | |
|
Uploaded using Trusted Publishing? What is trusted publishing? |
Yes |
| Uploaded via |
twine/7.0.0 CPython/3.13.14
|
Provenance
Provenance describes where a file came from. On PyPI, provenance is shared via attestations, which provide a verifiable record of the build or publishing details. View details, limitations and caveats.


PyPI Publish Attestation
PyPI verified that this artifact, at this checksum, originated from the publisher listed below.
Signed by GitHub Actions, verified by PyPI on Oct 10, 2026.
Transparency logRelease files / pytest_elasticsearch-6.0.0-py3-none-any.whl
| Download URL | pytest_elasticsearch-6.0.0-py3-none-any.whl |
|---|---|
| Size | 15.9 kB |
| Tags | Python 3 |
|
SHA-256 checksum How to use checksums |
1150393964855c605443d1f61e1dea22e7d69f61cd70b1030fca0addcffc10d1
|
|
BLAKE2b-256 checksum How to use checksums |
b1318a002dff2e04835c2a20447f115a29efcd3be62e7042171dc946230c1e22
|
| Upload date | |
|
Uploaded using Trusted Publishing? What is trusted publishing? |
Yes |
| Uploaded via |
twine/7.0.0 CPython/3.13.14
|
Provenance
Provenance describes where a file came from. On PyPI, provenance is shared via attestations, which provide a verifiable record of the build or publishing details. View details, limitations and caveats.
PyPI Publish Attestation
PyPI verified that this artifact, at this checksum, originated from the publisher listed below.
Signed by GitHub Actions, verified by PyPI on Oct 10, 2026.
Transparency log













