
Control library for Genmitsu CNC machines used as low-cost lab automation platforms (liquid handling, fraction collection, vision-based capping, etc.).
Verified details
These details have been verified by PyPIProject links
GitHub Statistics
Maintainers

Project description
CNC MACHINE CODE
Authors: Owen Melville, Kelvin Chow
Last Updated: 2026-03-18
Overall description
This package can be used to control Genmitsu CNC machines. This is useful for accelerated discovery because you can put your tools onto the CNC machine.Install from PyPI:
pip install cnc-4-science
Then import cnc_machine_core and use its methods to intuitively and seamlessly move the CNC machine with whatever scientific tools you want to incorporate. See examples/liquid_handling/picus_pipette/ for a full worked example.
Basic Functions:
-
Home CNC machine
-
Move to absolute points (x,y,z)
-
Move to locations defined in a structured way (Eg move to Vial Position 0)
-
Control of the spindle output
-
Handles all gcode and CNC communication so you don't have to
-
Makes sure you don't move the CNC machine to a position it can't go
-
Automatic alarm detection and recovery (re-homes if a limit switch is triggered)
-
Orthogonal waypoint moves for collision avoidance between deck slots
API Reference
| Method | Description |
|---|---|
home() |
Homes the robot and parks at the origin |
origin() |
Moves the robot to the origin |
connect() / close() |
Open and close serial connection to the CNC |
move_to_point(x, y, z) |
Move to absolute coordinates |
move_to_point_safe(x, y, z) |
Raises Z to clearance first, moves XY, then lowers Z. Prevents collisions with labware |
move_to_point_safe_orthogonal(x, y, z, waypoint, axis_order) |
Moves one axis at a time through waypoints for collision avoidance. Axis orders: yxy, xyx, xyxy, yxyx |
move_to_location(location, index) |
Move to a named location at the given index |
spindle_on(speed) |
Turn on spindle at given RPM (M3) |
spindle_off() |
Turn off spindle (M5) |
is_alarm() |
Returns True if GRBL is in alarm state (e.g. limit switch triggered) |
recover_if_alarm() |
Checks for alarm and auto-homes to recover. Called internally before every move |
Deck and Labware
The cnc_deck module provides Well, Labware, and Deck objects for coordinate resolution:
from cnc_machine_core import Deck

deck = Deck()                                        # standard 4-slot deck
plate = deck.load_labware("1", "labware/my_labware.json")  # returns Labware

well = plate["A1"]                                   # Well object
x, y, z = well.position()                            # absolute CNC coordinates
x, y, z = well.position(offset={"x": 6.75, "y": -4.0})  # with tool offset

for well in plate.wells():                           # iterate in ordering
    print(well.name, well.position())
Alternative deck layouts are in deck/ (pass by name or path):
cnc_4_slot_deck.json— standard 4-slot (2×2) [default]cnc_1_slot_deck.json— single slot at origin (open deck, no labware required)
Labware definitions are created using the Opentrons Labware Creator. Only the X and Y well coordinates from the Opentrons JSON are used. Z heights are defined per-protocol as calibrated constants, since Z depends on the specific tool and labware combination rather than the labware geometry alone.
Custom labware JSON files go in labware/. See the existing files there for reference.
Direct Positioning (No Labware)
For simpler setups that don't need labware definitions, use the open deck and move directly to absolute coordinates:
from cnc_machine_core import Deck

deck = Deck("cnc_1_slot_deck")           # built-in name; or pass a path to custom JSON
# No labware needed — move to raw coordinates
cnc.move_to_point_safe(x=100, y=50, z=-20)
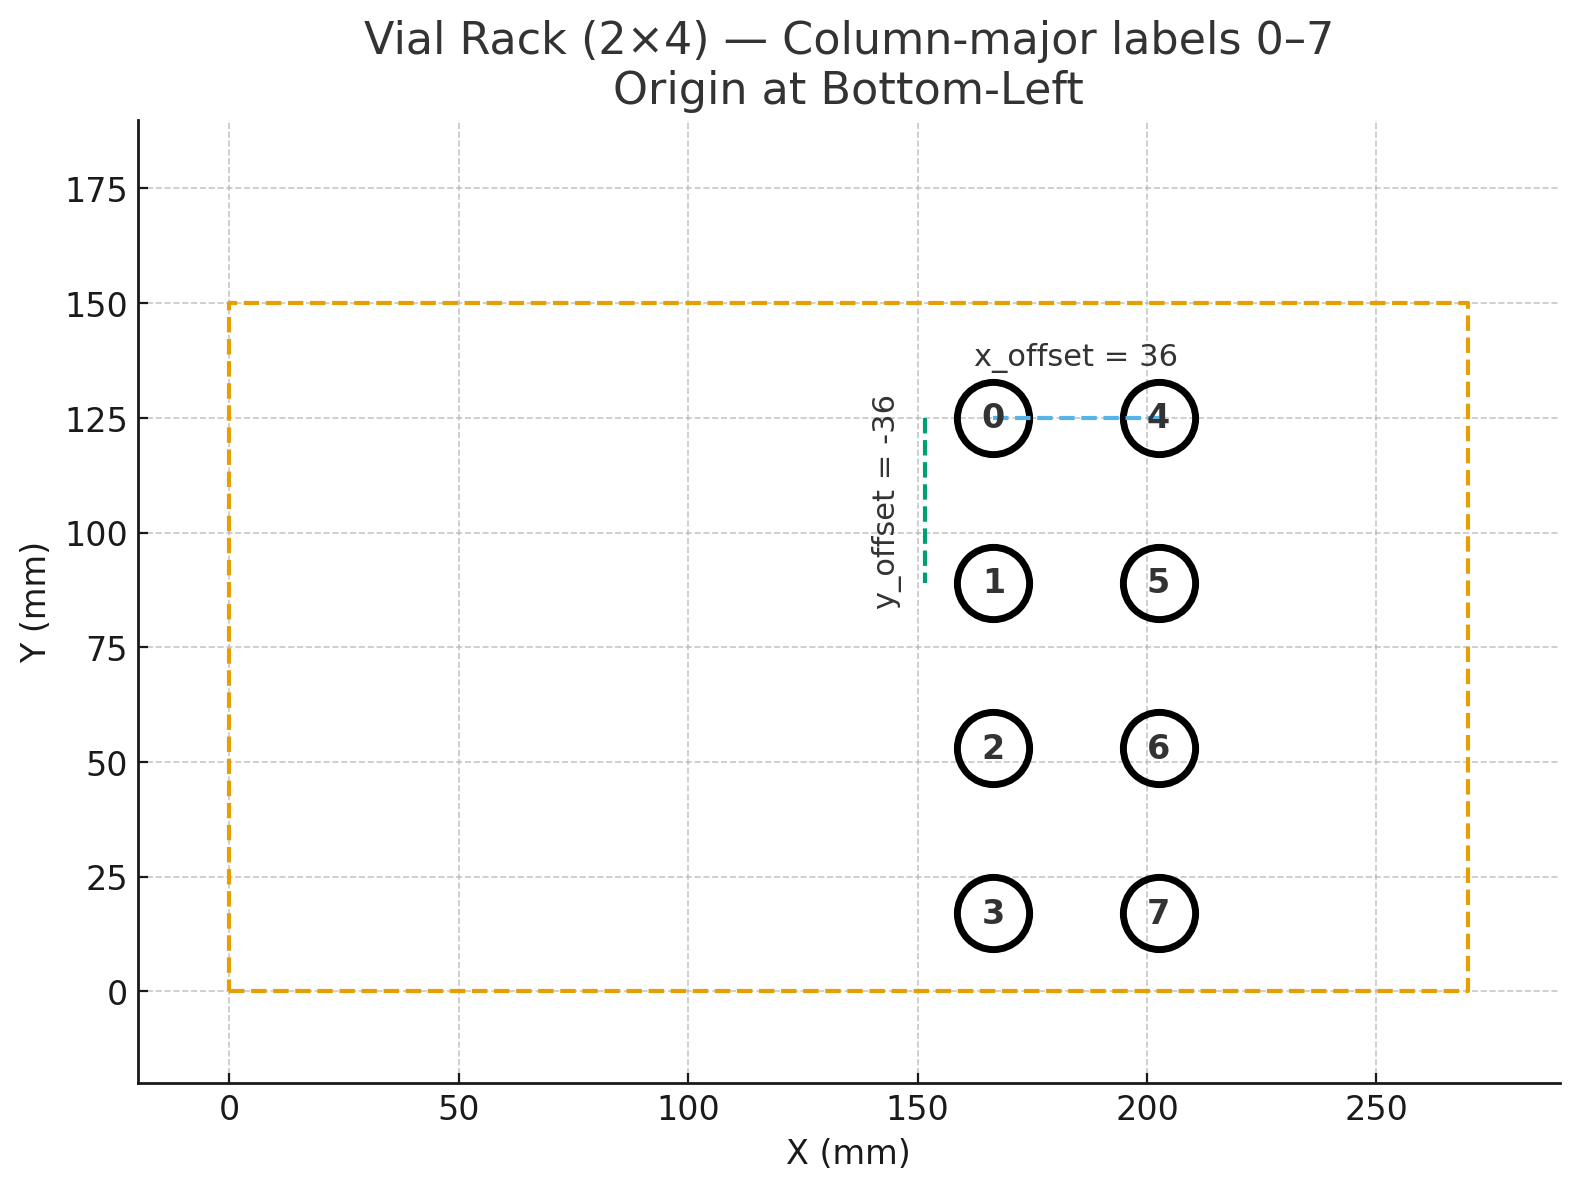
Alternatively, position arrays can be defined in a YAML file and addressed by index using move_to_location(). This is useful for regular grids where you don't need named wells. Positions are defined in location_status.yaml:
vial_rack:
  num_x: 2          # columns
  num_y: 4          # rows
  x_origin: 166.5   # first position X
  y_origin: 125     # first position Y
  z_origin: 0
  x_offset: 36      # spacing between columns
  y_offset: -36     # spacing between rows
The location index moves through a full column before advancing to the next. Index 0 is at the origin.
Z Calibration Helper
A Z calibration script is included at examples/liquid_handling/picus_pipette/z_helper.py. It moves the CNC to a selected slot/well (with tool offset applied), then lets the user step Z up and down at three granularity levels (coarse, medium, fine) to find the correct working height. This is much faster than manually jogging and reading coordinates. Copy it into your own application and update the deck/labware/tool configuration for your setup.
Deck State
The deck_state module tracks per-well status across all deck slots with YAML persistence:
from cnc_machine_core import DeckState

ds = DeckState()
ds.init_wells_from_labware("1", plate)              # from Labware object
ds.init_from_preset({"1": {"A1": "sample"}})         # override specific wells
ds.set_status("1", "A1", "processed")               # update (auto-saves)
loc = ds.find_next(["1", "2"], "sample")             # first match -> ("1", "A2")
ds.count(["1"], "processed")                         # count by status
ds.summary()                                         # print slot breakdown
Status strings are application-defined — use whatever makes sense for your workflow.
A sample preset is in examples/liquid_handling/picus_pipette/deck_preset.yaml.
Starting a New Application
After physically setting up the CNC machine, run examples/hello_cnc/hardware_check.py as a sanity check to verify the serial connection, homing, movement, and spindle all work correctly. Edit examples/hello_cnc/cnc_config.yaml to match your COM port and bounds before running:
python examples/hello_cnc/hardware_check.py
Once the hardware check passes, create your application from the starter example at examples/liquid_handling/picus_pipette/ (a full worked example using a Sartorius Picus 2 pipette for serial dilution).
-
Copy the example — copy
examples/liquid_handling/picus_pipette/to a new repository or directory -
Install cnc-4-science — install as a dependency in your project's virtual environment:
Linux / macOS / Raspberry Pi:
python3 -m venv .venv
source .venv/bin/activate
pip install cnc-4-science
Windows:
python -m venv .venv
.\.venv\Scripts\Activate.ps1
pip install cnc-4-science
Or for local editable development against an unreleased core:
pip install -e path/to/cnc-machine
-
Configure your CNC — edit
tools/cnc_config.yaml(COM port, baud, bounds). Then load it in your script withCNC_Machine.from_config("tools/cnc_config.yaml") -
Add your labware — place custom labware JSON files in
custom_labware/, or load standard Opentrons labware viaopentrons_shared_data.labware.load_definition(...) -
Configure each tool — create
tools/<tool>_config.yamlper pipette/effector with COM port, mounting offset, Z heights, and any tool-specific parameters -
Calibrate Z heights — run
python z_helper.pyto find working Z for each tool + labware combo; copy results into the tool's<tool>_config.yaml -
Validate — set
virtual: trueintools/cnc_config.yamlfor a dry run, then on hardware -
Implement tools — use
tools/picus_pipette.pyas a pattern for wrapping new tools
Architecture
cnc-4-science (library, on PyPI)         Your Application (copied example)
├── src/cnc_machine_core/                  ├── protocols/
│   ├── cnc_machine.py  (motion)            │   └── serial_dilution_demo.py
│   ├── cnc_deck.py     (deck/wells)        ├── z_helper.py
│   ├── deck_state.py   (state)             ├── deck_preset.yaml
│   ├── deck/           (definitions)       ├── custom_labware/
│   └── labware/        (labware JSON)      ├── tools/
├── examples/                                │   ├── cnc_config.yaml          (CNC + deck layout + Z heights)
│   ├── hello_cnc/                          │   ├── picus_config.yaml        (tool: port, offset, volumes)
│   └── liquid_handling/                     │   ├── picus_pipette.py         (tool wrapper)
└── pyproject.toml                            │   └── picus_driver.py          (vendored low-level driver)
                                              └── requirements.txt  (`cnc-4-science`)
- Library owns: machine control, deck/labware primitives, standard definitions
- App owns: concrete tool implementations, calibrated configs, workflow protocols
Tool Contract
Every tool class must follow this interface:
class MyTool:
    def __init__(self, cnc_machine, tool_config):
        self.cnc = cnc_machine
        self.offset = tool_config.get("offset", {"x": 0, "y": 0, "z": 0})
        # extract parameters from tool_config["parameters"]
See examples/liquid_handling/picus_pipette/tools/picus_pipette.py for a working reference implementation.
Advice on Integration with Scientific Instruments
-
Create a separate python file for each tool (camera, force sensor, syringe pump, etc.)
-
Create an instrument class that imports cnc_machine along with the python files for each tool (eg fraction_collector.py)
-
In your instrument class make methods that intuitively describe the general actions of your instrument (eg dispense_fraction)
-
Make your workflows in seperate python files or Jupyter notebook files that create an instance of your instrument class
-
This will make your workflows as clean and simple as possible while hard to mess up!
Project details
Verified details
These details have been verified by PyPIProject links
GitHub Statistics
Maintainers
Release history Release notifications | RSS feed


Download files
Download the file for your platform. If you're not sure which to choose, learn more about installing packages.
Source Distribution
Built Distribution
Filter files by name, interpreter, ABI, and platform.
If you're not sure about the file name format, learn more about wheel file names.
Copy a direct link to the current filters
File details
Details for the file cnc_4_science-0.8.0.tar.gz.
File metadata
- Download URL: cnc_4_science-0.8.0.tar.gz
- Upload date:
- Size: 20.2 kB
- Tags: Source
- Uploaded using Trusted Publishing? Yes
- Uploaded via: twine/6.1.0 CPython/3.13.12
File hashes
| Algorithm | Hash digest | |
|---|---|---|
| SHA256 |
18f146e24e1c6607508d7dee28c10625d149a1d8c76e147a233b41f964293554
|
|
| MD5 |
236693e4163f6dc2d73472b023707318
|
|
| BLAKE2b-256 |
b6b38969c38603862e14e8c37dcdda7f46c236ef2b4c16c3e79f7c9f19081ed6
|
Provenance
The following attestation bundles were made for cnc_4_science-0.8.0.tar.gz:
Publisher:
publish.yml on AccelerationConsortium/cnc-4-science
-
Statement:
-
Statement type:
https://in-toto.io/Statement/v1 -
Predicate type:
https://docs.pypi.org/attestations/publish/v1 -
Subject name:
cnc_4_science-0.8.0.tar.gz -
Subject digest:
18f146e24e1c6607508d7dee28c10625d149a1d8c76e147a233b41f964293554 - Sigstore transparency entry: 1781555480
- Sigstore integration time:
-
Permalink:
AccelerationConsortium/cnc-4-science@b112be60d2e0bbb324659ebd1311e1845f301953 -
Branch / Tag:
refs/tags/v0.8.0 - Owner: https://github.com/AccelerationConsortium
-
Access:
public
-
Token Issuer:
https://token.actions.githubusercontent.com -
Runner Environment:
github-hosted -
Publication workflow:
publish.yml@b112be60d2e0bbb324659ebd1311e1845f301953 -
Trigger Event:
push
-
Statement type:
File details
Details for the file cnc_4_science-0.8.0-py3-none-any.whl.
File metadata
- Download URL: cnc_4_science-0.8.0-py3-none-any.whl
- Upload date:
- Size: 21.7 kB
- Tags: Python 3
- Uploaded using Trusted Publishing? Yes
- Uploaded via: twine/6.1.0 CPython/3.13.12
File hashes
| Algorithm | Hash digest | |
|---|---|---|
| SHA256 |
0bd7cd064aeb3e32467c5bec094d04506859047f94474f421bf0172ad978d512
|
|
| MD5 |
0fc221ef6340ec4d6a830bae4f7de565
|
|
| BLAKE2b-256 |
bd00fb9f284285e9f2ea008bd809fdbf3ac4480b3a47647b9e658d72070130de
|
Provenance
The following attestation bundles were made for cnc_4_science-0.8.0-py3-none-any.whl:
Publisher:
publish.yml on AccelerationConsortium/cnc-4-science
-
Statement:
-
Statement type:
https://in-toto.io/Statement/v1 -
Predicate type:
https://docs.pypi.org/attestations/publish/v1 -
Subject name:
cnc_4_science-0.8.0-py3-none-any.whl -
Subject digest:
0bd7cd064aeb3e32467c5bec094d04506859047f94474f421bf0172ad978d512 - Sigstore transparency entry: 1781555613
- Sigstore integration time:
-
Permalink:
AccelerationConsortium/cnc-4-science@b112be60d2e0bbb324659ebd1311e1845f301953 -
Branch / Tag:
refs/tags/v0.8.0 - Owner: https://github.com/AccelerationConsortium
-
Access:
public
-
Token Issuer:
https://token.actions.githubusercontent.com -
Runner Environment:
github-hosted -
Publication workflow:
publish.yml@b112be60d2e0bbb324659ebd1311e1845f301953 -
Trigger Event:
push
-
Statement type:






