Raytrace module

Project description
Chromatic Confocal Sensor Ray Tracer
Specialized ray tracing engine designed for simulating and optimizing chromatic confocal sensors. This repository provides a powerful toolset for researchers and engineers working on precise optical measurement systems, enabling the accurate modeling of light interactions within chromatic confocal setups.
Installation
The library can be simply installed by:
pip install confocal-raytracer
Defining the setup
The optical setup is defined inside a JSON-like file. If, for example, an achromatic doublet is defined each face of both lenses should be defined as follows:
doublet = {
    "AC500-150-A-ML_1": {
        "Front Face": dict(
            curvature=96.85, konic=0, z_0=0, aperture_radius=50 / 2
        ),
        "Back Face": dict(
            curvature=-73.74,
            konic=0,
            z_0=9.5,
            aperture_radius=50 / 2,
        ),
        "Material": "BAK4",
        "Calibration": False,
    },
    "AC500-150-A-ML_2": {
        "Front Face": dict(
            curvature=-73.74, konic=0, z_0=9.5, aperture_radius=50 / 2
        ),
        "Back Face": dict(
            curvature=-241.63,
            konic=0,
            z_0=13.5,
            aperture_radius=50 / 2,
        ),
        "Material": "SF10",
        "Calibration": False,
    },
    "AC500-150-A-ML_1_R": {
        "Front Face": dict(
            curvature=241.63,
            konic=0,
            z_0=0,
            aperture_radius=50 / 2,
        ),
        "Back Face": dict(
            curvature=73.74, konic=0, z_0=4, aperture_radius=50 / 2
        ),
        "Material": "BAK4",
        "Calibration": False,
    },
    "AC500-150-A-ML_2_R": {
        "Front Face": dict(
            curvature=73.74,
            konic=0,
            z_0=4,
            aperture_radius=50 / 2,
        ),
        "Back Face": dict(
            curvature=-96.85, konic=0, z_0=13.5, aperture_radius=50 / 2
        ),
        "Material": "SF10",
        "Calibration": False,
    },
    "Sensor": {
        "Front Face": dict(
            curvature=float("inf"),
            konic=0,
            z_0=170,
            aperture_radius=100,
        ),
        "Back Face": dict(
            curvature=float("inf"),
            konic=0,
            z_0=170,
            aperture_radius=100,
        ),
        "Material": "SF2",
        "Calibration": False,
    },
}
Lens materials
The materials available with their refractive indexes should be specified in a Pandas Data Frame. The custom spectrum intensity can also be specified in the same Data Frame as follows:
| wl_nm | intensity | n_BK7 | n_SF2 | n_SF5 | n_BAF10 | n_SF10 | n_BAK4 | n_SF57 |
|---|---|---|---|---|---|---|---|---|
| 500.5 | 0.0851431638 | 1.5213856439764 | 1.6587264318676913 | 1.6847781738090497 | 1.67825 | 1.74315 | 1.57468 | 1.86746 |
| 500.7 | 0.08645302802 | 1.5213723632237195 | 1.6586929033319964 | 1.6847437966326086 | 1.6782202524647911 | 1.7430968741556505 | 1.574659846238762 | 1.8673847333525386 |
| 500.8 | 0.08502408117 | 1.5213657288620468 | 1.658676166909398 | 1.684726608044388 | 1.6782055071330022 | 1.7430704823647605 | 1.5746498284981434 | 1.8673473595993073 |
| 501.0 | 0.08721513301 | 1.5213524721680336 | 1.6586427497546976 | 1.6846922308679468 | 1.6781762683497092 | 1.7430180354906653 | 1.5746299095672376 | 1.86727312240276 |
| 501.1 | 0.08640539646 | 1.5213458498356942 | 1.658626069022597 | 1.684675042279726 | 1.6781617729016662 | 1.7429919781855066 | 1.5746200076850838 | 1.867236255427011 |
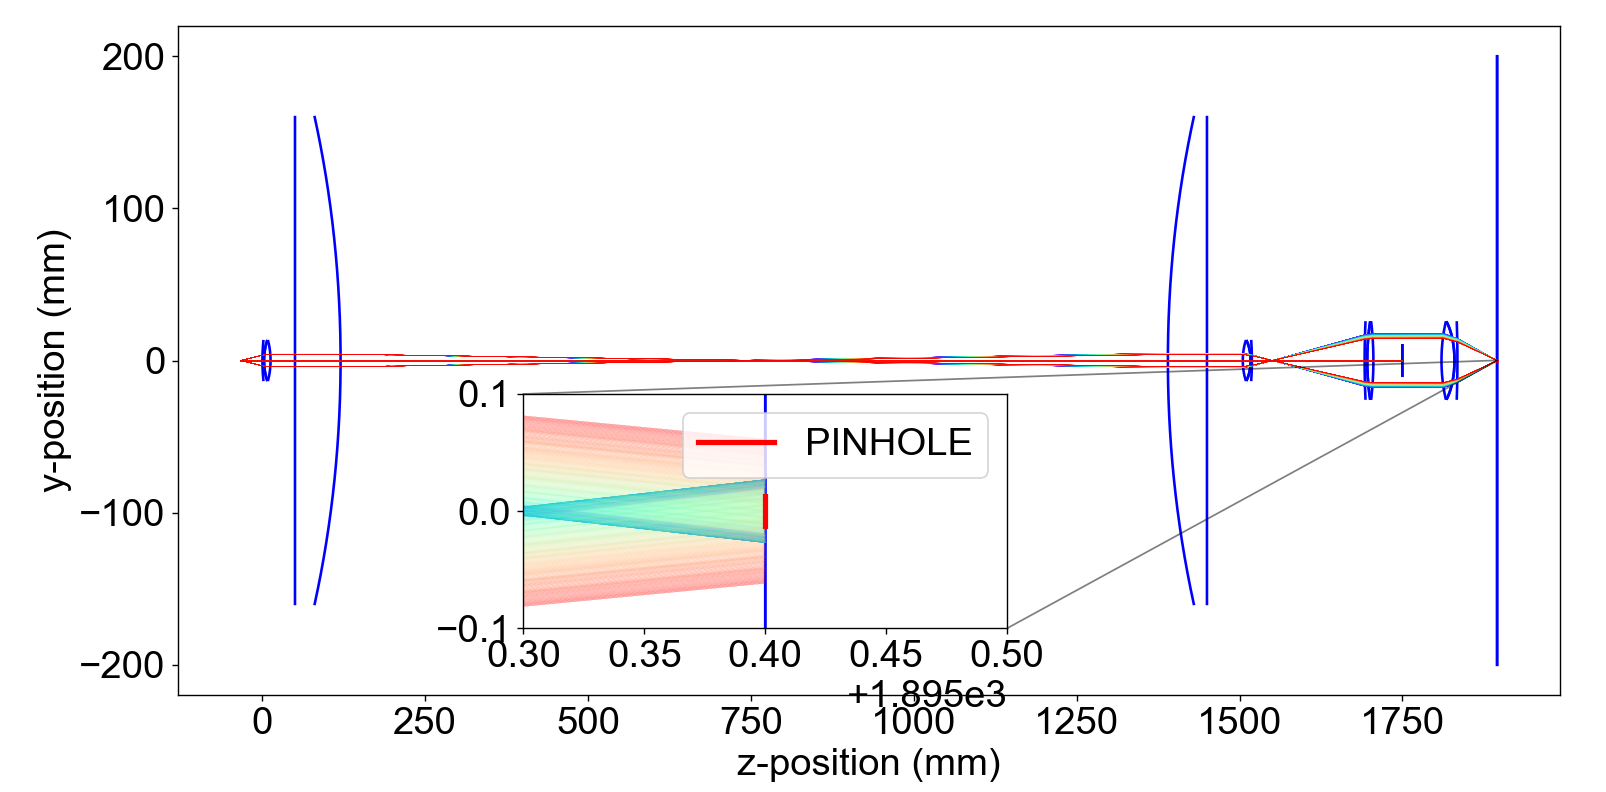
Example usage
from confocal_raytracer.simulation.raytrace import RayTrace
from confocal_raytracer.simulation.setup import chromatic_confocal
from confocal_raytracer.simulation._utils import plotter
from confocal_raytracer.load_data import n_data
import numpy as np
import matplotlib.pyplot as plt
import time
import warnings


# Ignore warning in axins legend location.
warnings.filterwarnings("ignore")

# Set refractive index of the spatial filter
n_data["n_absorb"] = np.inf

# Decimate the refractive index data to make
# the plot faster
n_data = n_data[::5]

# Get example optical data
optical_data = chromatic_confocal

# Set the pinhole size before sensor
PINHOLE_SIZE = 25 / 1000  # milimeters

# Number of rays from light source
N_RAYS = 3
# Set the extension of the light source
LIGHT_SOURCE_RADIUS = 0 / 1000  # milimeters
# Set the desviation angle with respecto to the
# optical axis of the N_RAYS
THETA = 6.0  # Degrees
# If LIGHT_SOURCE_RADIUS != 0 it is possible to set
# more rays for each height with the same desviation angle
N_RAYS_HEIGHT = 1
# Light source position
Z0 = -33.4  # Light source position same as
# back focal length of the achormatic doublet

fig, ax = plt.subplots()

# RayTrace object
raytrace = RayTrace(
    optical_data=optical_data,
    n_data=n_data,
    light_source_radius=LIGHT_SOURCE_RADIUS,
    n_rays=N_RAYS,
    theta=THETA,
    z0=Z0,
    n_rays_height=N_RAYS_HEIGHT,
)

t0 = time.perf_counter()
# After intersecting the full system,
# frays will have the shape (len(n_data), N_RAYS_HEIGHT, N_RAYS)
# where each one of the rays will be a Ray object with all the
# parameters included in it such as: angle of incidence and path followed by the ray
frays = raytrace.intersect_full_system()
print("Elapsed time (s): ", time.perf_counter() - t0)

# Plot setup
fig, ax = plotter(optical_data=optical_data, final_rays=frays, fig=fig, ax=ax)
plt.plot(
    [
        optical_data["Sensor"]["Front Face"]["z_0"],
        optical_data["Sensor"]["Front Face"]["z_0"],
    ],
    [-PINHOLE_SIZE / 2, PINHOLE_SIZE / 2],
    c="r",
)
ax.set(xlabel="z-position (mm)", ylabel="y-position (mm)")
axins = ax.inset_axes([0.25, 0.1, 0.35, 0.35])
plotter(optical_data=optical_data, final_rays=frays, fig=fig, ax=axins)
axins.plot(
    [
        optical_data["Sensor"]["Front Face"]["z_0"],
        optical_data["Sensor"]["Front Face"]["z_0"],
    ],
    [-PINHOLE_SIZE / 2, PINHOLE_SIZE / 2],
    c="r",
    lw=3,
    label="PINHOLE",
)
x1, x2, y1, y2 = (
    optical_data["Sensor"]["Front Face"]["z_0"] - 0.1,
    optical_data["Sensor"]["Front Face"]["z_0"] + 0.1,
    -0.1,
    0.1,
)
axins.legend()
axins.set_xlim(x1, x2)
axins.set_ylim(y1, y2)
plt.gca().indicate_inset_zoom(axins, edgecolor="black")
plt.tight_layout()
plt.show()
Release history Release notifications | RSS feed


Download files
Download the file for your platform. If you're not sure which to choose, learn more about installing packages.
Source Distribution
Built Distribution
Filter files by name, interpreter, ABI, and platform.
If you're not sure about the file name format, learn more about wheel file names.
Copy a direct link to the current filters
File details
Details for the file confocal_raytracer-0.1.34.tar.gz.
File metadata
- Download URL: confocal_raytracer-0.1.34.tar.gz
- Upload date:
- Size: 300.9 kB
- Tags: Source
- Uploaded using Trusted Publishing? No
- Uploaded via: poetry/1.8.2 CPython/3.9.13 Windows/10
File hashes
| Algorithm | Hash digest | |
|---|---|---|
| SHA256 |
01e33583f2417b3d5ca2592ab9e451520a6110dd354ae15315a5aaf090ecceba
|
|
| MD5 |
430192c0c77ee34a281b0778970d943c
|
|
| BLAKE2b-256 |
13f154a6e17ccfbef39f607c490213c6f080b86f6be30777b444ff13e1d9b885
|
File details
Details for the file confocal_raytracer-0.1.34-py3-none-any.whl.
File metadata
- Download URL: confocal_raytracer-0.1.34-py3-none-any.whl
- Upload date:
- Size: 293.2 kB
- Tags: Python 3
- Uploaded using Trusted Publishing? No
- Uploaded via: poetry/1.8.2 CPython/3.9.13 Windows/10
File hashes
| Algorithm | Hash digest | |
|---|---|---|
| SHA256 |
92edc9689b94cde9e595a4cd9dd33cb12b2ceedc54fb1a555a0001137e536232
|
|
| MD5 |
f147058c5fad3f411638c7488deccf15
|
|
| BLAKE2b-256 |
bb868c1ef126ce73746e3f48025b4812a1df8ee1137bee4b1edea63394aec366
|


