
CLI Tools for Amdocs ConnectX

Project description

Introduction
The ctxcli package provides Command Line Interface (CLI) tools for Amdocs ConnectX. These tools allow authorized ConnectX users to perform various operations on the system.
Installation
Before installing ctxcli, ensure that Python and pip are installed on your system.
To install ctxcli from PyPI, execute the following command:
pip install ctxcli
Authentication
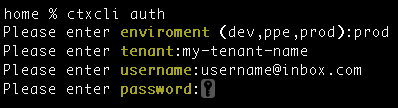
Before running any command, you need to authenticate by running the ‘auth’ command. Use the following command to authenticate:
ctxcli auth
You will be prompted to enter your tenant, environment (dev, ppe, prod), username, and password.
You can check the validity of your current session in any time by using the authcheck command. This command verifies whether you are authenticated and provides information about your active session:
ctxcli authcheck

Commands
The ctxcli commands are divided into the following categories: Users, Tenant, and Migration.
Users
To list all the users in the system, execute the following command:
ctxcli user list
Here’s an example of the output:

Tenant
To list all the sub-tenants in the system, execute the following command:
ctxcli tenant list
Here’s an example of the output:

Migration
To list all the migration files in the system, execute the following command:
ctxcli migration file list
Here’s an example of the output:

Business Units
List all business units
To list all the business units in the system, execute the following command:
ctxcli business-unit list
Here’s an example of the output:

Assign Users to Business Units in Bulk
To add users to business units, execute the following command:
ctxcli business-unit add-users --file <file_path>
This command requires a CSV file that contains the necessary user information. You can specify the path to this CSV file using the –file argument followed by the path to your file. The following headers are required in the first row of the CSV file:
Field |
Details |
|---|---|
business_unit_id |
The internal ID of the Business Unit the user should be assigned to. |
username |
The username of the user that should be assigned to the Business Unit. |
The command will read each line of the CSV file and attempt to add the specified user to the corresponding Business Unit.
You can download the CSV template here.
Create Business Units in Bulk
To create multiple business units, execute the following command:
ctxcli business-unit create --file <file_path>
This command requires a CSV file that contains the necessary user information. You can specify the path to this CSV file using the –file argument followed by the path to your file. The following headers are required in the first row of the CSV file:
Field |
Details |
|---|---|
name |
The name of the Business Unit. |
description |
The name of the Business Unit. |
businessunitspec.butype |
The description of the Business Unit Specification. |
businessunitspec.buhref |
The API endpoint URL of the Business Unit Specification. |
speccharacteristics.names |
The names (in comma-separated format) of the characteristics according to the selected Business Unit Specification. |
speccharacteristics.values |
The values (in comma-separated format) of the characteristics corresponding to the names listed in the ‘speccharacteristics.names’ field. The order of the values should match the order of the names. |
externalid |
The external unique identifier for the Business Unit. |
address.street1 |
The primary street address line for the Business Unit. |
address.street2 |
The secondary street address line for the Business Unit. |
address.city |
The city where the Business Unit is located. |
address.postcode |
The postal code for the Business Unit’s address. |
address.stateorprovince |
The state or province where the Business Unit is located. |
address.country |
The country where the Business Unit is located. |
phone |
The primary phone number for the Business Unit. |
childof.id |
The unique identifier of the parent Business Unit. |
childof.href |
The API endpoint URL for the parent Business Unit. |
This list now only contains field names and their descriptions.
The command executes the POST /businessUnit API for every line in the CSV file, using the corresponding field values from the CSV. For mandatory fields, data format, and more information, please refer to the official API documentation.
You can download the CSV template here.
Orders
To export orders to an Excel file for a specified date range execute the following command:
ctxcli order export --start-date <start_date> --end-date <end_date> --output <file_path>while:
Field |
Details |
|---|---|
--start-date <start_date> |
The start date for the order export in the format YYYY-MM-DD. |
--end-date <end_date> |
The end date for the order export in the format YYYY-MM-DD. |
--output <file_path> |
The file path for the output Excel file. The file will be created if it does not exist. |
Customers
Delete multiple individuals
To delete multiple individuals execute the following command:
ctxcli customer delete –file <file_path>
This command requires a CSV file that contains the necessary user information. You can specify the path to this CSV file using the –file argument followed by the path to your file. The following headers are required in the first row of the CSV file:
Field |
Details |
|---|---|
individual_id |
The internal ID of the individual. |
status |
The status of the customer. Status can be “Initialized”, “Approved” or “Activated”. |
The command will read each line of the CSV file and attempt to delete all entities related to the specified individual.
Delete single individual
To delete single individual execute the following command:
ctxcli customer delete –individual-id <individual id>
The user will be prompted to select customer status. The user navigates the list using the arrow keys and selects a status by pressing Enter. The command will attempt to delete all entities related to the specified individual.
License
Copyright 2024 Amdocs
Release history Release notifications | RSS feed


Download files
Download the file for your platform. If you're not sure which to choose, learn more about installing packages.
Source Distribution
File details
Details for the file ctxcli-0.1.9.tar.gz.
File metadata
- Download URL: ctxcli-0.1.9.tar.gz
- Upload date:
- Size: 19.0 kB
- Tags: Source
- Uploaded using Trusted Publishing? No
- Uploaded via: twine/5.1.0 CPython/3.9.12
File hashes
| Algorithm | Hash digest | |
|---|---|---|
| SHA256 |
476d693ad2564adafacdc3c4187849ac599891fa28513e107840ac1f6dd04994
|
|
| MD5 |
6695ef510f77873612edf954f78c4dc2
|
|
| BLAKE2b-256 |
77f35104b69aafcd5f1d1dcff64d7e784b598368221dce21e4729b05f6ae995d
|






