


Production-grade AI agents defined in YAML, powered by LangGraph, deployed on Databricks.


DAO is an infrastructure-as-code framework for building, deploying, and managing multi-agent AI systems. Instead of writing boilerplate Python code to wire up agents, tools, and orchestration, you define everything declaratively in YAML configuration files.
# Define an agent in 10 lines of YAML
agents:
  product_expert:
    name: product_expert
    model: *claude_sonnet
    tools:
      - *ai_search_tool
      - *genie_tool
    prompt: |
      You are a product expert. Answer questions about inventory and pricing.
🎓 Learn DAO: Hands-on Workshop
New to DAO? Start with the DAO AI Workshop — a self-paced, hands-on workshop that takes you from zero to a deployed, governed multi-agent system. Designed for solution architects, data engineers, and analysts, it's organized as L100 → L200 → L300 with lectures and lab notebooks covering:
- Tool use — Unity Catalog SQL functions and managed MCP servers
- NL-to-SQL with Genie Spaces
- Vector search, memory, and chat-history summarization
- Prompts + guardrails and multi-agent orchestration
By the end you'll have built, tested, and deployed a multi-agent system — all defined in YAML and running as a Databricks App.
🎨 Visual Configuration Studio
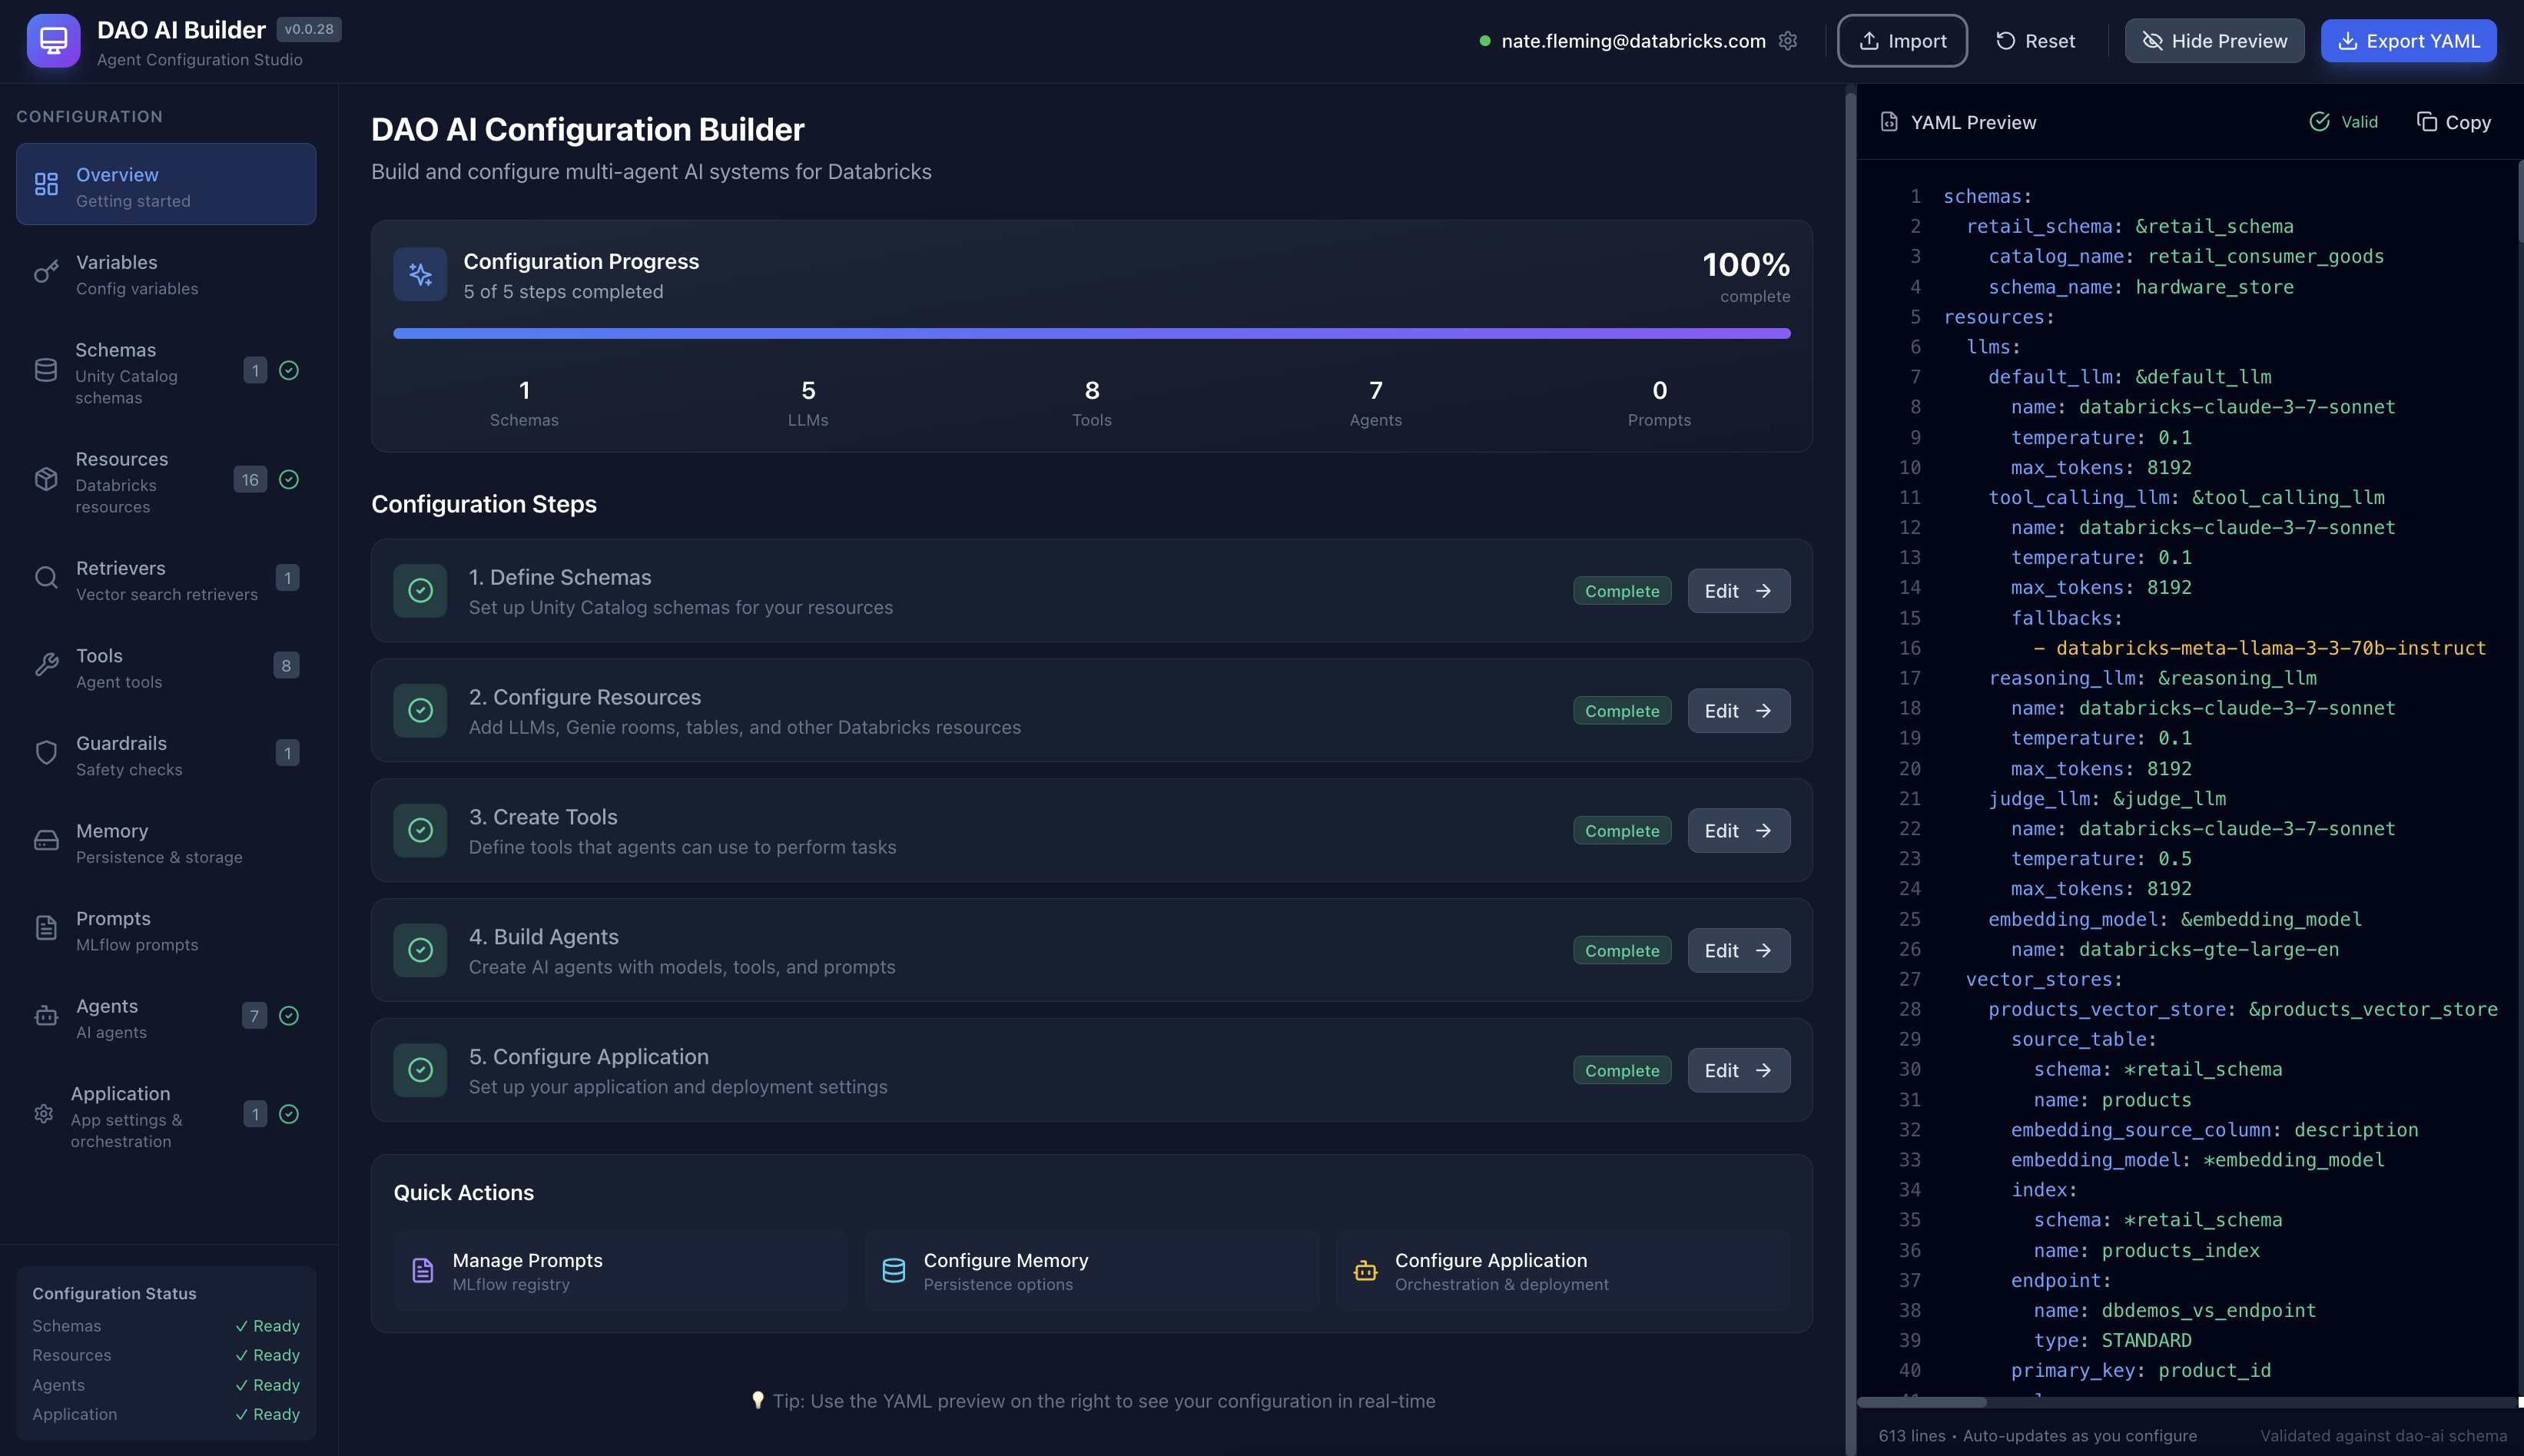
Prefer a visual interface? Check out DAO AI Builder — a React-based web application that provides a graphical interface for creating and editing DAO configurations. Perfect for:
- Exploring DAO's capabilities through an intuitive UI
- Learning the configuration structure with guided forms
- Building agents visually without writing YAML manually
- Importing and editing existing configurations
DAO AI Builder generates valid YAML configurations that work seamlessly with this framework. Use whichever workflow suits you best — visual builder or direct YAML editing.
📚 Documentation
Getting Started
- Why DAO? - Learn what DAO is and how it compares to other platforms
- Quick Start - Build and deploy your first agent in minutes
- Architecture - Understand how DAO works under the hood
Core Concepts
- Key Capabilities - Explore 20 powerful features for production agents
- Configuration Reference - Complete YAML configuration guide
- Examples - Ready-to-use example configurations
- A2A Protocol - Google Agent2Agent endpoints on every Apps deployment
- MCP Server - Expose a dao-ai agent as a single MCP tool via
dao-ai agent build --mode mcp— for integrating dao-ai into external agent frameworks (Claude Desktop, Cursor, MAS, ADK, etc.) - Background Agents - kickoff/poll/cancel for multi-minute graph runs
- Auditable Tool Invocations - Tamper-evident approval receipts + agent-driven audit-trail queries (SOX / SOC2 / HIPAA-ready)
Reference
- CLI Reference - Command-line interface documentation
- Python API - Programmatic usage and customization
- FAQ - Frequently asked questions
Contributing
- Contributing Guide - How to contribute to DAO
Quick Start

Prerequisites
Before you begin, you'll need:
- Python 3.11 or newer installed on your computer (download here)
- A Databricks workspace (ask your IT team or see Databricks docs)
- Access to Unity Catalog (your organization's data catalog)
- Model Serving or Databricks Apps enabled (for deploying AI agents)
- Optional: AI Search (formerly Vector Search), Genie (for advanced features)
Not sure if you have access? Your Databricks administrator can grant you permissions.
Installation
Requires Python 3.11 or newer.
Option 1: Install from PyPI (Recommended)
Follow these five steps in order. Copy each command exactly.
Step 1 — Check your Python version. Open a terminal (Mac: Terminal.app; Windows: PowerShell; Linux: your terminal) and run:
python3 --version
- You should see
Python 3.11.xor newer. - If you see
Python 3.10.xor older, or you get an error, install a newer Python from https://www.python.org/downloads/ before continuing. - Python 3.13 and 3.14 are supported only when using
uv(Step 2). Standardpipmay fail on 3.13+ with a "resolution exceeded maximum depth" error because dao-ai's dependency graph is deep.
Step 2 — Install uv (a fast Python package installer). uv is required because it can resolve dao-ai's dependencies on any recent Python version.
# Mac / Linux:
curl -LsSf https://astral.sh/uv/install.sh | sh

# Windows (PowerShell):
powershell -c "irm https://astral.sh/uv/install.ps1 | iex"
Close and reopen your terminal so uv is on your PATH, then verify:
uv --version
You should see something like uv 0.11.x or newer.
Step 3 — Create a project folder and virtual environment. A virtual environment isolates dao-ai from other Python projects on your machine.
mkdir dao-ai-project
cd dao-ai-project
uv venv
uv venv prints a line like Using CPython 3.12.3 — uv picks a Python for you from whatever is available on your machine. Any 3.11 or newer is fine; it may differ from the version you saw in Step 1.
Then activate it:
# Mac / Linux:
source .venv/bin/activate

# Windows (PowerShell):
.venv\Scripts\Activate.ps1
You should see (dao-ai-project) or (.venv) at the start of your terminal prompt.
Step 4 — Install dao-ai.
uv pip install dao-ai
This downloads and installs dao-ai plus its dependencies (~230 packages). It typically finishes in under a minute.
Step 5 — Verify the install.
dao-ai version
You should see output that starts with a version line, e.g.:
dao-ai 0.2.4
  Published: True
  Python:    3.11.x   (or 3.12.x — whichever `uv venv` picked in Step 3)
  Platform:  ...
  Dependencies:
    mlflow: ...
    langchain-core: ...
    langgraph: ...
    langchain: ...
    databricks-sdk: ...
If you see a version number and a dependency list, dao-ai is installed correctly. Continue to "Your First Agent" below.
Optional feature extras. A plain uv pip install dao-ai is all you need to
build and deploy agents. Some features pull in heavier dependency trees that are
gated behind extras so the base install stays lean — install only the ones your
config uses (the deploy path auto-selects the right extras into generated bundles;
at runtime a missing extra raises a friendly install dao-ai[<extra>] error):
| Extra | Adds | Install |
|---|---|---|
mcp |
FastAPI + Uvicorn for the MCP-server App | uv pip install "dao-ai[mcp]" |
a2a |
Google Agent2Agent (A2A) protocol endpoints | uv pip install "dao-ai[a2a]" |
rerank |
FlashRank reranking for AI Search / RAG | uv pip install "dao-ai[rerank]" |
deepagents |
Deep Agent orchestration (todo, filesystem, sub-agents, skills) | uv pip install "dao-ai[deepagents]" |
memory |
Long-term memory via langmem | uv pip install "dao-ai[memory]" |
search |
Web search tool | uv pip install "dao-ai[search]" |
excel |
Excel (.xlsx) file support via openpyxl |
uv pip install "dao-ai[excel]" |
databricks |
databricks-connect for local Model Serving deploys |
uv pip install "dao-ai[databricks]" |
all |
Every runtime feature extra above | uv pip install "dao-ai[all]" |
Option 2: For developers familiar with Git
# Clone this repository
git clone <repo-url>
cd dao-ai

# Create an isolated Python environment
uv venv
source .venv/bin/activate  # On Windows: .venv\Scripts\activate

# Install DAO and its dependencies
make install
Option 3: For those new to development
- Download this project as a ZIP file (click the green "Code" button on GitHub → Download ZIP)
- Extract the ZIP file to a folder on your computer
- Open a terminal/command prompt and navigate to that folder
- Run these commands:
# On Mac/Linux:
python3 -m venv .venv
source .venv/bin/activate
pip install -e .

# On Windows:
python -m venv .venv
.venv\Scripts\activate
pip install -e .
Verification: Run dao-ai --version to confirm the installation succeeded.
Your First Agent
Let's build a simple AI assistant in 4 steps. This agent will use a language model from Databricks to answer questions.
Step 1: Create a configuration file
Create a new file called config/my_agent.yaml and paste this content:
schemas:
  my_schema: &my_schema
    catalog_name: my_catalog        # Replace with your Unity Catalog name
    schema_name: my_schema          # Replace with your schema name

resources:
  models:
    default_llm: &default_llm
      name: databricks-gpt-5-4-mini  # The AI model to use

agents:
  assistant: &assistant
    name: assistant
    model: *default_llm
    prompt: |
      You are a helpful assistant.

app:
  name: my_first_agent
  registered_model:
    schema: *my_schema
    name: my_first_agent
  agents:
    - *assistant
  orchestration:
    swarm:
      default_agent: *assistant
💡 What's happening here?
schemas: Points to your Unity Catalog location (where the agent will be registered)resources: Defines the AI model (databricks-gpt-5-4-miniin this case)agents: Describes your assistant agent and its behaviorapp: Configures how the agent is deployed and orchestrated
Step 2: Validate your configuration
This checks for errors in your YAML file:
dao-ai validate -c config/my_agent.yaml
You should see: ✅ Configuration is valid!
Step 3: Visualize the agent workflow (optional)
Generate a diagram showing how your agent works:
dao-ai graph -c config/my_agent.yaml -o my_agent.png
This creates my_agent.png — open it to see a visual representation of your agent.
Step 4: Deploy to Databricks
Option A: Using Python (programmatic deployment)
from dao_ai.config import AppConfig

# Load your configuration
config = AppConfig.from_file("config/my_agent.yaml")

# Package the agent as an MLflow model
config.create_agent()

# Deploy to Databricks Model Serving
config.deploy_agent()
Option B: Using the CLI (one command)
dao-ai agent up -c config/my_agent.yaml
This single command:
- Validates your configuration
- Packages the agent
- Deploys it to Databricks
- Starts the deployed agent
Deploying to a specific workspace:
# Deploy to AWS workspace
dao-ai agent up -c config/my_agent.yaml --profile aws-field-eng

# Deploy to Azure workspace
dao-ai agent up -c config/my_agent.yaml --profile azure-retail
The bundle commands are verb-under-noun —
dao-ai <agent|workflow> <up|build|sync|start|down>. The verbs are plain-language names for the DAB lifecycle:buildbuilds the bundle (inspect / hand-edit),syncpushes it to the workspace (bundle deploy— does not start it;agent syncauto-builds if nothing is staged,workflow syncrequires a priorbuild/up),startmakes it live (bundle run— no re-sync: starts the app / runs the job), anddowntears it down.upis the idempotent one-command path: build (if unchanged, skipped) → sync (convergent re-sync) → start — safe to re-run. Use--mode mcpon theagentnoun to build the MCP-server App instead, or--mode model_servingfor a Model Serving endpoint. The old flatgenerate-agent,generate-mcp,generate-workflow, anddao-ai mcpcommands — the pre-v3generate/deploy/run/destroyverbs — and the one-shotgenerate --deploy/--runflags — have been removed. See the migration table.
Step 5: Interact with your agent
Once deployed, you can chat with your agent using Python:
from mlflow.deployments import get_deploy_client

# Connect to your Databricks workspace
client = get_deploy_client("databricks")

# Send a message to your agent
response = client.predict(
    endpoint="my_first_agent",
    inputs={
        "messages": [{"role": "user", "content": "Hello! What can you help me with?"}],
        "configurable": {
            "thread_id": "1",           # Conversation ID
            "user_id": "demo_user"      # User identifier
        }
    }
)

# Print the agent's response
print(response["message"]["content"])
🎉 Congratulations! You've built and deployed your first AI agent with DAO.
Next steps:
- Explore the
examples/folder for more advanced configurations - Try the DAO AI Builder visual interface
- Learn about Key Capabilities to add advanced features
- Read the Architecture documentation to understand how it works
Parameterising a Config
Make one YAML re-usable across catalogs, schemas, environments, and users by declaring parameters: and referencing them with ${param.NAME} (or its alias ${var.NAME}). The config can also reference workspace context (host, current user) using the same ${workspace.*} namespace as Databricks Asset Bundles.
parameters:
  catalog:
    description: Unity Catalog catalog name
    default: main
  genie_parent_path:
    description: Workspace folder for the Genie space
    default: "/Users/${workspace.current_user.userName}/genie"

schemas:
  s:
    catalog_name: ${param.catalog}
    schema_name: dao_ai

genie_rooms:
  ops:
    parent_path: ${param.genie_parent_path}
    workspace_url: ${workspace.host}
Supported workspace references (match the DABs convention):
${workspace.host}— workspace URL, no trailing slash${workspace.current_user.userName}— full email${workspace.current_user.short_name}— email prefix, dots intact${workspace.current_user.domain_friendly_name}— email domain
Override declared parameters at runtime, or inspect them:
dao-ai chat -c dao_ai.yaml --param catalog=nfleming
dao-ai parameters list -c dao_ai.yaml      # see all declared parameters + resolved workspace values
dao-ai vars and --var remain as aliases for backwards compatibility.
Full reference: Parameters (Load-Time Substitution).
Key Features at a Glance

DAO provides powerful capabilities for building production-ready AI agents:
| Feature | Description |
|---|---|
| Dual Deployment Targets | Deploy to Databricks Model Serving or Databricks Apps with a single config |
| Long-Running Agents | OpenAI Responses API–compatible background kickoff + poll / stream retrieve backed by Lakebase; survives Model Serving's 5 min worker timeout and Databricks Apps' 120 s proxy timeout |
| Multi-Tool Support | Python functions, Unity Catalog, MCP, Agent Endpoints |
| Orchestration Patterns | Supervisor, Swarm, Deep Agent (langgraph deepagents — todo, filesystem, shell, sub-agents, skills, AGENTS.md memory) |
| On-Behalf-Of User | Per-user permissions and governance |
| Advanced Caching | Two-tier (LRU + Semantic) caching for cost optimization |
| AI Search Reranking | Improve RAG quality with FlashRank |
| Human-in-the-Loop | Approval workflows for sensitive operations |
| Auditable Tool Invocations | Tamper-evident approval receipts to Lakebase — args-hash bound, fail-closed on drift, hash-chained per thread. See docs/audit.md |
| Memory & Persistence | Long-term memory with structured schemas, background extraction, auto-injection; PostgreSQL, Lakebase, or in-memory backends |
| Reusable Prompts | Define prompts once as first-class config objects and reference them across agents via YAML anchors |
| Guardrails | Content filters, safety checks, validation |
| Middleware | Input validation, logging, performance monitoring, audit trails |
| Conversation Summarization | Handle long conversations automatically |
| Structured Output | JSON schema for predictable responses |
| Custom I/O | Flexible input/output with runtime state |
| Hook System | Lifecycle hooks for initialization and cleanup |
👉 Learn more: Key Capabilities Documentation
Architecture Overview

👉 Learn more: Architecture Documentation
Example Configurations
The examples/ directory contains ready-to-use configurations organized in a progressive learning path:
01_getting_started/minimal.yaml- Simplest possible agent02_tools/vector_search_with_reranking.yaml- RAG with improved accuracy04_genie/genie_context_aware_cache.yaml- NL-to-SQL with PostgreSQL context-aware caching04_genie/genie_in_memory_context_aware_cache.yaml- NL-to-SQL with in-memory context-aware caching (no database)05_memory/conversation_summarization.yaml- Long conversation handling06_on_behalf_of_user/obo_basic.yaml- User-level access control07_human_in_the_loop/human_in_the_loop.yaml- Approval workflows07_human_in_the_loop/human_in_the_loop_audited.yaml- HITL with tamper-evident audit receipts
And many more! Follow the numbered path or jump to what you need. See the full guide in Examples Documentation.
CLI Quick Reference
# Validate configuration
dao-ai validate -c config/my_config.yaml

# Generate JSON schema for IDE support
dao-ai schema > schemas/model_config_schema.json

# Visualize agent workflow
dao-ai graph -c config/my_config.yaml -o workflow.png

# Generate + deploy + start a Databricks Apps bundle in one command
dao-ai agent up -c config/my_config.yaml -p <profile>

# Provision backing infra (Vector Search, Lakebase, Genie…) then deploy + run the agent
dao-ai workflow up -c config/my_config.yaml

# Deploy to a specific workspace (multi-cloud support)
dao-ai agent up -c config/my_config.yaml --profile aws-field-eng
dao-ai agent up -c config/my_config.yaml --profile azure-retail

# Re-deploy the already-staged bundle without regenerating (retry a transient failure)
dao-ai agent sync -c config/my_config.yaml -p <profile>

# Interactive chat with agent
dao-ai chat -c config/my_config.yaml

# Inspect declared parameters and resolved values
dao-ai parameters list -c config/my_config.yaml --param catalog=nfleming
Deploying to Databricks Apps
dao-ai agent build produces a deploy-ready Databricks Apps bundle: databricks.yaml, the app resource YAML (with the agent's UC resource wiring), a pyproject.toml, a portable uv.lock, and a copy of your config. The Apps build phase installs dependencies by running uv sync --locked --no-dev from the pyproject + lock (no requirements.txt — it would take precedence and force the slower pip path). The lock's internal-mirror URLs are rewritten to the public CDN so it resolves from Apps containers.
The simplest path is up (build + bundle deploy + trace-link/grant + bundle run):
dao-ai agent up -c config/my_config.yaml -p <profile>
Or build first, optionally hand-edit the staged files, then ship exactly what's on disk with the sync verb, and make it live with start:
dao-ai agent build -c config/my_config.yaml -s ./my-bundle
# (optionally hand-edit ./my-bundle)
dao-ai agent sync -c config/my_config.yaml -s ./my-bundle -p <profile>
dao-ai agent start    -c config/my_config.yaml -s ./my-bundle -p <profile>

# ...or drive the bundle by hand
cd ./my-bundle
databricks bundle deploy -t dev -p <profile>
databricks bundle run <app-name> -t dev -p <profile>
The generated pyproject.toml pins dao-ai[<extras>]==<version> (published mode) so the deploy is reproducible, or redirects dao-ai to the bundled local wheel via [tool.uv.sources] under --development; either way uv lock captures the full closure into uv.lock. The app runtime command is bare python -m dao_ai.apps.start_app (chat-proxy variant) or python -m dao_ai.apps.server (no chat UI).
Pre-publish note: published-mode lock generation resolves
dao-ai==<version>from PyPI, so it only works once that version is published (locks are generated at release time in CI). For local/pre-release iteration use--development, which locks against the bundled wheel and works anytime.
Trace persistence on Apps
MLflow's default control-plane trace export does not work on Databricks Apps today: the artifact-storage host (us-east-1.storage.cloud.databricks.com) is unreachable from App containers, so trace spans are silently dropped (you'll see WARNING mlflow.tracing.export.mlflow_v3: ... Connection refused in the App logs). To capture traces, set app.trace_location in your config so traces export through a SQL warehouse → UC OTEL tables (reachable from Apps):
app:
  name: my_app
  # ...
  trace_location:
    schema: *retail_schema                   # reference an existing SchemaModel anchor
    warehouse: "your-warehouse-id"           # or a *warehouse anchor
When trace_location is set, agent generate automatically attaches the SQL warehouse as an App resource (with CAN_USE for the App SP) and adds MLFLOW_TRACING_SQL_WAREHOUSE_ID to the App's env. The OTEL trace tables themselves are auto-created by MLflow at first trace write — dao-ai does not emit per-table grants because the tables don't exist at deploy time and the Apps platform would reject the bundle. After deploy, grant the App SP schema-level privileges so MLflow can create + write to the OTEL tables (one-time setup):
SP=$(databricks apps get <app-name> -p <profile> --output json | jq -r .service_principal_client_id)
databricks grants update catalog <catalog> -p <profile> \
  --json "{\"changes\":[{\"principal\":\"$SP\",\"add\":[\"USE_CATALOG\"]}]}"
databricks grants update schema <catalog>.<schema> -p <profile> \
  --json "{\"changes\":[{\"principal\":\"$SP\",\"add\":[\"USE_SCHEMA\",\"CREATE_TABLE\",\"MODIFY\",\"SELECT\"]}]}"
Run dao-ai trace link between bundle deploy and bundle run so the UC linkage is established from your machine on a fresh (0-traces) experiment — the app's own runtime link attempt is rejected on re-deploys with already contains traces, which causes silent trace loss. agent generate prints a one-line reminder in its "Next steps" when trace_location is set. See docs/cli-reference.md#trace-commands for details, including the migration playbook (Databricks does not allow un-linking or changing a UC destination once set — moving traces to a different catalog / schema / table_prefix requires a fresh experiment).
When trace_location is unset, agent generate emits a loud warning. Local notebook/CLI runs and Model Serving deploys are unaffected and continue to use the default control-plane path. See examples/01_getting_started/ai_gateway.yaml for a commented example.
Multi-Cloud Deployment
DAO AI supports deploying to Azure, AWS, and GCP workspaces with automatic cloud detection:
# Deploy to AWS workspace
dao-ai workflow up -c config/my_config.yaml --profile aws-prod

# Deploy to Azure workspace
dao-ai workflow up -c config/my_config.yaml --profile azure-prod

# Deploy to GCP workspace
dao-ai workflow up -c config/my_config.yaml --profile gcp-prod
The CLI automatically:
- Detects the cloud provider from your profile's workspace URL (pass
--cloud {aws|azure|gcp}if it can't be detected) - Selects appropriate compute node types for each cloud
- Creates isolated deployment state per profile
👉 Learn more: CLI Reference Documentation
Community & Support
- Documentation: docs/
- Examples: examples/
- Issues: GitHub Issues
- Discussions: GitHub Discussions
Contributing

We welcome contributions! See the Contributing Guide for details on:
- Setting up your development environment
- Code style and testing guidelines
- How to submit pull requests
- Project structure overview
License
This project is licensed under the MIT License - see the LICENSE file for details.
1 maintainer

Download files
Download the file for your platform. If you're not sure which to choose, learn more about installing packages.
Source Distribution
Built Distribution
Filter files by name, interpreter, ABI, and platform.
If you're not sure about the file name format, learn more about wheel file names.
Copy a direct link to the current filters
File details
Details for the file dao_ai-0.2.5.tar.gz.
File metadata
- Download URL: dao_ai-0.2.5.tar.gz
- Upload date:
- Size: 65.2 MB
- Tags: Source
- Uploaded using Trusted Publishing? Yes
- Uploaded via: twine/6.1.0 CPython/3.13.7
File hashes
| Algorithm | Hash digest | |
|---|---|---|
| SHA256 |
d73eed164216eb2faaa34b252a2a6bcda0bdf84584a66ce1baa4ce7623bab853
|
|
| MD5 |
7423e3eaca32029a581d00db057f41c9
|
|
| BLAKE2b-256 |
323a5bdc5c6a25f47ceb483abeed27999eee0cc057c87e066aabbd0f89db055c
|
Provenance
The following attestation bundles were made for dao_ai-0.2.5.tar.gz:
Publisher:
publish-to-pypi.yaml on natefleming/dao-ai
-
Statement:
-
Statement type:
https://in-toto.io/Statement/v1 -
Predicate type:
https://docs.pypi.org/attestations/publish/v1 -
Subject name:
dao_ai-0.2.5.tar.gz -
Subject digest:
d73eed164216eb2faaa34b252a2a6bcda0bdf84584a66ce1baa4ce7623bab853 - Sigstore transparency entry: 2346625170
- Sigstore integration time:
-
Permalink:
natefleming/dao-ai@e9edf7f45ae70bc933b18ce306f5112d472ba6b8 -
Branch / Tag:
refs/tags/v0.2.5 - Owner: https://github.com/natefleming
-
Access:
public
-
Token Issuer:
https://token.actions.githubusercontent.com -
Runner Environment:
github-hosted -
Publication workflow:
publish-to-pypi.yaml@e9edf7f45ae70bc933b18ce306f5112d472ba6b8 -
Trigger Event:
push
-
Statement type:
File details
Details for the file dao_ai-0.2.5-py3-none-any.whl.
File metadata
- Download URL: dao_ai-0.2.5-py3-none-any.whl
- Upload date:
- Size: 829.8 kB
- Tags: Python 3
- Uploaded using Trusted Publishing? Yes
- Uploaded via: twine/6.1.0 CPython/3.13.7
File hashes
| Algorithm | Hash digest | |
|---|---|---|
| SHA256 |
c04adcfda2eead3ef70742d6b91944c4ff3f8048d7157cfc2c22ad7b0255a9f2
|
|
| MD5 |
fe0c907c1ac9f66056afea1d12e8bef9
|
|
| BLAKE2b-256 |
aff40c0a7cb922c2b031c12eb854b74cdf8caeda38107af53b05a6db826e0642
|
Provenance
The following attestation bundles were made for dao_ai-0.2.5-py3-none-any.whl:
Publisher:
publish-to-pypi.yaml on natefleming/dao-ai
-
Statement:
-
Statement type:
https://in-toto.io/Statement/v1 -
Predicate type:
https://docs.pypi.org/attestations/publish/v1 -
Subject name:
dao_ai-0.2.5-py3-none-any.whl -
Subject digest:
c04adcfda2eead3ef70742d6b91944c4ff3f8048d7157cfc2c22ad7b0255a9f2 - Sigstore transparency entry: 2346625293
- Sigstore integration time:
-
Permalink:
natefleming/dao-ai@e9edf7f45ae70bc933b18ce306f5112d472ba6b8 -
Branch / Tag:
refs/tags/v0.2.5 - Owner: https://github.com/natefleming
-
Access:
public
-
Token Issuer:
https://token.actions.githubusercontent.com -
Runner Environment:
github-hosted -
Publication workflow:
publish-to-pypi.yaml@e9edf7f45ae70bc933b18ce306f5112d472ba6b8 -
Trigger Event:
push
-
Statement type:







