
depression.ai
YOUR TERMINAL. YOUR TOOLS. YOUR MODEL.



Your A–Z AI, from a single terminal.
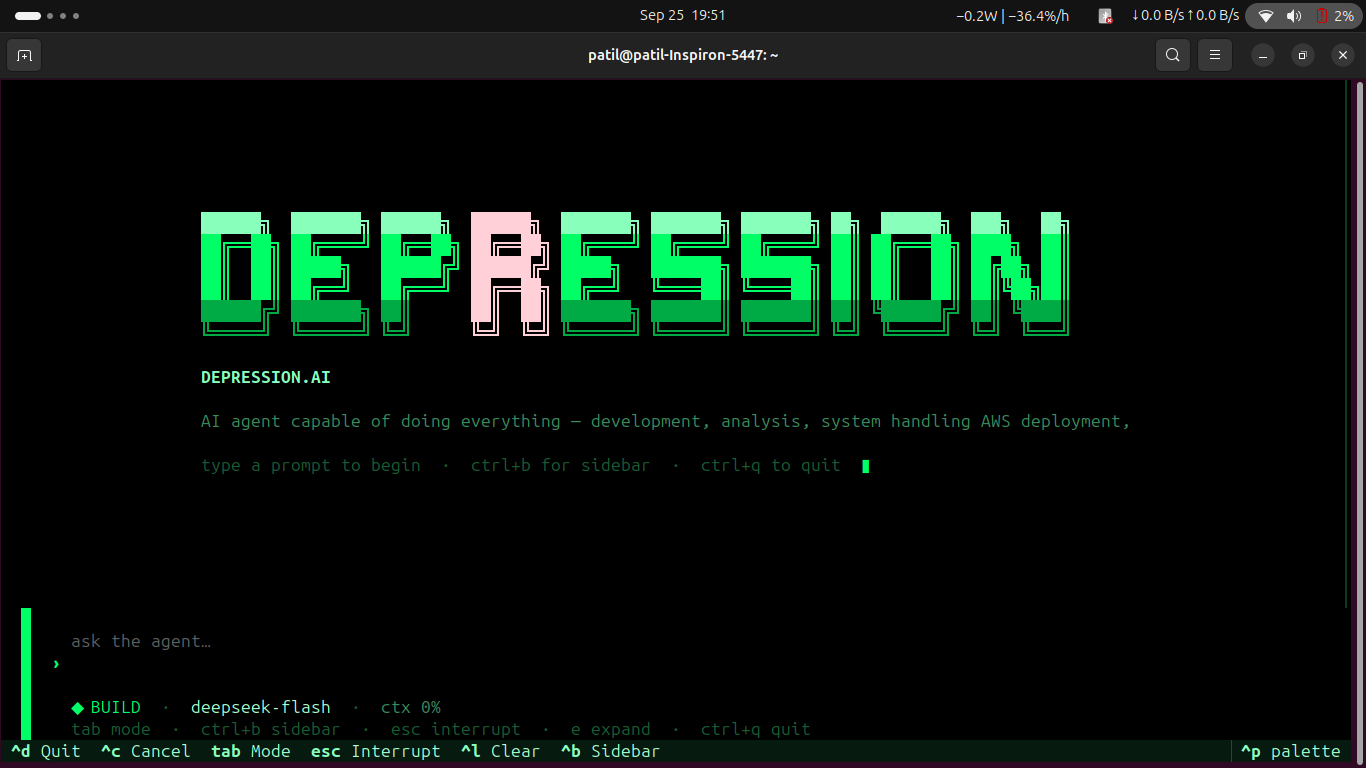
An open-source, local-first AI agent harness for coding, system work, and cloud operations.
Get started · Explore the UI · Connect your model · AWS · Security
▶ Watch the walkthrough demo on YouTube
Start here — in simple words
Describe the job. Choose your model. Approve the tools.
depression.ai runs an AI agent in your terminal. It can inspect project files, plan edits, call tools, learn from tool errors and verify results instead of only returning text.
| You ask | The agent can help with |
|---|---|
| “Why won't this app start?” | Investigate a failure, edit the relevant code, rerun checks |
| “Build a feature” | Plan, implement, and test the changes |
| “Inspect my AWS environment” | Use available tools within your AWS IAM permissions |
| “Use a local model” | Connect a compatible local endpoint without a cloud LLM API |
The model reasons; the harness runs tools under your configured permissions. Results depend on the connected model and the actual tool responses.
- It can code and fix bugs — read files, edit code, run tests.
- It can work on your system — run commands, inspect processes, use Git.
- It can work with AWS — inspect and manage cloud resources your keys allow.
- It asks before risky actions — you stay in control.
- Credentials stay on your device — API keys and AWS keys are stored locally and never sent to Team Depression.
- Local-model option — a compatible local LLM can work without remote inference; web and cloud tools still need connectivity.
- Google login is optional — it only personalizes the agent (for example, your name); that profile data stays on your device.
- Your chats stay private — Team Depression does not store your conversation history, and chats are not linked to your Gmail.
- You choose the AI model — use a cloud API or a local model.
- No account is required — install, run
depression --nosignin, connect a model and start. - Works across platforms — Python 3.10+ on Linux, macOS and Windows, including VMs and servers.
Quick start:
pip install depression.ai
depression --nosignin
Open the LLM Connection panel (/connect), paste your Base URL, Model ID, and API key if needed, then press CONNECT. On Ubuntu/Debian, see installation without manual venv setup if pip install is blocked.
👥 Team Depression
A team that builds ON ETHICS
🎓 Academic Institution & Project Context

Moodlakatte Institute of Technology (MIT), Kundapura
Department of Information Science & Engineering (ISE)
depression.ai is being developed as an academic major project by final-year Information Science & Engineering (ISE) students of Moodlakatte Institute of Technology (MIT), Kundapura.
The project combines AI agents, software engineering, system automation, cloud operations and LLM integration.
College
- 🏫 Moodlakatte Institute of Technology (MIT), Kundapura
- 🎓 Department: Information Science & Engineering (ISE)
- 📚 Project Type: Academic Major Project
- 👨🎓 Team: TEAM DEPRESSION
College LinkedIn
🧑💻 R Naveen Patil

Lead Developer • AI Agents • Cloud & Infrastructure
R Naveen Patil is the main developer of depression.ai. He built the core architecture, agent workflow, LLM integration, system tools, cloud integration and overall project.
Profiles
🤝 Team Members

Rahul Jadav📧 |

K G Meghashree Naik📧 |

SUMANTHA MS📧 |
🚀 What Is depression.ai?
depression.ai is an AI agent that runs in your terminal. It is built by Team Depression.
It is for people who want an AI that can work on a real computer — real projects, real tools and real cloud systems — not just answer questions in a chat window.
Think of it as an AI workspace for a developer or technical operator:
                    USER
                      │
                      ▼
              depression.ai
                AI Agent
                      │
          ┌───────────┼───────────┐
          ▼           ▼           ▼
       Reason       Plan        Context
          │           │           │
          └───────────┼───────────┘
                      ▼
                Tool Selection
                      │
        ┌─────────────┼─────────────┐
        ▼             ▼             ▼
    Filesystem     Terminal        Git
        │             │             │
        ├─────────────┼─────────────┤
        ▼             ▼             ▼
      Browser        MCP           AWS
                      │
                      ▼
                 Verification
                      │
                      ▼
                    RESULT
It handles multi-step jobs such as:
- Understanding an unfamiliar codebase
- Finding bugs and failures
- Planning changes
- Creating and editing files
- Running commands and tests
- Debugging problems
- Reviewing Git changes
- Using browser automation
- Searching and checking information
- Working with MCP tools
- Inspecting and operating supported AWS environments
- Preparing apps for deployment
- Checking that the work actually succeeded
The LLM does the thinking. depression.ai gives the model what it needs to act: context, tools, permissions, sessions, execution and recovery.
Important: results depend on both the framework and the model. A weak model, or one that does not call tools reliably, can still produce poor results even when the framework provides the right tools.
🧠 It Acts, Not Just Chats
A normal chatbot mostly returns text.
depression.ai follows an action loop:
Understand
   ↓
Inspect
   ↓
Plan
   ↓
Choose Tool
   ↓
Execute
   ↓
Observe Result
   ↓
Re-evaluate
   ↓
Continue / Correct
   ↓
Verify
   ↓
Report
This makes it useful when the answer is not just a paragraph of text, but a change that has to be made and checked on a real system.
For example:
"Find why my application is failing and fix it."

            ↓

Inspect project
            ↓
Read relevant files
            ↓
Understand configuration
            ↓
Run diagnostic commands
            ↓
Identify failure
            ↓
Modify required files
            ↓
Run tests / verification
            ↓
Inspect the result
            ↓
Report what changed
The exact behaviour depends on the model, available tools, permissions and environment.
🧠 About depression.ai
Built by Team Depression, depression.ai brings development, code analysis, debugging, Git, system operations and AWS tools into one terminal workspace. You describe the task; the model decides an approach; the harness provides tools, permissions, project context and execution.
It isn't a fixed set of commands. Its results depend on the connected model, available tools and permissions.
🖥️ Terminal-Native TUI
The main screen is a terminal UI (built with Textual) where you work with the agent interactively.
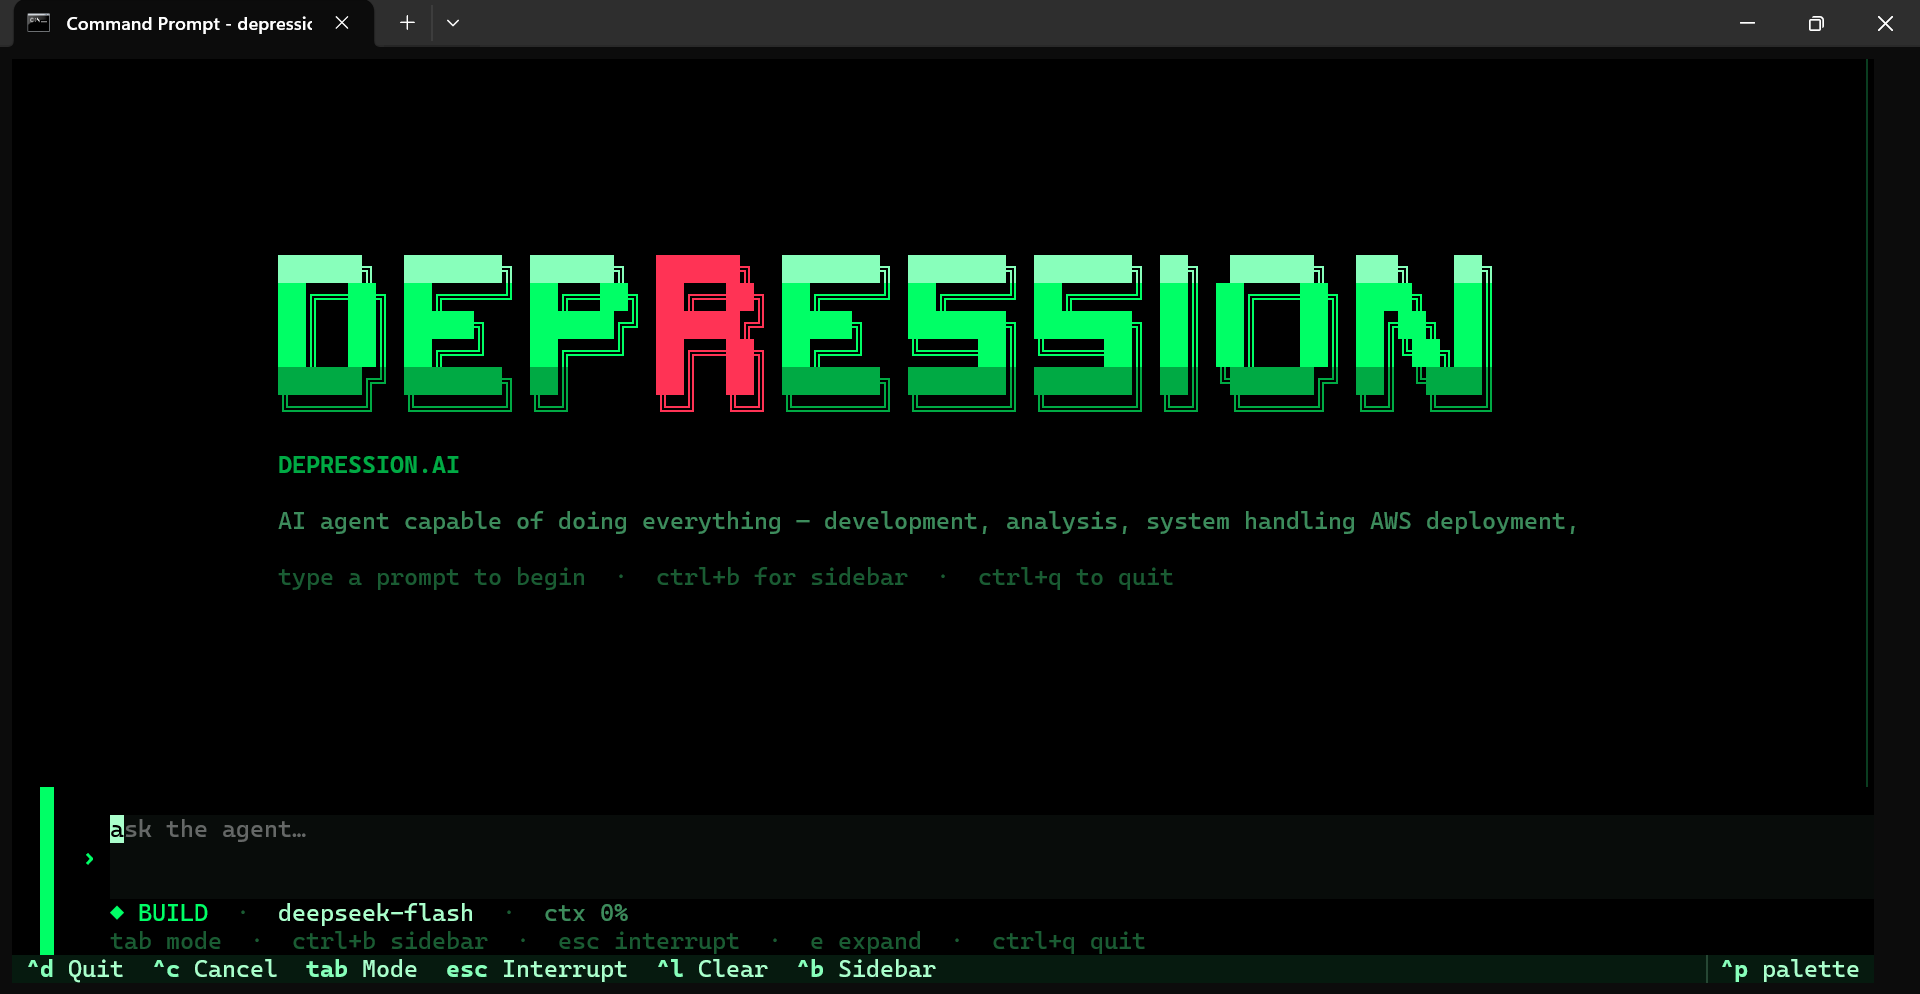
Start screen — type a prompt to begin, or run depression --nosignin to enter without Google sign-in.
Everything happens in one workspace:
- Interactive conversation
- Plan / Build / Auto mode switching
- LLM connection configuration
- AWS configuration
- Tool-call cards
- Permission prompts
- Todo tracking
- Thinking indicators
- Diff inspection
- Session management
- Project context
- Agent execution feedback
The goal is one consistent workflow: understand → act → observe → verify.
Paste-first connection panels
| Panel | What you enter |
|---|---|
LLM (/connect) |
Base URL, Model ID, API key (if required) |
MCP (/mcp) |
HTTP/SSE URL and token, local command, or JSON |
AWS (/aws) |
Authorized AWS credentials and region |
The sidebar keeps connection controls editable while additional server details remain collapsed.
🏗️ Architecture
                         USER
                           │
                           ▼
                ┌─────────────────────┐
                │   depression.ai     │
                │       TUI / CLI     │
                └──────────┬──────────┘
                           │
                ┌──────────┴──────────┐
                │                     │
                ▼                     ▼
        ┌───────────────┐     ┌───────────────┐
        │   PLAN AGENT  │     │  BUILD AGENT  │
        │               │     │               │
        │ Read / Analyze│     │ Execute Tools │
        │ Plan Tasks    │     │ Modify System │
        └───────┬───────┘     └───────┬───────┘
                │                     │
                └──────────┬──────────┘
                           ▼
                  ┌─────────────────┐
                  │   TOOL SYSTEM   │
                  ├─────────────────┤
                  │ Terminal        │
                  │ Filesystem      │
                  │ Git             │
                  │ Patch           │
                  │ Search          │
                  │ Web             │
                  │ Browser         │
                  │ AWS             │
                  │ MCP             │
                  │ Todo / Process  │
                  └─────────────────┘
🧩 Plan + Build Architecture
depression.ai splits thinking and doing into two modes.
PLAN
The Plan agent studies the task before changing anything.
User Request
     ↓
Project Inspection
     ↓
Context Gathering
     ↓
Problem Analysis
     ↓
Task Breakdown
     ↓
Execution Plan
During planning, the agent can read project files, understand dependencies, inspect the environment and decide the steps needed.
BUILD
The Build agent carries out the plan with the available tools.
Approved / Selected Plan
          ↓
     Tool Selection
          ↓
       Execution
          ↓
      Verification
          ↓
        Result
This keeps reasoning and execution separate.
💻 Development Capabilities
depression.ai can work directly on software projects using its tools.
Project Understanding
- Analyze existing projects
- Inspect project structure
- Read source code
- Understand dependencies
- Search through files
- Identify configuration problems
- Analyze build errors
Code Operations
- Create files
- Modify existing files
- Apply patches
- Refactor code
- Debug applications
- Run tests
- Verify changes
- Work with Git
Example
User:
"Analyze this project and find why the application is failing."

Agent:
    ↓
Inspect project
    ↓
Read configuration
    ↓
Inspect source code
    ↓
Run relevant commands
    ↓
Identify failure
    ↓
Create fix
    ↓
Run verification
    ↓
Report result
The agent decides what to do based on the task, the tools available and the model you connect.
🖥️ System Operations
The agent can work with your local development environment using the tools you enable.
Example tasks:
"Check my project structure."

"Find why this application is failing."

"Install the required dependencies."

"Run the tests and fix the errors."

"Find unused files."

"Check the running processes."

"Prepare this project for deployment."

"Inspect the Git changes."

"Create a clean patch for this issue."
Risky system actions go through the permission system.
☁️ AWS Integration
AWS support lets the agent work with cloud infrastructure from the same terminal.
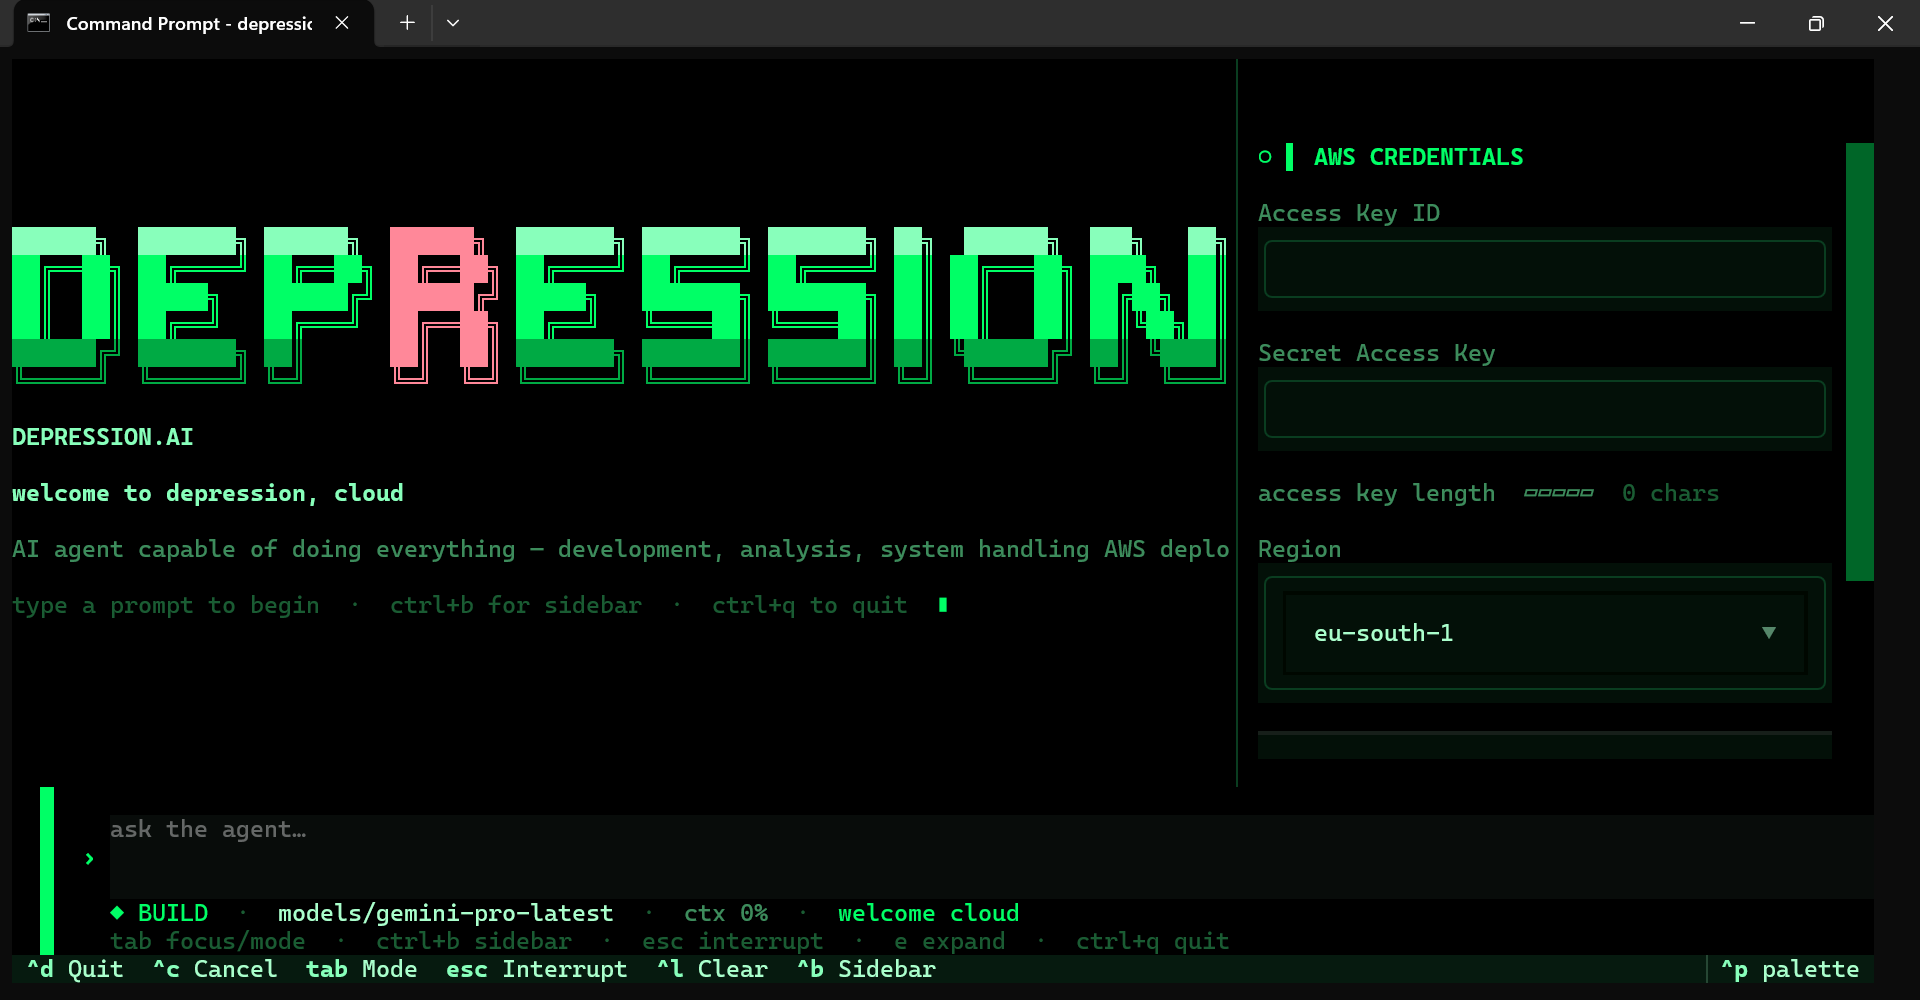
AWS CREDENTIALS panel — configure the Access Key ID, Secret Access Key and Region from the TUI.
The agent connects your request to AWS through its tools:
User Request
     ↓
depression.ai
     ↓
Agent Reasoning
     ↓
AWS Tools / AWS CLI
     ↓
AWS Environment
What it can do depends on your tools, AWS permissions and credentials. It can help with:
- AWS environment inspection
- Infrastructure analysis
- Resource management
- AWS CLI workflows
- Deployment workflows
- Cloud operations
- Monitoring and troubleshooting workflows
- Creating supported resources
- Modifying supported resources
- Removing supported resources
- Application deployment workflows
What is actually allowed depends on your AWS credentials, IAM permissions and configured tools.
🔐 AWS Security & Permissions
depression.ai does not bypass AWS security controls.
It uses the AWS identity and permissions you provide.
For example:
AWS IAM Permissions
        ↓
depression.ai
        ↓
Allowed AWS Operations
If your AWS identity is not allowed to do something, the agent cannot do it.
So AWS keeps controlling access through normal authentication and IAM rules.
🔌 Connecting an AWS Account
You can set AWS credentials in the TUI or with supported environment variables.
Example:
export AWS_ACCESS_KEY_ID="your-access-key"
export AWS_SECRET_ACCESS_KEY="your-secret-key"
export AWS_DEFAULT_REGION="ap-south-1"
Then start:
depression
You can also set up AWS from the TUI when your version supports it.
AWS Access Key Setup
Important: AWS recommends using temporary credentials and IAM roles instead of long-term access keys whenever possible. Use an IAM user access key only when your use case actually requires programmatic long-term credentials. For
depression.ailocal development, an IAM user with only the permissions required by your workflows can be used.
An AWS access key contains two values:
Access Key ID
Secret Access Key
You need both values. AWS shows the secret access key only once, when the key is created, so save it then.
Step 1 — Sign in to AWS
Open the AWS Management Console and sign in with an identity that has permission to manage IAM users and credentials.
Step 2 — Open IAM
From the AWS Management Console:
AWS Console
    ↓
IAM
Then open Users.
Step 3 — Create an IAM User
If you do not already have a suitable IAM user:
IAM
  ↓
Users
  ↓
Create user
Enter a username, for example:
depression-agent
Give the user only the permissions required for the AWS operations that depression.ai needs.
AWS recommends managing permissions through groups and policies and following the principle of least privilege. Do not give administrator-level permissions just because the agent is easier to configure that way.
For example, if the agent only needs to inspect S3, grant the minimum S3 permissions required instead of attaching AdministratorAccess.
Step 4 — Open the User's Security Credentials
After creating or selecting the IAM user:
IAM
  ↓
Users
  ↓
depression-agent
  ↓
Security credentials
Find the Access keys section.
Step 5 — Create the Access Key
Choose:
Create access key
AWS may first show an Access key best practices & alternatives page. Review the alternatives. If your workflow genuinely requires an access key, continue with the appropriate programmatic-access use case.
Add an optional description such as:
depression.ai local development
Then choose:
Create access key
Step 6 — Save the Credentials Immediately
AWS will display:
Access Key ID
Secret Access Key
Save both securely.
The secret access key cannot be retrieved again after the creation screen. If you lose it, create a replacement access key rather than expecting AWS to show the old secret again.
Do not paste the secret key into:
- GitHub
- README files
- source code
- public issue trackers
- screenshots
- Discord/Slack/WhatsApp messages
- public
.envfiles - public cloud logs
Step 7 — Configure depression.ai
For local development, the credentials can be supplied through the supported TUI configuration or environment variables.
Example:
export AWS_ACCESS_KEY_ID="YOUR_ACCESS_KEY_ID"
export AWS_SECRET_ACCESS_KEY="YOUR_SECRET_ACCESS_KEY"
export AWS_DEFAULT_REGION="ap-south-1"
Then start the agent:
depression
The values above are examples only. Replace them with your actual credentials.
Step 8 — Verify the AWS Credentials
If AWS CLI is installed, verify the identity before using the agent:
aws sts get-caller-identity
A successful response should identify the AWS account and IAM identity associated with the credentials.
You can then test the AWS integration used by your workflow.
AWS Credential Flow
AWS Console
     ↓
IAM
     ↓
IAM User
     ↓
Attach Required Permissions
     ↓
Security Credentials
     ↓
Create Access Key
     ↓
Access Key ID + Secret Access Key
     ↓
depression.ai
     ↓
AWS SDK / AWS CLI
     ↓
AWS Resources
Least-Privilege Example
Do not start with:
AdministratorAccess
unless there is a genuine administrative requirement and you understand the security consequences.
Prefer a policy that grants only the operations required by the agent.
For example:
depression.ai
     ↓
IAM User
     ↓
Required AWS Policy
     ↓
Only required services/actions
If the agent only needs to inspect resources, use read-only permissions where practical.
If the agent needs to create, modify or delete resources, grant only the specific write/delete actions required for those workflows.
Rotating an Access Key
If you need to replace a key:
Create new access key
        ↓
Update depression.ai / environment
        ↓
Verify the new key
        ↓
Deactivate old key
        ↓
Confirm old key is unused
        ↓
Delete old key
Do not immediately delete an old key that may still be used by an application. AWS supports having up to two access keys for an IAM user, which allows a controlled rotation process.
Security Rules
Never commit AWS credentials to Git.
Add sensitive files to .gitignore:
.env
.env.*
*.pem
*.key
.aws/
If an AWS secret is accidentally exposed:
Stop using the exposed credential
        ↓
Deactivate the access key
        ↓
Create a replacement key if required
        ↓
Check CloudTrail / access history
        ↓
Review the IAM permissions
        ↓
Remove the secret from the repository/history
A leaked AWS secret should be treated as compromised. Do not simply delete the visible line from the latest commit and assume the credential is safe.
Never commit AWS access keys, secret keys,
.envfiles or other credentials to GitHub.
For production deployments, prefer IAM roles, temporary credentials, workload identity or another AWS-supported short-lived credential mechanism instead of embedding long-lived access keys in applications or servers.
For the latest AWS guidance, see the official AWS IAM documentation on access keys and IAM users.
🤖 LLM Integration
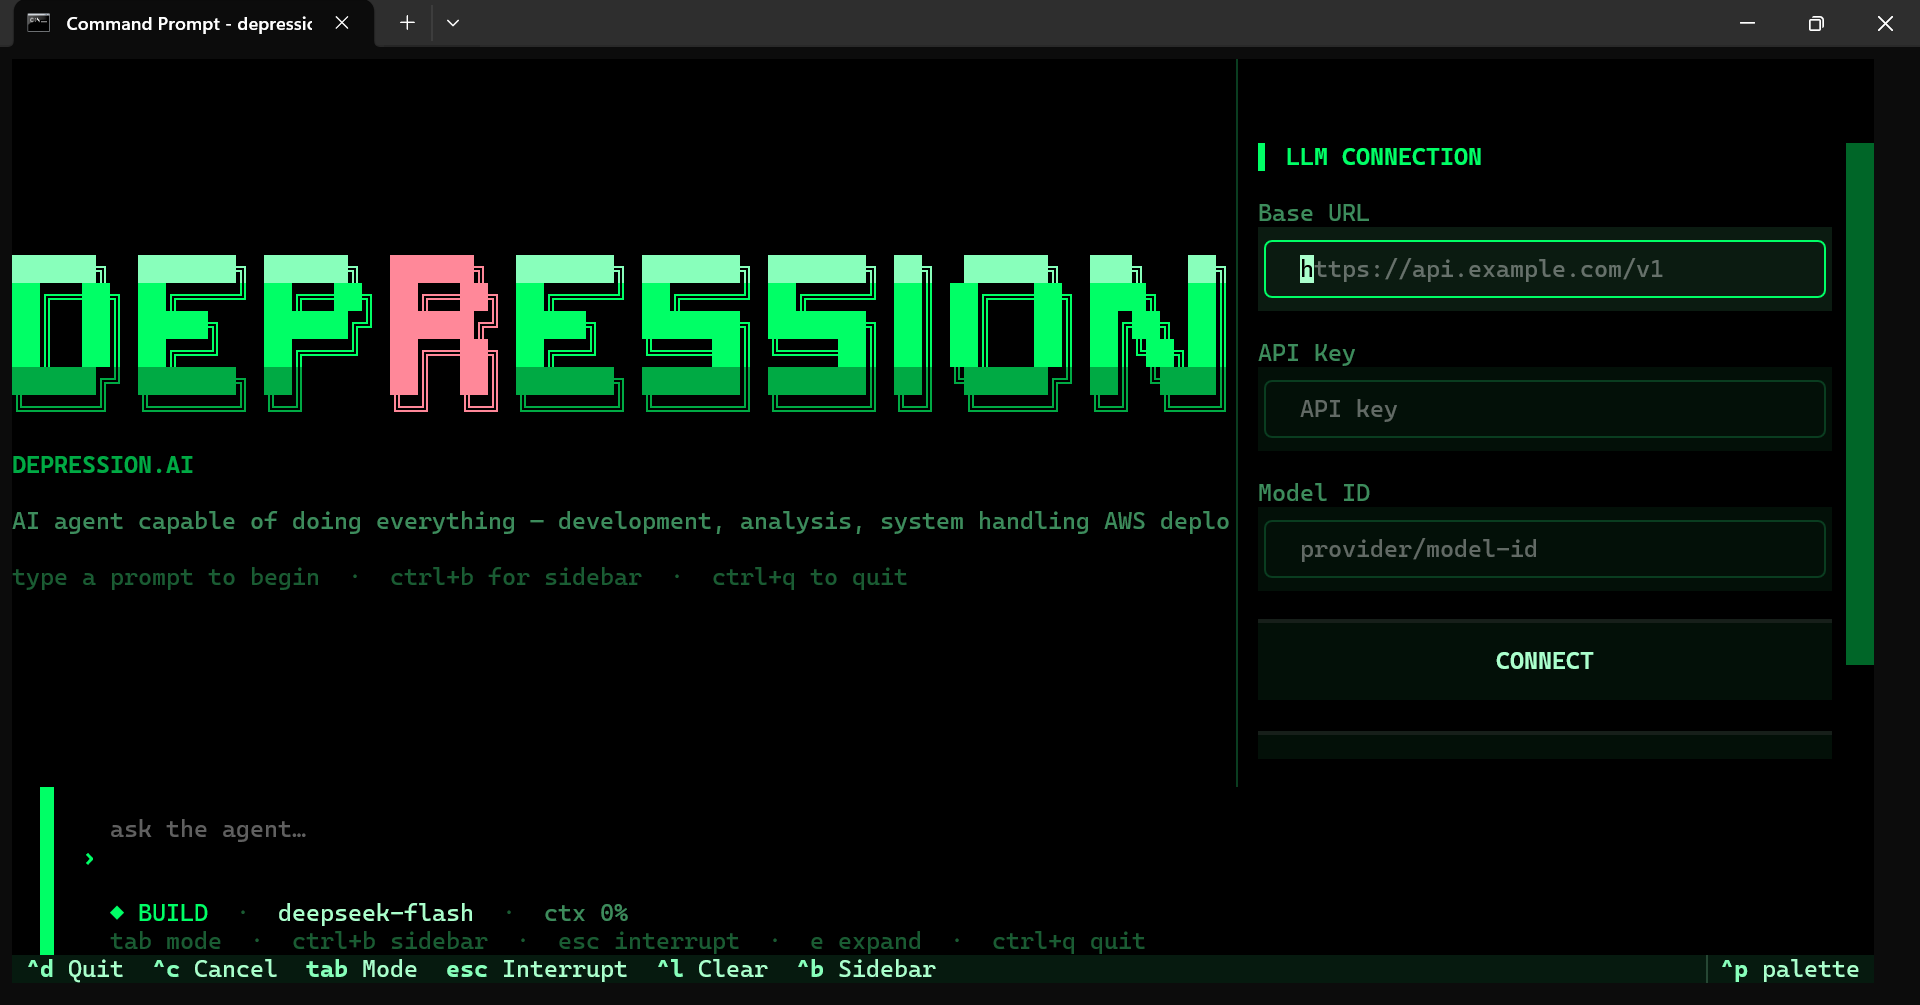
LLM CONNECTION panel — configure Base URL, API Key and Model ID from inside the TUI.
The agent and the model are separate, so you can change the model without changing the agent.
The model does the thinking while depression.ai provides:
LLM
 ↓
Agent
 ↓
Context
 ↓
Tools
 ↓
Permissions
 ↓
Execution
You can connect a model with:
Provider
Base URL
API Key
Model
Example:
Provider : custom
Base URL : https://api.example.com/v1
API Key  : ****************
Model    : your-model
This lets depression.ai work with any compatible remote model API.
Usage & cost tracking
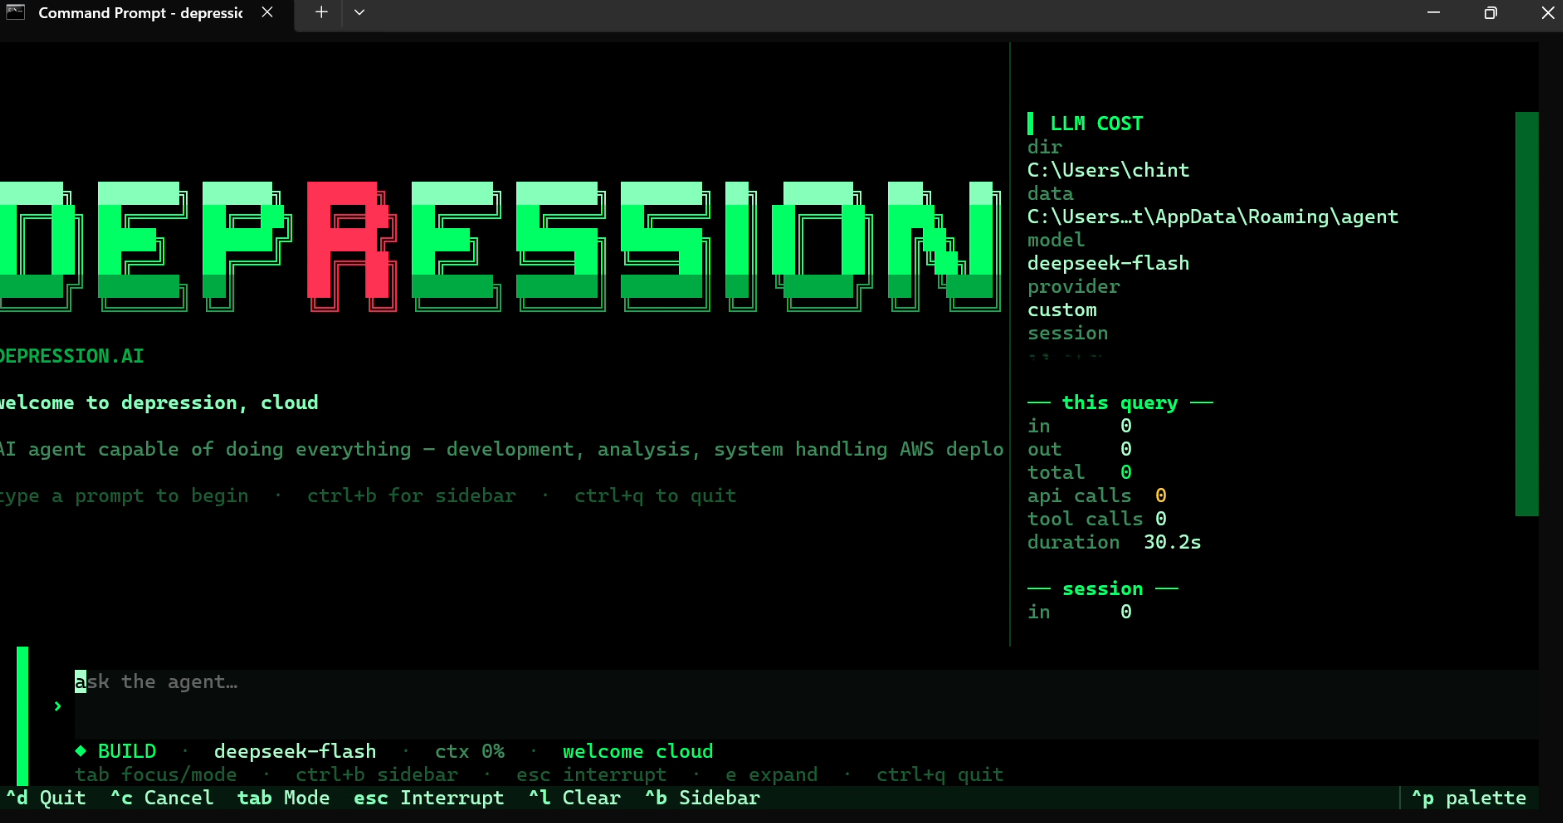
The TUI tracks token usage and API cost per query and per session. Open the live panel with /llmcost (or /cost) to see input/output tokens, total cost, API calls, tool calls and query duration.
🧠 OpenAI-Compatible & API-Based Models
You are not locked to one model provider. depression.ai can use any compatible API endpoint.
Example:
depression.ai
      │
      ▼
┌──────────────────┐
│ Compatible API   │
│ Endpoint         │
└────────┬─────────┘
         │
         ▼
       LLM
A compatible endpoint speaks the API format expected by the provider adapter.
However:
A compatible API does not guarantee the model will be a good agent.
Agent work needs more than text generation.
🧠 Model Requirements
A model used with depression.ai should ideally have:
- Chat / text generation
- Sufficient context length
- Strong instruction following
- Code understanding
- Multi-turn conversation support
- Reliable reasoning
- Structured output capability
- Tool / function calling where supported
- Consistent responses
Model quality matters because the model must understand the task and decide which tools to use. The agent's 1M-token generic fallback is an estimate, not a promise that the connected model accepts that much context.
🏠 Local LLM Support
A major goal of depression.ai is running models locally or on your own servers.
You can run a local model server and connect it to the same agent.
For example:
Local GPU
    ↓
Model Server
    ↓
Compatible API
    ↓
depression.ai
    ↓
Agent
    ↓
Tools
A local endpoint can look like this:
Provider : custom
Base URL : http://localhost:11434/v1
API Key  : local
Model    : your-local-model
The exact URL, API format and model name depend on the local model server you use.
⚡ GPU-Based Local AI
With local deployment, the model runs on hardware you control.
┌─────────────────────────────────────────┐
│             LOCAL GPU SERVER             │
│                                         │
│        ┌──────────────────────┐         │
│        │     GPU / VRAM       │         │
│        └──────────┬───────────┘         │
│                   ↓                     │
│        ┌──────────────────────┐         │
│        │    Local Model       │         │
│        │      Server          │         │
│        └──────────┬───────────┘         │
│                   ↓                     │
│             Local LLM API              │
└───────────────────┬─────────────────────┘
                    ↓
             depression.ai
                    ↓
          Agents + Tools + Data
GPU memory, RAM and compute needs depend on model size, quantization, context length, number of users and workload.
🔒 Local & Self-Hosted AI
depression.ai already keeps the agent framework and tools on your system; the LLM can come from an API.
The next step is to let the model itself run inside your own network.
┌────────────────────────────────────────────────┐
│              ORGANIZATION NETWORK              │
│                                                │
│  ┌───────────────┐                             │
│  │ User / TUI    │                             │
│  └───────┬───────┘                             │
│          ↓                                     │
│  ┌────────────────┐                            │
│  │ depression.ai  │                            │
│  │ Agent          │                            │
│  └───────┬────────┘                            │
│          ↓                                     │
│  ┌────────────────┐                            │
│  │ Local LLM      │                            │
│  │ GPU Server     │                            │
│  └───────┬────────┘                            │
│          ↓                                     │
│  ┌────────────────────────────────────────┐    │
│  │ Internal Files / Tools / Infrastructure│    │
│  └────────────────────────────────────────┘    │
│                                                │
└────────────────────────────────────────────────┘
This is for environments where sensitive documents, source code, internal messages, financial data, designs or other confidential information must stay inside controlled infrastructure.
🧠 Multiple Local Models
A self-hosted setup can run several open-weight models for different jobs.
                 depression.ai
                       │
          ┌────────────┼────────────┐
          ↓            ↓            ↓
     Code Model    General Model   Reasoning
          │            │            │
          └────────────┼────────────┘
                       ↓
                  GPU Server
Different tasks need different model strengths.
For example:
| Task | Potential Model Requirement |
|---|---|
| Code generation | Strong code understanding |
| Code review | Long context + reasoning |
| Document analysis | Large context |
| Planning | Strong instruction following |
| Tool execution | Reliable tool calling |
| General assistance | General-purpose instruction model |
The model-selection layer can evolve to choose a model based on the task.
🛠️ Tool System
The agent uses tools to work on your environment.
Current tool categories:
┌─────────────────────────┐
│       TOOL SYSTEM       │
├─────────────────────────┤
│ Terminal                │
│ Filesystem              │
│ Git                     │
│ Patch                   │
│ Search                  │
│ Web                     │
│ Todo                    │
│ Process                 │
│ Browser Automation      │
│ AWS                     │
│ MCP                     │
└─────────────────────────┘
The model chooses which tools fit the task.
So one agent can handle many workflows without a separate app for each one.
🔗 MCP Support
depression.ai supports the Model Context Protocol (MCP).
MCP lets you connect extra tool servers to the agent.
depression.ai
      │
      ├── Built-in Tools
      │
      └── MCP
           ├── Server 1
           ├── Server 2
           ├── Server 3
           └── ...
You can add new capabilities without hard-coding every integration into the core.
Connect an MCP server
- Enter
/mcpand select HTTP, SSE, LOCAL, or JSON. - Paste the matching server details (URL and optional token, executable and arguments, or a compatible JSON snippet).
- Choose SAVE & CONNECT. Use MANAGE SERVERS to connect, disconnect or delete saved servers; expand CONNECTION DETAILS to troubleshoot.
Only connect servers you trust. MCP tools can perform sensitive actions; permission checks remain in effect.
🔐 Permission System
An AI agent can change your files, system or infrastructure.
So depression.ai asks for permission for tool actions.
Example:
filesystem.execute [medium]

Allow? [y/N]
You can review sensitive or destructive actions before they run.
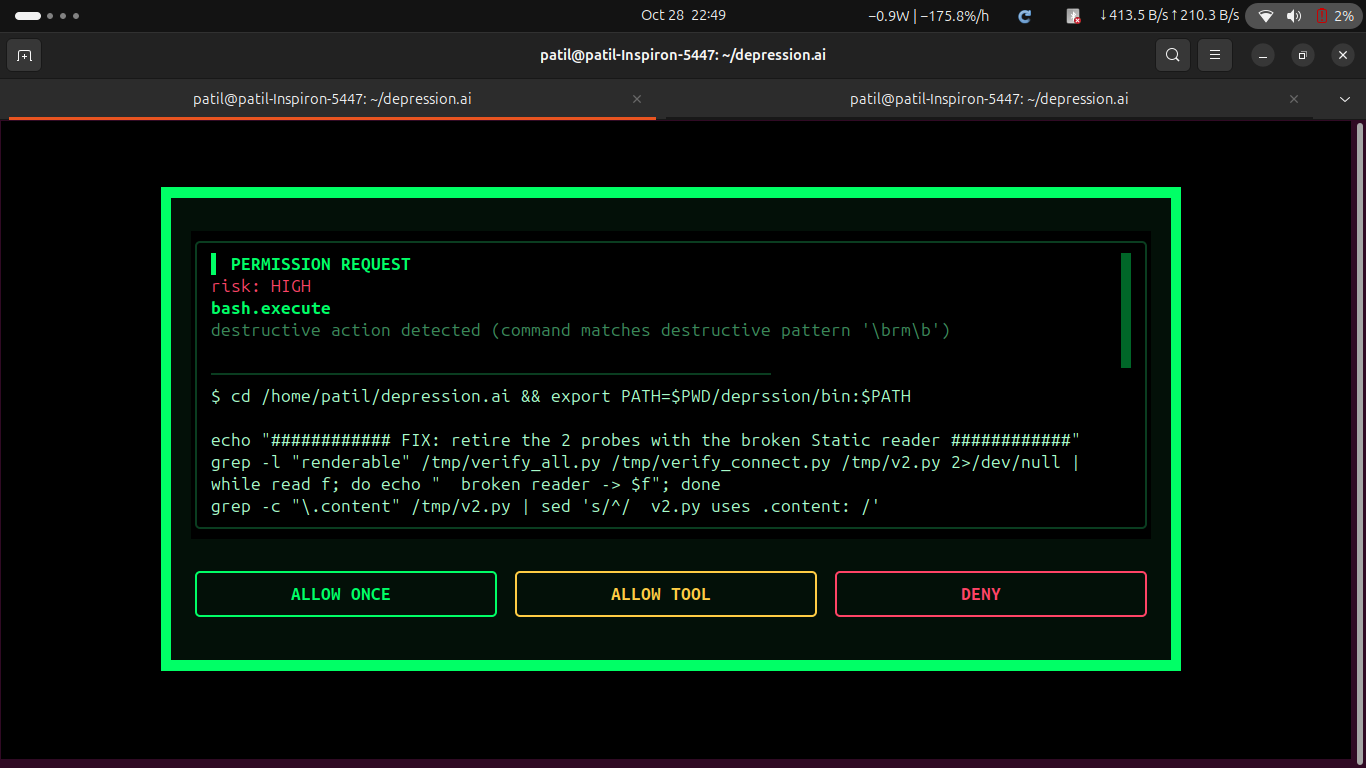
Permission request modal — high-risk tool actions must be explicitly allowed or denied.
How it works:
Agent wants to execute action
          ↓
Permission Check
          ↓
┌─────────┴─────────┐
│                   │
▼                   ▼
Allowed           Ask User
                    │
                 y / N
                    │
                    ▼
                Execute
💾 Sessions & Recovery
depression.ai saves sessions and project state.
Features:
- Persistent sessions
- Session resume
- SQLite-backed session storage
- Snapshots
- Git-stash-based undo
- Diff inspection
- Todo tracking
- Tool execution history
Useful commands:
/session
/snapshot
/undo
/compact
You can continue work across multiple interactions with the relevant state kept.
📋 Todo & Task Tracking
Complex tasks involve many steps.
The TUI tracks them so you can follow progress.
TODO
────────────────────────
✓ Inspect project
✓ Identify dependency issue
→ Modify configuration
○ Run tests
○ Verify deployment
────────────────────────
For complex work, the agent can create a plan or use the todo tool to add and update tasks. The panel shows their progress automatically; for a simple request, it may stay empty. Open it with /todo.
⌨️ TUI Commands
/help
/connect
/aws
/mcp
/todo
/copy
/plan
/build
/auto
/snapshot [message]
/undo
/model
/provider
/session
/compact
/tools
/permissions
/plugins
/metrics
/cost
/tokens
/config
/set
/exit
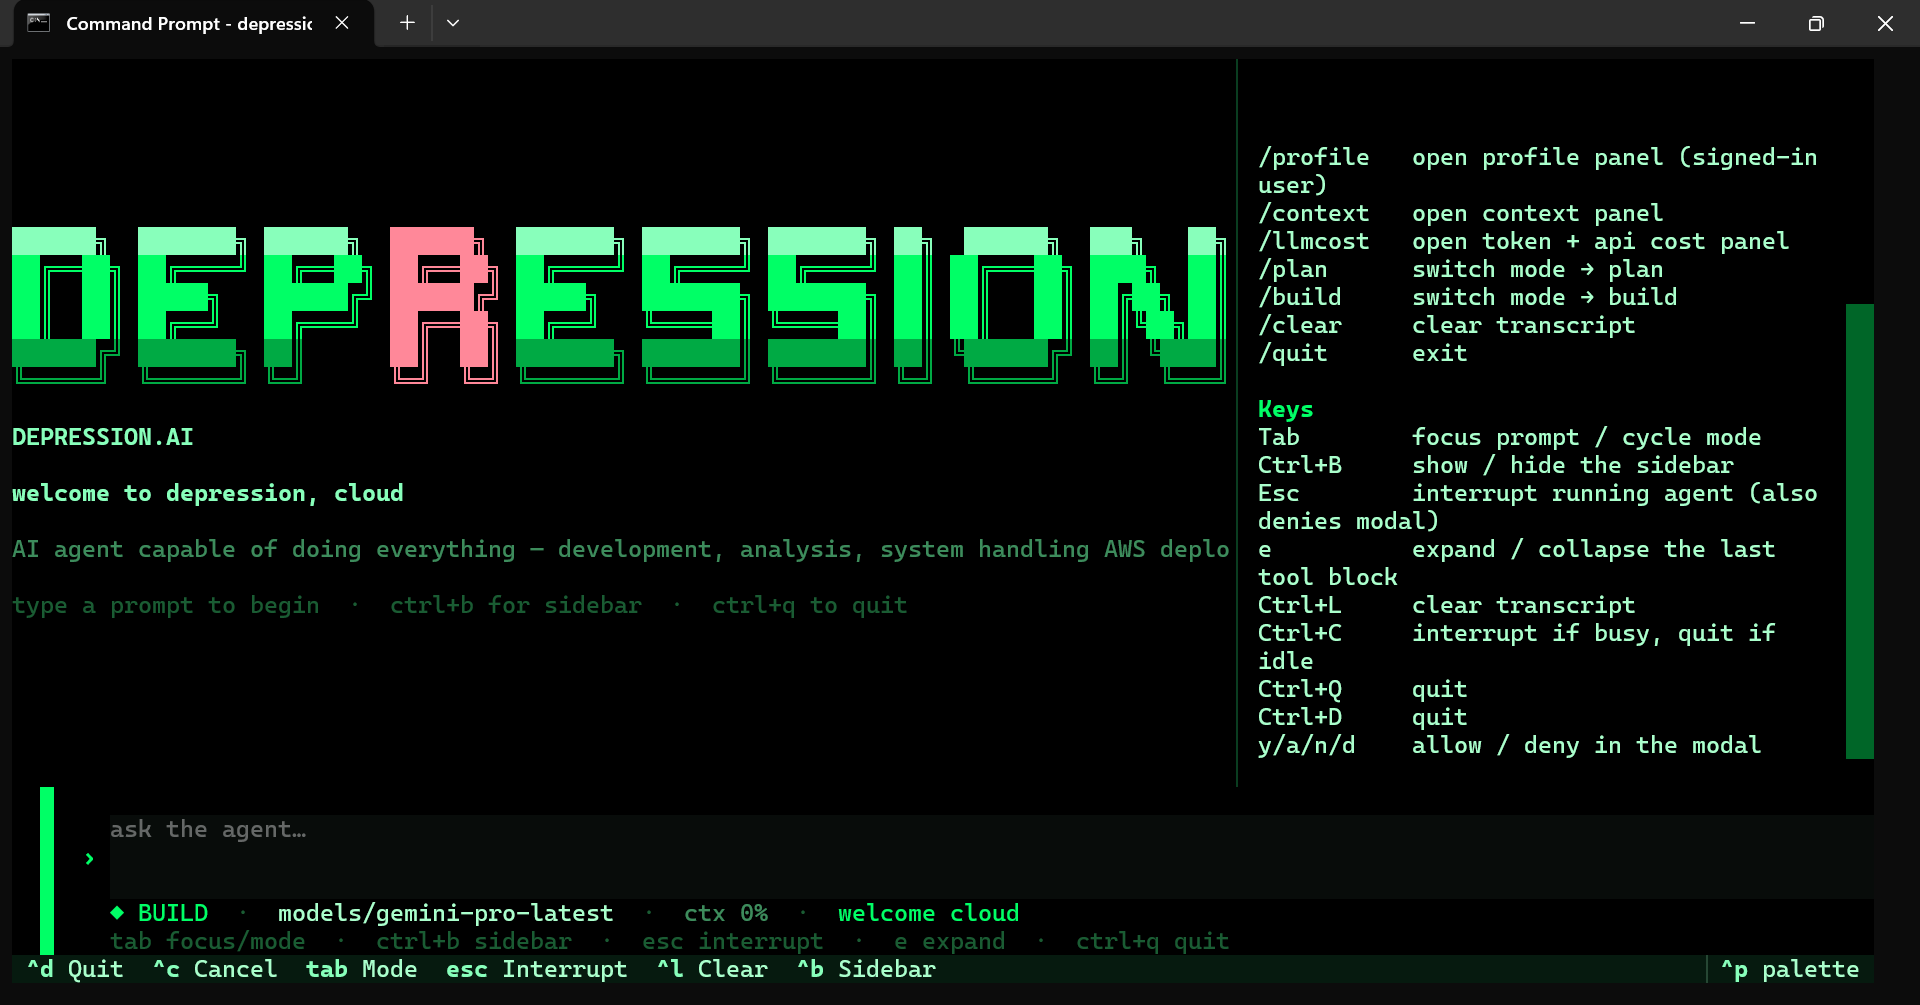
Mode Switching
Tab
Switch between:
PLAN ↔ BUILD ↔ AUTO
- PLAN — read-only analysis and task planning.
- BUILD — executes tools and applies changes.
- AUTO — runs Plan and Build in a loop until the task succeeds or the iteration limit is reached (
--max-iterations).
You can also switch directly with /plan, /build and /auto.
Copy and paste: The COPY button and /copy use your system clipboard when available. On Linux, install wl-clipboard (Wayland) or xclip/xsel (X11) if needed; copying over SSH depends on terminal support.
🖥️ CLI
Start the application:
depression
Skip the Google sign-in / onboarding screen and enter as a local guest:
depression --nosignin
This is useful for offline use, CI/demo environments, or when you simply want to reach the prompt immediately. A local guest profile is stored on disk and the Google sign-in screen is bypassed; you can still sign in later from the profile panel.
Specify a project:
depression -p /path/to/project
Select a model:
depression -m MODEL
Select a provider:
depression --provider PROVIDER
Start a new session:
depression --new-session
Resume a session:
depression --session <id>
Disable MCP:
depression --no-mcp
Set maximum turns:
depression --max-turns N
🚪 Start Without Sign-In (--nosignin)
Google sign-in is optional. To enter the TUI immediately with a local guest profile (no Google account or email required), run:
depression --nosignin
You can combine it with other options:
depression --nosignin -p /path/to/project
depression --nosignin --provider groq --model <model>
Your tools, sessions and permissions still work in guest mode. The local profile is saved on your device; you can sign in later from /profile.
📦 Installation
Requirements: Python 3.10+ and a terminal. No GPU is needed when using a hosted model. Once installed, you can run depression from any folder.
Install directly with pip
Windows (PowerShell or Command Prompt):
py -m pip install depression.ai
depression
Linux/macOS (if your Python installation allows pip):
python3 -m pip install depression.ai
depression
On Windows, Python's Scripts directory must be on PATH. On Ubuntu/Debian, pip may reject direct installation with externally-managed-environment—use the method below.
Install without creating a virtual environment
You don't have to create or activate a venv. On Ubuntu/Debian, install the CLI with pipx:
sudo apt update
sudo apt install pipx
pipx ensurepath
pipx install depression.ai
On macOS with Homebrew:
brew install pipx
pipx ensurepath
pipx install depression.ai
Then launch the agent:
depression --nosignin
If depression isn't found, open a new terminal after pipx ensurepath. pipx manages an isolated Python environment automatically; you never create or activate it. Avoid --break-system-packages, which bypasses your OS's Python safeguards.
To update a pipx install, run pipx upgrade depression.ai. PyPI releases may be behind the latest GitHub commits.
Want to develop or inspect the source? Clone it:
git clone https://github.com/rnaveenpatil/depression.ai.git
cd depression.ai
pip install -e ".[dev]"
Development installs are best done in an isolated environment. Regular users don't need to clone or build the project.
🧩 Compatibility
depression.ai supports Python 3.10+ on Windows, Linux and macOS, including virtual machines and remote servers. The CLI doesn't require a GPU; local models need hardware appropriate to their size. Browser tools and cloud features may need additional software or credentials.
Plug-and-play setup
After installation, run depression --nosignin, open /connect, and enter a compatible model's Base URL, Model ID, and API key (if required). A cloud provider account or local model server is needed for inference, but a Team Depression account is not.
⚡ Quick Start
If you installed from PyPI, simply run depression. For a development checkout, use:
git clone https://github.com/rnaveenpatil/depression.ai.git
cd depression.ai
pip install -e .
depression
To bypass Google sign-in and go straight to the TUI:
depression --nosignin
After starting the TUI, configure the LLM:
LLM CONNECTION
────────────────────────────
Base URL : https://api.example.com/v1
API Key  : ... (optional for local endpoints)
Model ID : your-model-id
────────────────────────────
Select CONNECT. For AWS work, use the separate /aws panel with credentials and region.
🔧 Environment Configuration
Where credentials are saved: LLM, AWS and MCP secrets saved in the TUI go into the nearest project .env file (or a .env in the current directory if none exists). Existing ~/.agent/env entries remain readable as a legacy fallback. MCP server settings are stored separately in ~/.agent/config.json.
These files stay on your device but are not encrypted. Never commit a .env file or copy secrets into a public repository. When using remote LLMs or cloud services, the required request data still goes to those providers.
You can also use environment variables where supported:
export DEPRESSION_PROVIDER=custom
export DEPRESSION_BASE_URL=https://api.example.com/v1
export DEPRESSION_API_KEY="your-api-key"
export DEPRESSION_MODEL="your-model"

export AWS_ACCESS_KEY_ID="your-access-key"
export AWS_SECRET_ACCESS_KEY="your-secret-key"
export AWS_DEFAULT_REGION="ap-south-1"
Local model example:
export DEPRESSION_PROVIDER=custom
export DEPRESSION_BASE_URL=http://localhost:11434/v1
export DEPRESSION_API_KEY=local
export DEPRESSION_MODEL="your-local-model"
⚙️ Configuration
Config can be saved in:
.agent/config.json
or:
~/.agent/config.json
Create a config file:
depression --init-config
🎯 Example Agent Tasks
Development
Analyze this project and explain its architecture.

Find the cause of this build error and fix it.

Review the dependencies and identify unnecessary packages.

Run the tests and fix the failing tests.

Refactor this module without changing its public API.
System
Check my project structure.

Find the process using this port.

Inspect the current environment.

Check why this command is failing.

Prepare this project for deployment.
Git
Review my Git changes.

Explain the current diff.

Create a clean patch for this change.

Prepare the project for a commit.
AWS
Analyze my AWS environment.

Investigate the deployment failure.

Check the configured AWS environment.

Prepare this application for AWS deployment.

Analyze the infrastructure configuration.
What the agent can do depends on the tools, model, credentials and permissions.
🔄 Agent Execution Flow
A typical task looks like this:
                    USER REQUEST
                         │
                         ▼
                 ┌──────────────┐
                 │ Context Load │
                 └──────┬───────┘
                        ↓
                 ┌──────────────┐
                 │ Plan Agent   │
                 └──────┬───────┘
                        ↓
                 ┌──────────────┐
                 │ Task Planning│
                 └──────┬───────┘
                        ↓
                 ┌──────────────┐
                 │ Build Agent  │
                 └──────┬───────┘
                        ↓
                 ┌──────────────┐
                 │ Tool Calling │
                 └──────┬───────┘
                        ↓
                 ┌──────────────┐
                 │ Verification │
                 └──────┬───────┘
                        ↓
                       RESULT
🧱 Why the Framework Is Different
depression.ai is a general-purpose AI agent framework, not just a coding assistant.
What makes it different
- Credentials stay on your device — the agent uses API keys and AWS keys locally, only for the services you configure. Team Depression never receives them.
- No data is sent to Team Depression — your conversations, project files, terminal output and usage data are not sent to us.
- Works offline — with a local model, the agent runs without an internet connection.
- Conversations stay private — we do not store your chat history, and your chats are not linked to your Google account.
- Google login is optional and only for personalization — it provides your name/profile locally; your Gmail content is never read.
- Sensitive actions need permission — you approve risky tool actions before they run.
- Open source and modifiable — inspect the code, fork it and adapt the agent, tools, models or workflows to your needs.
- Lightweight and optimized — a small Python package that runs on any machine, virtual or physical, without heavy infrastructure.
- Single-command install —
pip install depression.ai.
One agent can use:
LLM
 │
 ├── Development
 ├── Filesystem
 ├── Terminal
 ├── Git
 ├── System Operations
 ├── Browser Automation
 ├── MCP
 └── AWS
So one workspace can go from:
Idea
 ↓
Analysis
 ↓
Development
 ↓
Testing
 ↓
System Handling
 ↓
Cloud Operations
 ↓
Deployment
🔒 Security, Privacy & Data Boundary
depression.ai is built to keep your work local and secure first.
The agent and its tool actions run on your machine:
USER MACHINE
────────────────────────────────────
depression.ai
Agent
Project Context
Filesystem
Terminal
Git
Sessions
Permissions
Configured Tools
AWS Integration
────────────────────────────────────
What stays local
Team Depression does not receive or remotely inspect your project files, terminal output, source code or local system data just because you installed the package or signed in.
Local parts include:
- Agent execution
- Tool execution
- Filesystem interaction
- Terminal commands
- Git operations
- Session and conversation state
- Credentials, API keys and profile data
- Permission handling
- Local project context
Credentials and data boundary
- Credentials are stored on your device. LLM API keys, AWS access keys, tokens and session data are kept locally in the agent's data/config directory. The agent uses them only on your machine to connect to the provider or service you configure. They are never sent to Team Depression, and no one at Team Depression can access them.
- Nothing is sent to Team Depression. Your credentials, conversations, project files, terminal output and usage data are not sent to Team Depression.
- Works offline. With a local model, the agent can run without an internet connection. The project is open source, so you can inspect exactly what it does.
- Project data stays local. Project files, terminal output, source code and tool results stay on your machine. Only the prompt/context you send to a configured remote LLM leaves the machine.
- Conversations stay private. Team Depression does not store your conversation history. Locally saved sessions remain on your device, and your conversations are not linked to your Gmail account.
- Sign-in is optional.
depression --nosigninruns the full agent with a local guest profile and requires no Google account. - Nothing is sold, shared or disclosed. Your credentials, project data, conversations and login details are not published, sold or shared with any third party. Data sent to a remote LLM provider is governed by that provider's policy (see below).
- Google/Gmail login is only for personalization. If you choose to sign in, Google provides basic profile information (such as your name and email) so the agent can personalize your experience. That profile data is stored locally on your device, is not disclosed by Team Depression to anyone, and your Gmail content is never read. If you use
--nosignin, no Google login data is created at all.
Remote LLM providers
If you use a remote LLM API, the information needed to answer your request may leave your machine and go to that provider.
Depending on the task, this can include:
- Your prompt
- Relevant conversation/context
- Selected project content
- Tool results
- Code or configuration required for the model to reason about the task
So:
A remote LLM does not make the whole framework remote. The agent stays local, but model requests and the data in them follow the provider's policies.
Read your provider's privacy and data-retention policy before sending sensitive information to a remote model.
Local LLM mode
You can also connect a local, OpenAI-compatible model server in the LLM Connection panel.
For example:
User Machine
     ↓
depression.ai
     ↓
Local LLM Server
     ↓
Local GPU / CPU
With a local model, inference stays on your machine or network instead of going to a public API.
Gmail / Google login
Google/Gmail login is not the agent backend.
It is optional. If you sign in, Google shares basic profile information (such as your name and email) so the agent can personalize your experience. This profile data is stored locally on your device and is not sent to Team Depression.
Signing in does not give Team Depression remote access to your terminal, project directory or local files.
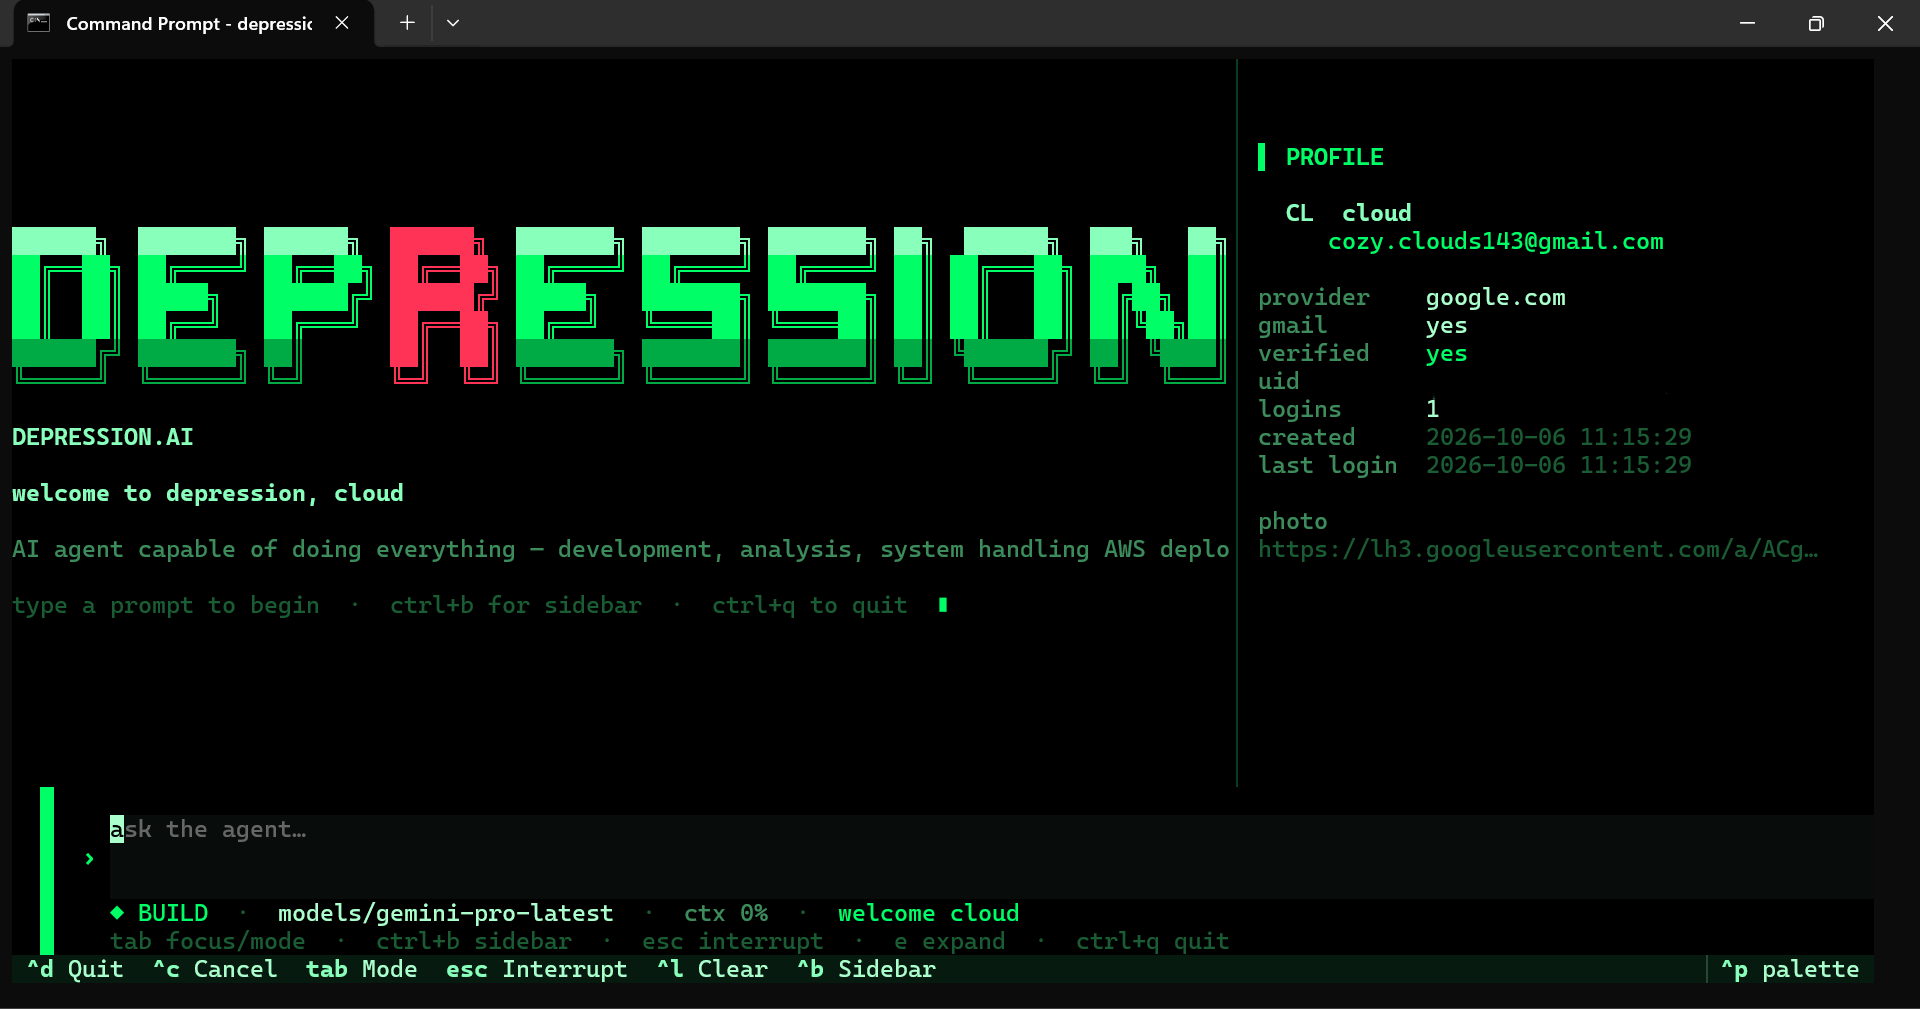
Signed-in profile — Google identity, verification status and login metadata.
Sign-in is optional. Start with depression --nosignin to enter the TUI immediately with a local guest profile (local-guest); you can sign in with Google later from the profile panel. Gmail-specific features remain disabled for guest profiles.
Team Depression does not disclose your Google/Gmail login data or personalization details to anyone. They are stored locally, and Team Depression does not publish, sell or share them with third parties. Sign-in itself is handled by Google/Firebase. Your Gmail content is never accessed, your conversation history is not stored by Team Depression, and your conversations are not linked to your Gmail account. If you use --nosignin, no Google login data is created at all.
Login and agent execution are separate:
Google Login
     │
     └── Product authentication / usage identification

depression.ai Agent
     │
     └── Local agent + tool execution
Signing in with Google does not make your project data available to Team Depression.
Conversation storage
- Chats are not stored by Team Depression. Team Depression does not keep your conversation history.
- Local sessions stay on your device. If you save or resume a session, that data remains on your machine.
- Chats are not linked to Gmail. Your conversations are not connected to your Google/Gmail account.
- No conversation data is disclosed. Your chats are not published, sold or shared with anyone.
Open source & auditability
The project is open source. Anyone can inspect and audit the code.
Be realistic about security: no software can guarantee perfect safety. Review the source, permissions, connected tools, AWS policies and LLM provider settings before using it with sensitive systems.
Security principles
depression.ai focuses on:
- Local-first agent execution
- Offline operation with local models
- Credentials and profile data stored on your device
- No conversation data sent to or stored by Team Depression
- Explicit permission handling for sensitive operations
- Sensitive-file protection
- Secret redaction / scanning mechanisms where implemented
- Least-privilege AWS access
- User-controlled LLM configuration
- Separation between authentication and agent execution
- Open-source code for inspection
Never commit API keys, AWS secrets, passwords, tokens, private keys or .env files to Git.
📁 Project Structure
src/
├── agent/
├── cli/
├── config/
├── context/
├── llm/
├── mcp/
├── permissions/
├── plugins/
├── project/
├── session/
├── storage/
├── tools/
├── tui/
└── utils/
The code is organized around the agent, LLM integration, context handling, tools, permissions, sessions, plugins, MCP and TUI.
🧪 Development
Install development dependencies:
pip install -e ".[dev]"
Run tests:
pytest
Lint:
ruff check src/
Format check:
ruff format --check src/
Type checking:
mypy src/
📌 Project Status
depression.ai is an actively developed AI agent framework by Team Depression.
The current version provides:
✓ Terminal-native agent
✓ Plan + Build architecture
✓ Tool execution
✓ Filesystem operations
✓ Terminal operations
✓ Git workflows
✓ MCP support
✓ Permission controls
✓ Persistent sessions
✓ Snapshot / undo workflows
✓ TUI
✓ LLM setup while running
✓ AWS-oriented workflows
Future plans include:
→ Stronger local LLM support
→ GPU-based inference
→ Self-hosted deployment
→ Multiple local model support
→ Task-based model selection
→ Controlled on-premise deployments
→ Enterprise / industrial AI workflows
🔗 Repository
GitHub: https://github.com/rnaveenpatil/depression.ai
TEAM DEPRESSION
Build. Break. Fix. Repeat.
Your A-Z AI depression.ai
depression.ai — Developed by Team Depression
🎬 Demo
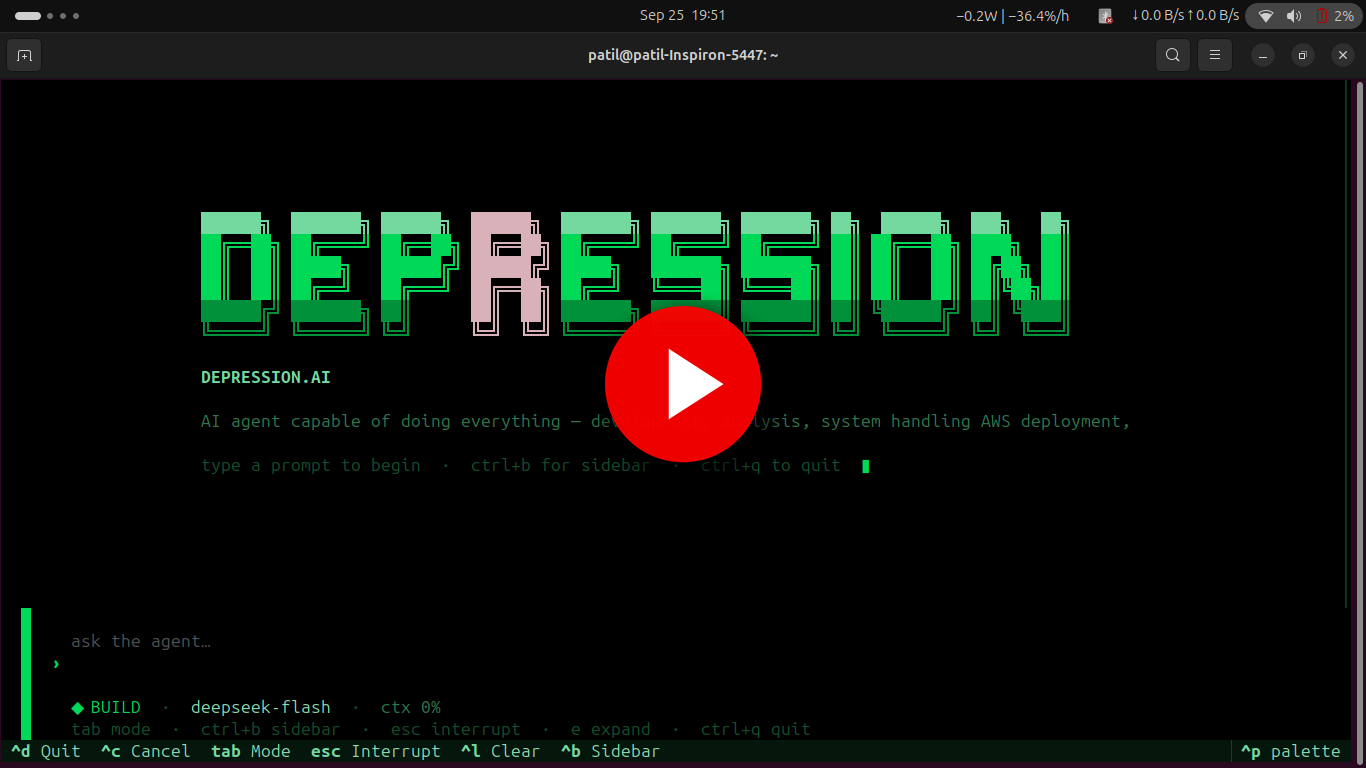
▶ Watch the complete walkthrough on YouTube
See the complete setup and agent workflow in the official depression.ai demo — install with one command, connect your API credentials and start working with the agent on any machine.
📜 License
This project is released under the MIT License (see LICENSE). Developed as an academic project at Moodlakatte Institute of Technology, Kundapura.
1 maintainer

Metadata
1 maintainer
Release files for depression.ai 1.2.7
For a detailed explanation of source distributions (sdists) and built distributions (wheels), please see the package formats documentation.
Source distribution (sdist)
| File | Size | Uploaded | Provenance | Actions |
|---|---|---|---|---|
| depression_ai-1.2.7.tar.gz | 522.7 kB | Without provenance | Details for depression_ai-1.2.7.tar.gz |
Built distribution (wheel)
| File | Interpreter | ABI | Platform | Actions Reset |
|---|---|---|---|---|
| depression_ai-1.2.7-py3-none-any.whl | Python 3 | none | any | Details for depression_ai-1.2.7-py3-none-any.whl |
Total release size: 1.1 MB
Release files / depression_ai-1.2.7.tar.gz
| Download URL | depression_ai-1.2.7.tar.gz |
|---|---|
| Size | 522.7 kB |
| Tags | Source |
|
SHA-256 checksum How to use checksums |
0c3bf5cfb4a5dcbe5047d6bc79ce6f73e2bf56e98887f8ce3dec5b612120d71b
|
|
BLAKE2b-256 checksum How to use checksums |
8941e37b0286abee08285317fe76d69ff11e5f64c27dc7394c25ccfa07cc9936
|
| Upload date | |
|
Uploaded using Trusted Publishing? What is trusted publishing? |
No |
| Uploaded via |
twine/7.0.0 CPython/3.12.3
|
Release files / depression_ai-1.2.7-py3-none-any.whl
| Download URL | depression_ai-1.2.7-py3-none-any.whl |
|---|---|
| Size | 551.9 kB |
| Tags | Python 3 |
|
SHA-256 checksum How to use checksums |
ce685fad443a23822faf04091b09c048d3ad7a0249977eef6179644b4ebf19d8
|
|
BLAKE2b-256 checksum How to use checksums |
e04235d6772b4437fc145d12a67ac2154f2ea31fdf97b39408ae5bdac1c619ec
|
| Upload date | |
|
Uploaded using Trusted Publishing? What is trusted publishing? |
No |
| Uploaded via |
twine/7.0.0 CPython/3.12.3
|
Security for depression.ai 1.2.7
Provenance
Provenance describes where a file came from. On PyPI, provenance is shared via attestations, which provide a verifiable record of the build or publishing details. View details, limitations and caveats.
No provenance found
None of the files in this release were uploaded with provenance metadata.
A note on package security
PyPI is a repository for distributing packages, not a service for auditing them. While third-party security researchers and our staff do their best to detect and remove malicious packages, PyPI cannot guarantee the quality, security or suitability of any given package.
To learn more about protecting yourself from malicious actors, visit our package security documentation.














